Produced by Big Data Digest
Compiled by: Zhu Yihui, Xue Qing, Xiao Yu
Can object detection be achieved with just 10 lines of code?!
The author of this article and his team have built a Python library called ImageAI, which integrates popular deep learning frameworks and computer vision libraries. This article will guide you step-by-step in building your first object detection application, and the author has already tested it for you, proving its effectiveness!
With numerous use cases such as unmanned supermarkets, facial recognition, and autonomous driving, object detection is becoming one of the most promising directions in computer vision.
This technology may seem difficult to implement, requiring a large amount of training data and algorithms. In fact, the author has developed a Python-based library that can efficiently achieve object detection with just ten lines of code.
For readers who are not yet familiar, let’s first look at what object detection is and the challenges faced by software developers.
Object detection is a technology that uses computers and software systems to locate targets in images/scenes and identify the category of each target. It is currently widely used in areas such as face detection, vehicle detection, pedestrian counting, web images, security systems, and autonomous vehicles. With the continuous development of computer technology and the relentless efforts of software developers, the future of object detection technology will become more widespread.
Using advanced object detection methods in applications and systems, as well as building new applications based on these methods, is not easy. Early object detection was implemented based on classical algorithms, such as those supported by OpenCV (a popular computer vision library). However, the performance of these classical algorithms can be limited by conditions.
In 2012, numerous breakthroughs were made in the field of deep learning, and researchers proposed a series of new, high-precision object detection algorithms and methods, such as R-CNN, Fast-RCNN, Faster-RCNN, RetinaNet, and the fast and accurate SSD and YOLO. To use these deep learning-based methods and algorithms (which are, of course, based on machine learning), a deep understanding of mathematics and deep learning frameworks is required. Millions of software developers are dedicated to integrating object detection technology into new product development. However, understanding and utilizing this technology is not easy for programmers outside the deep learning field.
A self-taught developer, Moses Olafenwa, realized this problem a few months ago and, together with his peers, developed a Python library called ImageAI.
ImageAI allows programmers and software developers to easily integrate state-of-the-art computer vision technology into their existing and new applications with just a few lines of code.
To implement object detection with ImageAI, you only need to follow these steps:
1. Install Python
2. Install ImageAI and related libraries
3. Download the object detection model file
4. Run the example code (only 10 lines)
Preparation
The testing environment for Big Data Digest is a Windows 64-bit system with Python version 3.6. Reply with “Detection” in the Big Data Digest backend to obtain the code and model files~
1) Download and install Python 3 from the official website, and install pip.
Download links:
https://python.org
https://pip.pypa.io/en/stable/installing/
2) Install the following dependencies using pip
Find the Scripts folder in the Python installation directory, such as C:\XXX\Python\Python36\Scripts, open the cmd command window, and enter the following installation commands sequentially.
1. Tensorflow:
pip install tensorflow
2. Numpy:
pip install numpy
3. SciPy:
pip install scipy
4. OpenCV:
pip install opencv-python
5. Pillow:
pip install pillow
6. Matplotlib:
pip install matplotlib
7. H5py:
pip install h5py
8. Keras:
pip install keras
9. ImageAI:
pip install https://github.com/OlafenwaMoses/ImageAI/releases/download/2.0.1/imageai-2.0.1-py3-none-any.whl
Note: If an exception occurs while installing ImageAI, you can first download the .whl file and place it in the Scripts folder, then use the following command to install:
pip install imageai-2.0.1-py3-none-any.whl
3) Download the RetinaNet model file for object detection:
Download link:
https://github.com/OlafenwaMoses/ImageAI/releases/download/1.0/resnet50_coco_best_v2.0.1.h5
Preparation is complete, and you can write your first object detection code. Create a new Python file and name it (e.g., FirstDetection.py), then write the following code into this file. Next, place the RetinaNet model file, FirstDetection.py, and the image you want to detect in the same path, naming the image “image.jpg”.
Here are the 10 lines of code in FirstDetection.py:
from imageai.Detection import ObjectDetection
import os
execution_path = os.getcwd()
detector = ObjectDetection()
detector.setModelTypeAsRetinaNet()
detector.setModelPath( os.path.join(execution_path , "resnet50_coco_best_v2.0.1.h5"))
detector.loadModel()
detections = detector.detectObjectsFromImage(input_image=os.path.join(execution_path , "image.jpg"), output_image_path=os.path.join(execution_path , "imagenew.jpg"))
for eachObject in detections:
    print(eachObject["name"] + " : " + eachObject["percentage_probability"] )
Then, double-click FirstDetection.py to run the code, and after a moment, the recognition results will be printed in the console. Once the results are output in the console, you will find a newly saved image in the folder containing FirstDetection.py, named “imagenew.jpg”.
Note: If an exception occurs while running the code:
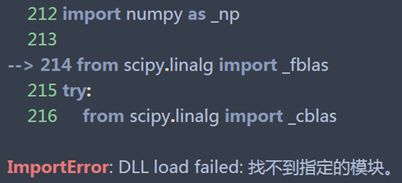
You need to install the Numpy+MKL dependencies, download the corresponding .whl file and place it in the Scripts folder, then install the .whl file using pip.
Download link:
https://www.lfd.uci.edu/~gohlke/pythonlibs/#numpy
Detection Results
Let’s take a look at the following two example images and the new images saved after detection.
Before Detection:

After Detection:
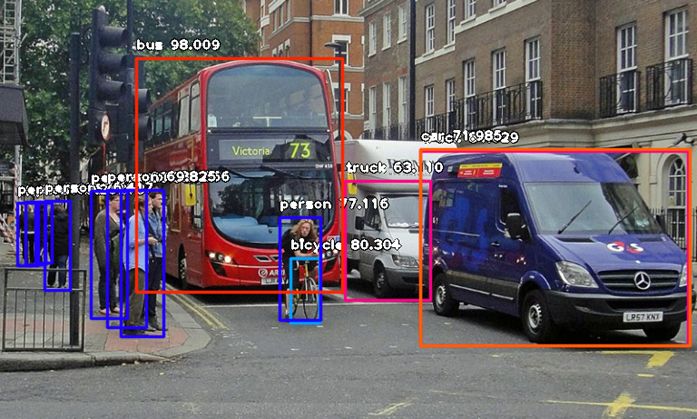
Detection Results:
person : 55.8402955532074
person : 53.21805477142334
person : 69.25139427185059
person : 76.41745209693909
bicycle : 80.30363917350769
person : 83.58567953109741
person : 89.06581997871399
truck : 63.10953497886658
person : 69.82483863830566
person : 77.11606621742249
bus : 98.00949096679688
truck : 84.02870297431946
car : 71.98476791381836
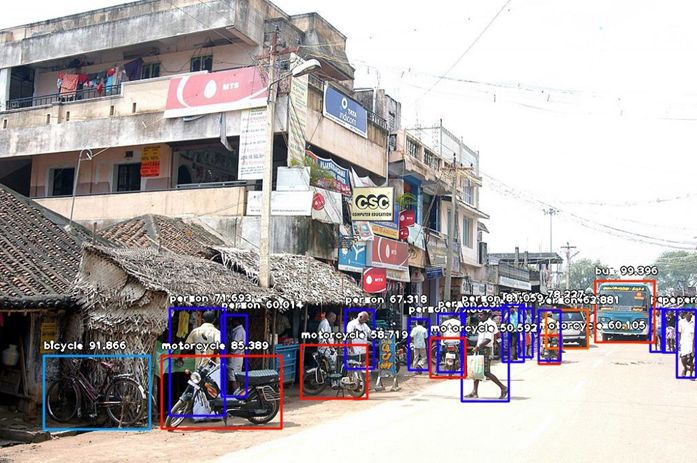
Detection Results:
person : 71.10445499420166
person : 59.28672552108765
person : 59.61582064628601
person : 75.86382627487183
motorcycle : 60.1050078868866
bus : 99.39600229263306
car : 74.05484318733215
person : 67.31776595115662
person : 63.53200078010559
person : 78.2265305519104
person : 62.880998849868774
person : 72.93365597724915
person : 60.01397967338562
person : 81.05944991111755
motorcycle : 50.591760873794556
motorcycle : 58.719027042388916
person : 71.69321775436401
bicycle : 91.86570048332214
motorcycle : 85.38855314254761
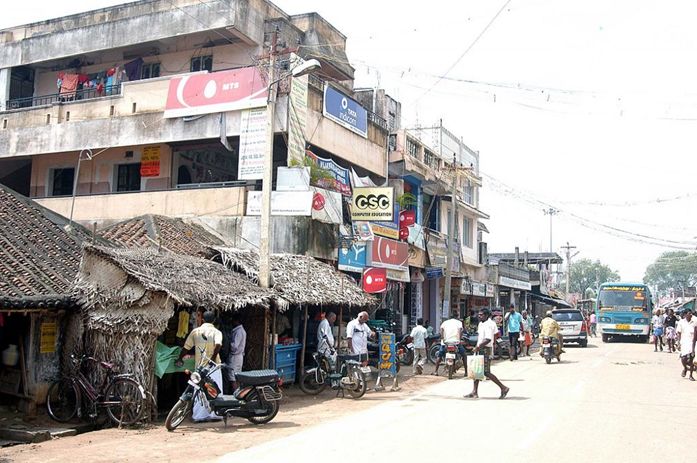
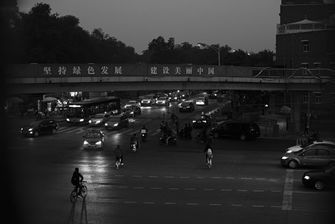
Big Data Digest tested several other images, and the results are as follows:
Before Detection:

After Detection:
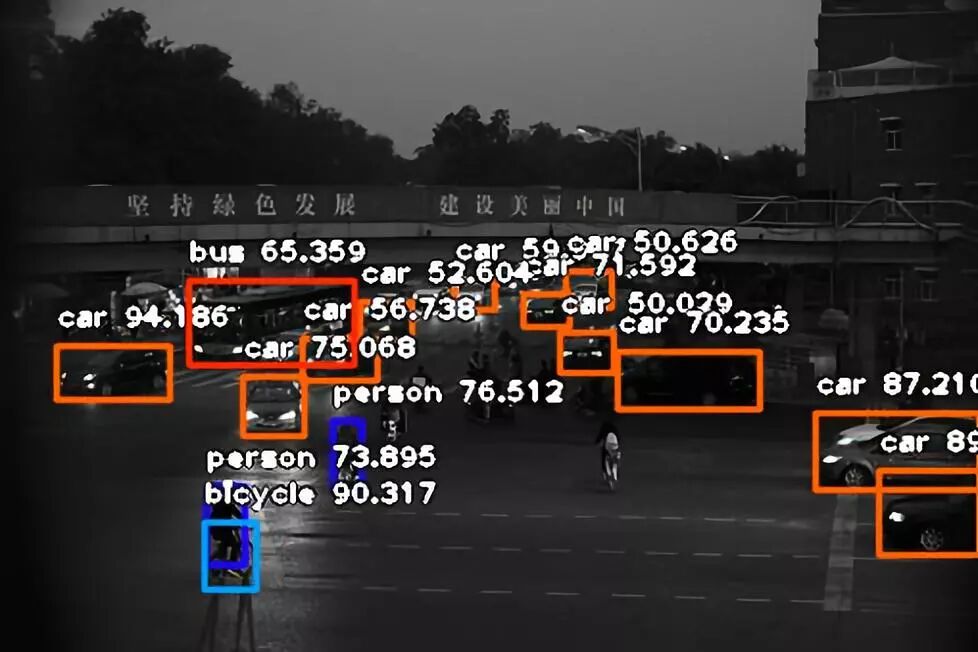
Detection Results:
car : 59.04694199562073
car : 50.62631368637085
car : 71.59191966056824
car : 52.60368585586548
person : 76.51243805885315
car : 56.73831105232239
car : 50.02853870391846
car : 94.18612122535706
car : 70.23521065711975
car : 75.06842017173767
car : 87.21032738685608
car : 89.46954607963562
person : 73.89532923698425
bicycle : 90.31689763069153
bus : 65.3587281703949
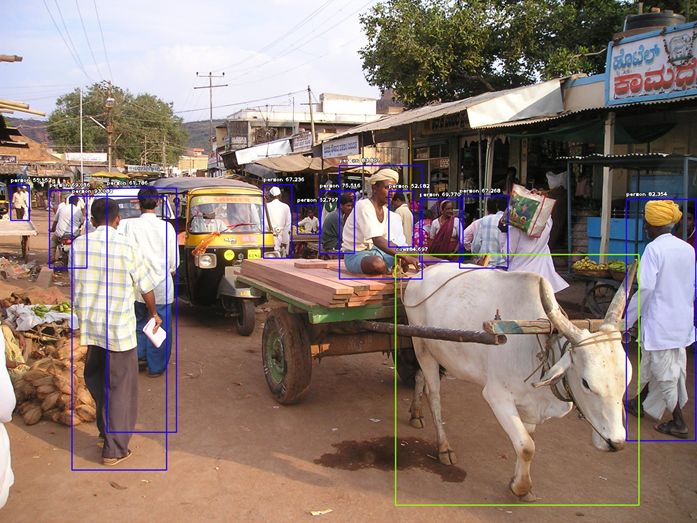
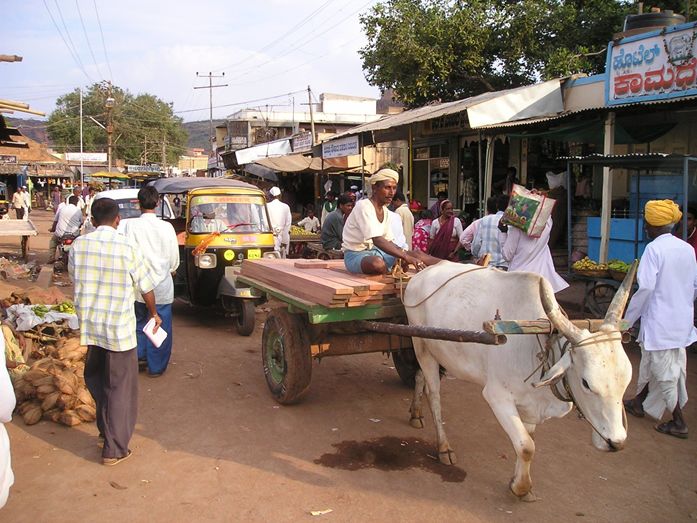
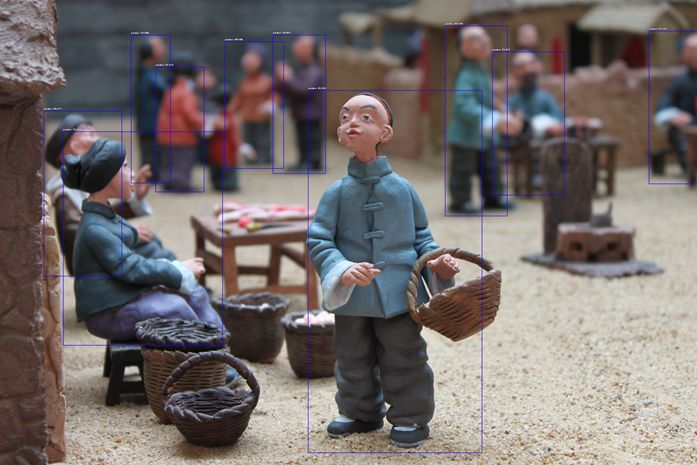
It can even detect cows…
Detection Results:
person : 55.15214800834656
person : 62.79672980308533
person : 69.01599168777466
person : 67.26776957511902
person : 75.51649808883667
person : 52.9820442199707
person : 67.23594665527344
person : 69.77047920227051
person : 83.80664587020874
person : 61.785924434661865
person : 82.354336977005
person : 93.08169484138489
cow : 84.69656705856323
Detection Results:
person : 65.07909297943115
person : 65.68368077278137
person : 68.6377465724945
person : 83.80006551742554
person : 85.69389581680298
person : 55.40691018104553
person : 56.62997364997864
person : 58.07020664215088
person : 70.90385556221008
person : 95.06895542144775
Code Explanation
Now let’s explain the meaning of these 10 lines of code.
from imageai.Detection import ObjectDetection
import os
execution_path = os.getcwd()
In the first three lines of code, the first line imports the object detection class from ImageAI, the second line imports Python’s os class, and the third line defines a variable to store the path of the folder containing the Python file, RetinaNet model file, and image.
detector = ObjectDetection()
detector.setModelTypeAsRetinaNet()
detector.setModelPath( os.path.join(execution_path , "resnet50_coco_best_v2.0.1.h5"))
detector.loadModel()
detections = detector.detectObjectsFromImage(input_image=os.path.join(execution_path , "image.jpg"), output_image_path=os.path.join(execution_path , "imagenew.jpg"))
In the next five lines of code, the first line defines the object detection class, the second line sets the model type to RetinaNet, the third line sets the model path to the location of the RetinaNet model file, the fourth line loads the model into the object detection class, and the fifth line calls the detection function, parsing the input and output image paths.
for eachObject in detections:
    print(eachObject["name"] + " : " + eachObject["percentage_probability"] )
In the last two lines of code, the first line iterates through all the results returned by the detector.detectObjectsFromImage function, and the second line prints the type and probability of each target detected in the image.
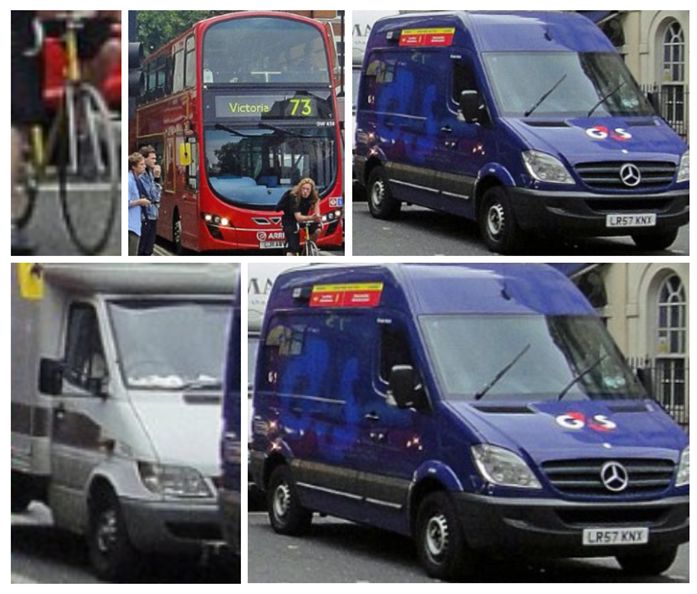
ImageAI also supports configuring other features during the object detection process. For example, you can extract images of each detected target separately. By simply adding extract_detected_objects=True to the detectObjectsFromImage function, the object detection class will create a new folder for the detected image objects, extract each image, store them in this folder, and return an array to save the path of each image, as shown below:
detections, extracted_images = detector.detectObjectsFromImage(input_image=os.path.join(execution_path , "image.jpg"), output_image_path=os.path.join(execution_path , "imagenew.jpg"), extract_detected_objects=True)
The detection results extracted from the first example image are shown in the figure below:
Parameter Configuration
To meet the production needs of object detection, ImageAI provides several configurable parameters, including:
Adjusting Minimum Probability
The default threshold is 50%. If the probability value of the detection result is below 50%, the detection result will not be displayed. You can modify this threshold according to specific needs.
Custom Objects Detection
Using the provided CustomObject class, you can configure the detection results to only display specific types of targets.
Detection Speeds
You can set the detection speed to “fast”, “faster”, and “fastest” to reduce the time required for detecting images.
Input Types
You can parse and modify the file path of the image, where Numpy arrays or image file streams can be used as input types.
Output Types
You can modify the return results of the detectObjectsFromImage function, such as returning image files or Numpy arrays.
Detailed documentation is available on GitHub, link:
https://github.com/OlafenwaMoses/ImageAI
Reply with “Detection” in the Big Data Digest backend to obtain the code and model files~
Give it a try, and feel free to share in the comments section~
Related reports:
https://towardsdatascience.com/object-detection-with-10-lines-of-code-d6cb4d86f606
【Today’s Machine Learning Concept】
Have a Great Definition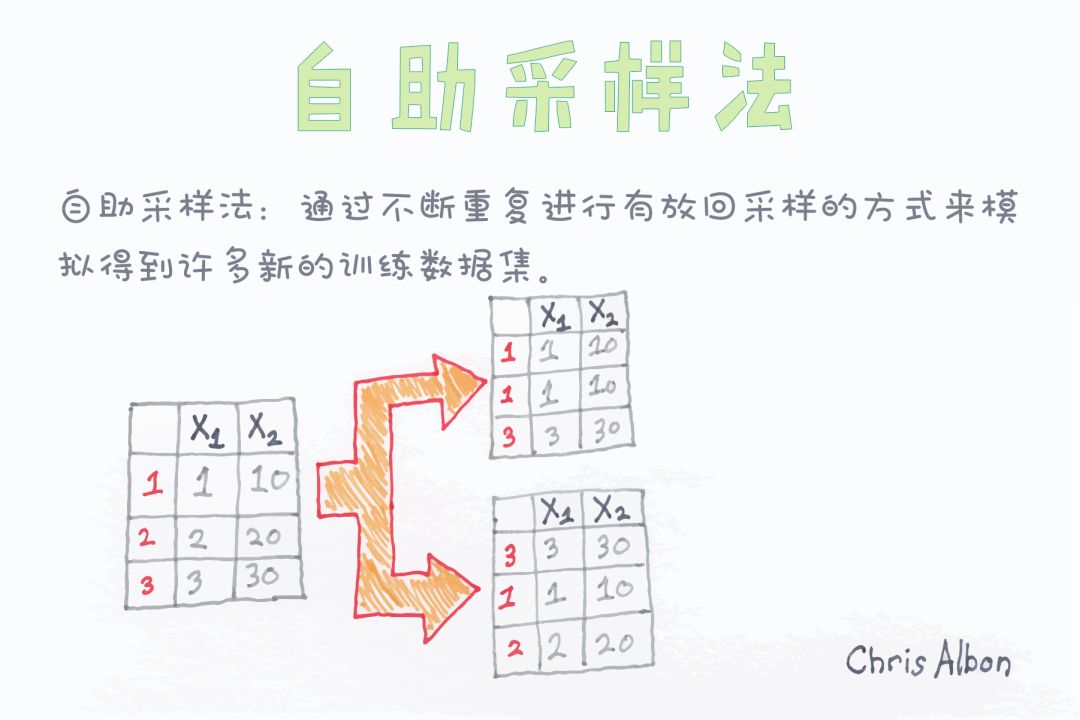
Contributors
Reply with “Volunteer” to join us