If you don’t want to miss my updates, remember to click the top right corner – view public account – set as a star, and send me a star.
What can you do with an LED strip? Today’s project will show you:
☞ Game 1: Reaction Time Challenge
At the start of the game, all LEDs on the strip will flash in rainbow mode for 2-8 seconds. When the rainbow pulse ends, the strip will turn white, and players on both sides need to press the button as quickly as possible. The first to press scores, and half of the LED strip turns green. If both press at the same time, the LED strip turns yellow, and no points are awarded or deducted. If someone presses too early, the round ends, and that person will lose a point.
Finally, record each person’s scores. The difficulty of the game can be modified, such as setting different flashing times, etc.
When the white LED moves to the end of the strip, players send a single LED back and forth by pressing their respective buttons. Good timing and quick pressing are essential for successfully hitting the ball. If no one presses after reaching the bottom, a point is lost. Since the speed of the LED increases after each successful hit, the game becomes more exciting as it progresses.
When the match begins, the entire strip pulses red – yellow – green, then two white lights turn on in the middle of the strip. Each side needs to press the button as quickly as possible to “pull” these two lights to the ends of the strip. The closer the two LEDs get to the ends, the more they will turn green.
☞ Game 4: Mini Golf for One

Charge a light dot to move it different distances along the strip. Hitting the green section of the strip means you have made it in the hole.
How do you like these games? Are you interested? There are similar projects on Kickstarter that are crowdfunding, and products are expected to be available by the end of the year.
Here are the required hardware and materials:
-
Arduino Nano R3
-
1 meter WS2812 LED strip (60 LEDs)
-
128×32 SSD1306 OLED display
-
1 x 220Ω resistor
-
2 black buttons, 3 red buttons, 1 power button
-
1 x 18650 3.7V 2000mAh lithium battery
-
1 lithium battery boost/charge/control circuit
-
1.5m USB data cable
-
Other materials: wires, plastic casing, translucent plastic tube, screws, nuts, etc.
Many of the materials above are very common; you can check if you have any waste washing machine or dishwasher drain pipes at home.
The complete Arduino code can be downloaded from GitHub:
Link: https://github.com/johan-m-o/LEDTennis
Author: Johan
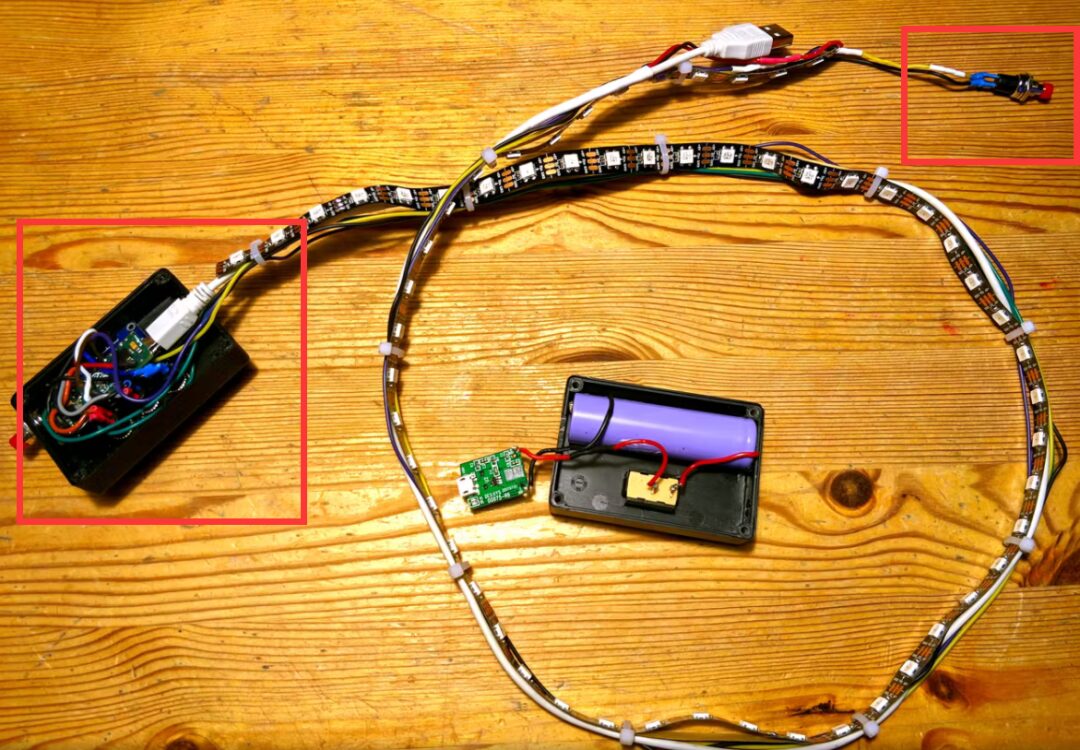
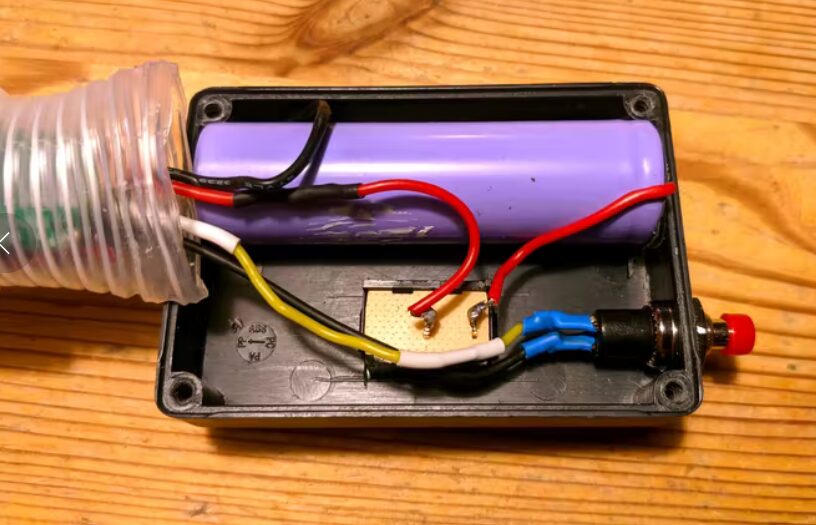
The original plan was to use 2 lithium batteries, but due to the size of the casing, only one battery could be used for power.Fortunately, the LED brightness can be adjusted, and the entire LED strip does not light up for long periods, so the power consumption is not particularly high; one is enough.
In a two-player game, each person holds one controller, as shown in the red box below. The Arduino control board and Player 1’s control button are in one casing, while the USB head, battery, power control board, and Player 2’s button are in the same casing.
The “Mode” button can pause the game, and it can also end the game and return to the main screen on the displayed screen. The game mode can be selected using the left and right buttons. Additionally, the LED brightness can also be adjusted using the left and right buttons from 1 (dim) to 10 (bright), with a default brightness level of 3.
More practical project recommendations:
1)STM32 IoT Smart Home Project
2)Project Share | Hands-on MATLAB + Raspberry Pi for Face Recognition
3)Raspberry Pi + Compute Stick 2 for Real-time Face Recognition Project
4)Cloud Computing Platform Construction for Embedded Development Boards
5)STM32 for the Simplest Air Mouse
7)STM32 Version “AI Soul Painter”
8)STM32 Electronic Photo Album Production
9)STM32 + DDS Homemade Signal Generator
10)Using Raspberry Pi with Web Interface to Remotely Control Appliances
11)STM32 “Cloud” Music Player
12)Raspberry Pi Remote Monitoring
13)Design of Neon Tube Clock Based on STM32
14)Homemade FPGA Minimal System Board (PCB can be directly produced)
15)Raspberry Pi 4 Build NAS for Easy Network Connection of Hard Drive
16)ESP32 Car Software and Hardware Practical Sharing
17)Only 79 Lines of Code for Creative Gesture Recognition
18)IoT + Electronic Ink Screen to Create Custom Display Screen
19)Create a Pathfinding Robot Worth Over a Thousand Yuan with Just Dozens of Yuan
20)Glasses with 3D Holographic Display, Visual Persistence POV Project
21)DIY Gesture Recognition Module
22)Practical Small Design that Can Be DIYed from Scratch
23)Raspberry Pi to Create a Smart Doorbell + Smart Lock with Video
24)Strange! My Development Board Can Automatically Play Games
25)Homemade Breathing Machine
26)ESP8266 + Zigbee Networking to Transform Wall Switches
27)Wireless Home Monitoring System
28)DIY Bionic Arm, A Tool to Free Your Hands
29)Handmade Air Purifier, All Design Materials Open Source
30)Tech Toy: Bluetooth Artillery That Can Be Remotely Controlled
31)Make LittleBee Monitoring System with ST Sensors to Let Bees “Talk”
32)Homemade Cat Petting Device
33)STM32 + Raspberry Pi to Achieve 6s Rubik’s Cube Robot
34)Blind Modification of Drone Controller, DIY “Foam” Drone
35)Make a Smart Relay without Arc Using STM32
36)Make a Practical New Type Necklace with Just 5 Components
37)The Simplest Method for Heart Rate Measurement (suitable for secondary development)
38)Breakthrough Magnetic Levitation Globe
39)Amazing Light Can Transmit Video? Reveal the Production Process
40)STM32 Homemade Smart Watch 60FPS Animation
41)Pay Tribute to Classic Radio, Observe the Production Process
42)DIY Third Eye: “Special” Glasses with Bluetooth/OLED/Lens Functionality
43)Homemade Solar Charger That Can Track Maximum Power Point
44)MCU-Free Night Vision Goggles, Just Connect Wires
45)The Right Way to DIY a Flow Meter, Interest Modifier
46)Homemade High-Difficulty Racing Timer (Lap/Heat Sensitive Printing)
47)DIY Wi-Fi Controlled LED Dice
48)Gas-Powered Charging Treasure
49)Homemade Simple Raspberry Pi Security System
50)Build a Small Weather Station with Microcontroller + ESP8266
51)Super Mini & Highly Expandable Palm Machine Car
52)Dreamy Interaction, Remote Development of Microcontroller with Raspberry Pi
53)Automatic Pathfinding + Pest Recognition Plant Protection Robot
54)uECG to Achieve Heartbeat LED Ring
55)Wireless Smart High-Power Switch
56)Make ESP8266 Smart Health Watch from Scratch
57)Collect Old MCUs to Turn Waste into Treasure
58)Pi Pico + Edge Impulse Deploy Intruder Detection System
59)DIY Wi-Fi Signal Strength Detector
60)Complete Real-time Face Recognition with Raspberry Pi in Seven Steps
61)Ultrasonic Distance Measurement with Radar Appearance
62)Make IoT Power Meter (Voltage/Current/Power)
63)Homemade Measuring Instrument: Use ESP32 + OLED to Draw CO2 Level Curve
64)ThingSpeak Networked Watering Device
65)Homemade Line Following Robot
66)Delta Parallel Manipulator Source Code Sharing
67)[Homemade] This Might Be the Strongest DIY Bicycle Speedometer You’ve Seen
68)Digital Control Desktop Power Supply
69)Made ALTA-STM32H7 Handheld Computer in Two Years
70)H Bridge PWM DC Motor Driver
71)DIY Ink Screen Watch
72)Make Gesture-Controlled MPU-6050 Car
73)ESP_MASTER Voice/Face with 9 Major Functions, Squeeze ESP32 Dry
74)Create Your Own Outdoor Weather Station for 300 Yuan
75)DIY Outdoor Roaming Smart Car
76)Control 8-channel Relay in Two Ways: WIFI & Manual
77)Make an International Space Station Tracker with Raspberry Pi
78)DIY Electronic Paper Desktop Weather & News Station
79)Handheld Mini Oscilloscope
80)How to Real-time Transmit Images Between Arduino and Android
90)What Amazing Effects Can a 16x16x16 4096 RGB LED Cube Create?
Project Share | Electric Competition Series | Artificial Intelligence | Postgraduate Entrance Examination
Must-know Knowledge Points | Graduation Design | Switching Power Supply | Job Seeking
We are Ni Mo, the founder of Darwin, a sister who only talks about technology and not flirting. The Darwin online education platform aims to serve professionals in the electronics industry, providing skills training videos covering popular topics in various subfields, such as embedded systems, FPGA, artificial intelligence, etc. It tailors layered learning content for different groups, such as common knowledge points, disassembly assessments, electric competitions/intelligent cars/postgraduate entrance exams, etc. Welcome to follow.
Official website: www.darwinlearns.com
QQ Group: Group 1: 786258064 (full)
Group 2: 1057755357 (full)