1.1 Web Security Vulnerabilities
Before discussing web vulnerabilities, let me briefly talk about web security knowledge.
Let’s briefly understand the knowledge related to computer networks and protocols.
Composition of Computer Communication Networks
A computer network consists of a communication subnet and a resource subnet. The communication subnet is responsible for the error-free and orderly transmission of data, with processing functions including error control, flow control, routing, and network interconnection.
The resource subnet is the local system environment for computer communication, including hosts, terminals, and applications. The main functions of the resource subnet are user resource allocation, data processing and management, software and hardware sharing, and load balancing.
In summary, a computer communication network is a system that transmits and shares various types of information from the resource subnet, supported by the communication subnet.
Communication Protocols
To achieve orderly information exchange between computers, the concept of communication protocols is proposed, defined as a complete set of rules that both (or multiple) parties must follow for information exchange.
Protocols involve three elements:
- Syntax: The structure and format of user data and control information, as well as the significance of the order in which data appears.
- Semantics: The meaning of each part of the bit stream.
- Timing: Detailed description of the sequence of events.
OSI Seven-Layer Model
Introduction
The OSI (Open System Interconnection) model is divided into seven layers: physical layer, data link layer, network layer, transport layer, session layer, presentation layer, and application layer, with specific functions as follows.
Physical Layer
- Provides the mechanical and electrical characteristics and procedures required to establish, maintain, and release physical links.
- Physically transmits data streams (bit streams) through transmission media, fault monitoring, and physical layer management.
- Receives frames from the data link layer and converts the bit stream into signals on the underlying physical medium.
Data Link Layer
- Transmits data between the two ends of the physical link.
- Provides data transmission functions and control between network layer entities.
- Provides flow control for data.
- Detects and corrects errors generated by the physical link.
- Formatted messages are called frames.
Network Layer
- Responsible for routing or switching end-to-end data, establishing connections for transparent data transmission.
- Adds addressing and resolves all issues related to data transmission across heterogeneous networks.
- Utilizes the functions of the transport layer above and the data link layer below.
- Formatted messages are called packets.
Transport Layer
- Provides error-free data transmission.
- Receives data from the session layer, segments it into smaller packets if necessary, and transmits packets to the network layer, ensuring packets arrive intact and correctly at their destination.
- Provides reliable transparent data transmission between systems, offering end-to-end error recovery and flow control.
Session Layer
- Coordinates the communication process between nodes.
- Responsible for enforcing session rules (e.g., whether connections allow half-duplex or full-duplex communication), synchronizing data flow, and re-establishing connections when faults occur.
- Utilizes the functions of the presentation layer above and the transport layer below.
Presentation Layer
- Provides data format, transformation, and encoding conversion.
- Involves the syntax and semantics of the data being transmitted.
- Encodes messages into a suitable electronic transmission format.
- Performs data compression and encryption at this layer.
- Receives messages from the application layer, converts formats, and transmits them to the session layer, which is often merged into the application layer.
Application Layer
- Includes various protocols that define specific user-oriented applications, such as email, file transfer, etc.
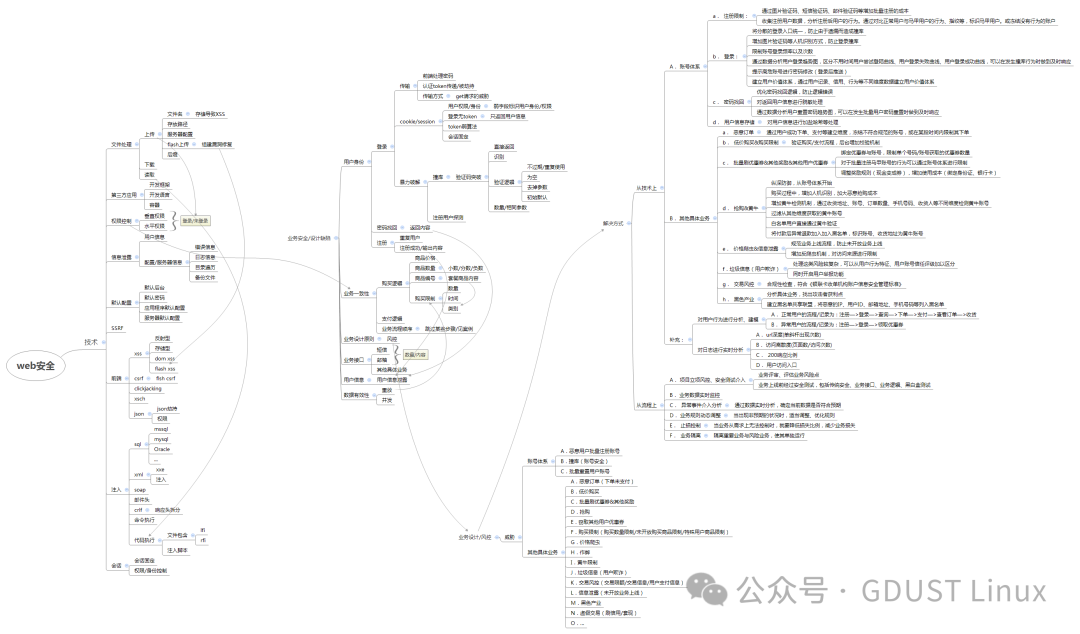
In simple terms, web security vulnerabilities refer to design or coding flaws in web applications or websites that attackers can exploit to disrupt the normal functioning of web applications or websites, or to gain unauthorized access or sensitive information. Web security vulnerabilities are the most common attack targets in penetration testing and one of the most harmful threats.Common web vulnerabilities include:
SQL Injection Vulnerability: Refers to the failure of web applications or websites to properly filter and escape special characters when processing user input, causing user input to be executed as part of SQL statements, thereby manipulating data in the database or executing other commands.
HTML Injection Vulnerability: Refers to the failure of web applications or websites to properly validate and encode HTML tags and JavaScript code when processing user input, allowing users to inject malicious HTML tags and JavaScript code into the target page by modifying URL parameters or other means, thus altering page content or conducting other attacks.
Remote Command Execution: Refers to the failure of web applications or websites to properly validate and encode functions that execute system commands when processing user input, allowing users to inject malicious commands or code into the target server or website’s operating system by modifying URL parameters or other means, thereby obtaining sensitive information or executing other attacks.
XSS Vulnerability: Refers to the failure of web applications or websites to properly filter and escape HTML tags and JavaScript code when processing user input, allowing users to input malicious HTML tags and JavaScript code to affect the display or behavior of pages on other users’ browsers, thus stealing user information or conducting other attacks.
Redirection Vulnerability: Refers to the failure of web applications or websites to properly filter and validate links that redirect to external sites when processing user input, allowing users to induce other users to redirect to untrusted websites by inputting malicious links, thus conducting phishing attacks, spreading malware, and other activities.
File Inclusion Vulnerability: Refers to the failure of web applications or websites to properly filter and restrict file names when processing user input, allowing users to include and execute local or remote files by inputting arbitrary file paths, thereby obtaining sensitive information or executing malicious code.
Arbitrary File Reading: Refers to the failure of web applications or websites to properly encode and escape file reading paths when processing user input, allowing users to inject malicious paths into the target website to read arbitrary files outside the application, such as passwords, private keys, certificates, and other sensitive files.
Arbitrary File Upload: Refers to the failure of web applications or websites to properly filter and restrict file types, sizes, and content when processing user-uploaded files, allowing users to upload files of any type or content to the target server, thereby obtaining sensitive information or executing malicious code.
SSRF Vulnerability: Refers to the failure of web applications or websites to properly filter and validate the destination address of requests when processing user input, allowing users to construct malicious addresses that cause the server to initiate requests to external sites or internal systems, thus conducting port scanning, information gathering, remote command execution, and other attacks.
1.2 Using Burp Suite
Abbreviated as bp, this tool can help penetration testers intercept, brute-force, analyze, and modify web applications to discover vulnerabilities within them.
1.2.1 Installing Java
Download from the official Java website: search for Java JDK.
After installation, configure the environment variables: copy C:\Program Files\Java\jdk1.8.0_201 to 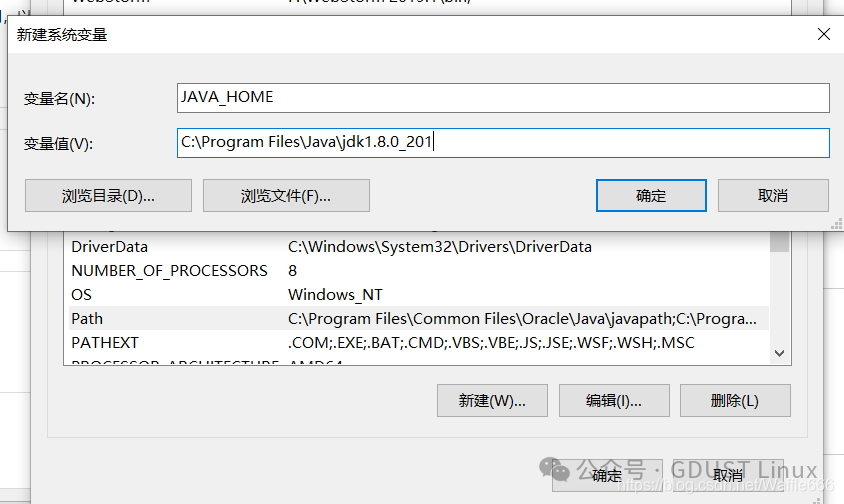 Click OK.Then open the bin directory and copy the directory C:\Program Files\Java\jdk1.8.0_201\bin to
 Click OK.Now you can use the cmd command to input javac and java.
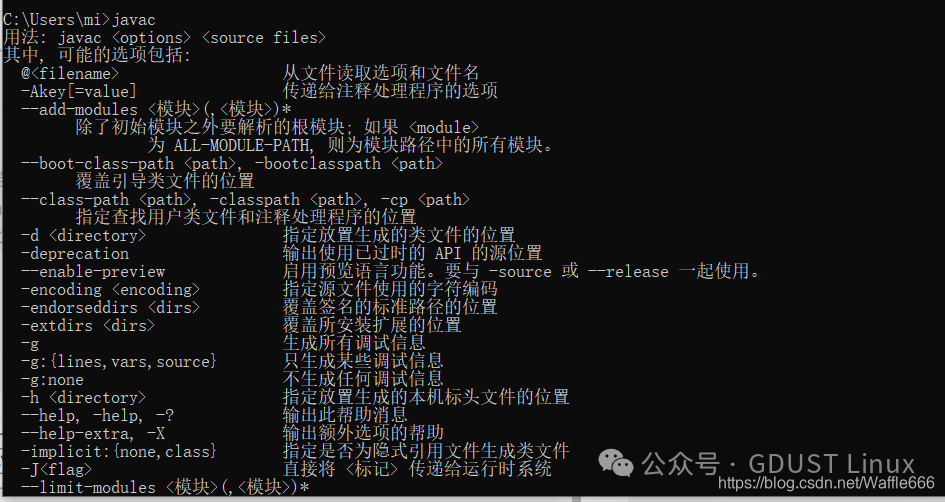
1.2.2 Configuring Burp Suite Proxy
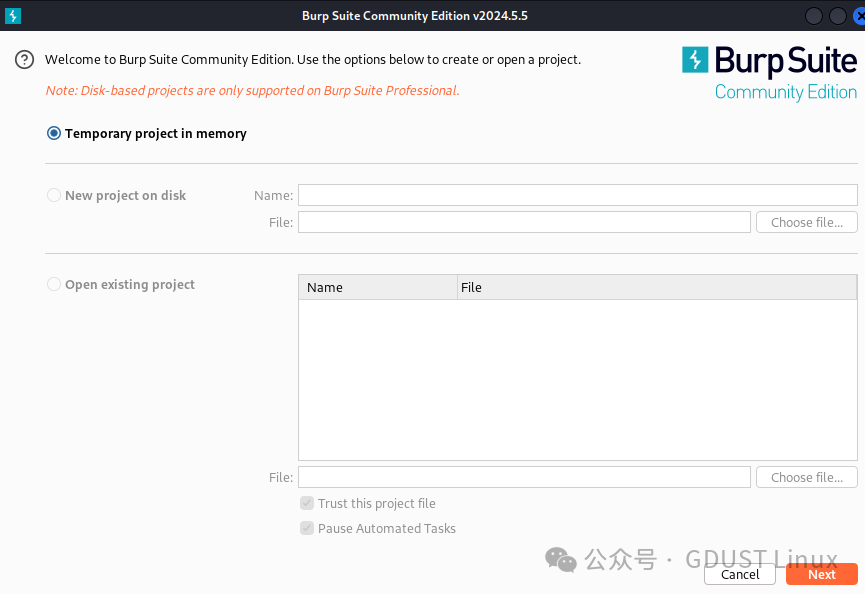
Before using Burp Suite, you need to change the browser proxy settings so that the request data can be passed through Burp Suite, allowing Burp Suite to perform interception, modification, replay, and other functions. First, click the Log icon in the upper left corner of the Kali Linux desktop and find “Web Applications”, then click Burp Suite to start it.After the pop-up page appears, click the Next button to load the configuration file; it is recommended to choose the default.
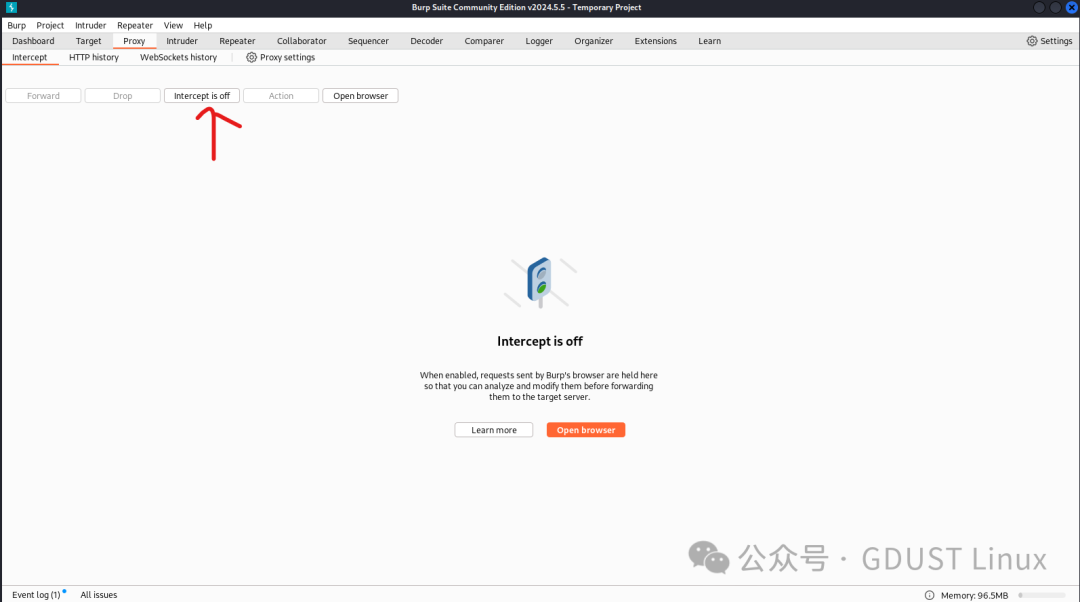
 Next, enter the main interface of Burp Suite. Click on the Proxy tab of Burp Suite and click the intercept is on tab to change it to intercept is off status, thus disabling the interception function.
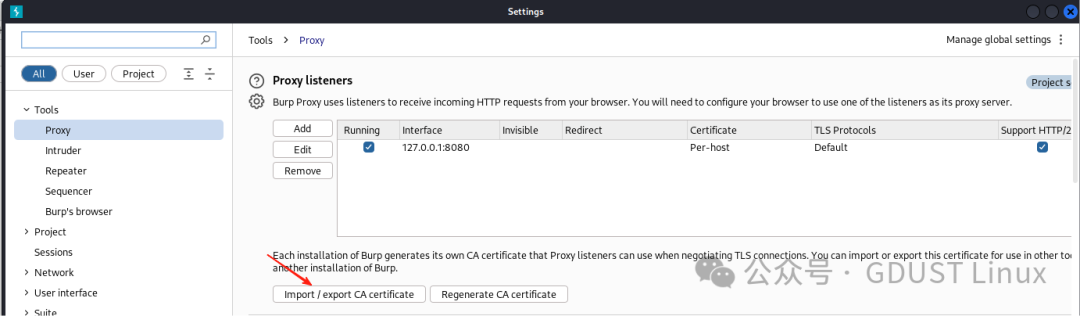
 Then click the Options tab to switch to the Burp Suite proxy settings interface, where you can see the Burp Suite proxy address. The default proxy address for Burp Suite is 127.0.0.1, and the default port is 8080. If the port number conflicts with other tools, you can change it manually. Then click the regenerate CA certificate button to generate the certificate.
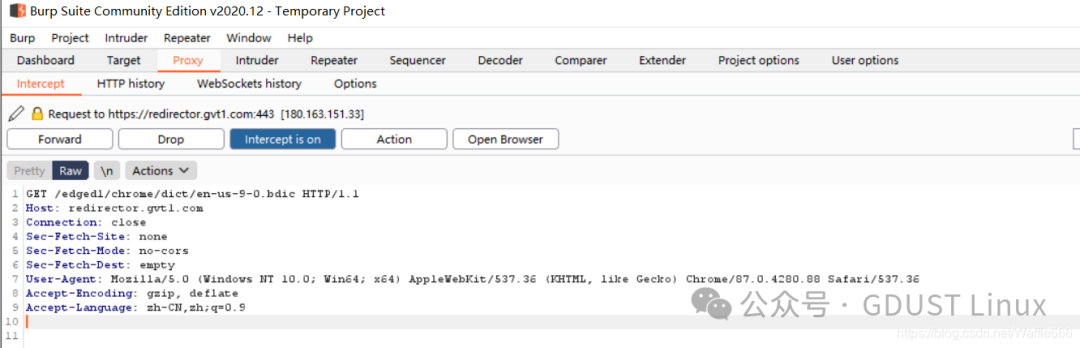
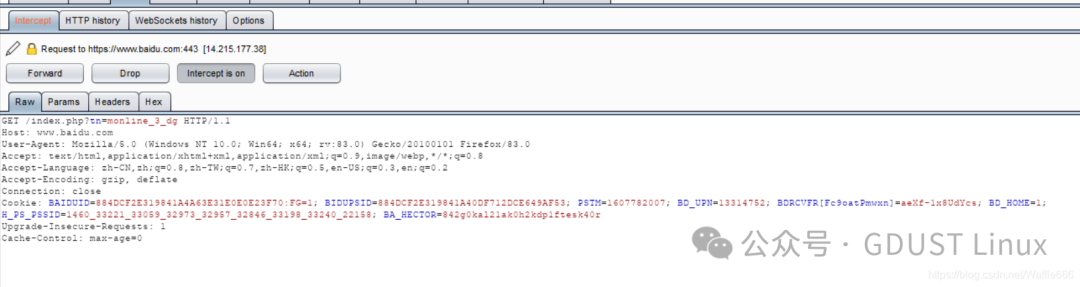
 With the certificate, you can intercept HTTPS traffic. For example, in Firefox, we can select “Manual proxy configuration” in the Firefox “Connection Settings” dialog, and then fill in the Burp Suite tool’s proxy address and port in the “HTTP Proxy” text box and the “Port” text box, as shown in Figure 4.5.Then, in the Firefox “Certificate Manager” dialog, import the generated certificate (der file). After importing, you can see the Port Swigger certificate belonging to Burp Suite.After clicking the OK button, return to the Burp Suite interface, enable the interception option, and try to access a URL with HTTPS in the Firefox browser to verify whether Burp Suite can intercept HTTPS traffic.In the above figure, it can be seen that Burp Suite successfully intercepted HTTPS traffic.
 SSL can be considered as HTTPS.
How do we capture HTTPS packets?
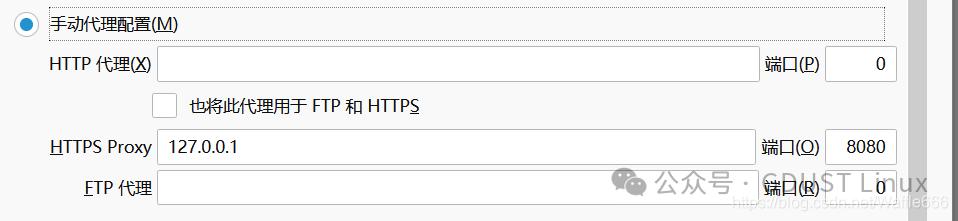
If you want to capture HTTP packets, you need to use an HTTP proxy. If you want to capture HTTPS packets, you need to use an HTTPS proxy (SSL proxy). HTTP defaults to port 80, while HTTPS uses port 443. The two ports are different; to proxy HTTPS, you must use SSL for proxying.
Is it enough to set up the proxy? No, HTTPS (S stands for security) adds an additional SSL layer (between TCP and HTTP) for encryption.

Burp Suite has a certificate: http://burp/ (input is http, so you must proxy http to access http websites; proxying https allows access to https websites).
After installing the certificate, you can decrypt the data returned by Baidu.
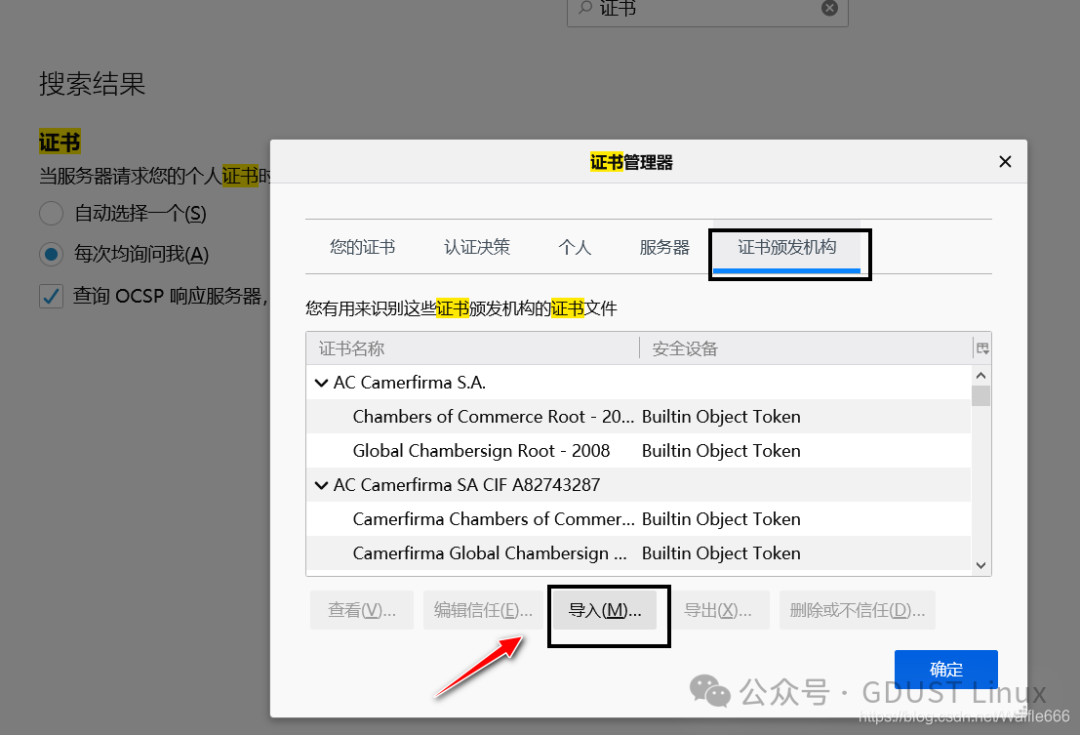
Import the certificate you just downloaded.

This certificate is called PortSwigger CA. After importing, the pop-up dialog (selecting the first one is fine, selecting all is also fine) will appear. Importing this certificate allows you to decrypt the garbled data within the HTTPS protocol.
Now let’s capture a packet from Baidu!
If only the SSL proxy is set, can we capture HTTP packets? No, because there is no HTTP proxy set; only HTTPS is proxied. SSL is understood as HTTPS, so to capture HTTP, you need to set up an HTTPS proxy.
Summary: To capture HTTPS packets, proxy SSL; to capture HTTP packets, proxy HTTP. Capturing HTTPS also requires importing a certificate. Proxying is for proxying, and importing a certificate is for importing a certificate. Proxying must proxy SSL, and importing a certificate is to decrypt the data returned via HTTPS (the certificate is for decryption, SSL is for proxying).
1.2.3 Proxy
The interception function of Burp Proxy is mainly composed of the intercept tab, including Forward, Drop, Interception is on/off, and Action, with the following functions:
1. Forward (send packet) indicates sending the intercepted or modified data packet to the server.
2. Drop (discard packet) indicates discarding the currently intercepted data packet.
3. Interception is on (intercept request) indicates enabling the interception function; clicking it changes to interception is off (interception disabled), indicating disabling the interception function.
4. Clicking the Action button allows further sending of the data packet to Spider, Scanner, Repeater, Intruder, and other functional components for further testing, including changing the request method and body encoding of the data packet (sending to other functional components).
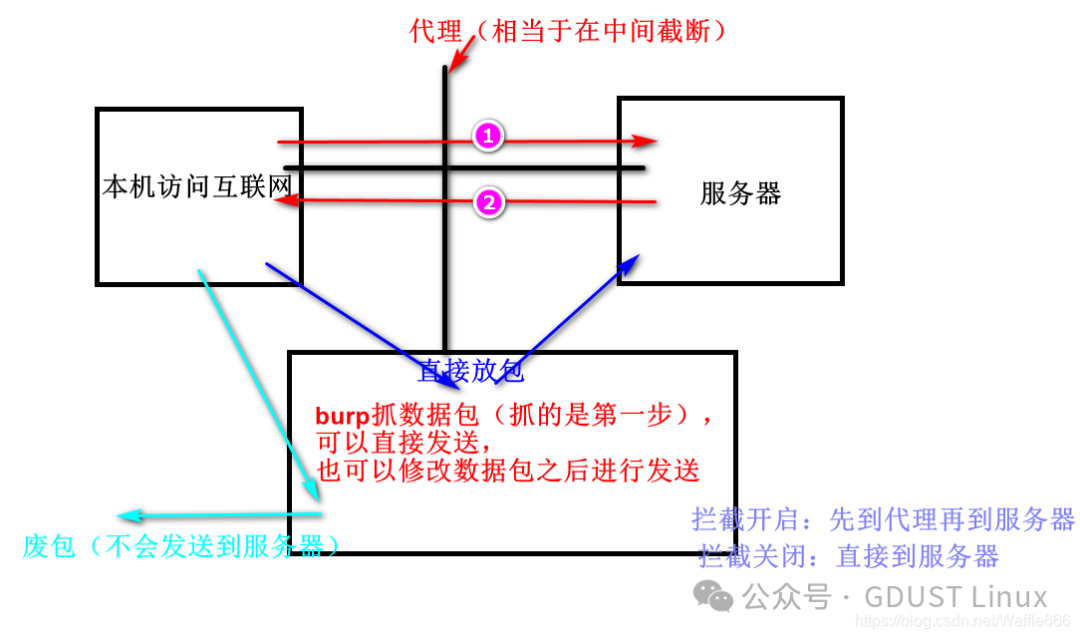
Open the browser, enter the URL you want to access, and press Enter. At this point, you will see the data traffic passing through Burp Proxy and pausing until you click the Forward button, at which point it will continue to transmit. If you click the Drop button, the data will be lost and will not be processed further.
After Burp Suite intercepts the interaction between the client and server, we can view the entity content, message headers, request parameters, and other information of this request in the message analysis options of Burp Suite. Burp has four message types to display packets: Raw, Params, Headers, and Hex.
Raw mainly displays the raw format of the web request, showing the data packet in plain text, including the request address, HTTP protocol version, host header, browser information, Accept content types, character set, encoding method, cookies, etc. You can manually modify this information for penetration testing on the server side. (Raw displays the data packet in text format.)
Params mainly displays the parameter information of the client request, including parameters for GET or POST requests and cookie parameters. You can modify these request parameters to complete penetration testing on the server side.
Headers display the header information in the data packet in name-value format.
Hex corresponds to the binary content of the information in Raw, allowing you to modify the request content using a Hex editor, which is very useful during 00 truncation.
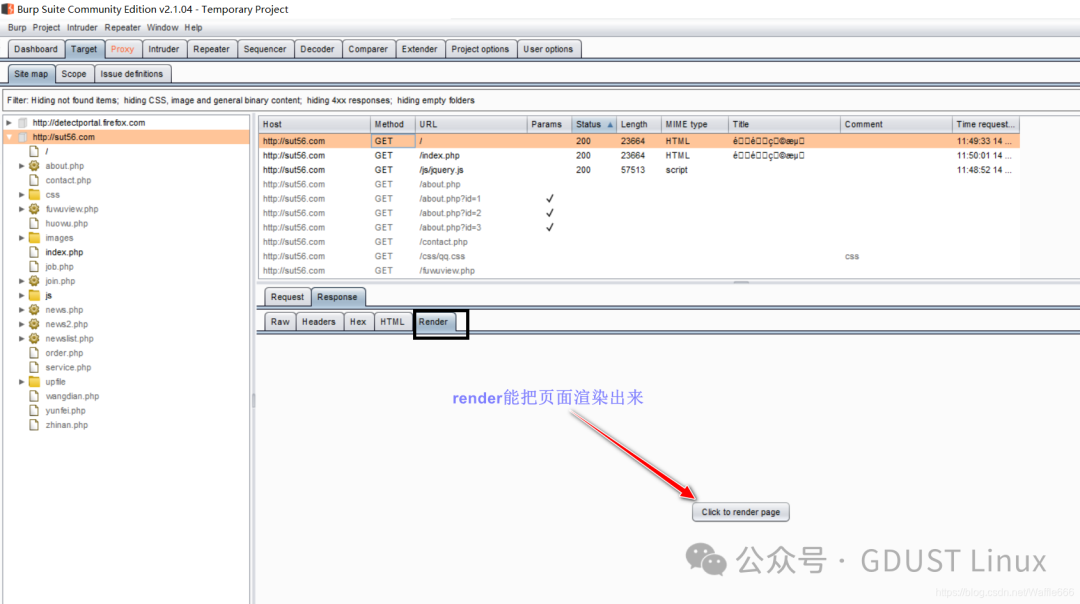
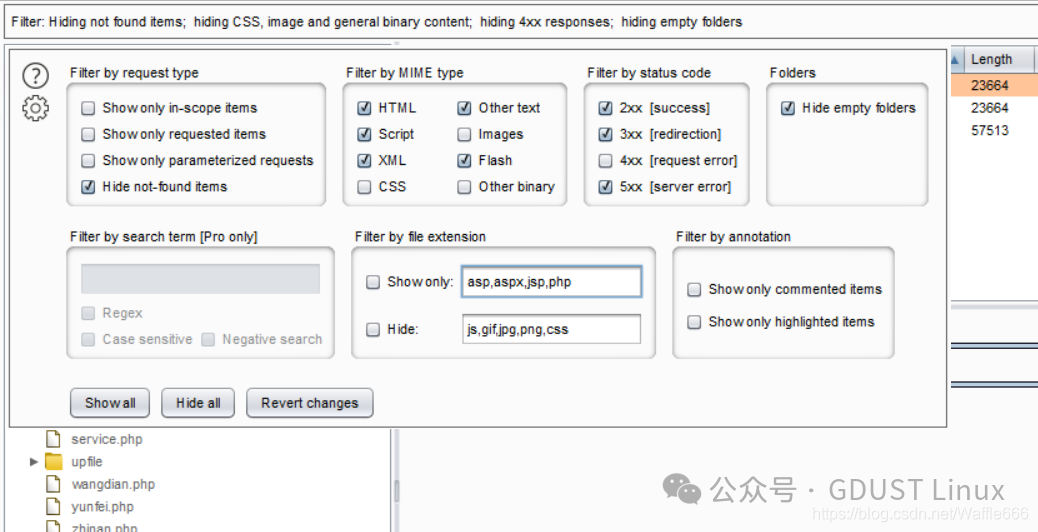
Filter
Spider: The spider crawling function of Spider can help us understand the structure of the system, and the content crawled by Spider will be displayed in Target.
Decoder: The Decoder function is relatively simple; it is a built-in tool in Burp for encoding, decoding, and hash conversion, capable of converting raw data into various encoding formats and hashes.
Repeater: Can repeat a packet.
API is used for writing plugins.
In Repeater, the data can be forwarded to each other.
Extender (plugin extension): BApp Store is the official plugin, requiring the professional version to install.
Intruder (brute force)
Send the content from Repeater to Intruder.

The above image shows that the target of the attack is Baidu, the port is 443, and it uses HTTPS.
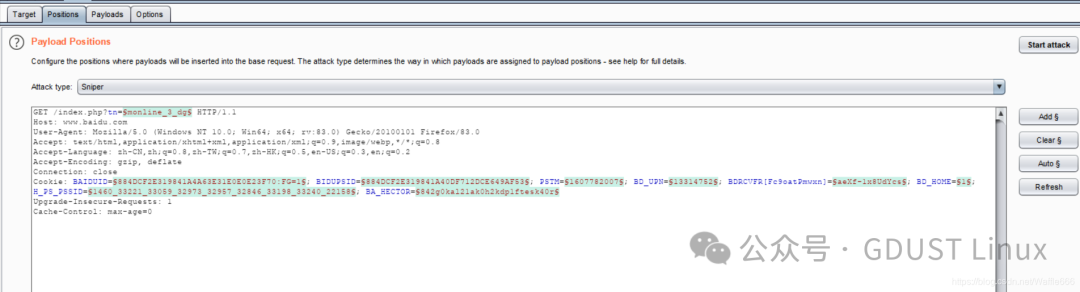
Remove the dollar sign $.For example, if you want to traverse Baidu’s directory.
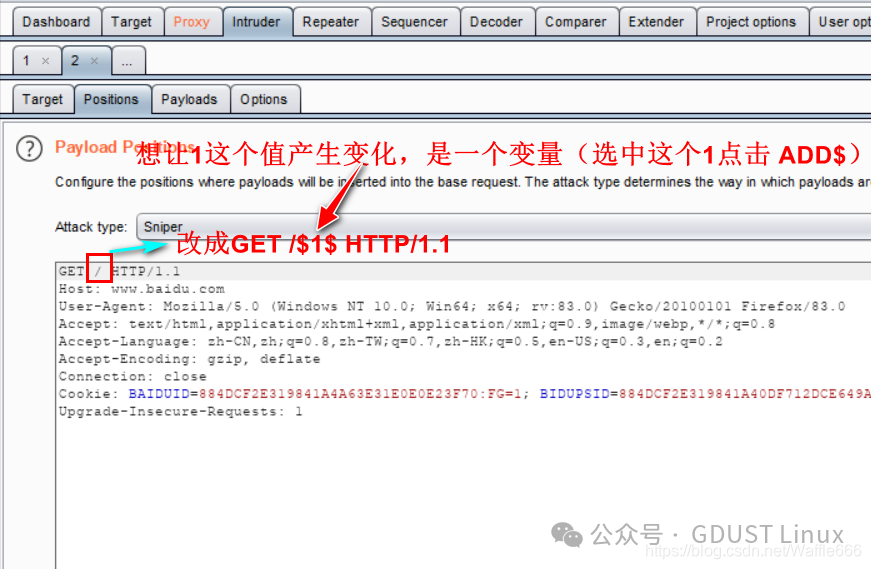

Attack MethodsSniperPayload contains three important modules.

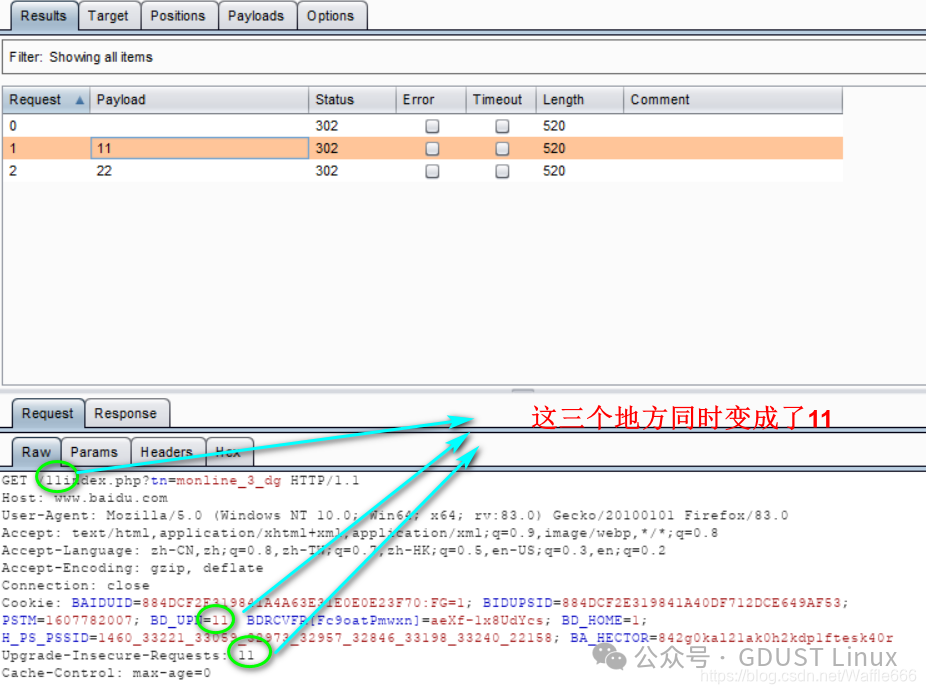
What effect do the added 11 and 22 have? 11 and 22 will be in GET /11 GET /22.Start the attack:
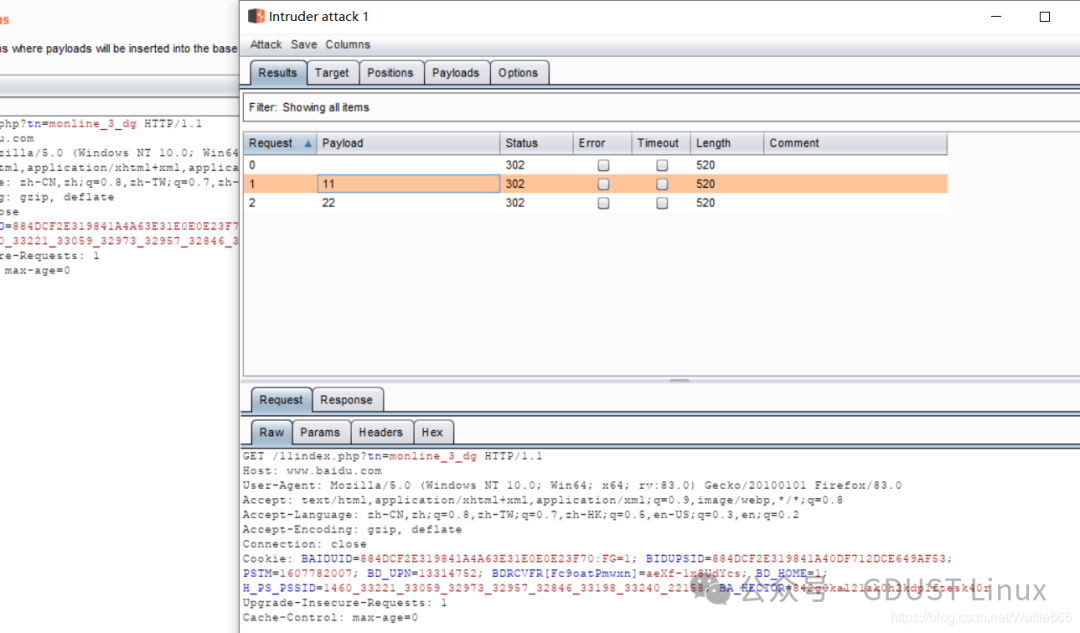
Battering Ram

Notes on Using Burp Suite
If you are a beginner and have some issues with Burp, please first read the introductory help for Burp Suite and follow its instructions. If the help does not mention a solution, the following problems and solutions may help you.
Burp cannot run. First, ensure that you have installed the appropriate version of Java. Then start Burp from the command line. Check any error messages or other output that appears in the command line, as these may contain the main reasons for the failure to start.
-
I get an error message saying NoClassDefFoundError. When running Burp from the command line, ensure that the -jar parameter is included, followed by the location of the Burp JAR file. If there are still issues, check that your command is starting the correct version of Java. Run the command java -version, which will return the currently installed version of Java; please confirm that the running version is 1.6 or higher. If you have installed a higher version of Java, but an older version is still executing, replace the “java” environment variable with the absolute path of the correct java executable on your system. If there are still issues, your installed Java may be corrupted; please reinstall Java and try again. If you receive this error message when trying to start Burp with the Burp Extender plugin, check that the BurpExtender class is declared in the burp package and that the extension’s JAR file exists in the burp folder.
-
I have unzipped the Burp JAR file. What should I do next? You do not need to unzip the Burp JAR file. This may be because your computer associates the .JAR file extension with some extraction software. You can change this association to run with Java, or you can start Burp from the command line (which is also our recommended method).
-
My browser cannot make any requests. If your browser is always waiting and not displaying any actual content, try the following steps to resolve the issue. After completing each step, check if the problem still exists; if it does, you can continue to the next step to troubleshoot.
-
First, run Burp, then go to the Intercept sub-tab of the Proxy tab. If you can see HTTP requests here, you can try turning off interception (click the “Intercept is on” button to toggle the listening state). At this point, your browser should work normally. For more help on using Burp Proxy, refer to the Burp Proxy introduction. Try accessing other websites with your browser (preferably well-known ones). If you can access them, the problem may be related to the website you are trying to access. Go to the Options sub-tab of the Proxy tab. In the “Proxy Listeners” section, the table should show at least one entry, and Running should be checked. If it is not checked, click to check it. If you cannot check that box and the “Alerts” tab shows a message “Failed to start proxy service,” it means Burp cannot listen on the specified port. This is usually because the port is being used by another program. Go back to the table, select the item in the table, click the “Edit” button, change the port number (Bind to port) to another port number, click “OK,” and then see if you can enable the listener now. You can first check which ports are available on your computer and choose a port number from them for configuration. Then use the new port number in the browser’s proxy configuration to update the browser’s proxy settings. Check that your browser’s proxy settings are configured correctly, ensuring they match the IP address and port number configured on the Burp proxy listener (in Burp’s default settings, this is IP address 127.0.0.1 and port 8080, which may differ from your Burp configuration). For detailed information, refer to configuring the browser. In Burp, go to the User Options tab, and in the Connections sub-tab, check if an upstream proxy server is configured; if so, confirm that the upstream proxy is available. Make more requests from the browser (e.g., refresh a few times). Check the “Alerts” tab for any new prompts. If there are any, this information may indicate the main reason for the problem. Go to the Burp menu and select “Restore defaults” for all options. Then close the browser and restart Burp. Then check if Burp and the browser can work normally. Burp has not intercepted anything. In Burp, go to the HTTP history sub-tab of the Proxy tab. Make more requests from the browser (e.g., refresh a few times) and see if new entries appear in the proxy history. If they do, it means Burp is processing your browser traffic but is not displaying any interception messages. Go to the Intercept tab and enable the interceptor (click the “Intercept is off” button to toggle the interception state). Then go to the Proxy Options tab and find “Intercept Client Requests” and “Intercept Server Responses”; restore them to default (click the gear icon next to it and click “Restore defaults”). Then make more requests from the browser, and these requests should appear in the “Proxy Intercept” tab.
-
If your browser can load web pages correctly, but no items are displayed in the proxy history, you need to check the browser’s proxy settings. Your browser should be configured to use Burp’s proxy for both HTTP and HTTPS, disable any “automatic” proxy options, and remove any “exceptions” entries from the proxy settings. If you are unsure whether it is set, carefully follow the steps in configuring the browser to ensure your browser settings are correct.
-
Burp does not intercept HTTPS requests. If your browser can send HTTP requests through Burp but cannot send HTTPS requests, your browser may be configured to proxy only HTTP. Check your browser’s proxy settings to ensure the browser’s proxy configuration applies to both protocols using Burp’s proxy. If you are unsure, carefully follow the steps in configuring the browser to ensure your browser settings are correct. Websites using HTTPS do not work properly. If your browser can access HTTPS websites through Burp but these websites do not work properly (e.g., the user interface is incomplete or not fully functional, or the browser issues warnings), the application may be trying to load scripts or other resources via HTTPS from another domain, and your browser triggers security alerts when loading these resources through Burp. You need to install Burp’s CA certificate in your browser to ensure that applications using HTTPS work properly. If you receive authentication failures when using Burp, if the application you are testing uses platform authentication (usually displayed in the browser as a pop-up login dialog), and you receive authentication failure messages when the browser is configured to use Burp, you need to configure Burp to handle the website’s authentication. Go to the User Options tab, in the Connections sub-tab, in the Platform Authentication section, add a new entry for each hostname used by the application, configuring the corresponding authentication type and credentials. If you are unsure of the authentication type, you should first try NTLMv2, then NTLMv1, and then other types. You may need to restart the browser and clear the browser cache if necessary to prevent any browser cache from interfering with the authentication process. Burp is running out of memory. Burp is limited by the amount of memory available to the Java process on your computer. You can allocate the appropriate memory by using the -Xmx parameter to start Burp from the command line. For more details on this issue, refer to starting Burp. How to run a scan? Burp is designed to support user-driven manual testing. Attempting to fully automate the scanning process with conventional web scanners has certain limitations, and these scanners cannot fully identify corresponding defects. If you want to use Burp as a traditional scanner and wish to fully automate the scanning process, refer to using Burp as a click scanner.Just in case, let’s talk about an example!
A SQL injection vulnerability appeared in a certain school.
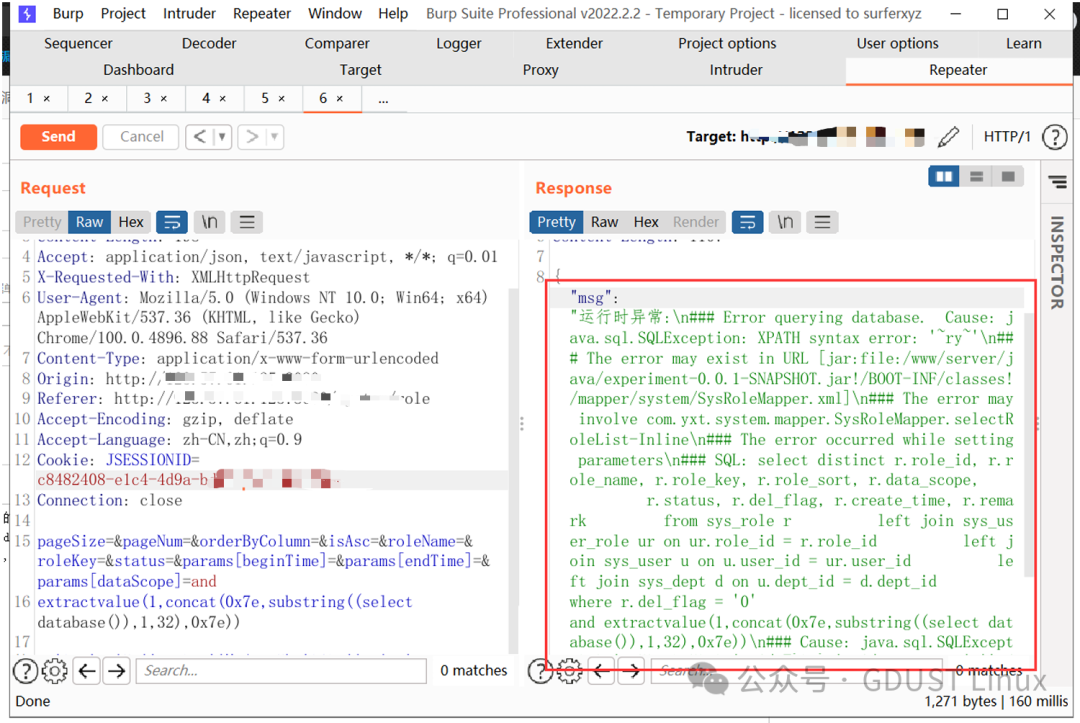 The login account password is also a weak password: admin, admin12.
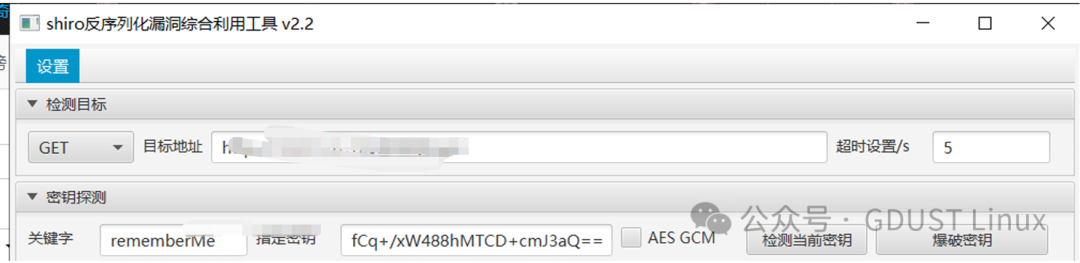
 There is a Shiro deserialization framework.
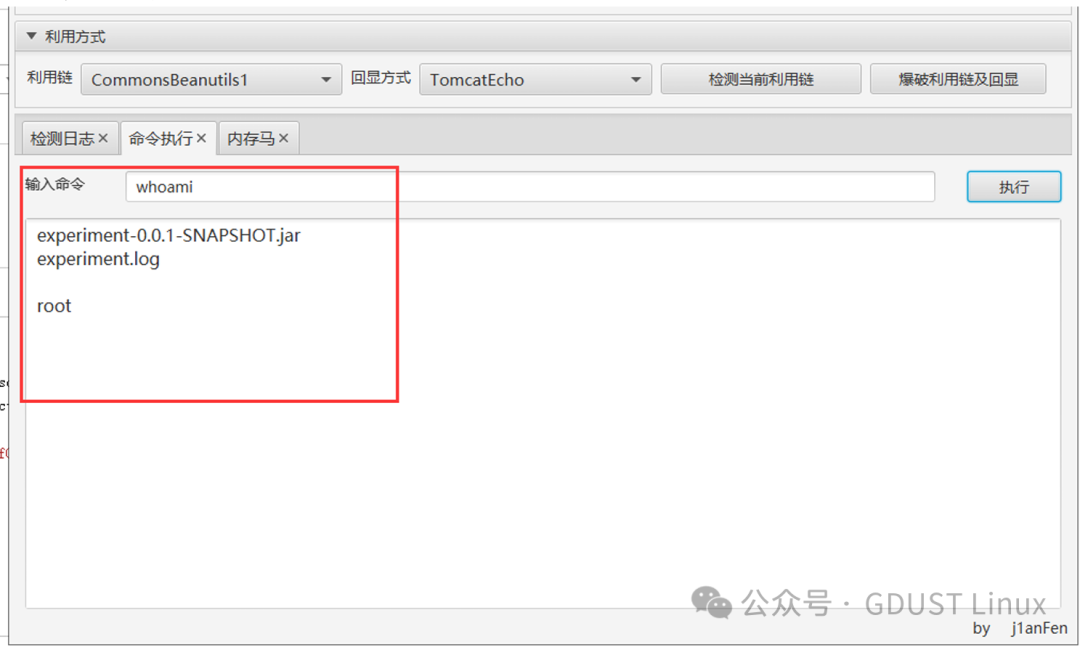
That’s all for today. See you next time!