This series will explain the book “Assembly Language”. This section covers Chapter 4 – The First Complete Assembly Program.
We can finally write our first complete program. Previously, we were writing some instructions in Debug and executing them there. Now we will start writing a complete assembly language program, using <span>compilation</span> and <span>linking</span> to compile and link them into an <span>executable file</span> (such as <span>*.exe</span> files), to run in the operating system.
In this chapter, we will write our first such program.
| 1. The process from writing a source program to execution |
| 2. The components of the source program |
3. The <span>complete development process</span> using DOSBox |
| 4. Execution of .exe |
5. Who loads the executable file <span>into memory</span> and <span>executes it</span>? |
| 6. Experiment – Tracing the program execution process |
1. The Complete Process from Writing to Executing a File
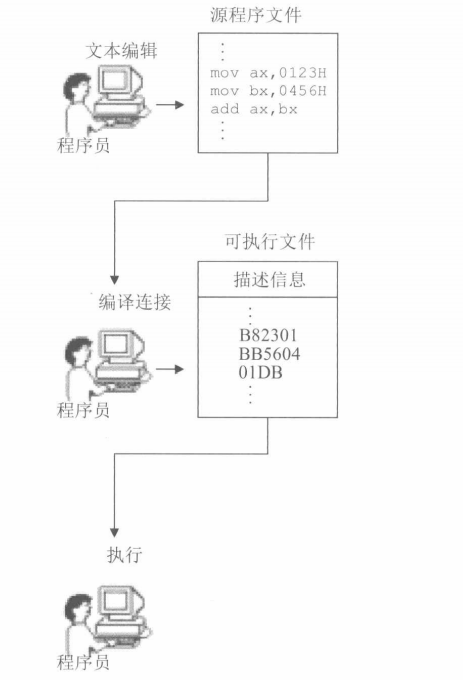
- Step 1:
Write the source file text, which generates a text file that stores the source file.
- Step 2:
Compile and link the source file
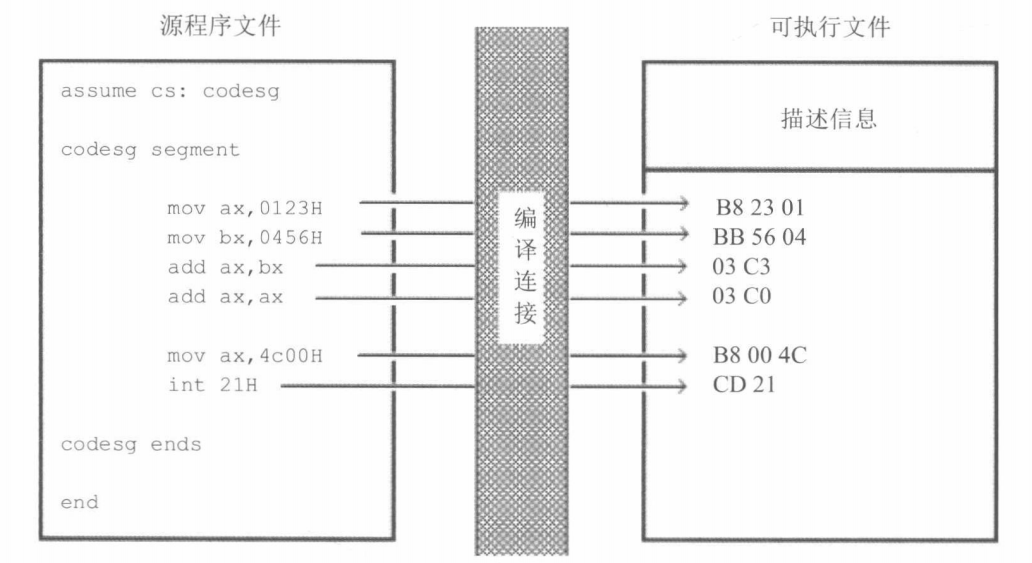
Use the compiler to compile the source program in the source file, generating a target file; then use the linker to link the target file, producing an executable file that can be run directly in the operating system.
The executable file contains two parts:
| Contents of the Executable File | Explanation |
|---|---|
| 1. Program | Translated from <span>assembly instructions</span> in the <span>source program</span> to <span>machine code</span> and <span>data</span> (data defined in the source program) |
| 2. Related descriptive information | For example:<span> the size of the program</span>, how much <span>memory space</span> it will occupy, etc. |
This step will produce an <span>executable file that runs in the operating system</span>.
- Step 3:
Execute the program (instructions) in the executable file.
Note that in Step 2, we saw that the executable file contains not only <span>executable instruction machine code</span> and <span>data</span>, but also related descriptive information. This step is to <span>execute only the machine code</span>. How is it executed?
The operating system loads the <span>machine code and data</span> from the executable file into <span>memory</span>, according to the <span>descriptive information</span> in the executable file, and performs related <span>initialization</span> (for example, setting <span>CS:IP to point to the first instruction to be executed</span>), and then the CPU executes the program.
2. Components of the Source Program
First, here is the complete program:
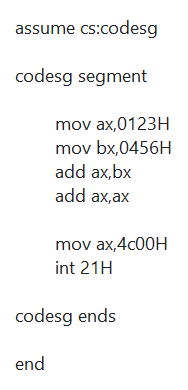
Next, we will explain each component one by one:
| Components of the Source Program |
|---|
| Pseudoinstructions |
| Assembly instructions |
| Labels |
1. Pseudoinstructions
In an assembly program, there are two types of instructions: one is <span>assembly instructions</span> and the other is <span>pseudoinstructions</span>. The difference between the two is as follows:
| Instruction | Explanation |
|---|---|
| Assembly instructions | Correspond to the instructions of machine code, ultimately executed by the CPU |
| Pseudoinstructions | Intermediate products for better compiler operation, not executed by the CPU |
In the above program, there are three types of pseudoinstructions:
- 1. Segment definition pseudoinstructions:
This is a pair of pseudoinstructions that must be used when using assembly.
As mentioned earlier, <span>memory</span> is divided into <span>multiple segments</span>, and a segment must have a <span>name</span> to <span>identify</span> it, so this instruction is essential.
XXX segment

xxx ends
- 2. Assume pseudoinstruction:
That is, assume, in the source code it is:
assume cs:codesg
This pseudoinstruction means “assume” it associates a certain segment register with a segment defined in the program using segment…ends. By using assume, this association is explained, and when necessary, the compiler can link the segment register with a specific segment.
<span>This indicates that codesg is used to store the code segment (CS segment).</span>
- 3. End pseudoinstruction:
This is the <span>last instruction</span> in the assembly source code, used to <span>indicate that the program can end compilation</span>.
The end is a termination marker for an assembly program. When the compiler encounters the pseudoinstruction end during the compilation of the assembly program, it <span>ends the compilation of the source program</span>. Therefore, when we write a program, if the program is finished, we must add the pseudoinstruction end at the end.<span>Otherwise, the compiler will not know where the program ends during compilation.</span>
2. Assembly Instructions in the Source Program
Instructions or data in the source program that are ultimately executed and processed by the computer.
3. Labels
As a name of a segment, ultimately compiled and linked into a segment address.
In the assembly source program, in addition to assembly instructions and pseudoinstructions, there are also some labels, such as <span>"codesg"</span>.
A <span>label</span> refers to an <span>address</span>. For example, codesg is in front of the segment, serving as a <span>name of a segment</span>, and this <span>name of a segment</span> will ultimately be processed by the <span>compiler and linker into a segment address</span>.
<span>Large project</span>programs are often decomposed into<span>one segment after another</span>to complete, so labels are sometimes essential.
3. Related to Program Termination
Note that we also have the following two instructions:
mov ax,4c00H
int 21H
These two instructions have not been discussed; they are the program return instructions under the DOS operating system. Now we know that after a program ends, it will <span>return control of the CPU</span> to the <span>program that allowed it to run</span>, and we call this process:<span>program return</span>. So, how to return? We should add a return <span>program segment at the end of the program.</span>
Just like the code segment above!
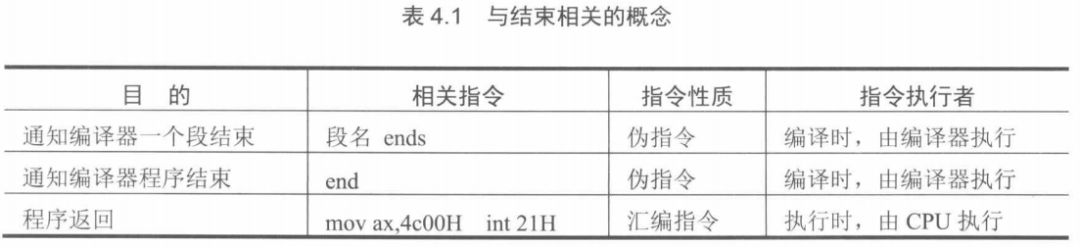
<span>segment name ends</span>, <span>end</span>, <span>mov ax,4c0H ,int 21H</span>4. The Complete Development Process Using DOSBox
Previously, we were executing short instruction sets on the debug program in DOSBox. Now we will go through the complete <span>source writing - compilation - linking - execution</span> process.
For details, please refer to this article: The Complete Development Process Using DOSBox.
5. Who Loads the Program from the Executable File into Memory and Makes It Run?
Clearly, for the executable file P1 to run, there must be a <span>running program P2</span> that loads <span>P1 from the executable file into memory</span> and hands over control of the CPU to it, allowing P1 to run; when P1 finishes running, it should return control of the CPU to the program P2 that allowed it to run.
In fact, in DOSBox, there is a <span>command.com</span> program, which is the <span>shell of the DOSBox operating system</span>.
The operating system is a large and complex software system composed of multiple functional modules. Any general-purpose operating system must provide a program called a
<span>shell</span>, which users (operators) use to operate the computer system for work.

The process of running a program is as follows:
(1) When executing 1.exe directly in DOS, it is the running command that loads the program from 1.exe into memory;
(2) <span>command sets</span> the CPU’s <span>CS:IP</span> to point to the first instruction of the program (<span>the entry point of the program</span>), allowing the program to run;
(3) After the program finishes running, it returns to command, and the CPU <span>continues running command</span>, displaying the drive prompt.
Small Insight
So what actually runs is not the executable file, but the <span>instruction set loaded into memory by the program that loads the executable file</span>.
6. Tracing the Program Execution Process
This is what we usually refer to as debugging, setting breakpoints. For details, please refer to this article: Tracing the Program Execution Process in DOSBox.
Conclusion
Alright, in this section we discussed the <span>complete assembly program from writing to running and debugging</span>. Let’s review:
| 1. The process from writing a source program to execution |
| 2. The components of the source program. |
| 3. What are pseudoinstructions? |
| 4. What pseudoinstruction associates program segments with registers? |
5. The <span>complete development process using DOSBox</span> |
| 6. Execution of .exe |
7. Who loads the executable file <span>into memory</span> and <span>executes it</span>? |
| 8. The memory architecture for loading executable files in DOSBox, what do the cx and ds registers hold? |
| 9. Why is the address of the first instruction in the source code said to be ds+10:0000? |
| 10. When debugging a program, provide the call chain of the program. |
If you cannot explain each item in this table, then review the above content carefully!
Answers can be found in the comments section, and everyone is welcome to discuss~

😉【Linux】 Essential Knowledge Points Before Learning Linux😉【Linux】 Linux Kernel Memory Abstraction for Processes😉【Linux】 Overview of Linux 1 – Linux’s Use of Physical Memory😉【Linux】 The Entire Process from Writing to Running Software😉【Linux】 “Entering the Intranet” – Overview of Linux Kernel Structure😉【Linux】 Linux Interrupt Mechanism😉【Linux】 Description of Linux Processes😉【Assembly Language】 1 – Basic Hardware Knowledge😉【DOSBox】 1 – Debug😉【Assembly Language】 2 – Basic Knowledge of Registers😉【Assembly Language】 3 – Interaction Between Registers and Memory😉【DOSBox】 Complete Development Process😉【DOSBox】 Debugging Executable Files
About Xiao Xi
😉 Hehe, I am Xiao Xi, focusing on <span>C language</span>, <span>Linux kernel</span>, and <span>cloud computing</span>.
Here is my WeChat, looking forward to learning and communicating with you!

Xiao Xi believes:
<span>It is best to gradually speed up, and the foundation is always worth spending 85% of the effort on</span>. My articles are all about simple foundational knowledge. If you like this style:
What do you want to see in the next issue? Leave a message in the comments section! See you next time!