This article will briefly introduce what JWT authentication in HTTP requests is and how to use JWT in practical projects.
Welcome to follow my public account NLP Journey, where original technical articles are pushed at the first time.
Welcome to follow my knowledge planet Natural Language Processing Journey, where I am working hard to build my own technical community.

What is JWT?
What is HTTP Request Authentication?
Before introducing JWT authentication in HTTP requests, we first need to understand what authentication in HTTP requests is.
When we use internet services in our daily lives, we often rely on user authentication, which is essentially HTTP request authentication.
Authentication in HTTP requests refers to the confirmation of identity and verification of permissions by the server when a client (such as a browser, app, or API caller) accesses protected resources. It mainly consists of two parts: authentication and authorization. Authentication means that the client needs to provide its “identity credentials”, and the server confirms whether the identity is valid based on the credentials. Authorization means that even if authentication is successful, the server still needs to determine: can you access this interface or resource?
Currently, there are four common authentication methods:
- • HTTP Basic Authentication
- • session-cookie
- • Token verification
- • OAuth (Open Authorization)
The JWT authentication discussed in this article belongs to Token verification.
Principle of JWT
JWT stands for JSON Web Token. Its basic principle is that after the server authenticates, it generates a JSON object and sends it back to the user, as shown below.
{
  "name": "Zhang San",
  "role": "Administrator",
  "expiration_time": "2018-07-01T00:00:00"
}
In the future, when the user communicates with the server, they must send back this JSON object. The server relies solely on this object to determine the user’s identity.
Structure of JWT
In fact, the JWT we use looks like the following string:
eyJhbGciOiJIUzI1NiIsInR5cCI6IkpXVCJ9.eyJzdWIiOiIxMjM0NTY3ODkwIiwibmFtZSI6IkpvaG4gRG9lIiwiaWF0IjoxNTE2MjM5MDIyfQ.cThIIoDvwdueQB468K5xDc5633seEFoqwxjF_xSJyQQ
It is separated by dots and consists of three parts: Header (header), Payload (payload), and Signature (signature).
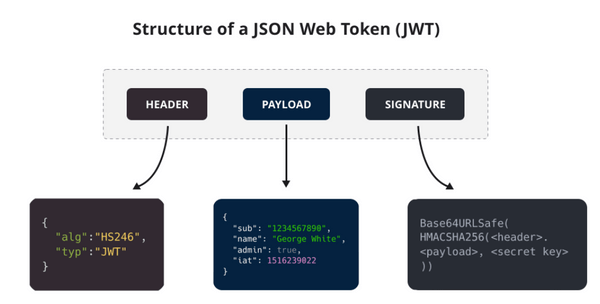
The Header part, after being parsed, is a JSON object that describes the metadata of the JWT, generally structured as follows:
{
    "alg": "HS256",
    "typ": "JWT"
}
The alg attribute indicates the signing algorithm (algorithm), which defaults to HMAC SHA256; the typ attribute indicates the type of token (type). The JSON object is converted to a string using the Base64URL algorithm.
The Payload part, after being parsed, is also a JSON object used to store user identity-related data. For example:
{
    "sub": "1234567890",
    "name": "George White",
    "admin": true,
    "iat": 1516239022
}
The above JSON object is converted to a string using the Base64URL algorithm, and both the Header and Payload parts are implemented using this algorithm.
The official standard fields for the Payload part are as follows:
iss (issuer): Issuer
exp (expiration time): Expiration time
sub (subject): Subject
aud (audience): Audience
nbf (Not Before): Effective time
iat (Issued At): Issuance time
jti (JWT ID): ID
The Signature part is obtained through salted encryption, which is implemented by the server, as shown in the following diagram:
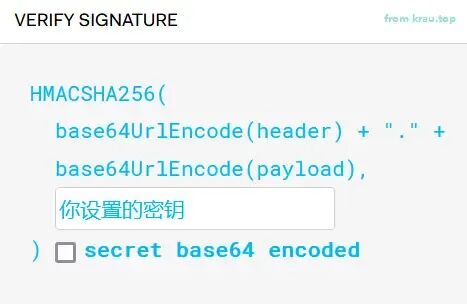
In simple terms, it involves base64 encoding the Header and Payload parts, concatenating them with a dot, and then using the specified secret key and algorithm to perform salted encryption to obtain the Signature part.
Implementing JWT in Python
In Python, there are many third-party modules that provide JWT implementations. We will use the python-jose module as an example to demonstrate how to use JWT.
First, we will generate and verify JWT using this module. The code is as follows:
# Using the jose library to generate and verify JWT
# pip install python-jose==3.5.0

from jose import jwt

# Create Payload
payload = {"user_id": "1234", "user_name": "Python"}

# Signing key
secret_key = "jc2025"

# Generate JWT
token = jwt.encode(payload, secret_key, algorithm='HS256')

print("JWT Token:", token)

# Verify JWT
decoded_token = jwt.decode(token, secret_key, algorithms=['HS256'])
print("Decoded Payload:", decoded_token)
The output is as follows:
JWT Token: eyJhbGciOiJIUzI1NiIsInR5cCI6IkpXVCJ9.eyJ1c2VyX2lkIjoiMTIzNCIsInVzZXJfbmFtZSI6IlB5dGhvbiJ9.IzJ1AplGgQzPuOO2RRnx_PscdwL1efZw8FRa0bjpIKs
Decoded Payload: {'user_id': '1234', 'user_name': 'Python'}
Many websites also provide JWT parsing, such as https://jwt.io/, which offers a simple and practical JWT authentication function. We will parse the above JWT Token on this website, as shown in the following image:
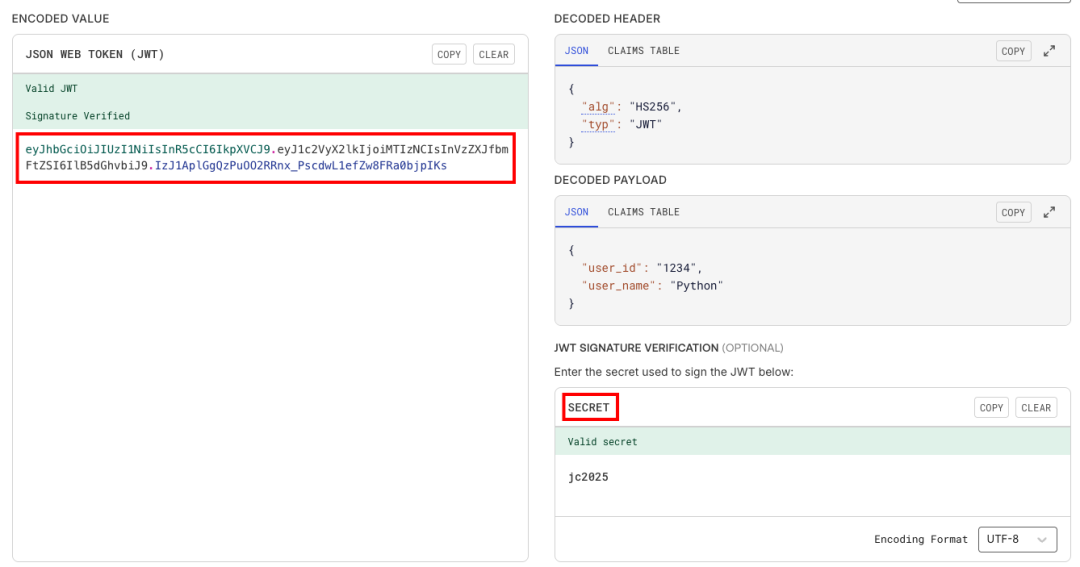
We paste the JWT Token into the left side of the ENCODE VALUE, and the right side will automatically parse the Header and Payload parts, but the Signature part requires us to provide the correct secret key (SECRET) for verification.
We will introduce a timeout mechanism based on the JWT generation and verification functionality above, which is also a common usage of JWT. The example code is as follows:
# Add expiration time exp of 1 minute in payload, then verify
import time
from jose import jwt
from datetime import datetime, timedelta, timezone

# Create payload with expiration time
exp_payload = {
    "user_id": "1234",
    "user_name": "Python",
    "exp": datetime.now(timezone.utc) + timedelta(minutes=1)  # Expires in 1 minute
}
secret_key = "jc2025"

# Generate JWT with expiration time
exp_token = jwt.encode(exp_payload, secret_key, algorithm='HS256')

print("\nJWT Token with expiration time:", exp_token)

try:
    decode_secret_key = secret_key
    # decode_secret_key = secret_key + "2"
    # time.sleep(62)
    # Verify JWT with expiration time
decoded_exp_token = jwt.decode(exp_token, decode_secret_key, algorithms=['HS256'])
    print("Decoded Payload:", decoded_exp_token)
except jwt.ExpiredSignatureError:
    print("Token has expired!")
except jwt.JWTError:
    print("Token verification failed!")
In the above code, we added a timeout mechanism in the Payload part.
- • If we use the correct secret key and the time does not exceed 1 minute, it can be correctly parsed.
- • If the wrong secret key is used, it will report an error: Token verification failed!
- • If the correct secret key is used but the time is exceeded, it will report an error: Token has expired!
The outputs for the above three situations are as follows:
JWT Token with expiration time: eyJhbGciOiJIUzI1NiIsInR5cCI6IkpXVCJ9.eyJ1c2VyX2lkIjoiMTIzNCIsInVzZXJfbmFtZSI6IlB5dGhvbiIsImV4cCI6MTc1MTI5MTc2MX0.jMrINdHTy56q19N--P8rLtgBpb2wmFamYaeErEXiMEA
Decoded Payload: {'user_id': '1234', 'user_name': 'Python', 'exp': 1751291761}

JWT Token with expiration time: eyJhbGciOiJIUzI1NiIsInR5cCI6IkpXVCJ9.eyJ1c2VyX2lkIjoiMTIzNCIsInVzZXJfbmFtZSI6IlB5dGhvbiIsImV4cCI6MTc1MTI5MTc4Mn0.W2ecyHE7YaNH58P87dZ5aXqRq9Fy1BAITtrEDtMgSrA
Token verification failed!

JWT Token with expiration time: eyJhbGciOiJIUzI1NiIsInR5cCI6IkpXVCJ9.eyJ1c2VyX2lkIjoiMTIzNCIsInVzZXJfbmFtZSI6IlB5dGhvbiIsImV4cCI6MTc1MTI5MTgxMX0.Kh1StJcVtq59oAvodh_Ul_OOOZFmXWxfKLzBLfold0I
Token has expired!
The above Python code, although simple, is very helpful for understanding the JWT mechanism.
Using JWT in FastAPI
Mature Python web frameworks, such as Flask and FastAPI, provide good support for JWT. This section will introduce how to use JWT in FastAPI.
We will implement a simple JWT service in FastAPI for user authentication and authorization of the corresponding API. The example code is as follows:
# Using jwt in fastapi - simplified version
# Main function: Implement basic user login and JWT authentication demonstration

from datetime import datetime, timedelta, timezone
from fastapi import FastAPI, Depends, HTTPException, status
from fastapi.security import OAuth2PasswordBearer, OAuth2PasswordRequestForm
from pydantic import BaseModel
from jose import JWTError, jwt, ExpiredSignatureError

app = FastAPI()

oauth2_scheme = OAuth2PasswordBearer(tokenUrl="token")

# Key and algorithm configuration
SECRET_KEY = "09d25e094faa6ca2556c818166b7a9563b93f7099f6f0f4caa6cf63b88e8d3e7"
ALGORITHM = "HS256"
ACCESS_TOKEN_EXPIRE_MINUTES = 10


# User model
class User(BaseModel):
    username: str
    email: str | None = None


class Token(BaseModel):
    access_token: str
    token_type: str


# Simulated user database (simplified version)
fake_users_db = {
    "admin": {
        "username": "admin",
        "email": "[email protected]",
        "password": "admin123"  # In actual applications, hashed passwords should be stored
    },
    "user": {
        "username": "user",
        "email": "[email protected]",
        "password": "user123"
    }
}


# Validate user login
def authenticate_user(username: str, password: str):
    user = fake_users_db.get(username)
    if not user:
        return False
    if user["password"] != password:  # In actual applications, hashed passwords should be verified
        return False
    return user


# Create JWT token
def create_access_token(data: dict, expires_delta: timedelta | None = None):
    to_encode = data.copy()
    if expires_delta:
        expire = datetime.now(timezone.utc) + expires_delta
    else:
        expire = datetime.now(timezone.utc) + timedelta(minutes=15)
    to_encode.update({"exp": expire})
    encoded_jwt = jwt.encode(to_encode, SECRET_KEY, algorithm=ALGORITHM)
    return encoded_jwt


# Get current user
async def get_current_user(token: str = Depends(oauth2_scheme)):
    credentials_exception = HTTPException(
        status_code=status.HTTP_401_UNAUTHORIZED,
        detail="Could not validate credentials",
        headers={"WWW-Authenticate": "Bearer"},
    )
    expired_exception = HTTPException(
        status_code=status.HTTP_401_UNAUTHORIZED,
        detail="Token has expired",
        headers={"WWW-Authenticate": "Bearer"},
    )
    try:
        payload = jwt.decode(token, SECRET_KEY, algorithms=[ALGORITHM])
        username: str = payload.get("sub")
        if username is None:
            raise credentials_exception
    except ExpiredSignatureError:
        raise expired_exception
    except JWTError:
        raise credentials_exception

    user = fake_users_db.get(username)
    if user is None:
        raise credentials_exception
    return User(username=user["username"], email=user["email"])


# Login interface
@app.post("/token", response_model=Token)
async def login_for_access_token(form_data: OAuth2PasswordRequestForm = Depends()):
    user = authenticate_user(form_data.username, form_data.password)
    if not user:
        raise HTTPException(
            status_code=status.HTTP_401_UNAUTHORIZED,
            detail="Incorrect username or password",
            headers={"WWW-Authenticate": "Bearer"},
        )
    access_token_expires = timedelta(minutes=ACCESS_TOKEN_EXPIRE_MINUTES)
    access_token = create_access_token(
        data={"sub": user["username"]}, expires_delta=access_token_expires
    )
    return {"access_token": access_token, "token_type": "bearer"}


# Example of an interface that requires authentication
@app.get("/users/me", response_model=User)
async def read_users_me(current_user: User = Depends(get_current_user)):
    return current_user


# Example of a protected resource interface
@app.get("/protected")
async def protected_route(current_user: User = Depends(get_current_user)):
    return {"message": f"Hello {current_user.username}, this is a protected interface!"}


if __name__ == "__main__":
    import uvicorn
    uvicorn.run(app, host="0.0.0.0", port=8000)
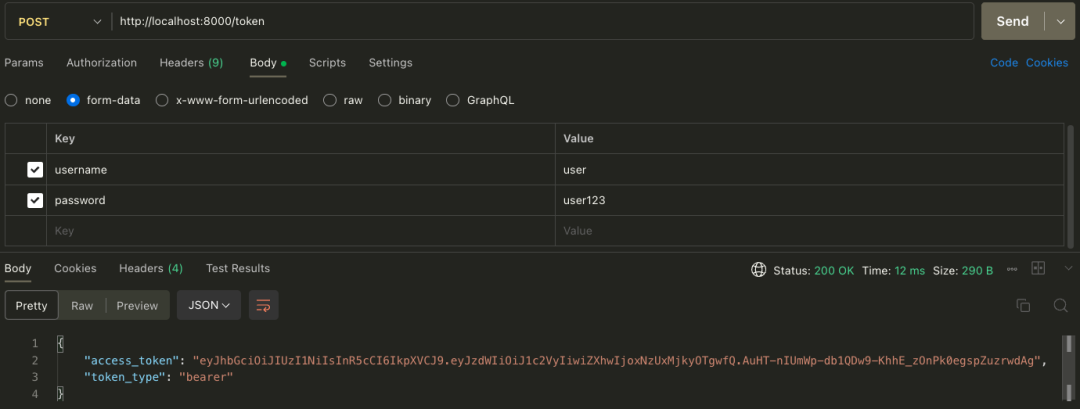
Starting the above service, the /token interface provides the corresponding user’s JWT Token, the /users/me interface uses JWT authentication to obtain the corresponding user information, and the /protected interface demonstrates a protected resource.
The Python code using the JWT mechanism above should be easy to understand.
We use two tools to test the interface service, one is Postman, and the other is the built-in Swagger page of FastAPI.
- • Postman
Taking Postman as an example, the /token interface test is as follows:
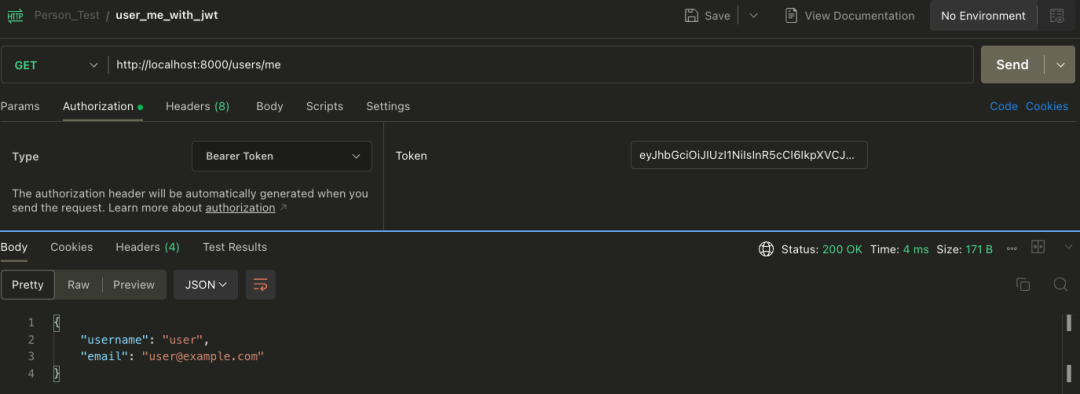
In the Authorization page, fill in the above JWT Token, request the /users/me interface, and the return result is as follows:
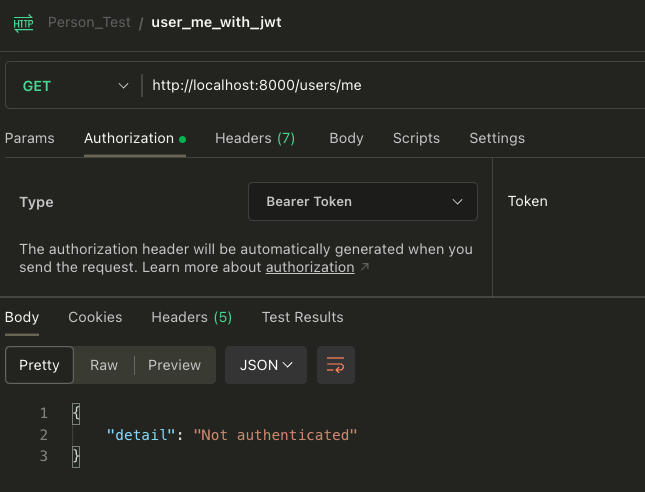
If no Token is entered, the request result is as follows:
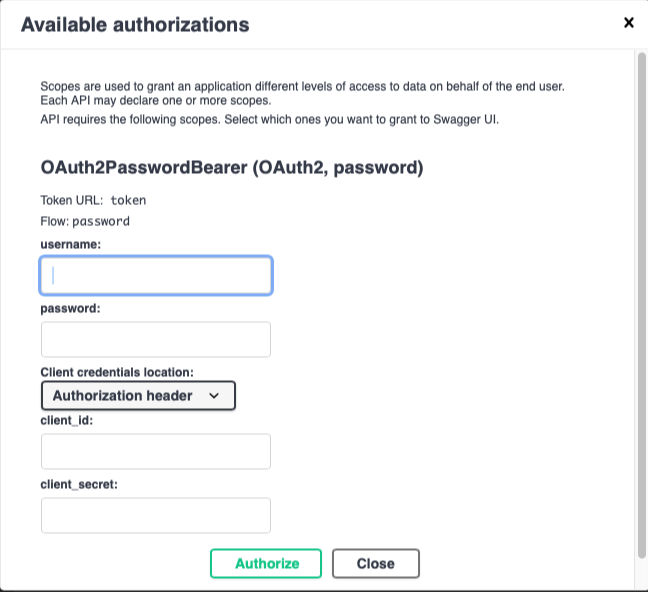
- • Swagger page
Using the built-in Swagger page of FastAPI, testing the interface will be very convenient.
The authorization page is as follows:
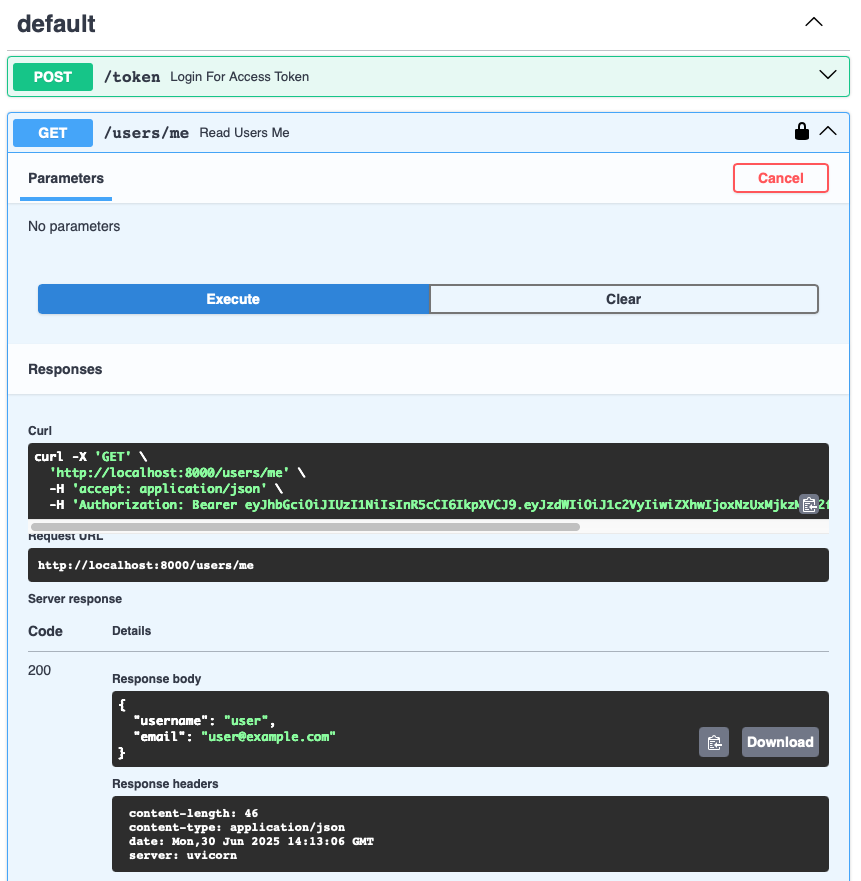
The request interface is as follows:
JWT Practical Application
JWT is often used for user authentication, so generally, any interface that requires user authentication can use the JWT mechanism for authorization and authentication.
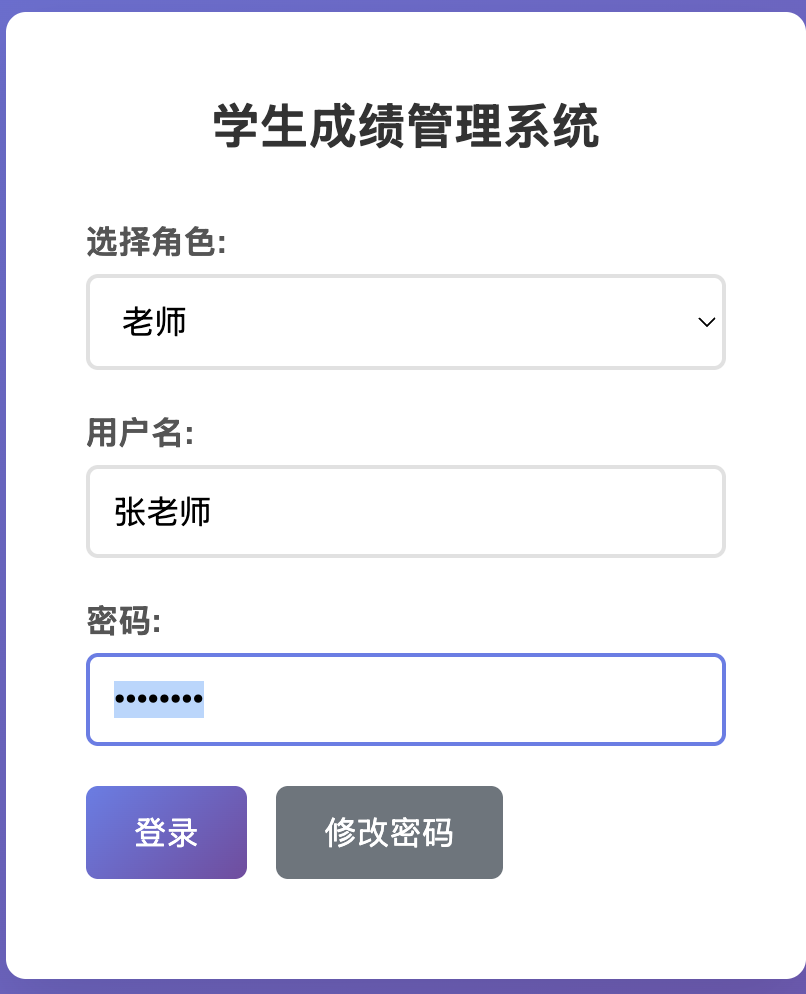
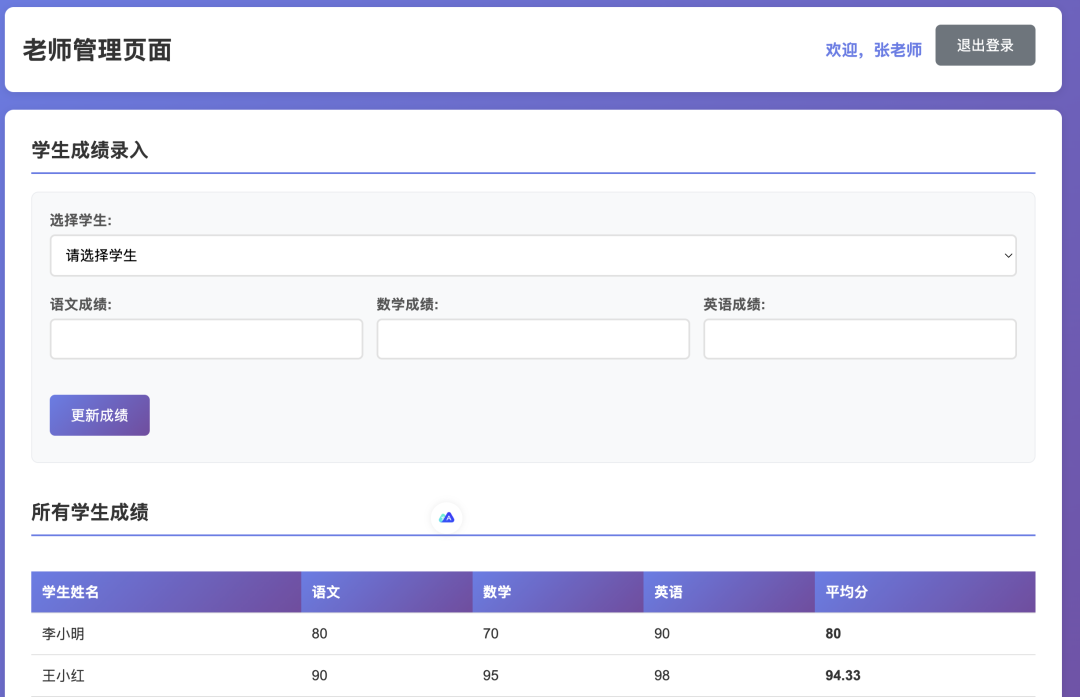
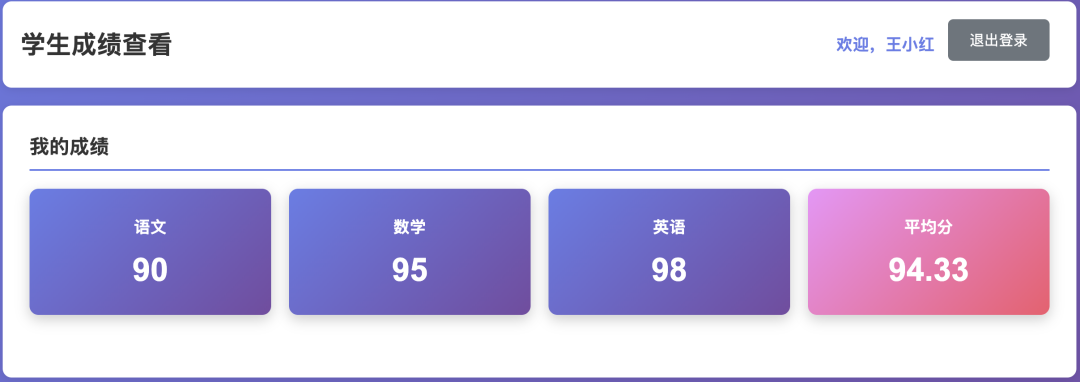
Recently, AI Coding has become very popular, and the tool I use in my daily work is Cursor. I have written a JWT practical project using Cursor, based on FastAPI and MySQL, which is a modern student grade management system that supports JWT identity authentication and has role management for both teachers and students. This project has been uploaded to GitHub, and the URL is: https://github.com/percent4/student_grade_management.
Here, I will not elaborate on the implementation code and specific user identity authentication of this project; I will only mention the main functions of this practical project. Interested readers can read the project code themselves. The main functions are as follows:
- • 🔐 Secure authentication: JWT token authentication, bcrypt password encryption
- • 👥 Role management: Teacher and student roles, permission separation
- • 📊 Grade management: Supports input and viewing of grades in Chinese, Mathematics, and English
- • 🔧 Password management: Users can modify their initial passwords
- • 📱 Responsive interface: Modern UI design, supports mobile access
- • 🚀 Real-time updates: Grade modifications take effect in real-time, data synchronized
- • 🛡️ Data security: Complete input validation and permission control
Below are screenshots of the main function pages:
Conclusion
This article mainly introduced what authentication in HTTP requests is, the basic principles and structure of JWT, and briefly demonstrated how to generate and verify JWT using Python.
In Python web frameworks, implementing JWT user identity authentication is very convenient, and this article also provided examples in this regard.
Finally, I used Cursor to implement a student grade management system, where user identity authentication utilized the JWT mechanism.
If you can read the above article completely and carefully read and test the above Python code, I believe you will master the basic knowledge of JWT.
This article ends here, and I will continue to update articles on HTTP authentication in the future~
References
- 1. Common authentication methods in front-end and back-end: https://juejin.cn/post/6844903927100473357
- 2. JWT authentication and its use in FastAPI: https://krau.top/posts/fastapi-jwt
- 3. JSON Web Token tutorial: https://www.ruanyifeng.com/blog/2018/07/json_web_token-tutorial.html
- 4. Principles, usage methods, and precautions of JWT (JSON Web Token): https://zhuanlan.zhihu.com/p/662299933
- 5. JWT verification tool website: https://jwt.io/