0. JHandler
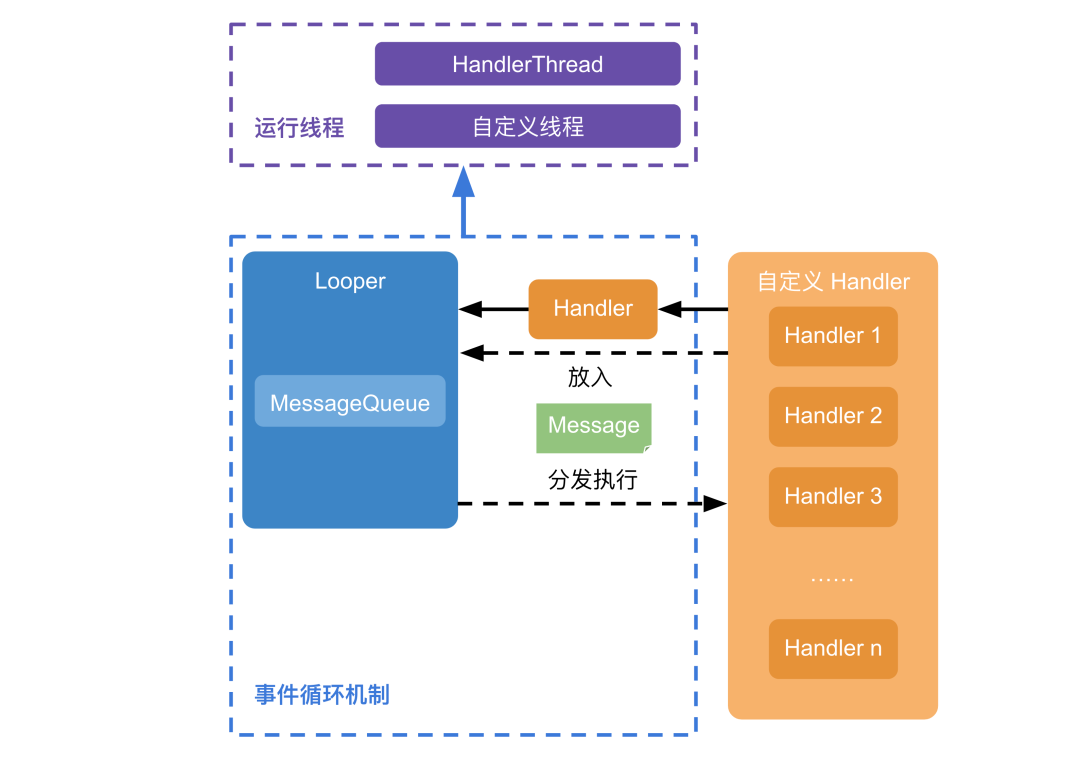
JHandler is a C++ event loop mechanism. It can be used in a user-created thread or utilize the independent thread encapsulated by JHandler to handle events.
Project address: https://github.com/zincPower/JHandler
1. Integration
Copy the <span>jhandler</span> folder into your project and add the following configuration in your project’s <span>CMakeLists.txt</span>:
include_directories("Path to the added jhandler directory relative to the current CMakeLists.txt file"/jhandler/include)
add_subdirectory(jhandler)

target_link_libraries("Target name" PUBLIC jhandler)
2. General Usage
1. Using the built-in thread of JHandler
<span>JHandler</span> has a prepared <span>HandlerThread</span>, which will create an independent thread after calling the start method, serially dispatching event messages or executing closures in the order they are placed.
// Create HandlerThread
auto handlerThread = jhandler::HandlerThread::create();
// Start HandlerThread, which will start the thread internally
handlerThread->start();

// Use HandlerThread

// Exit HandlerThread, it will complete all queued event messages and closures
handlerThread->quit();
<span>quit</span> method does not block the current thread; it allows the <span>HandlerThread</span> internal thread to close after processing all messages and closures.
2. Adding event messages and closures
After starting the <span>HandlerThread</span>, you can place closures or event messages <span>Message</span>.
Closure: Call the <span>Handler->post(std::function<void()> fun)</span> method to place a closure, as shown below:
auto name = "江澎涌";
handler->post([name]() {
jhandler::Log::i(TAG, "【runClosure】Running closure name=", name, " Looper thread id=", std::this_thread::get_id());
});

// Output
// 【CommonUse】 【runClosure】Running closure name=江澎涌 Looper thread id=0x700000339000
Event message Message: Call the <span>Handler->sendMessage(std::unique_ptr<Message> message)</span> method to place an event message.
auto message = jhandler::Message::obtain();             // Obtain event message
message->what = SAY_HI;                                 // Event type
message->data = std::make_shared<std::string>("江澎涌"); // Event data
message->arg1 = 1994;
message->arg2 = 170;
handler->sendMessage(std::move(message));               // Place event message

// Output
// 【FirstCommonUseHandler】 【handleMessage】Hello, 江澎涌(1994,170) Looper thread id=0x70000589c000
To learn how to handle event messages, please refer to the section on “Custom Event Handling Handler”.
3. Removing messages
You can remove event messages that match <span>what</span> using <span>Handler->removeMessage(int32_t what)</span>.
handler->removeMessage(SAY_HI);You can remove all closures and event messages using <span>Handler->removeAllMessages()</span>.
handler->removeAllMessages();4. Defining a Handler to process event messages
Event messages placed need the developer to inherit from <span>jhandler::Handler</span> to write a custom event handling <span>Handler</span> for processing.
In the overridden <span>handleMessage</span> method, receive the placed event messages and write the corresponding business logic. The specific implementation is as follows:
// Define event message what
static const int32_t SAY_HI = 10000;

// Define Handler
class FirstCommonUseHandler : public jhandler::Handler {
private:
    static std::string TAG;
public:
    explicit FirstCommonUseHandler(std::shared_ptr<jhandler::Looper> looper) {}
    void handleMessage(const std::unique_ptr<jhandler::Message> &message) override{
        // Receive Message here and write your business logic
        switch (message->what) {
            case SAY_HI: {
                auto name = message->getData<std::string>();
                auto year = message->arg1;
                auto height = message->arg2;
                Log::i(TAG, "【handleMessage】Hello, ", *name, "(", year, ",", height, ")", " Looper thread id=", std::this_thread::get_id());
                break;
            }
            case SHOW_DESCRIPTION: {
                Log::i(TAG, "【handleMessage】I am a C++ event loop mechanism Looper thread id=", std::this_thread::get_id());
                break;
            }
        }
    }
};

// Create HandlerThread
auto handlerThread = jhandler::HandlerThread::create();
// Start HandlerThread
handlerThread->start();
// Get Looper
auto looper = handlerThread->getLooper();
// Create your own Handler
auto handler = std::make_shared<FirstCommonUseHandler>(looper);
// Event message passing
auto message = jhandler::Message::obtain();
message->what = SAY_HI;
message->data = std::make_shared<std::string>("江澎涌");
message->arg1 = 1994;
message->arg2 = 170;
handler->sendMessage(std::move(message));

message = jhandler::Message::obtain();
message->what = SHOW_DESCRIPTION;
handler->sendMessage(std::move(message));

// Output
// 【FirstCommonUseHandler】 【handleMessage】Hello, 江澎涌(1994,170) Looper thread id=0x70000589c000
// 【FirstCommonUseHandler】 【handleMessage】I am a C++ event loop mechanism Looper thread id=0x70000589c000
5. Decoupling logic with multiple Handlers
Sometimes it is necessary to decouple the logic of processing event messages. You can consider creating multiple <span>Handler</span>s through <span>Looper</span> and sending event messages to the corresponding <span>Handler</span>. All Handlers run in the same thread and execute in the order they were added.
The specific implementation is as follows:
auto handlerThread = jhandler::HandlerThread::create();
handlerThread->start();

auto looper = handlerThread->getLooper();
// Create two Handlers
auto handler1 = std::make_shared<FirstCommonUseHandler>(looper);
auto handler2 = std::make_shared<SecondCommonUseHandler>(looper);

// Send SAY_HI type message to handler1, which will be processed by handler1
auto message = jhandler::Message::obtain();
message->what = SAY_HI;
message->data = std::make_shared<std::string>("江澎涌");
message->arg1 = 1994;
message->arg2 = 170;
handler1->sendMessage(std::move(message));

// Send SAY_HI type message to handler2, which will be processed by handler2
message = jhandler::Message::obtain();
message->what = SAY_HI;
message->data = std::make_shared<std::string>("jiang peng yong");
message->arg1 = 2025;
message->arg2 = 100;
handler2->sendMessage(std::move(message));

// You will see the following output, although it is the same type of message, it is processed by different Handlers, and the thread is the same and executed in order
//【FirstCommonUseHandler】 【handleMessage】Hello, 江澎涌(1994,170) Looper thread id=0x700009ae3000
//【SecondCommonUseHandler】 【handleMessage】Hello, jiang peng yong(2025,100) Looper thread id=0x700009ae3000
<span>FirstCommonUseHandler</span>and<span>SecondCommonUseHandler</span>please refer to the source code for details.
3. Using JHandler in a Custom Thread
In some cases, it is necessary to use the event loop mechanism in your own thread, so JHandler also supports adding the event loop mechanism in a custom thread.
For example, in HarmonyOS, it is necessary to encapsulate an OpenGL thread for camera use. OpenGL is thread-related and requires an event loop to continuously process each frame of data while managing Surface, filters, and other data. Below is a simulated example of OpenGL:
For the complete code, please refer to
<span>thread_use.cpp</span>
In a custom thread, follow these steps:
- 1. Create EGL by calling
<span>jhandler::Looper::create()</span><code><span>, then create an internal Handler to handle subsequent camera frames, filter management, etc.</span> - 2. Call the
<span>Looper::loop()</span>method to enter the event loop until the external call to<span>Looper::quit()</span>terminates the event loop. - 3. Release and recycle EGL-related resources.
void GLThread::loop(const std::shared_ptr<GLThread> &glThread) {
    Log::i(TAG, "------------------------ Entering GLThread to start GL logic ------------------------ thread id=", std::this_thread::get_id());

    Log::i(TAG, "------------------------ Simulating EGL environment creation ------------------------ thread id=", std::this_thread::get_id());
    // Sleep for 500 milliseconds to simulate EGL creation
    std::this_thread::sleep_for(std::chrono::milliseconds(500));

    Log::i(TAG, "------------------------ Entering event loop ------------------------ thread id=", std::this_thread::get_id());
    glThread->mLooper->loop();
    Log::i(TAG, "------------------------ Exiting event loop ------------------------ thread id=", std::this_thread::get_id());

    Log::i(TAG, "------------------------ Starting resource release ------------------------ thread id=", std::this_thread::get_id());

    Log::i(TAG, "------------------------ Releasing EGL ------------------------ thread id=", std::this_thread::get_id());

    Log::i(TAG, "------------------------ Releasing Handler ------------------------ thread id=", std::this_thread::get_id());
    glThread->mHandler->removeAllMessages();
    glThread->mHandler = nullptr;

    Log::i(TAG, "Releasing Looper");
    glThread->mLooper = nullptr;
    quitLoop(glThread);
    Log::i(TAG, "------------------------ Exiting GLThread ------------------------ thread id=", std::this_thread::get_id());
}
It also supports decoupling logic with multiple Handlers by obtaining the internal <span>Looper</span> to create corresponding <span>Handler</span>s.
void threadUse() {
    auto glThread = std::make_shared<GLThread>();
    glThread->start();

    // Create handlers needed for business, decoupled from GL related processes
    auto businessHandler = std::make_shared<BusinessHandler>(glThread->getLooper());
    businessHandler->sayHello();

    auto glHandler = glThread->getHandler();
    glHandler->addFilter();
    glHandler->requestRender();
    glHandler->removeFilter();

    businessHandler->sayHello();

    glThread->quit();

    // To ensure internal execution ends the entire project run.
    std::this_thread::sleep_for(std::chrono::seconds(1));

    // Output
    // 【GLHandler】 Adding filter filterName=0x600002314048 thread id=0x700009ae3000
    // 【GLHandler】 Rendering thread id=0x700009ae3000
    // 【GLHandler】 Removing filter filterName=0x600002314078 thread id=0x700009ae3000
    // 【BusinessHandler】 Hello thread id=0x700009ae3000
}
4. Author Profile
Juejin: https://juejin.im/user/5c3033ef51882524ec3a88ba/posts
CSDN: https://blog.csdn.net/weixin_37625173