Recently, a friend recommended a modern Linux open-source management panel called 1Panel, which is open-source and stable. Laziness is the first productivity, and while the command line is very flexible, a graphical interface is truly a necessity for lazy people. In this issue, we will deploy 1Panel on the Raspberry Pi, making Linux operation and maintenance easier and further lowering the threshold for using Raspberry Pi.Open-source address:https://github.com/1Panel-dev/1Panel

Installing 1Panel
curl -sSL https://resource.fit2cloud.com/1panel/package/quick_start.sh -o quick_start.sh && sudo bash quick_start.sh


If we directly access port 38414, it will prompt no permission. We must access the complete path with routing. If you forget the access path, you can check it by entering 1pctl user-info in the Raspberry Pi terminal.


Enter the complete URL, input the username and password, and log in!

On the homepage, we can see the current operating status of the Raspberry Pi and system information: CPU utilization at 90%, memory utilization at 60%. The Raspberry Pi is being utilized quite effectively and is definitely not collecting dust! (Raspberry Pi: Thank you!)

We can also check the running status of various Docker containers through the container menu.

Downloading Server Files to Local via Browser
We can directly download files from the Raspberry Pi to the local machine via the browser.

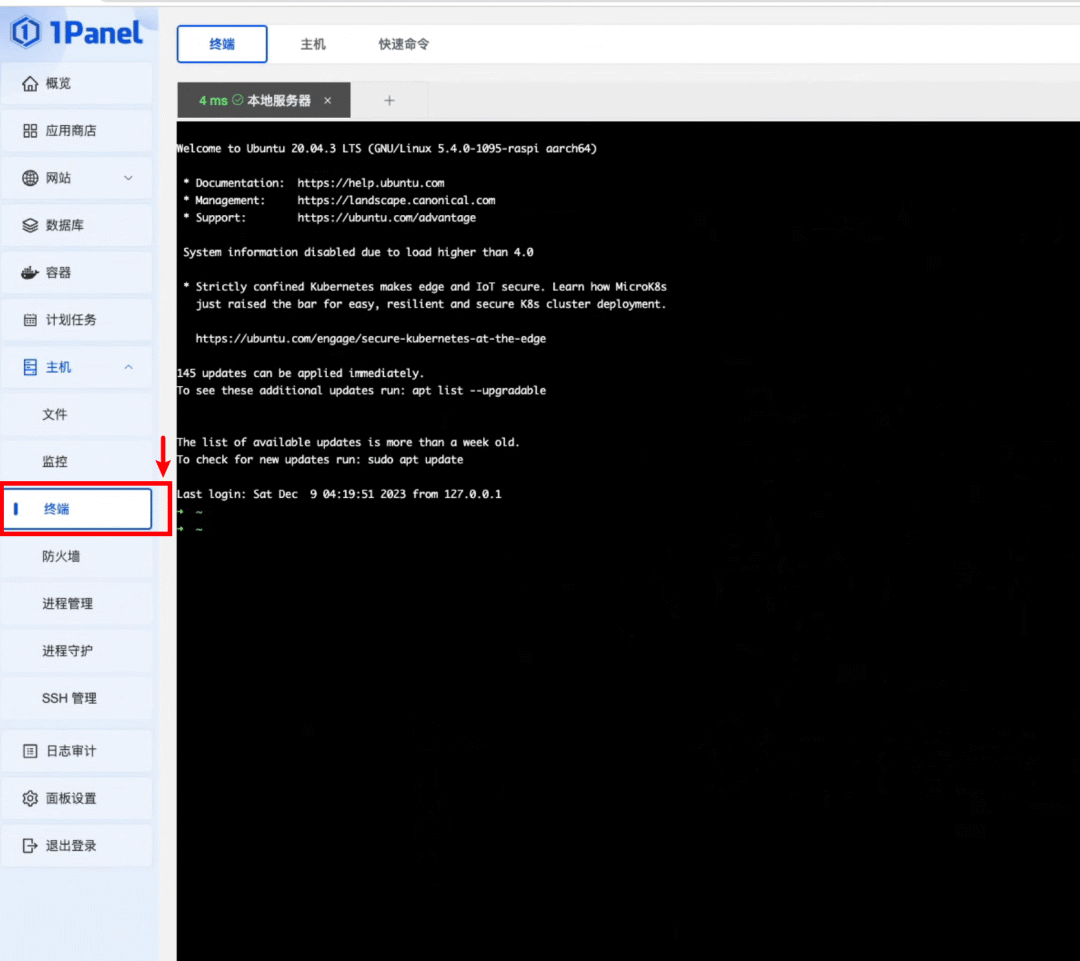
Using SSH via Browser
We can directly use terminal commands through the browser to control the Raspberry Pi.
Installing Software via App Store
1Panel also has a very convenient feature, which is one-click installation of various environments and open-source projects. Here we demonstrate the installation of a third-party client for NetEase Cloud, YouPlayMusic.

After clicking install, there will be a panel confirmation message. For convenience in demonstration, we allow external access.


According to the prompts in the image above, we can check the running yesplaymusic on the Raspberry Pi by accessing port 40075.


Mapping 1Panel to the Public Network
If you want to access your Raspberry Pi through 1Panel from anywhere with internet access, you can use traditional skills to map 1Panel to the public network using frp. Considering security, I will use HTTPS encryption to forward access to https://1panel.fangyuanxiaozhan.com/ to the local Raspberry Pi port 38414.
First, add the following configuration to the Raspberry Pi’s frpc.ini and restart the frpc service to make it effective.
[1panel-fangyuanxiaozhan-com-38414]
type = tcp
local_ip = 127.0.0.1
local_port = 38414
remote_port = 38414
Then, add the configuration file /etc/nignx/conf.d/1panel.fangyuanxiaozhan.com.conf on the cloud server.
upstream 1panel_fangyuanxiaozhan_com { server 127.0.0.1:38414; }

server {
  server_name      1panel.fangyuanxiaozhan.com;
  listen           80;

  location / {
    proxy_pass http://1panel_fangyuanxiaozhan_com;
    proxy_set_header Host $host:80;
    proxy_set_header X-Real-IP $remote_addr;
    proxy_set_header X-Forwarded-For $proxy_add_x_forwarded_for;
  }
}
Applying for Certificates via ACME
domain="1panel.fangyuanxiaozhan.com"
# Request certificate
acme.sh --issue -d $domain --nginx /etc/nginx/conf.d/$domain.conf
# Create folder
mkdir -p /etc/nginx/ssl/$domain/
# Install certificate
acme.sh --install-cert -d $domain \
--key-file       /etc/nginx/ssl/$domain/$domain.key  \
--fullchain-file  /etc/nginx/ssl/$domain/fullchain.cer \
--reloadcmd     "service nginx force-reload"
Replace the content of /etc/nignx/conf.d/1panel.fangyuanxiaozhan.com.conf with the following:
upstream 1panel_fangyuanxiaozhan_com { server 127.0.0.1:38414; }

server {
    server_name      1panel.fangyuanxiaozhan.com;
    listen           80;

    rewrite ^(.*)$ https://$host$1 permanent;

}

server {
    listen       443 ssl http2;
    listen       [::]:443 ssl http2;
    server_name  1panel.fangyuanxiaozhan.com;

    location / {
        proxy_pass http://1panel_fangyuanxiaozhan_com;
        proxy_set_header Host $host:443;
        proxy_set_header X-Real-IP $remote_addr;
        proxy_set_header X-Forwarded-For $proxy_add_x_forwarded_for;
    }

    ssl_certificate "/etc/nginx/ssl/1panel.fangyuanxiaozhan.com/fullchain.cer";
    ssl_certificate_key "/etc/nginx/ssl/1panel.fangyuanxiaozhan.com/1panel.fangyuanxiaozhan.com.key";
    ssl_session_cache shared:SSL:1m;
    ssl_session_timeout  10m;
    ssl_ciphers HIGH:!aNULL:!MD5;
    ssl_prefer_server_ciphers on;

    # Load configuration files for the default server block.

    error_page 404 /404.html;
        location = /40x.html {
    }

    error_page 500 502 503 504 /50x.html;
        location = /50x.html {
    }
}
Finally, restart the server-side Nginx:
nginx -s reload
Access 1Panel via browser on the public network.

Successfully logged in to Raspberry Pi 1Panel via public HTTPS.

The mobile version also has a good appearance.

Conclusion
If you want to keep track of the Raspberry Pi’s operating status at all times, 1Panel is a great choice. It is open-source and free, fully utilizing Docker’s features, allowing for one-click configuration of various environments and installation of various software.
The open-source address for the “Raspberry Pi Doesn’t Collect Dust” series is github.com/zhaoolee/pi