In the process of developing machine learning, once the model has been trained, the next step is to perform model inference. Depending on the deployment environment, it can be divided into three types of scenarios:
Edge Computing: Generally refers to mobile phones and embedded devices, performing inference directly on the device where the data is generated, avoiding the need to upload collected data to the cloud, thus providing excellent real-time performance.
End Computing: A computing platform that lies between cloud and edge devices, personal PCs fall into this category.
Cloud Computing: Refers to cloud computing platforms that have powerful computing and storage capabilities, releasing AI capabilities through services.
In the AI tools I shared earlier, they all performed inference on PCs, which is considered end-device inference.
Deep learning-based image segmentation tool https://github.com/AIDajiangtangDeep learning-based image stitching tool https://github.com/AIDajiangtang/Superpoint-LightGlue-Image-StichingLarge model-based segmentation tool https://github.com/AIDajiangtang/Segment-Anything-CPP https://github.com/AIDajiangtang/Segment-Anything-CSharpToday, I will demonstrate how to perform inference on edge devices.
For those preparing for graduation projects, this can serve as a reference.
The edge device I chose is the Raspberry Pi Zero W development board, with the following hardware configuration parameters:
-
1GHz single-core CPU ARM11 ARMv6
-
512MB RAM
-
Mini HDMI® port
-
Micro USB OTG port
-
Micro USB power
-
HAT-compatible 40-pin header
-
Composite video and reset headers
-
CSI camera connector (v1.3 only)
Here, I want to emphasize that for ARM chips, it is important to distinguish between chip series and CPU architecture. Different CPU architectures correspond to different instruction sets, which should be considered if compiling from source.
ARM7: Time point: The ARM7 series processors were released in 1994. Characteristics: The ARM7 series processors are early versions of the ARM architecture, using a 32-bit RISC architecture, mainly for embedded systems and low-power devices. It has lower power consumption and cost, suitable for resource-constrained applications. CPU architecture: ARMv4T architecture.
ARM9: Time point: The ARM9 series processors were released in 1997. Characteristics: The ARM9 series processors are also based on a 32-bit RISC architecture, used in various applications including embedded systems, mobile devices, and digital audio. It has higher performance and flexibility, suitable for medium power and performance requirements. CPU architecture: ARMv5TE architecture.

ARM11: Time point: The ARM11 series processors were released in 2002. Characteristics: The ARM11 series processors also use a 32-bit RISC architecture, mainly applied in mobile devices and digital media fields. It has higher performance and computing power, supporting multimedia processing and floating-point operations. CPU architecture: ARMv6 architecture.
ARM Cortex-A: Time point: The ARM Cortex-A series processors were released in 2005. Characteristics: The Cortex-A series is aimed at high-performance applications, used in smartphones, tablets, servers, and other devices requiring higher processing performance. It has more powerful processing capabilities, higher frequencies, and more complex functions. CPU architecture: Based on ARMv7-A or ARMv8-A architecture.
ARM Cortex-R: Time point: The ARM Cortex-R series processors were released in 2004. Characteristics: The Cortex-R series is aimed at real-time applications, used in embedded systems, automotive electronics, industrial control, etc., requiring quick response and reliability. It has lower latency and more reliable real-time performance. CPU architecture: Based on ARMv7-R or ARMv8-R architecture.
ARM Cortex-M: Time point: The ARM Cortex-M series processors were released in 2004. Characteristics: The Cortex-M series is aimed at low-power embedded systems, used in microcontrollers, sensors, IoT devices, and other resource-constrained applications. It has lower power consumption, small size, and efficient real-time performance. CPU architecture: Based on ARMv6-M or ARMv7-M architecture.
Common ARM Chip Series and Architecture
The Raspberry Pi Zero W we chose belongs to the ARM11 series, ARMv6 CPU architecture, supporting WiFi.
Raspberry Pi 1 Model A/B/A+/B+: CPU series: ARM11 series CPU architecture: ARMv6 architecture
Raspberry Pi 2 Model B: CPU series: ARM Cortex-A series CPU architecture: ARMv7-A architecture
Raspberry Pi 3 Model B/B+: CPU series: ARM Cortex-A series CPU architecture: ARMv8-A architecture
Raspberry Pi 4 Model B: CPU series: ARM Cortex-A series CPU architecture: ARMv8-A architecture
Raspberry Pi Zero/Zero W: CPU series: ARM11 series CPU architecture: ARMv6 architecture
Raspberry Pi Compute Module 3/3+: CPU series: ARM Cortex-A series CPU architecture: ARMv8-A architecture
Raspberry Pi Compute Module 4: CPU series: ARM Cortex-A series CPU architecture: ARMv8-A architecture
Common Raspberry Pi Development Board CPU Models
Since there are many software involved in this project, I have compiled them all together.
Follow the WeChat public account: Artificial Intelligence Lecture Hall, reply in the background with【rsb】to obtain models and all installation packages.
Let’s get started.
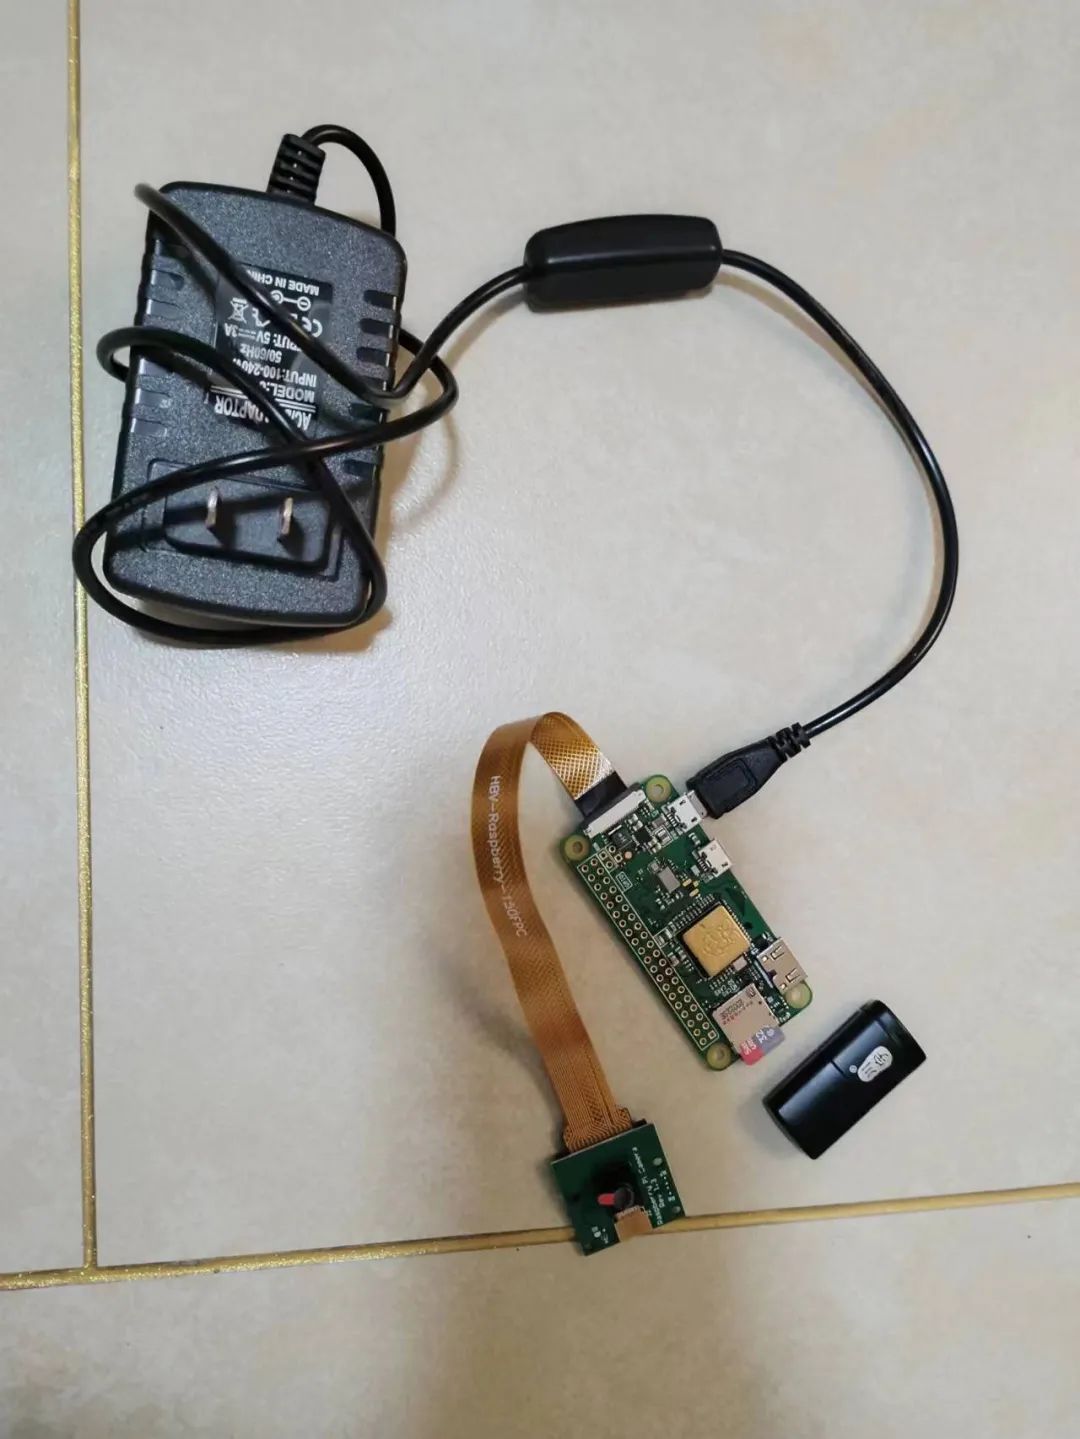
Prepare Hardware
In addition to the development board, you will also need a USB power supply, camera, micro SD card, and card reader. You can buy them on Taobao, and then connect as shown in the figure below.
Prepare Inference Framework
Logically, after the hardware is ready, the next step should be to install the operating system. Why do we need to talk about the inference framework first? It’s out of necessity!
The inference framework I chose is TensorFlow Lite, but it does not have a ready-made pip installation package for ARMv6, meaning you cannot install the inference runtime using the command below.
python3 -m pip install tflite-runtimeThere are two solutions.
The first is to install the Raspberry Pi operating system, prepare the compilation environment yourself, and compile the TensorFlow Lite whl installation package from source.
https://www.tensorflow.org/lite/guide/build_cmake_pipThe second is to find a ready-made installation package for ARM v6 architecture online.
I chose the second option.
The power of open source is strong, I found a whl installation package for ARM v6 architecture on GitHub, although it is a complete TensorFlow installation package, but can be used to export TensorFlow Lite for inference functionality.
import tensorflow as tf
interpreter = tf.lite.Interpreter(model_path=args.model_file)
Installation package download link
https://github.com/lhelontra/tensorflow-on-arm/releases/download/v2.4.0/tensorflow-2.4.0-cp37-none-linux_armv6l.whlIt is important to note that this pip installation package was compiled in a python3.7 environment, so the Raspberry Pi development board must also have an operating system with python3.7, which is why I confirmed the inference framework first.
Prepare Operating System
Next, we need to find a Raspberry Pi operating system that comes with python3.7.
In addition to python3.7, another factor to consider is memory. The Raspberry Zero W we chose has only 500MB of memory, so for efficiency, it is recommended to choose a Lite version of the operating system without a desktop.
For development boards with larger memory, you can choose an operating system with a desktop, or even an operating system pre-installed with various software environments.

Fortunately, I found an operating system with python3.7 in the Archive.
Operating system download link
https://downloads.raspberrypi.org/raspios_lite_armhf/images/raspios_lite_armhf-2021-05-28/After downloading, save it to another computer’s hard drive for later use.
Next, use the Raspberry Pi’s built-in tool, Raspberry Pi Imager, to burn the operating system onto the micro SD card.
Insert the SD card into the card reader and connect it to another computer’s USB port.
https://www.raspberrypi.com/software/
Start the burning software

1. Select Operating System -> Use Custom Image

2. Select SD Card
3. Settings
3.1 Check Set Hostname, enter hostname
3.2 Check Enable SSH service, choose password login

3.3 Check Set Operating System Username and Password, enter username andpassword
3.4 Check Configure WIFI, set hotspot name and login password (can use mobile hotspot)

4. Burn
After successful burning, insert the micro SD card into the Raspberry Pi’s SD card slot, connect the power supply, and it can boot up.
Remote Connect to Raspberry Pi
Since there is no desktop environment, you need another computer to connect remotely to the Raspberry Pi. At this point, the Raspberry Zero W’s WiFi support comes into play. During the installation of the operating system, we configured the network, and the Raspberry Pi will actively connect to the hotspot after booting. Another computer connected to the same hotspot can connect remotely.
Check the Raspberry Pi’s IP address via the mobile hotspot.
The other computer connects to the same mobile hotspot.
Start Windows PowerShell on the other computer.
Enter ssh Raspberry Pi username@Raspberry Pi IP
For example, ssh [email protected], you will be prompted to enter the password.
Just having remote access is not enough; you also need to be able to transfer files between the two systems. I recommend installing WinSCP on the other computer.
Start WinSCP, enter the Raspberry Pi hostname, username, and password.

Install Software
Install TensorFlow
wget https://github.com/lhelontra/tensorflow-on-arm/releases/download/v2.2.0/tensorflow-2.2.0-cp37-none-linux_armv6l.whlsudo pip3 install tensorflow-2.2.0-cp37-none-linux_armv6l.whlAfter installation, check whether it was successful with the command below
python -c "import tensorflow as tf;print(tf.reduce_sum(tf.random.normal([100, 100])))"If you encounter an error like the one below
TypeError: Descriptors cannot not be created directly.You can try to resolve it with the command below
Set PROTOCOL_BUFFERS_PYTHON_IMPLEMENTATION=pythonInstall OpenCV
sudo apt-get -y install libjpeg-dev libtiff5-dev libjasper-dev libpng12-dev
sudo apt-get -y install libavcodec-dev libavformat-dev libswscale-dev libv4l-dev
sudo apt-get -y install libxvidcore-dev libx264-dev
sudo apt-get -y install qt4-dev-tools libatlas-base-dev
sudo apt-get install libgstreamer1.0-dev
sudo apt-get install libopenexr-dev
sudo apt-get install libilmbase-dev
Depending on the environment, some may have already been installed, while others may still be missing. Install as needed.
pip3 install opencv-python==3.4.6.27You can also remove the version above and install the latest version.
Start Inference
Once the software and hardware are ready, you can start performing inference.
Prepare tflite model
Since TensorFlow Lite only supports models in tflite format, if you trained with other frameworks, you will need to convert them to tflite format.
Since my goal is to demonstrate how to run inference on embedded devices, the choice of model is not important.
I have prepared a fruit classification and detection model for everyone. Follow the WeChat public account: Artificial Intelligence Lecture Hall, reply with 【rsb】 to obtain the model and all previous installation packages.
The model is in the model folder, cls_model.tflite is the classification model, and det_model.tflite is the object detection model.

Classification Model Category Labels

Object Detection Model Category Labels
Open Camera
The Raspberry Pi development board takes images using an external camera.
sudo raspi-configSelect Interface Options—camera, choose yes, and enable camera permissions, so we can use the Raspberry Pi to take pictures.
Execute the following command in the command line to test. If you see a new image.jpg file in the folder, the configuration is successful.
raspistill -t 2000 -o image.jpgStart Inference
import tensorflow as tf
import numpy as np
import cv2

det = true  # is it classification or object detection
model_path = "cls_model.tflite"
if det:
    model_path = "det_model.tflite"
# Load classification tflite file
interpreter = tf.lite.Interpreter(model_path)
interpreter.allocate_tensors()
label_id_offset = 1

# Again, uncomment this decorator if you want to run inference eagerly
def detect(interpreter, input_tensor):
    """Run detection on an input image.
    Args:
        interpreter: tf.lite.Interpreter
        input_tensor: A [1, height, width, 3] Tensor of type tf.float32.
        Note that height and width can be anything since the image will be immediately resized according to the needs of the model within this function.
    Returns:
        A dict containing 3 Tensors (`detection_boxes`, `detection_classes`, and `detection_scores`).
    """
    input_details = interpreter.get_input_details()
    output_details = interpreter.get_output_details()
    # We use the original model for pre-processing, since the TFLite model doesn't
    # include pre-processing.
    preprocessed_image, shapes = detection_model.preprocess(input_tensor)
    interpreter.set_tensor(input_details[0]['index'], preprocessed_image.numpy())
    interpreter.invoke()
    boxes = interpreter.get_tensor(output_details[0]['index'])
    classes = interpreter.get_tensor(output_details[1]['index'])
    scores = interpreter.get_tensor(output_details[2]['index'])
    return boxes, classes, scores

# Define camera
capture = cv2.VideoCapture(0)
while True:
    # Take a picture and preprocess it
    ret, frame = capture.read()
    frame = cv2.flip(frame, 1)
    frame_rgb = cv2.cvtColor(frame, cv2.COLOR_BGR2RGB)
    if det:
        resized_image = cv2.resize(frame_rgb, (300, 300))
    else:
        resized_image = cv2.resize(frame_rgb, (224, 224))
    resized_image = resized_image.astype(np.float32)
    # Scale pixel values to range 0-1
    resized_image /= 255.0
    # Scale pixel values to range -1 to 1
    resized_image = (resized_image - 0.5) * 2.0
    test = np.expand_dims(resized_image, axis=0)
    input_tensor = tf.convert_to_tensor(test, dtype=tf.float32)
    # Object detection model detection
    boxes, classes, scores = detect(interpreter, input_tensor)
    viz_utils.visualize_boxes_and_labels_on_image_array(
        test[0],
        boxes[0],
        classes[0].astype(np.uint32) + label_id_offset,
        scores[0],
        category_index,
        use_normalized_coordinates=True,
        min_score_thresh=0.8)
    # Present detection results
    frame = cv2.cvtColor(test[0], cv2.COLOR_BGR2RGB)
    cv2.imshow("Object detector", frame)
    c = cv2.waitKey(20)
    # If q is pressed, terminate
    if c == 113:
        break
cv2.destroyAllWindows()
Final Result

