
Hello everyone, today Zhu Ge will continue to chat about the Linux system, and this time our protagonist is: CentOS. It is also my favorite and most commonly used Linux distribution. The full name of CentOS is: Community Enterprise Operating System, which is recompiled from the source code released by Red Hat Enterprise Linux (RHEL). It can be said that CentOS is the open-source, free version of RHEL. You may wonder: since RHEL already exists, why create CentOS? Don’t worry, let Zhu Ge explain slowly!
In 1994, a young man named Marc Ewing created his own Linux distribution: Red Hat Linux. Little Ewing’s grandfather once gave him a red hat, which he particularly liked and often wore. Ewing was a well-known programming talent in school, and classmates often went to him for help with problems. He was also very helpful and often helped female classmates (and male classmates…) fix computers. Gradually, people who knew him gave him a nickname: Red Hat, which is also the origin of the name.
In 1995, Bob Young, who was selling CDs abroad, found that a system disk called Red Hat Linux was selling very well, so he privately contacted the software author Marc Ewing for cooperation. After the two met, it was like thunder and fire, and they hit it off immediately! Soon, Young acquired Ewing’s company and reorganized it into a new company: Red Hat.
In 1999, Red Hat went public successfully, creating a stock market myth that year! Red Hat’s customers are large enterprises, and the company’s income mainly comes from enterprise services. Although Red Hat fully owns the trademark and copyright of RHEL, RHEL is still a distribution developed based on the Linux kernel. Since the Linux kernel uses the GPL open-source license agreement, Red Hat must also comply with the GPL agreement to open the source code of RHEL. Around 2004, some enthusiasts in the community planned to remove the Red Hat trademark and proprietary software from the open RHEL source code and then recompile a new Linux distribution, which is CentOS!
In 2014, Red Hat announced cooperation with the CentOS open-source project, and the CentOS team would be incorporated by Red Hat (getting paid).
In 2018, IBM announced the acquisition of Red Hat for $34 billion, and CentOS still maintains the operation mode of the community.
In simple terms: CentOS inherits the stability and reliability of RHEL and is currently one of the most popular Linux distributions among enterprises.
1. System Installation
1.1 Preparation
CentOS released the latest version CentOS 8.0 on September 25, 2019, but in production environments, we still prefer to choose the relatively stable version. CentOS 7, released in 2014, has passed the critical five-year test. Next, let’s install the CentOS 7 operating system in VMware with Zhu Ge.
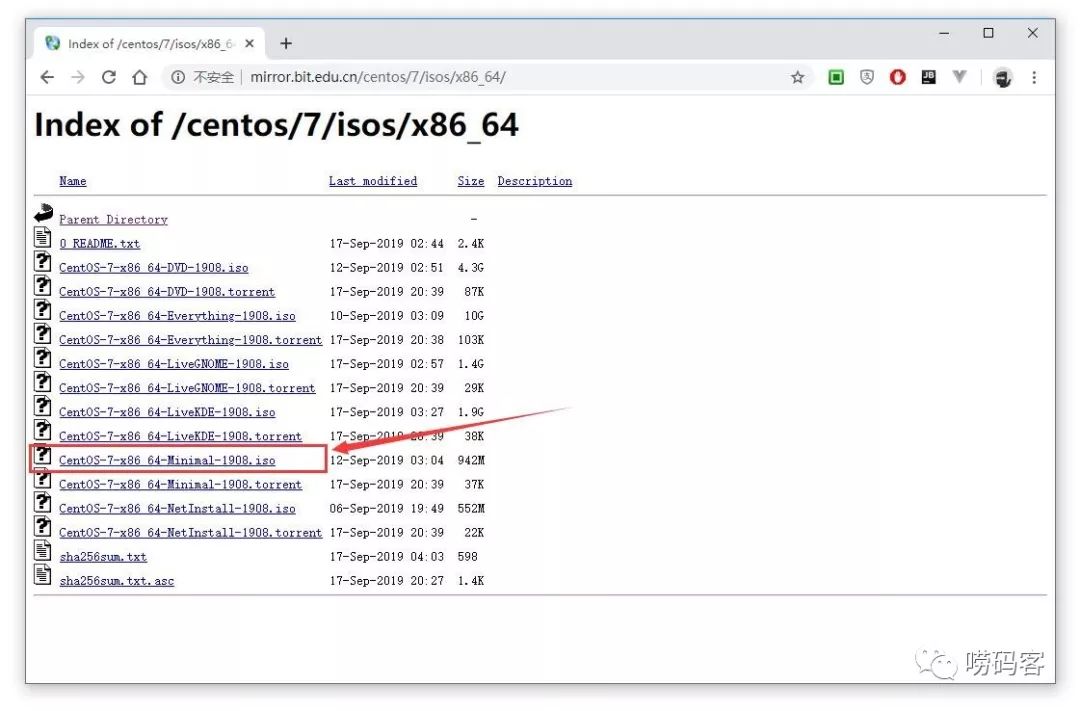
First, we need to download the installation image file of CentOS 7. You can download the latest installation file from the official website or domestic mirror sources:
Next, we also need to do the following preparations:
-
Install
VMware WorkstationorVirtualBoxand other virtualization software on your computer; -
Create a virtual machine, add a disk, and set the virtual machine network (you can set it to bridge mode first);
-
Add the downloaded image file to the CD drive;
-
Start the virtual machine and begin the installation.
1.2 Installation
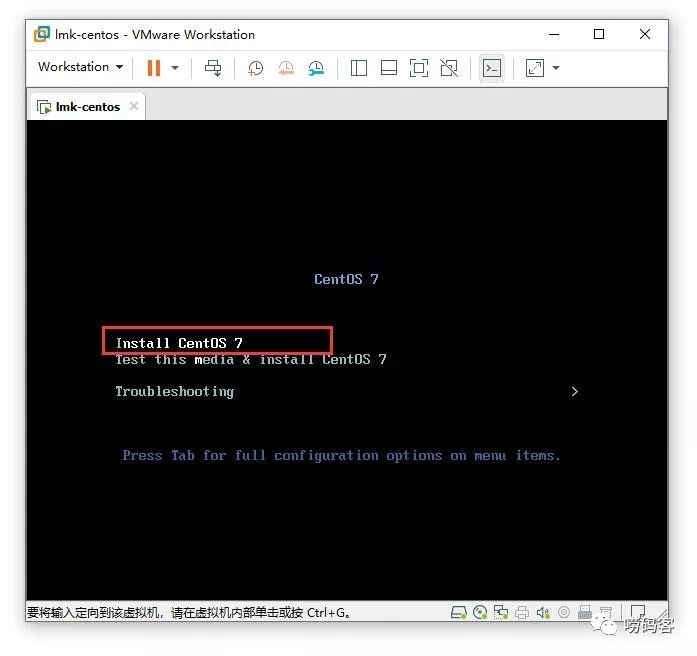
Running Mode: When the virtual machine starts from the CD drive, the screen will prompt you to select the running mode. We use the up and down arrow keys to select the first menu item 【Install CentOS 7】, and then press Enter:
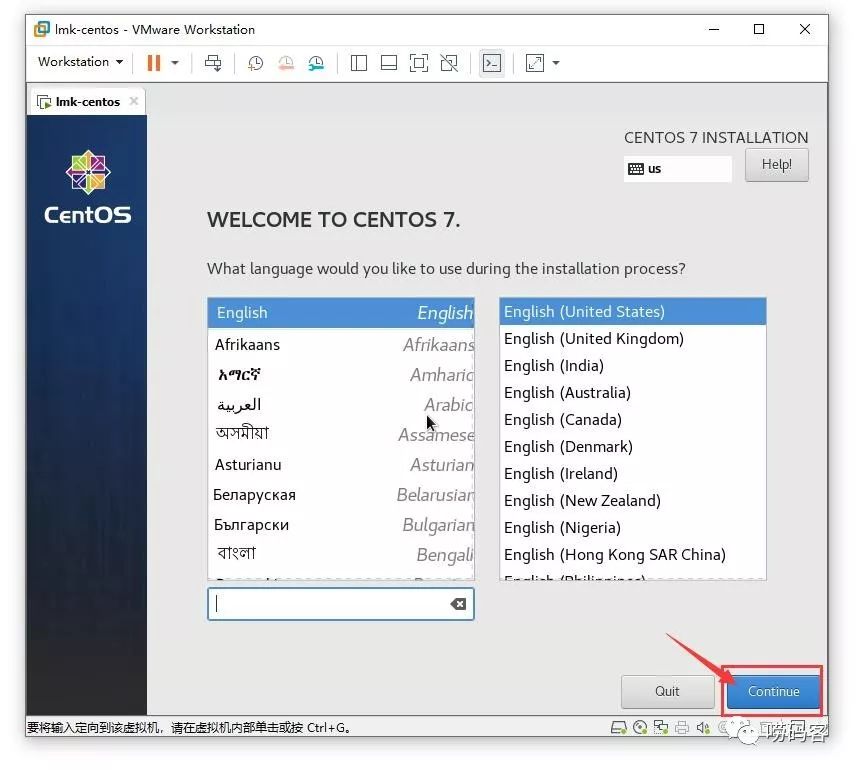
Language Selection: Here we need to select the language type for the window interface during the installation process. We keep the default English and then click the 【Continue】 button:
Entering the main installation interface, we can set: 【System Time】, 【Disk Partition】, 【Network Configuration】, etc.
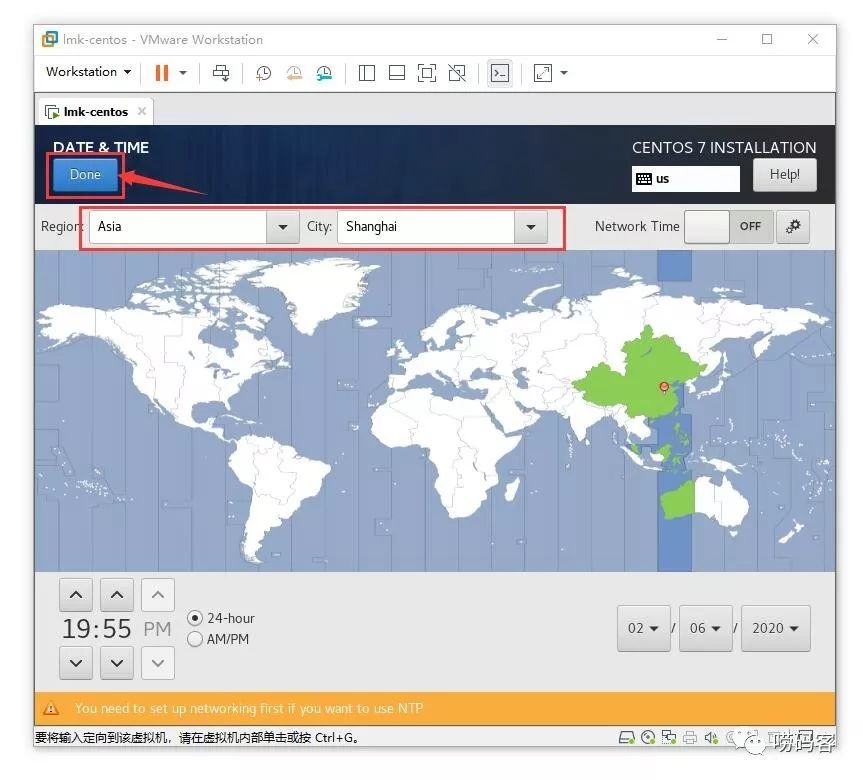
First, click the 【DATE & TIME】 menu item at the top to set the system time and time zone:
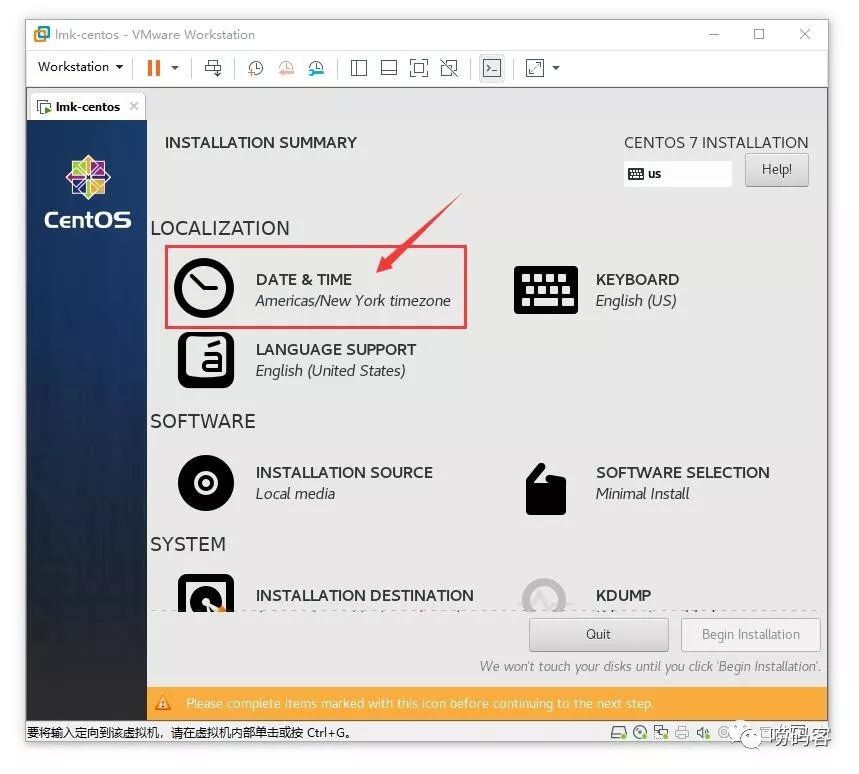
System Time: Here we mainly set the time zone, click on the area on the world map with the mouse, select 【Shanghai】, and then click the 【Done】 button in the upper left corner to complete the settings:
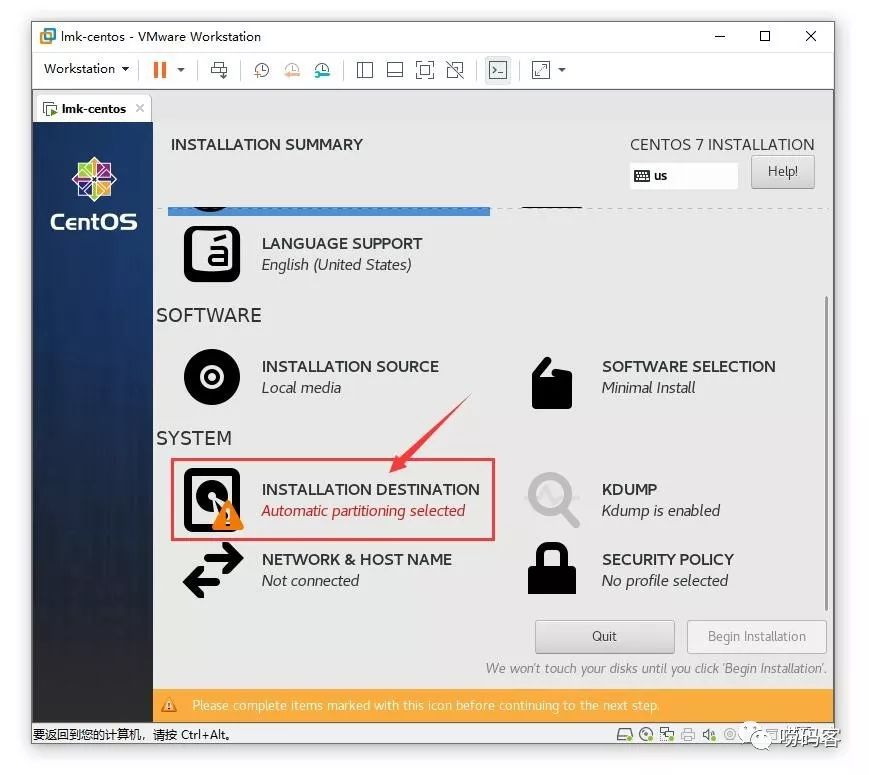
Back to the main interface, then click 【INSTALLATION DESTINATION】 to set up the disk partition:
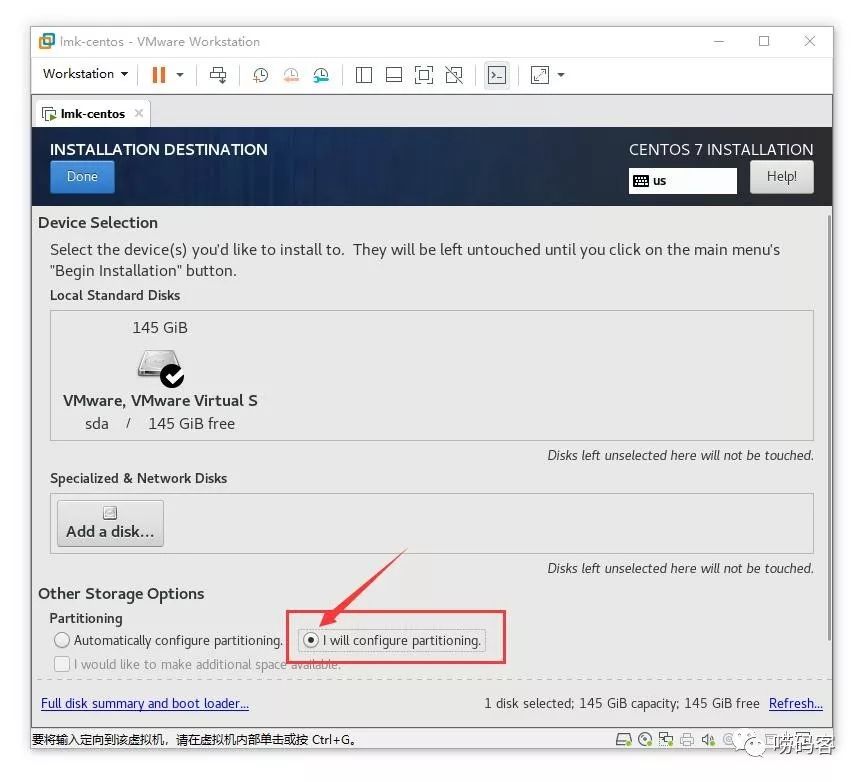
Zhu Ge will demonstrate manual partitioning for everyone, so in the 【Other Storage Options】 option, click to select 【I will configure partitioning.】 Then click the 【Done】 button in the upper left corner to start setting the partition:
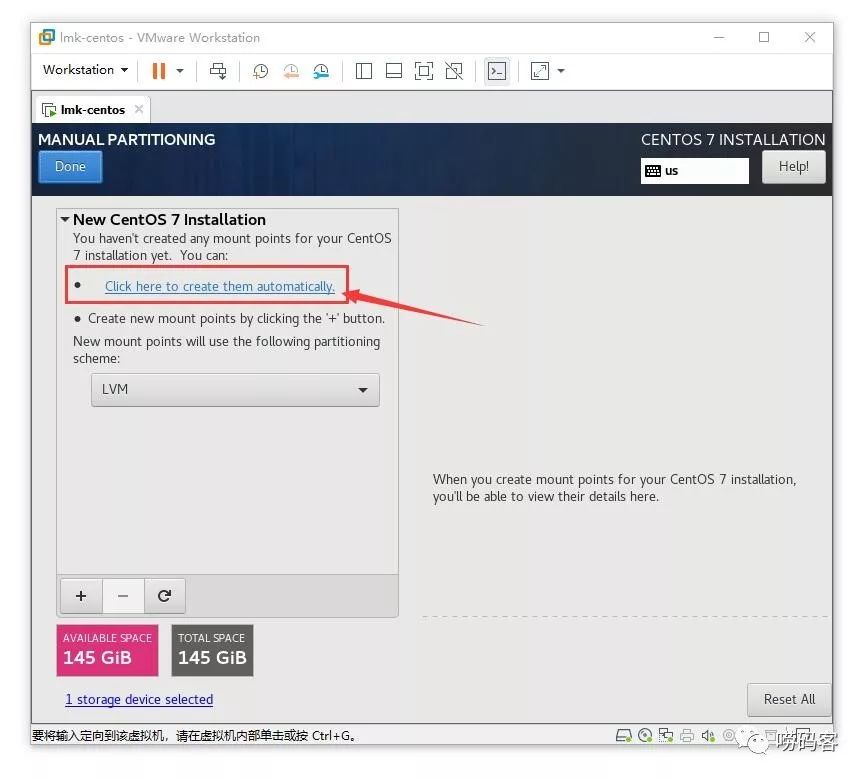
CentOS 7 uses LVM for partition management by default, we first click 【Click here to create them automatically.】, the installer will automatically create a partition scheme:
The automatically created partition scheme may not meet our actual needs, we still need to make some manual adjustments. Zhu Ge recommends keeping at least three partitions: ① /boot for system boot; ② swap swap space; ③ / system directory.
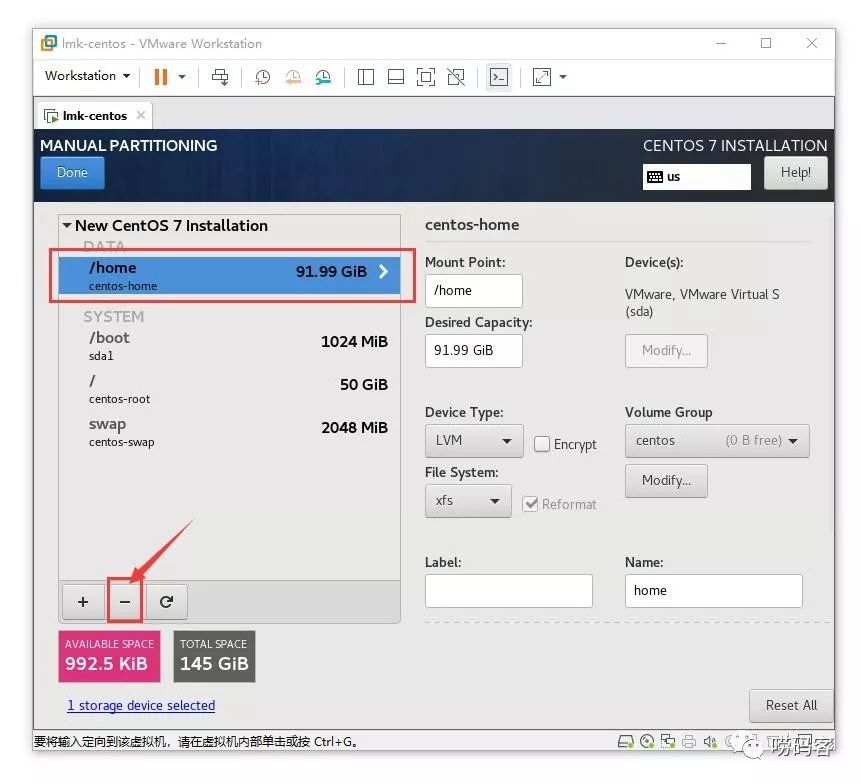
Select the /home partition with the mouse, then click the 【-】 button in the lower left corner to delete this partition first:
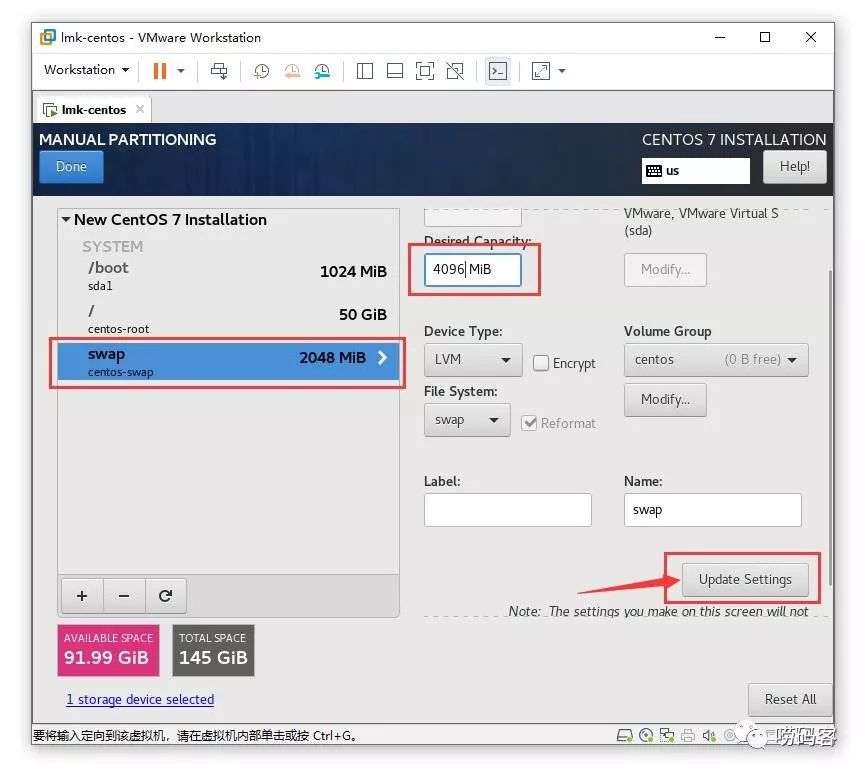
Set up the swap partition: We reserve 4GB of virtual memory for the system. Click on the swap partition with the mouse, in the right-side editing panel, increase its capacity to 4096 MiB, then click the 【Update Settings】 button in the lower right corner to update the settings:
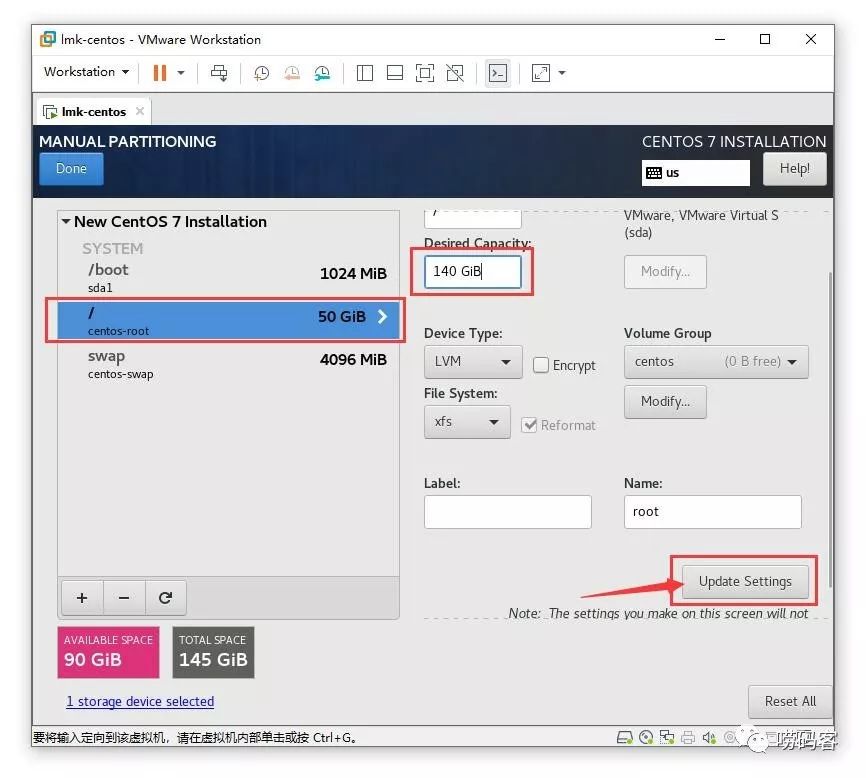
Set up the root partition: Mount all remaining disk space to the system root directory /. Click on the / partition with the mouse, in the right-side editing panel, adjust its capacity to the maximum (it can exceed the total disk capacity, the installation tool will automatically calculate and recognize it). Then click the 【Update Settings】 button in the lower right corner to update the settings:
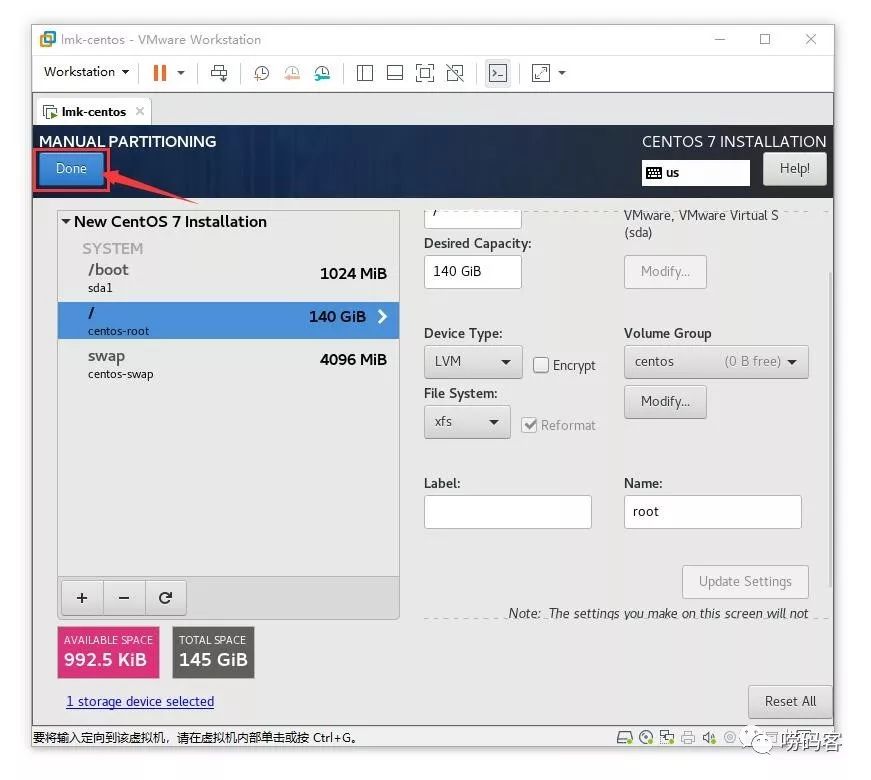
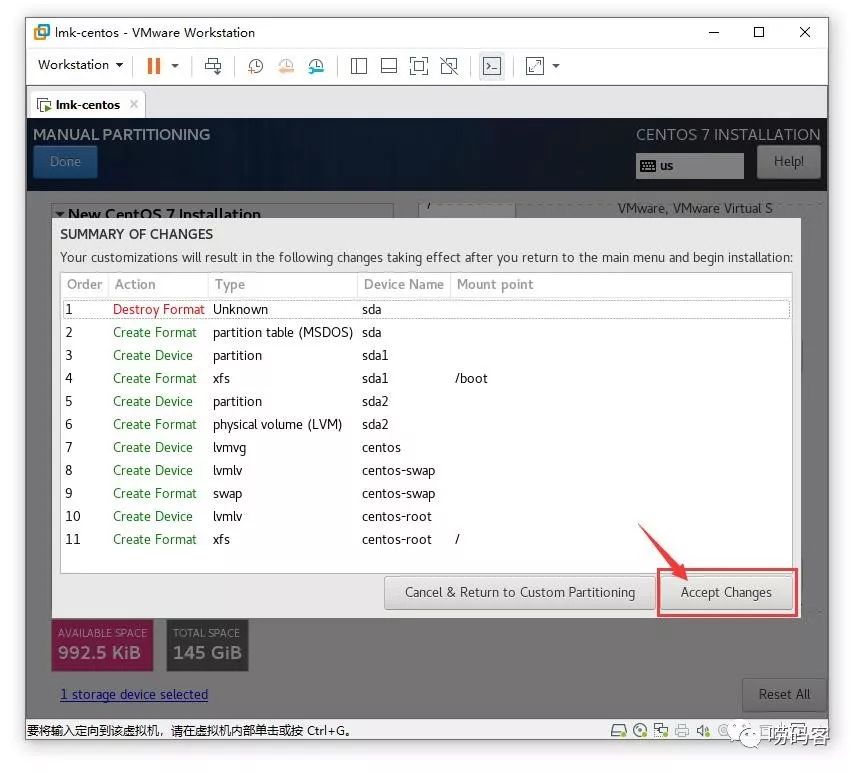
After the partition rule configuration is complete, click the 【Done】 button in the upper left corner to submit the partition scheme:
At this time, the installer will confirm the partition rules again, we click the 【Accept Changes】 button in the lower right corner to apply the configuration:
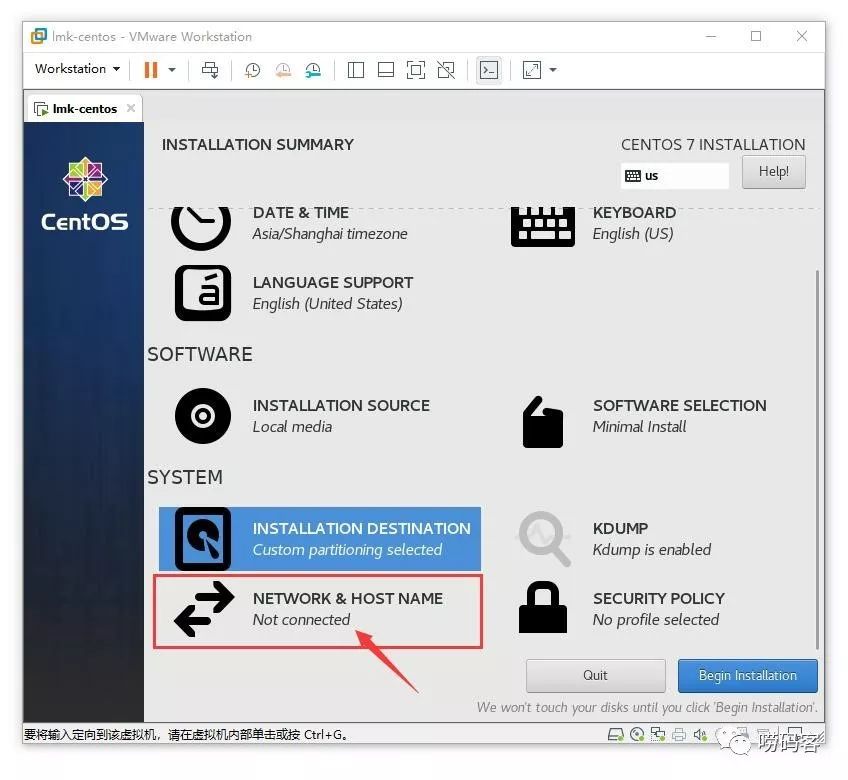
Back to the main interface, next we need to modify the network configuration of the system. Click the 【NETWORK & HOST NAME】 menu:
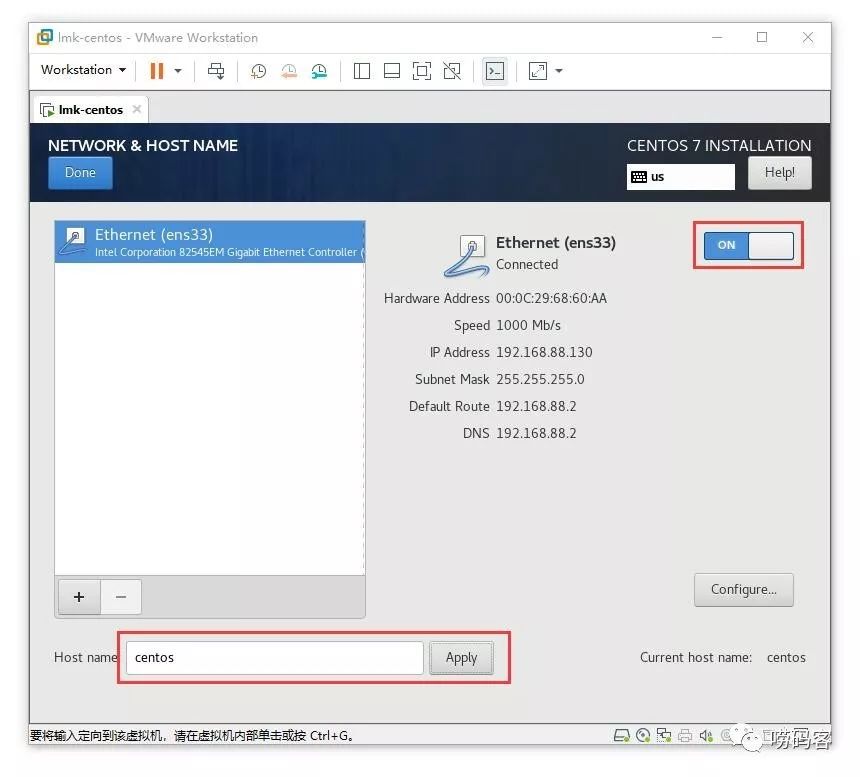
Set Hostname: At the bottom of the left panel, you can modify the hostname according to your preference. After entering, remember to click the 【Apply】 button.
Network Configuration: At the top of the right panel, click the switch button to enable the network adapter. The system defaults to obtain the IP address dynamically via DHCP. If you want to set a fixed IP address, you can click the 【Configure…】 button in the lower right corner for manual settings:
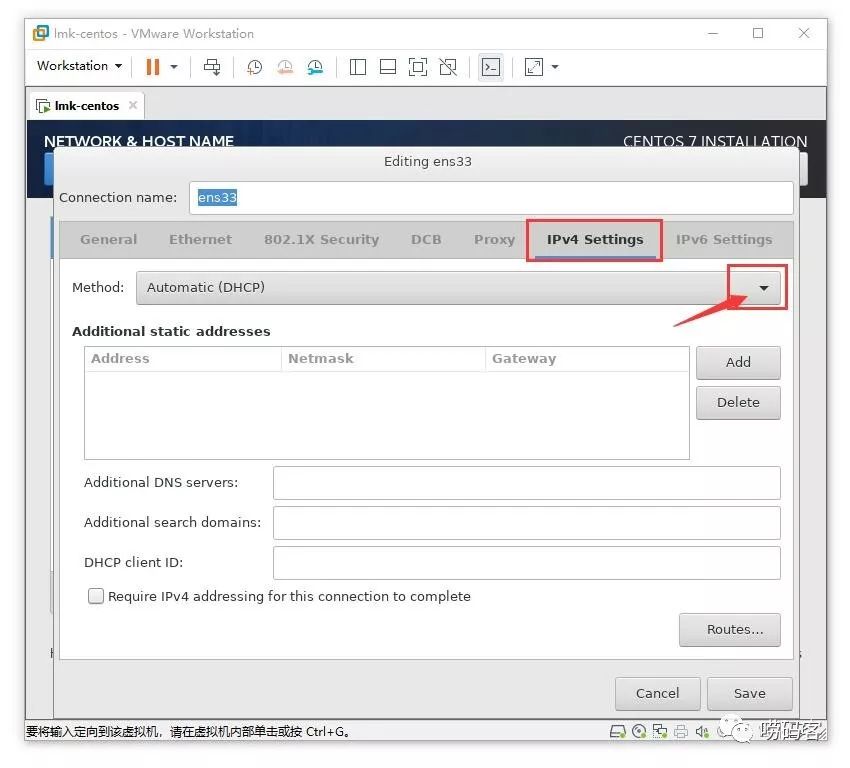
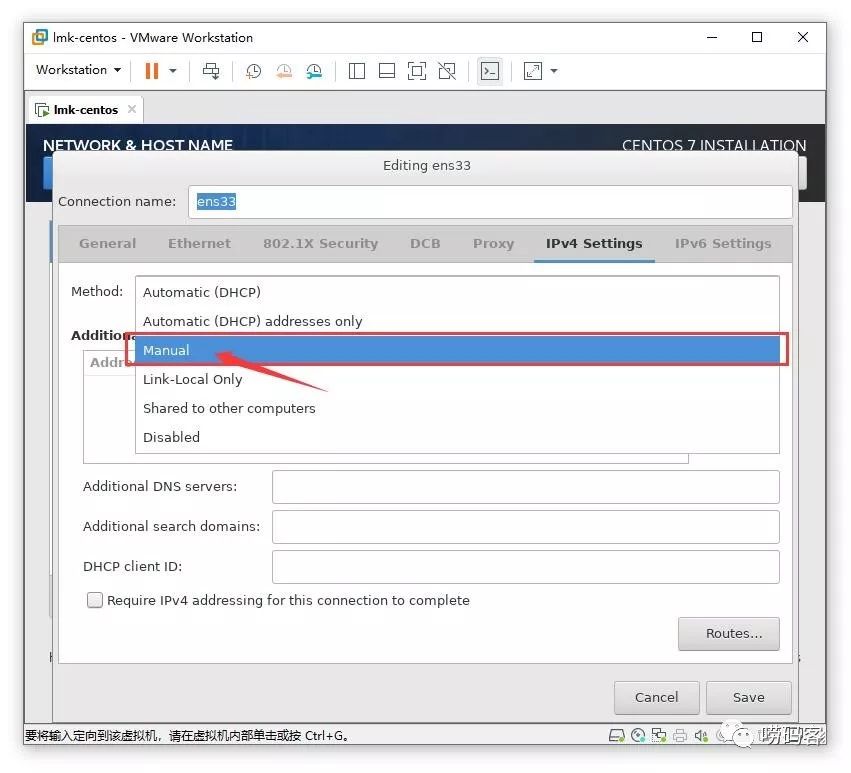
Click the 【IPv4 Settings】 tab at the top of the window. Then click the 【Method】 drop-down box, select 【Manual】, and the configuration window will open:
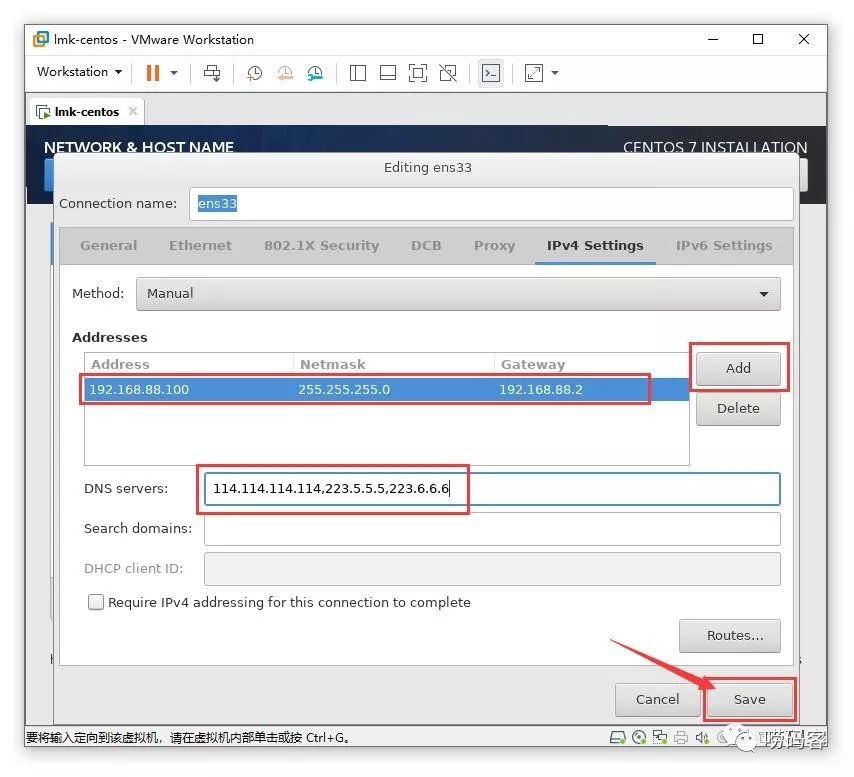
In the configuration window, click the 【Add】 button on the right to add the configuration. Then in the 【Address】 box, set the IP address, subnet mask, default gateway, and other parameters in detail. In the 【DNS servers】 input box, you can set the IP of the DNS server. We added three:114.114.114.114, 223.5.5.5, and 223.6.6.6, separated by commas. Finally, click the 【Save】 button in the lower right corner to save the configuration. For example:
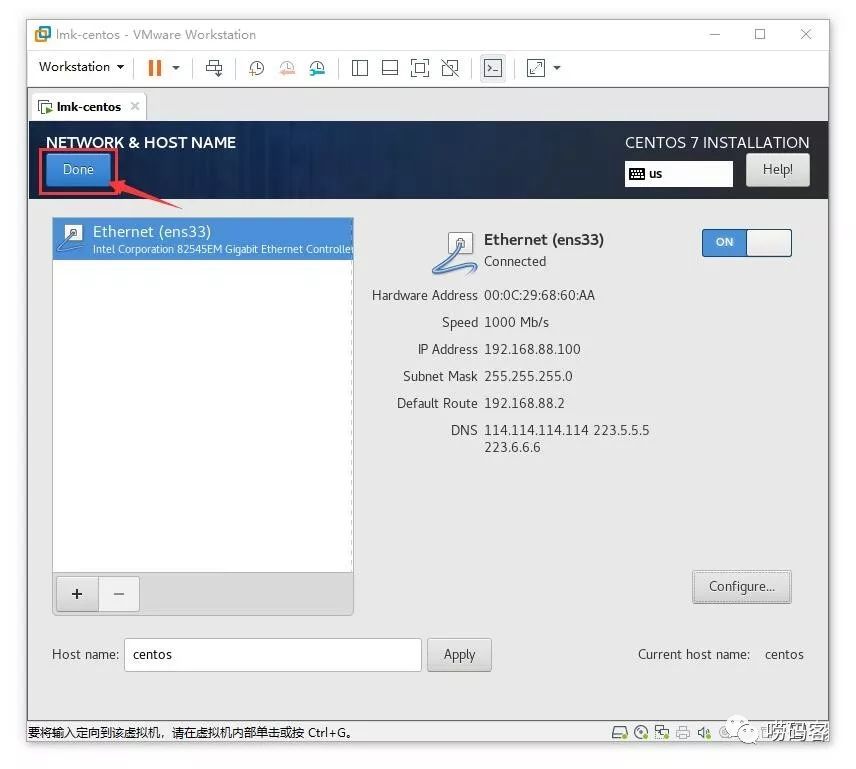
Back to the network configuration interface, click the 【Done】 button in the upper left corner to complete the configuration:
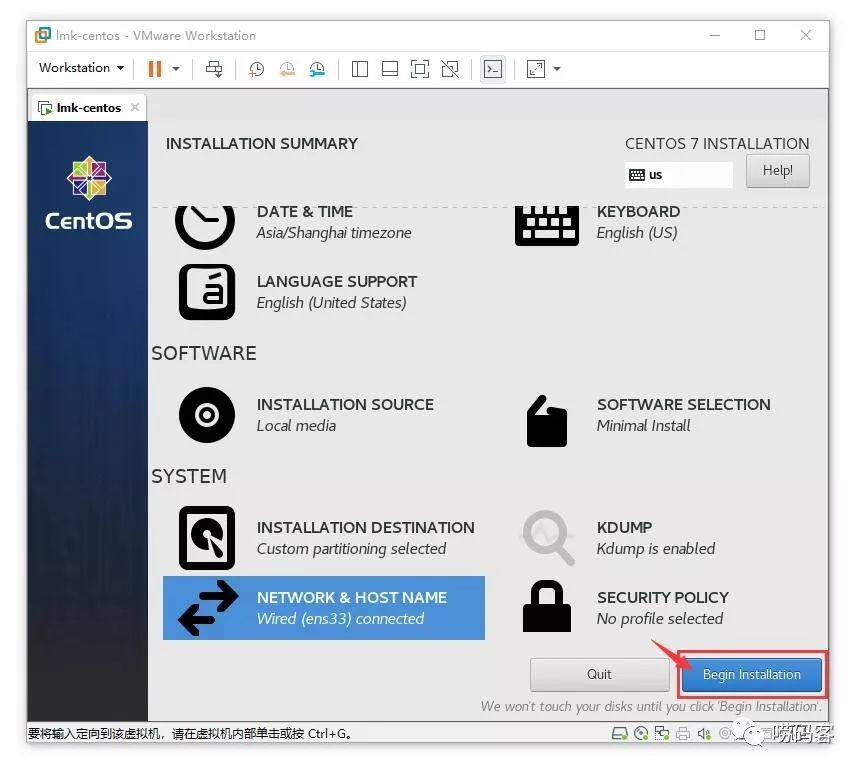
At this point, the main pre-installation configuration has been completed. Next, we click the 【Begin Installation】 button in the lower right corner to start the system installation:
During the system installation, you can create a system user and modify the ROOT user’s password.
Click 【USER CREATION】 to start creating a system user:
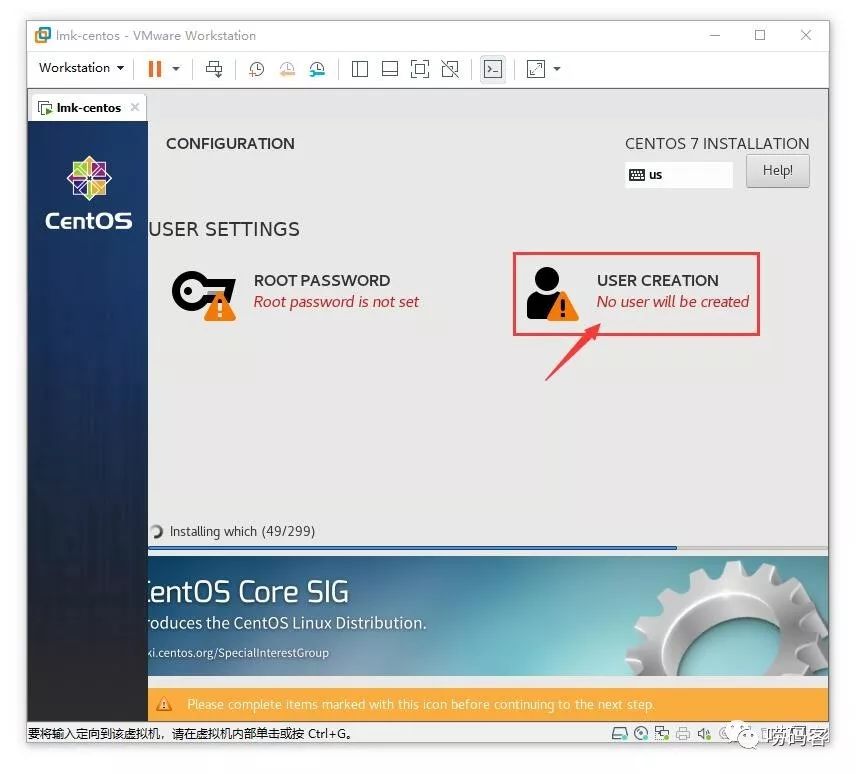
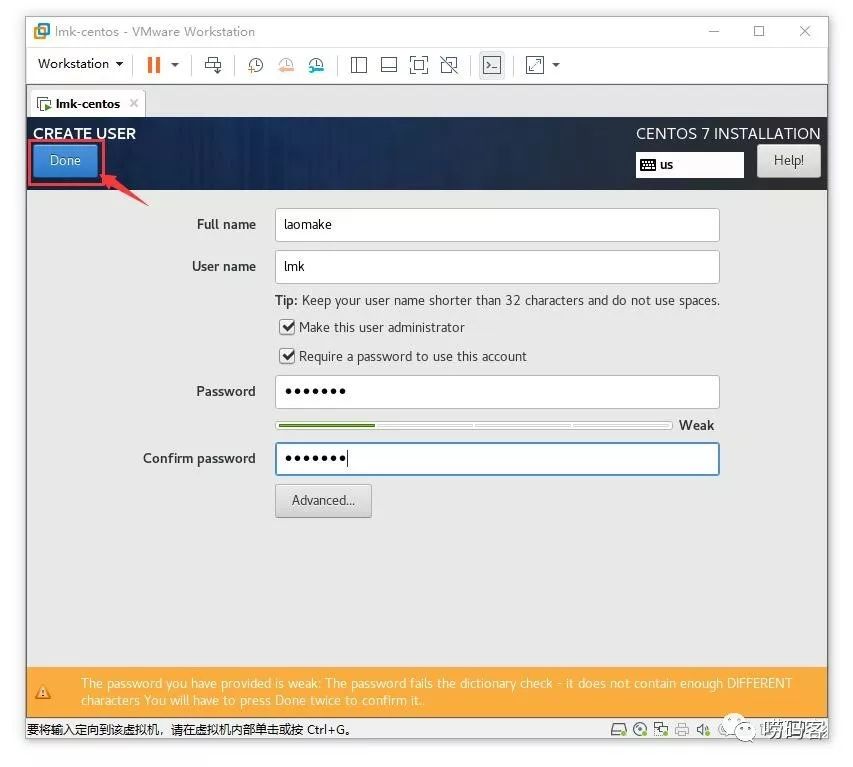
Set the user’s full name, username, and password according to your preference, then click the 【Done】 button in the upper left corner to complete the creation.
Note: If you set a weak password, the system will pop up a yellow background prompt at the bottom, as shown in the figure below. At this time, you need to click the 【Done】 button twice.
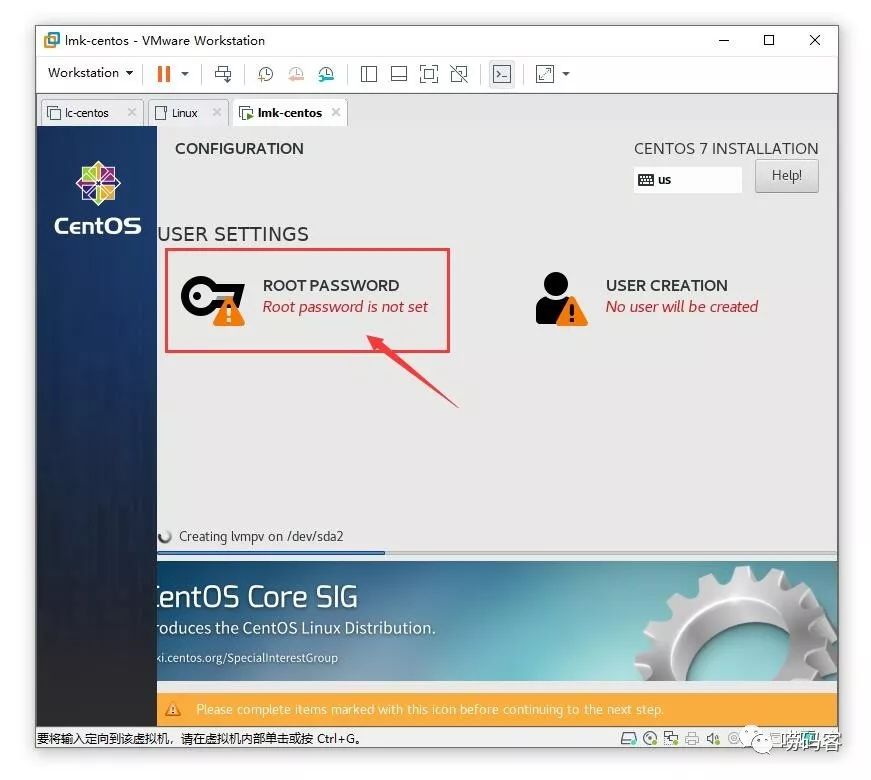
Back to the user interface, continue to click the 【ROOT PASSWORD】 option to set the initial password for the root user:
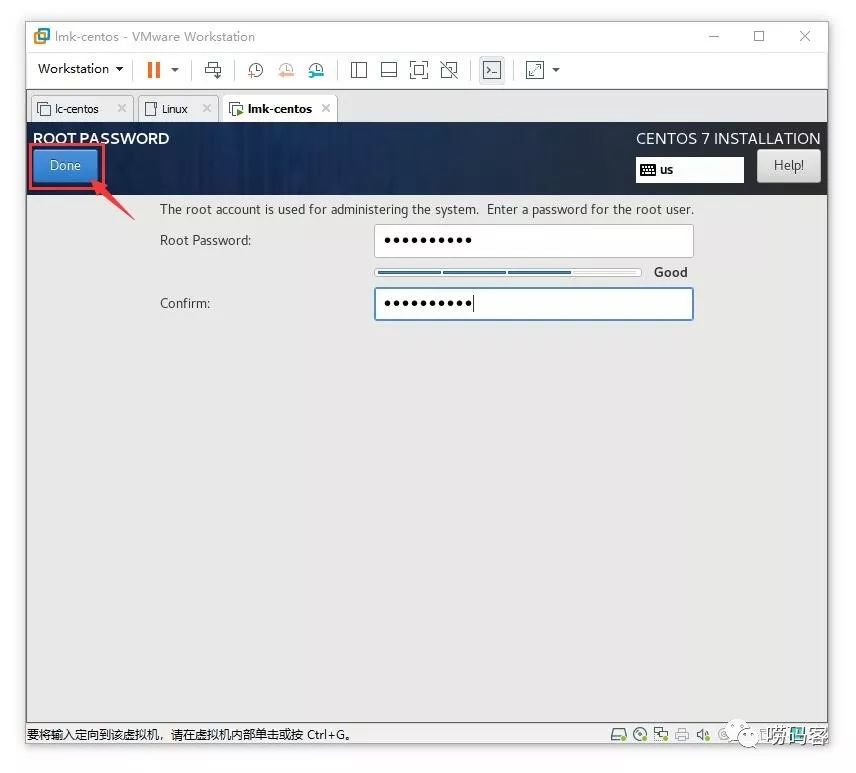
After entering the password, click the 【Done】 button in the upper left corner to save the configuration:
Back to the user interface, please wait patiently for the system installation to complete…
After the system installation is complete, the Reboot button will be displayed, as shown:
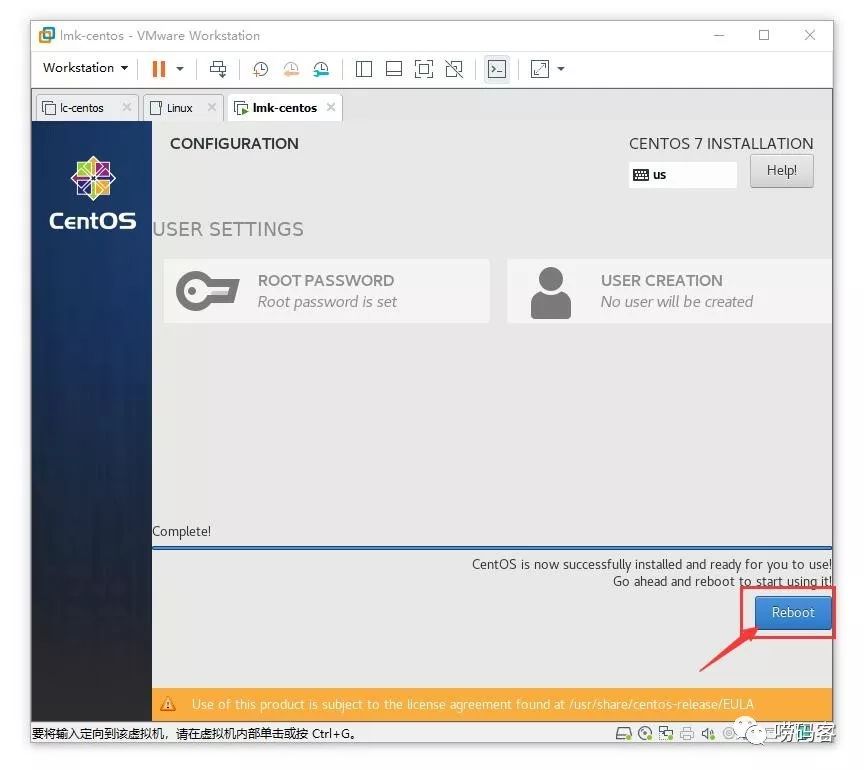
We just need to click the 【Reboot】 button to restart the system, and CentOS will be successfully installed!
2. Basic Configuration
After the system installation is complete, we also need to do some simple configurations to make it easier to use.
2.1 Common Configurations
2.1.1 Display Configuration
Fix Chinese garbled characters display
export LC_ALL='zh_CN.utf8'If you need to modify the hostname and welcome message, you can execute:
 hostnamectl set-hostname LmkServer
 vim /etc/motd
If you need to modify the time zone, you can execute
 rm -rf /etc/localtime
 ln -s /usr/share/zoneinfo/Asia/Shanghai /etc/localtime
2.2.2 Add sudo privileges
During the system installation, we created the lmk user, and we can add sudo execution privileges for him.
Modify the configuration file:/etc/sudoers, around line 100 of this file, add the configuration for lmk:
 # Copy the code from line 100, change the username to the current administrator user
 #   100 root    ALL=(ALL)       ALL
 # + 101 lmk     ALL=(ALL)       ALL
2.2.3 Disable SeLinux
Although SeLinux provides stronger security protection, it can also make our operations cumbersome. Here we will turn it off first.
-
Effective Permanently
Modify the
/etc/selinux/configfile, changeSELINUX=enforcingtoSELINUX=disabled, and then restart the system.
-
Effective Immediately
Execute the command:
sudo setenforce 0
2.2.4 Mirror Acceleration
Using the default software source of CentOS to install software can be very slow, we can change to domestic mirrors.
First, install the wget tool:
sudo yum install -y wgetUpdate yum repository configuration:
 sudo mv /etc/yum.repos.d/CentOS-Base.repo /etc/yum.repos.d/CentOS-Base.repo.backup
 sudo wget -O /etc/yum.repos.d/CentOS-Base.repo http://mirrors.aliyun.com/repo/Centos-7.repo  # Base
 sudo wget -O /etc/yum.repos.d/epel.repo http://mirrors.aliyun.com/repo/epel-7.repo           # Extension (optional)
Update system software:
 # Clean local cache
 sudo yum clean all
 # Update local cache
 sudo yum makecache
 # Update system
 sudo yum -y update
2.2 Kernel Cleanup
We can clean up some outdated and useless system kernels to save disk space.
Check the current system version:
cat /etc/redhat-releaseDelete excess kernels
① Check the currently used kernel version, for example:
 # uname -sr
 Linux 3.10.0-123.20.1.el7.x86_64
② Check all kernel versions present in the system
 # rpm -qa | grep kernel
 kernel-3.10.0-123.el7.x86_64
 kernel-3.10.0-123.20.1.el7.x86_64
 kernel-devel-3.10.0-123.el7.x86_64
③ Delete the excess content
Delete the lower version kernels and related components. (Do not delete the currently used kernel!!!)
sudo yum remove kernel-3.10.0-123.el7.x86_64 kernel-devel-3.10.0-123.el7.x86_642.3 Common Software
Install file transfer tools
sudo yum -y install lrzszUpload files
 rz
 # Or drag and drop directly
Download files
sz filenameInstall commonly used software packages and tools for CentOS
sudo yum -y install gcc gcc-c++ make cmake sudo wget htop unzip zip bzip2 bzip2-devel p7zip readline readline-devel ncurses-devel gdbm-devel glibc-devel tcl-devel openssl-devel curl-devel expat-devel db4-devel byacc sqlite-devel libyaml libyaml-devel libffi libffi-devel libxml2 libxml2-devel libxslt libxslt-devel libicu libicu-devel system-config-firewall-tui crontabs logwatch logrotate perl-Time-HiRes libcom_err-devel.i686 libcom_err-devel.x86_64 zlib-devel perl-CPAN gettext gettext-devel3. Network Configuration
3.1 IP
CentOS 7 can be configured graphically through the nmtui command. The configuration method is similar to what we did during the system installation, so I won’t repeat it here.
Configuration file example:
 TYPE="Ethernet"
 PROXY_METHOD="none"
 BROWSER_ONLY="no"
 BOOTPROTO="none"
 DEFROUTE="yes"
 IPV4_FAILURE_FATAL="no"
 IPV6INIT="yes"
 IPV6_AUTOCONF="yes"
 IPV6_DEFROUTE="yes"
 IPV6_FAILURE_FATAL="no"
 IPV6_ADDR_GEN_MODE="stable-privacy"
 NAME="enp0s3"
 UUID="c5f777d5-05bd-45bd-b73f-c5033922aaf2"
 DEVICE="enp0s3"
 ONBOOT="yes"
 IPADDR="192.168.88.100"
 PREFIX="24"
 GATEWAY="192.168.88.2"
 DNS1="114.114.114.114"
 DNS2="223.5.5.5"
 DNS3="223.6.6.6"
 IPV6_PRIVACY="no"
3.2 Firewall
3.2.1 Introduction
CentOS 7 uses firewalld to manage firewall configurations by default. The firewalld service introduces a concept of trust levels to manage associated connections and interfaces. It supports both ipv4 and ipv6 and supports bridging, using firewall-cmd (command) or firewall-config (gui) to dynamically manage temporary or permanent interface rules of kernel netfilter, which take effect immediately without restarting the service.
Firewall can classify different network connections into different trust levels, and Zone provides the following levels:
drop: Discard all incoming packets without giving any response
block: Reject all externally initiated connections, allowing internally initiated connections
public: Allow specified incoming connections
external: Same as above, for masqueraded incoming connections, generally used for routing forwarding
dmz: Allow restricted incoming connections
work: Allow trusted computers to have restricted incoming connections, similar to workgroup
home: Same as above, similar to homegroup
internal: Same as above, scope for all internet users
trusted: Trust all connections
3.2.2 Usage
 systemctl start firewalld         # Start,
 systemctl enable firewalld        # Start on boot
 systemctl stop firewalld          # Stop
 systemctl disable firewalld       # Disable startup
Specific rule management can be done using firewall-cmd, and you can refer to the specific usage by executing
firewall-cmd --help3.2.2.1 View Rules
Check the running state
firewall-cmd --stateView activated Zone information
 firewall-cmd --get-active-zones

 public
   interfaces: eth0 eth1
View Zone information for a specified interface
 firewall-cmd --get-zone-of-interface=eth0

 public
View interfaces for a specified level
 firewall-cmd --zone=public --list-interfaces

 eth0
View all information for a specified level, such as public
 firewall-cmd --zone=public --list-all

 public (default, active)
   interfaces: eth0
   sources:
   services: dhcpv6-client http ssh
   ports:
   masquerade: no
   forward-ports:
   icmp-blocks:
   rich rules:
View all allowed information for all levels
firewall-cmd --get-serviceView services allowed in all Zones after restart, i.e., services that are permanently allowed
firewall-cmd --get-service --permanent3.2.2.2 Manage Rules
 firewall-cmd --panic-on           # Set drop state
 firewall-cmd --panic-off          # Cancel drop
 firewall-cmd --query-panic        # View drop state
 firewall-cmd --reload             # Update rules without restarting the service
 firewall-cmd --complete-reload    # Update rules and restart the service
Add an interface to a trust level, for example, add eth0 to public, and make it permanent
firewall-cmd --zone=public --add-interface=eth0 --permanentSet public as the default trust level
firewall-cmd --set-default-zone=publica. Manage Ports
List allowed incoming ports for public level
firewall-cmd --zone=public --list-portsAllow TCP port 80 to public level, –permanent means it will still be effective after the system restarts. Without this parameter, it will be invalid after a restart.
firewall-cmd --zone=public --add-port=80/tcp --permanentDeny TCP port 80 to public level
firewall-cmd --zone=public --remove-port=80/tcp --permanentAllow a range of UDP ports to public level and make it permanent
firewall-cmd --zone=public --add-port=5060-5059/udp --permanentb. Manage Services
Add the smtp service to the work zone
firewall-cmd --zone=work --add-service=smtpRemove the smtp service from the work zone
firewall-cmd --zone=work --remove-service=smtpc. Configure IP Address Masquerading
View
firewall-cmd --zone=external --query-masqueradeEnable masquerading
firewall-cmd --zone=external --add-masqueradeDisable masquerading
firewall-cmd --zone=external --remove-masqueraded. Port Forwarding
To open port forwarding, you need to first
firewall-cmd --zone=external --add-masqueradeThen forward TCP port 22 to 3753
firewall-cmd --zone=external --add-forward-port=port=22:proto=tcp:toport=3753Forward data from port 22 to the same port on another IP
firewall-cmd --zone=external --add-forward-port=port=22:proto=tcp:toaddr=192.168.1.100Forward data from port 22 to port 2055 on another IP
firewall-cmd --zone=external --add-forward-port=port=22:proto=tcp:toport=2055:toaddr=192.168.1.1004. Install Docker
More and more companies are using Docker to deploy applications. Next, let’s install Docker with Zhu Ge.
4.1 Configure Software Source
Install the yum-utils tool
 sudo yum install -y yum-utils \
   device-mapper-persistent-data \
   lvm2
Add software repository
 sudo yum-config-manager \
     --add-repo \
     https://download.docker.com/linux/centos/docker-ce.repo
4.2 Install Docker
sudo yum install docker-ce docker-ce-cli containerd.io4.3 Start Configuration
 sudo systemctl enable docker
 sudo systemctl start docker
4.4 Mirror Acceleration
The official Docker image repository is abroad, we can use domestic mirror acceleration.
 # System requirements CentOS 7 and above, Docker 1.10 and above.
 # Note: Here we use Zhu Ge's Alibaba Cloud account for acceleration, you can also change to your own account, please refer to Alibaba Cloud's introduction document for details.
 mkdir -p /etc/docker
 tee /etc/docker/daemon.json <<-'EOF'
 {
   "registry-mirrors": ["https://k16l4r0k.mirror.aliyuncs.com"]
 }
 EOF
 sudo systemctl daemon-reload
 sudo systemctl restart docker
5. Install Nginx
Many of you have probably heard of Nginx, but the version of Nginx in the official CentOS repository is very low. We can install the latest version from the official Nginx.
5.1 Configure Software Source
Add the file /etc/yum.repos.d/nginx.repo
 [nginx-stable]
 name=nginx stable repo
 baseurl=http://nginx.org/packages/centos/7/$basearch/
 gpgcheck=1
 enabled=1
 gpgkey=https://nginx.org/keys/nginx_signing.key
 module_hotfixes=true
5.2 Install
sudo yum install -y nginx6. Summary
So tired, finally finished talking about the installation and configuration of CentOS! Today we talked in detail about the installation, configuration, and installation of commonly used software for CentOS. But this is just the beginning; there are many more things to learn about Linux, and learning is endless! This article contains a lot of content, and I hope it can help everyone. Zhu Ge will detail the configuration and usage of Docker and Nginx in subsequent articles, so stay tuned!
For more knowledge, please follow: Laoma Ke