Author: Hu Yaodong, Associate Professor at Henan Engineering University

Virtualization refers to the technology that allows a single computer to be virtualized into multiple logical computers. Multiple logical computers can run on a single computer simultaneously, each capable of running different operating systems, allowing applications to run in independent spaces without interfering with each other, significantly improving the utilization of computer resources.
Among all the materials, the most authoritative Citrix virtual desktop and virtual application testing operation manual is the “POC Standard Implementation Guide” jointly provided by Beijing Sitong Management Software Technology Co., Ltd., New Tai Technology, Lianqiang International, and Qunbai Digital Technology Co., Ltd. I received three versions, and the content is roughly the same, with version 1.0 being the most instructive, allowing deployment to be completed according to the chapters.
After installing the XenServer system on the physical machine, all management machines are installed on virtual machines, with the main management servers as follows (services running in parentheses):
(1) Active Directory Domain Controller (AD, DNS, DHCP);
(2) DDC Controller (StoreFront, Director, File Server);
(3) DB, License Server (Database, License);
(4) PVS Server (Diskless Boot Server);
(5) NetScaler Gateway (External Publishing, not needed for the university computer room).
In addition to various system CDs required, the necessary ISO images need to be downloaded from Citrix’s official website, including XenServer-6.5.0-install-cd.iso, XenApp_and_XenDesktop7_6.iso, ProvisioningServices7_6.iso, etc. Additionally, download the management tool installation file XenServer-6.5.0-SP1-XenCenterSetup.exe for easier management.
The HP BladeSystem Onboard Administrator function is excellent, allowing complete remote control of the physical machine through the iLO port, mounting CD image files, and installing operating systems, similar to IPMI service interfaces.
After installing the XenServer system, you can manage it through the graphical interface after installing XenCenter. First, install the management server, perform necessary optimization, then conduct Sysprep to create a management server template. Personal experience: Windows Server 2012 is not as user-friendly as Windows Server 2008; I recommend using the latter.
Creating a server from the server template:
First, install (1) the domain controller, configure the Active Directory, DNS service, and DHCP service, create organizational units, groups, and users in the Active Directory. When deploying in bulk, it’s necessary to use some scripts to quickly create a large number of users.
After installing (1) the Active Directory Domain Controller, it is recommended to install (3) the DB and License servers. If there is no official License, you can apply for a temporary one on the Citrix official website, then install (2) the DDC Controller. When installing XenDesktop, you can select the previously installed DB server, complete the configuration of StoreFront service and Director service, and conduct phase testing. At this point, you can publish existing virtual desktops and connect remotely to verify the configurations from the previous phase.
After verification, you can install (4) the PVS server. After configuring the PVS service, you need to capture the client image, which is the most challenging part. It is recommended not to update the serial number or optimize after installing the client operating system; just install the Provisioning Services target program. Once the image capture is successful, updates can be made; if the image capture is fine, you can deliver PVS desktops in bulk.
For virtual desktops delivered via PVS, it is essentially a diskless desktop based on streaming technology, with a single image managed uniformly and published to numerous virtual desktops. Besides inherent security, it greatly saves storage resources. The virtual desktop caches a single image in local memory, using Citrix’s exclusive RAM cache with disk overflow technology, keeping disk I/O at a very low level while providing a user experience similar to that running on high-performance storage.
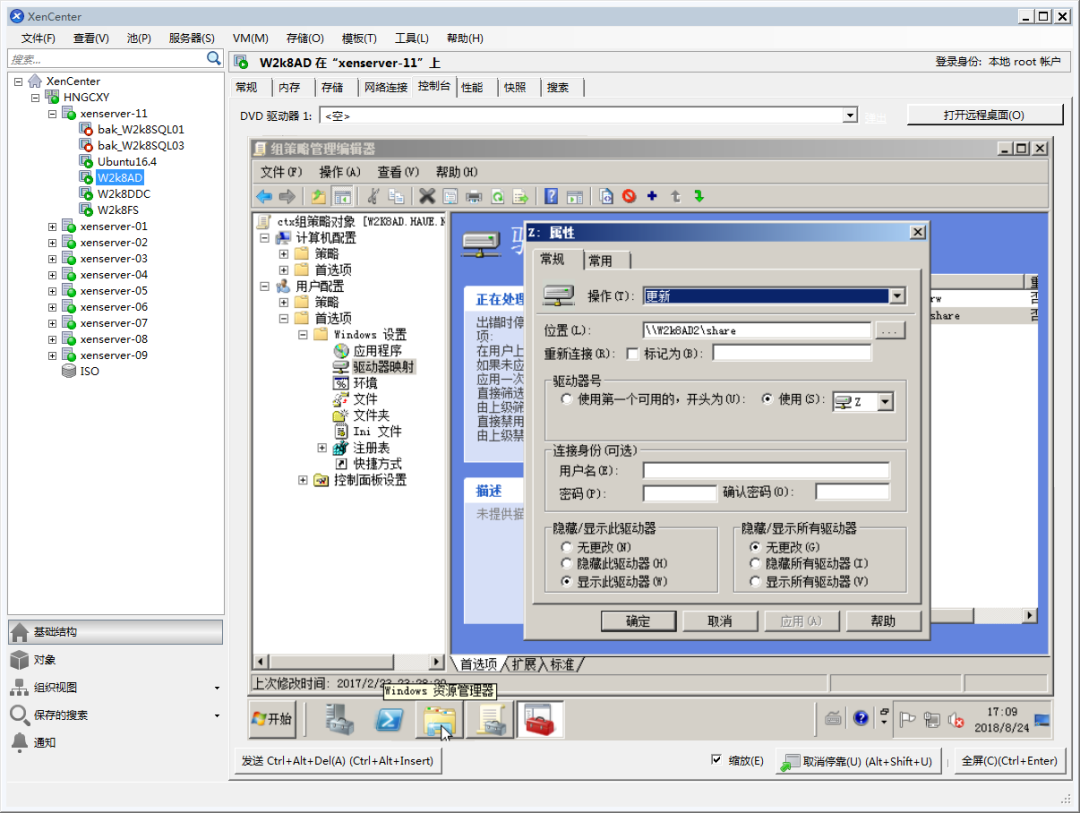
For all virtual desktop users, shared disk space can be set up through the domain, with one read-only shared disk and one read-write shared disk. For the read-only shared disk, management personnel can have write permissions, while virtual desktop users (students) can only read, ensuring resource sharing and security. For the read-write public disk, virtual desktop users (students) can read and write, removing machine restrictions. Others cannot delete files in use; if they want to save files in use, they can copy them to a USB drive or network space on any machine.
This method sacrifices file confidentiality for a more flexible approach, which is suitable for student practice files that do not require high confidentiality. The specific method for setting up domain shared folders is as follows:
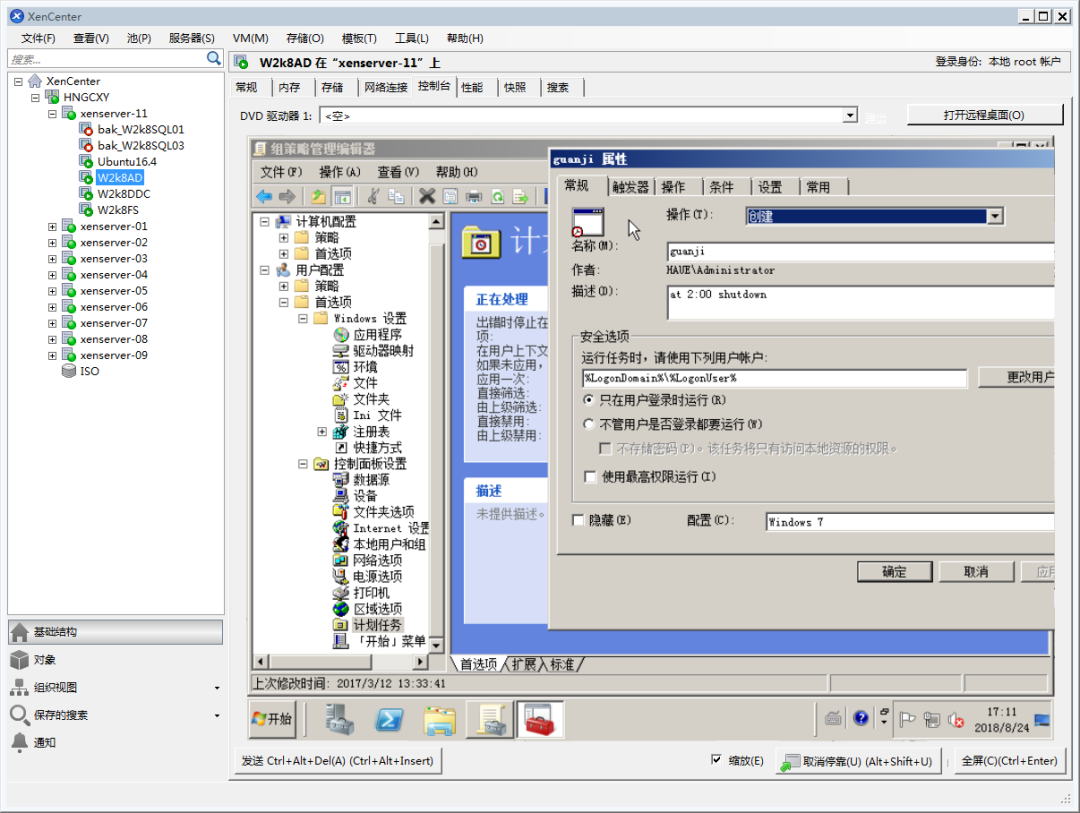
For public computer rooms in schools, it is impossible to shut down the virtual desktops after use at the terminal. Sometimes, management personnel will turn off the power after classes to prompt students to leave; however, some students casually change the desktop and install some software, affecting the next class’s use. Of course, we can restart the virtual desktops through the management interface, but such a restart is costly and affects usage. Therefore, my strategy is to restart already logged-in virtual machines at dawn, ensuring a uniform environment for the first class every morning. For particularly messy desktops, users can choose to restart their virtual desktops themselves.
The specific setup method: still in the Group Policy Management Editor, under User Configuration –> Preferences –> Control Panel Settings –> Scheduled Tasks, right-click “New Scheduled Task” on the right, in the “Properties” dialog, select “Run only when user is logged on” in the “General” section for “Security options”, create a new trigger for 2:00:00 every day, and create a shutdown -s operation in the action, keeping the rest default, and click “OK” to create a scheduled task that restarts already logged-in virtual desktops every day at 2 AM.
After deploying XenDesktop virtual desktops, to ensure a good user experience, a certain proportion of virtual desktops can be started to a registered state before users log in, so that users can immediately log in to virtual desktops during peak usage times, reducing startup storms during peak periods.
The default pre-startup number is typically 10% of the deployment quantity, which is suitable for non-high-concurrency environments, but this value is too low for university computer rooms, where the number of terminals is usually over 100. For our environment, with 330 virtual desktops deployed, the system’s default pre-startup number is 10%, or 33 virtual desktops. When the terminals in the computer room are powered on, they automatically enter, and the startup process for virtual desktops deployed in PVS mode takes about 3-4 minutes, resulting in a large number of terminals waiting to enter the desktop after powering on, leading to a poor experience. Therefore, it is necessary to change this pre-startup terminal number.
First, change the peak time period. Open the XenDesktop Studio console, find the delivery group to modify, click “Edit Delivery Group”, and define the peak time range in the power management view (this can be defined separately for working days and non-working days; it is recommended to set it for 1-2 hours before the user starts work and 1-2 hours after the user finishes work) and the power policy to execute during peak times.
Second, change the percentage of reserved virtual desktops during peak periods. Open PowerShell with administrator privileges on the DDC server, input asnp Citrix* to import Citrix management CMDLET, and input get-brokerdesktopgroup -name “Pool-PVS-Win7”. Pool-PVS-Win7 is the name of the delivery group, and you can view the information of all delivery groups in a certain domain. In the delivery group information, OffpeakBufferSizePercent indicates the percentage of reserved virtual desktops during non-peak periods, while PeakBufferSizePercent indicates the percentage of reserved virtual desktops during peak periods (both default to 10%).
Citrix as a leading solution for desktop virtualization has a substantial market share for a reason, especially its PVS deployment model, which is very suitable for the needs of university computer rooms, offering high security, efficient management, and most importantly, an exclusive handling method for concurrent I/O, which is nearly perfect. According to reports, users can also deploy Linux virtual desktops based on PVS. As a virtualization software with a long history and a solid software foundation, Citrix clients cover almost all smart terminals. For instance, by combining with XenApp to achieve application virtualization, we can use the Internet Explorer browser on Android smartphones and smart TVs, thus directly replacing VPN services and other application virtualization.
In the Citrix management server, a large number of Microsoft products are used, almost the entire Microsoft family. However, since XenDesktop is built on the foundation of XenServer, and XenServer is a Linux system, in high-load environments, especially in file I/O, Linux’s efficiency is far superior to that of Windows.
In terms of PVS deployment, virtual machines use iPXE for startup, while Citrix uses TFTP protocol. iPXE supports multiple network protocols like HTTP, FTP, iSCSI, AoE, etc. Numerous experimental data show that the efficiency of iPXE using HTTP protocol is ten times that of TFTP protocol; why not adopt a more efficient protocol?
To improve reliability and efficiency, some manuals suggest clustering deployment for PVS servers to enhance diskless station startup speed. To my knowledge, both Windows and Linux systems have methods to implement large-capacity memory disks, and after the virtual machine image update is completed, it remains almost unchanged. If the virtual machine image is placed on a memory disk, the access speed will exceed that of hard disks (even SSDs) by dozens of times; wouldn’t that be more efficient?
Statement
This WeChat article is reprinted for non-commercial educational and research purposes and does not imply endorsement of its views or confirmation of its content’s authenticity. If there are copyright issues with the reprinted manuscript, please contact us immediately, and we will modify or delete related articles to ensure your rights.