Hey there, friends! Today we’re going to create something super fun—a WebSocket chat! <span>websockets</span> library is our trusty assistant, allowing real-time communication between the client and server like good friends! Whether it’s for online games, real-time communication, or other scenarios requiring real-time interaction, it can be very useful. Installation is simple, just run <span>pip install websockets</span>! Easy to understand:
Core Features
- Supports multiple clients connecting simultaneously, real-time group chat (messages broadcast to all online users)
- Server automatically notifies all users when a client connects/disconnects
- Simple identity identification (input nickname when connecting)
- Based on asynchronous IO, non-blocking communication, high performance
- Cross-platform support (Windows/Mac/Linux)
Environment Setup
First, install the dependency library <span>websockets</span> (supports Python 3.7+):
pip install websockets
1. Server-side Code (<span>websocket_server.py</span>)
Responsible for listening to client connections, receiving messages, and broadcasting messages to all online clients:
import asyncio
import websockets
from typing import Set
# Store all online client connection objects
connected_clients: Set[websockets.WebSocketServerProtocol] = set()
# Store the mapping of client connections to nicknames (key: connection object, value: nickname)
client_nicknames: dict[websockets.WebSocketServerProtocol, str] = {}
async def broadcast(message: str, exclude_client: websockets.WebSocketServerProtocol = None):
"""Broadcast message to all online clients (optionally exclude a specific client)"""
if not connected_clients:
return
# Iterate through all connections and send the message
for client in connected_clients:
if client != exclude_client and client.open:
await client.send(message)
async def handle_client(websocket: websockets.WebSocketServerProtocol):
"""Handle communication logic for a single client"""
global connected_clients, client_nicknames
try:
# 1. Receive the nickname sent by the client
nickname = await websocket.recv()
nickname = nickname.strip() or f"User{id(websocket)%1000}" # Default nickname
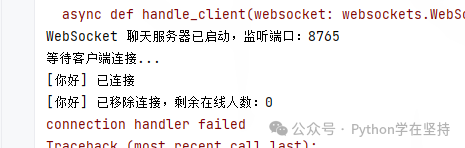
print(f"[{nickname}] Connected")
# 2. Record the client connection and nickname
connected_clients.add(websocket)
client_nicknames[websocket] = nickname
# 3. Broadcast "user joined" notification
join_msg = f"📢 System Notification: [{nickname}] joined the chat! Current online users: {len(connected_clients)}"
await broadcast(join_msg)
# 4. Loop to receive client messages and rebroadcast
async for message in websocket:
if message.strip() == "/quit":
# Client actively exits
leave_msg = f"📢 System Notification: [{nickname}] left the chat!"
await broadcast(leave_msg)
break
# Broadcast user message
chat_msg = f"[{nickname}]: {message}"
print(chat_msg) # Server log print
await broadcast(chat_msg, exclude_client=websocket)
except websockets.exceptions.ConnectionClosedError:
# Client disconnected abnormally
print(f"[{nickname}] Disconnected abnormally")
finally:
# 5. Clean up client connection
if websocket in connected_clients:
connected_clients.remove(websocket)
client_nicknames.pop(websocket, None)
# Broadcast "user left" notification
leave_msg = f"📢 System Notification: [{nickname}] left the chat! Current online users: {len(connected_clients)}"
await broadcast(leave_msg)
print(f"[{nickname}] Removed connection, remaining online users: {len(connected_clients)}")
async def main():
"""Start WebSocket server"""
# Listen on local port 8765 (can be changed to another port, e.g., 8080)
async with websockets.serve(handle_client, "0.0.0.0", 8765):
print("WebSocket chat server started, listening on port: 8765")
print("Waiting for client connections...")
await asyncio.Future() # Run indefinitely until manually terminated
if __name__ == "__main__":
try:
asyncio.run(main())
except KeyboardInterrupt:
print("\nServer manually shut down")
2. Client-side Code (<span>websocket_client.py</span>)
Responsible for connecting to the server, inputting nickname, sending messages, and receiving broadcast messages:
import asyncio
import websockets
import sys
async def send_messages(websocket, nickname):
"""Loop to read user input and send to server"""
while True:
try:
# Read user input (supports new lines, send on Enter)
message = await asyncio.get_event_loop().run_in_executor(None, sys.stdin.readline)
message = message.strip()
if not message:
continue
# Send message to server
await websocket.send(message)
# Input /quit to exit chat
if message == "/quit":
print("Exit request sent, disconnecting...")
break
except Exception as e:
print(f"Failed to send message: {e}")
break
async def receive_messages(websocket):
"""Loop to receive broadcast messages from server and print to console"""
while True:
try:
message = await websocket.recv()
print(f"\n{message}")
print("Please enter a message (type /quit to exit):", end="", flush=True)
except websockets.exceptions.ConnectionClosed:
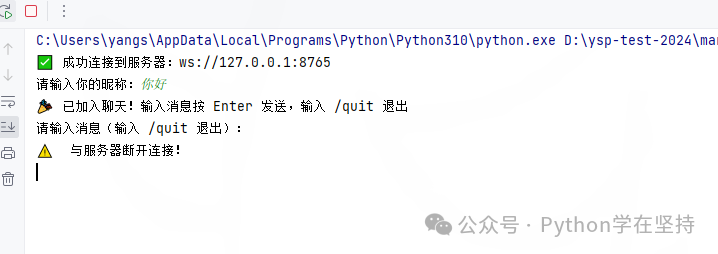
print("\n⚠️ Disconnected from server!")
break
except Exception as e:
print(f"\nFailed to receive message: {e}")
break
async def main():
"""Start WebSocket client"""
# Server address (use 127.0.0.1 for local testing, server IP for LAN, e.g., 192.168.1.100)
server_url = "ws://127.0.0.1:8765"
try:
# 1. Connect to server
async with websockets.connect(server_url) as websocket:
print(f"✅ Successfully connected to server: {server_url}")
# 2. Input nickname
nickname = input("Please enter your nickname:").strip()
if not nickname:
nickname = f"User{id(websocket)%1000}"
print(f"No nickname entered, defaulting to: {nickname}")
# Send nickname to server (as the first message after connection)
await websocket.send(nickname)
# 3. Run "send messages" and "receive messages" tasks simultaneously
print("🎉 Joined the chat! Type a message and press Enter to send, type /quit to exit")
print("Please enter a message (type /quit to exit):", end="", flush=True)
# Create two tasks to run concurrently
send_task = asyncio.create_task(send_messages(websocket, nickname))
receive_task = asyncio.create_task(receive_messages(websocket))
# Wait for any one task to finish (send /quit or disconnect)
await asyncio.wait([send_task, receive_task], return_when=asyncio.FIRST_COMPLETED)
except ConnectionRefusedError:
print(f"❌ Connection failed! Server {server_url} not started or unreachable")
except Exception as e:
print(f"❌ Client exception: {e}")
if __name__ == "__main__":
try:
asyncio.run(main())
except KeyboardInterrupt:
print("\nClient manually shut down")
3. Running Instructions
1. Local Testing (Same Computer)
- Start the server: Run
<span>websocket_server.py</span>, and the console should display “WebSocket chat server started, listening on port: 8765” indicating success. - Start multiple clients: Run
<span>websocket_client.py</span>separately (you can open multiple terminal windows), and each client can chat after entering a nickname.
2. LAN Testing (Multiple Computers)
- Ensure all computers are on the same local area network (e.g., connected to the same WiFi).
- Check the local IP of the server computer (use
<span>ipconfig</span>for Windows,<span>ifconfig</span>for Mac/Linux, find the<span>IPv4 Address</span>, e.g.,<span>192.168.1.105</span>). - Modify the
<span>server_url</span>in the client code to the server’s IP, for example:<span>server_url = "ws://192.168.1.105:8765"</span>. - Start the server computer running
<span>websocket_server.py</span>, and other computers run the modified<span>websocket_client.py</span>to connect.
4. Usage Instructions
- After the client connects, input a nickname and press Enter to confirm.
- Input a message and press Enter to send; all online clients will receive it in real-time.
- Type
<span>/quit</span>to exit the chat, and the server will notify other users. - The server console will print the connection status and chat messages of all users (for logging purposes).
5. Key Feature Descriptions
- Asynchronous Communication: Uses
<span>asyncio</span>and<span>websockets</span>to implement asynchronous IO, allowing a single server to handle multiple clients simultaneously without blocking. - Message Broadcasting: After the server receives a message from a client, it forwards it to all other online clients (group chat functionality).
- Status Notifications: When users join/leave, the server broadcasts system notifications to synchronize the number of online users.
- Error Handling: Handles scenarios such as client disconnections and server shutdowns to prevent program crashes.
- Flexible Deployment: Supports local and LAN testing; modifying the server IP allows expansion to the wide area network (requires port mapping).
6. Optional Extended Features
- Private Messaging: Supports
<span>@nickname message</span>format, with the server forwarding to the specified user. - Message Logging: The server saves chat logs to a file (e.g.,
<span>chat_log.txt</span>). - Authentication: Adds password login, restricting connections to authorized users only.
- Emoji Support: Parses input emojis (e.g.,
<span>:smile:</span>converts to 😊). - File Transfer: Extends the protocol to support sending files (requires handling binary data).
- GUI Interface: Combines Tkinter/PyQt to create a graphical chat window (replacing the command line).
7. Common Problem Solutions
- Connection Failed:
- Check if the server has started.
- For LAN testing, ensure the client’s
<span>server_url</span>is the correct IP of the server. - Disable firewalls on the server and client (or open port 8765).
- Ensure network stability; no delays during LAN testing.
- Avoid sending large amounts of data simultaneously (the simple version does not implement traffic control).
- Check if Python version is ≥ 3.7 (
<span>websockets</span>requirement). - Reinstall dependencies:
<span>pip install --upgrade websockets</span>.
This simple WebSocket chat tool is suitable for learning asynchronous communication and network programming, and can be extended into a more complex chat system (such as one-on-one private chat, file transfer, GUI interface, etc.)!
Below is a code example for the simple WebSocket chat:
import tkinter as tk
import asyncio
import websockets

async def connect_to_server():
    uri = "ws://localhost:8765"  # Change to your server address and port
    async with websockets.connect(uri) as websocket:
        name = name_entry.get()
        await websocket.send(name)
        while True:
            message = message_entry.get()
            await websocket.send(message)
            response = await websocket.recv()
            chat_text.insert(tk.END, f"Server: {response}\n")

# Create main window
root = tk.Tk()
root.title("WebSocket Chat Client")

# Create name input box and label
name_label = tk.Label(root, text="Please enter your name:")
name_label.pack()
name_entry = tk.Entry(root)
name_entry.pack()

# Create message input box and label
message_label = tk.Label(root, text="Please enter a message:")
message_label.pack()
message_entry = tk.Entry(root)
message_entry.pack()

# Create send button
send_button = tk.Button(root, text="Send Message", command=lambda: asyncio.create_task(connect_to_server()))
send_button.pack()

# Create chat record display box
chat_text = tk.Text(root, height=10, width=50)
chat_text.pack()

# Run main loop
root.mainloop()
Haha, friends, this code is like a small chat window where you can happily chat with the server! You input your name and message, and the server will receive and reply to you. Isn’t that interesting? Now let’s take a closer look at this code.
Part One: Importing Libraries
import tkinter as tk
import asyncio
import websockets
Here we import the <span>tkinter</span> library to create the graphical interface, the <span>asyncio</span> library for handling asynchronous operations, and the <span>websockets</span> library for implementing WebSocket communication.
Part Two: Defining the Connect to Server Function
async def connect_to_server():
    uri = "ws://localhost:8765"
    async with websockets.connect(uri) as websocket:
        name = name_entry.get()
        await websocket.send(name)
        while True:
            message = message_entry.get()
            await websocket.send(message)
            response = await websocket.recv()
            chat_text.insert(tk.END, f"Server: {response}\n")
This function is asynchronous; it first defines the server’s address and port, then uses <span>websockets.connect</span> to connect to the server. It then retrieves the user’s input name and sends it to the server, entering a loop to continuously get user input messages and send them to the server while receiving replies from the server and displaying them in the chat record display box.
Part Three: Creating the Main Window
root = tk.Tk()
root.title("WebSocket Chat Client")
A main window is created, and the title is set to “WebSocket Chat Client”.
Part Four: Creating Name Input Box and Label
name_label = tk.Label(root, text="Please enter your name:")
name_label.pack()
name_entry = tk.Entry(root)
name_entry.pack()
A name label and an input box are created for the user to input their name.
Part Five: Creating Message Input Box and Label
message_label = tk.Label(root, text="Please enter a message:")
message_label.pack()
message_entry = tk.Entry(root)
message_entry.pack()
A message label and an input box are created for the user to input messages.
Part Six: Creating Send Button
send_button = tk.Button(root, text="Send Message", command=lambda: asyncio.create_task(connect_to_server()))
send_button.pack()
A send button is created, which will create a new task to execute the <span>connect_to_server</span> function when clicked, achieving asynchronous connection to the server and sending messages.
Part Seven: Creating Chat Record Display Box
chat_text = tk.Text(root, height=10, width=50)
chat_text.pack()
A chat record display box is created to show the server’s replies and the messages sent by the user.
Knowledge Summary
- Mastered the basic use of the
<span>tkinter</span>library, including creating windows, labels, input boxes, buttons, and text boxes. - Learned to use the
<span>asyncio</span>library to handle asynchronous operations, achieving non-blocking WebSocket communication. - Understood the basic usage of the
<span>websockets</span>library, including connecting to servers, sending messages, and receiving messages.
Goals
- Implement a simple WebSocket chat client using
<span>Python</span>that can communicate with the server in real-time, sending and receiving messages. - Familiarize with the principles of WebSocket communication and the concepts of asynchronous programming in
<span>Python</span>, enhancing network programming skills.