1. Why Use HTTPS Instead of HTTP
1.1 Differences Between HTTPS and HTTP
1) The HTTPS protocol requires a certificate application from a CA, and generally, free certificates are rare and often require payment.
2) HTTP is the Hypertext Transfer Protocol, where information is transmitted in plain text, while HTTPS is a secure SSL encrypted transmission protocol.
3) HTTP and HTTPS use completely different connection methods and different ports; the former uses port 80, while the latter uses port 443.
4) The connection of HTTP is simple and stateless; the HTTPS protocol is a network protocol built on SSL + HTTP that allows encrypted transmission and identity authentication, making it more secure than HTTP.
1.2 Why HTTP is Not Secure
The HTTP protocol has no encryption or identity verification mechanisms, making it very susceptible to eavesdropping, hijacking, and tampering, which can lead to serious security issues such as personal privacy leaks and malicious traffic hijacking.
It’s like sending a letter; if I send you a letter, it may pass through many postal workers who can open the letter and read its contents because it’s in plain text. If your letter contains sensitive information like your bank account number, it could be stolen. Moreover, postal workers can also forge the content of your letter, leading to deception.
1.3 How HTTPS Ensures Security
HTTPS is an HTTP channel aimed at security; simply put, it is the secure version of HTTP. This means that an SSL layer is added under HTTP, and the security foundation of HTTPS is SSL. Therefore, the detailed content of encryption needs SSL. It is a URI scheme (abstract identifier system), with syntax similar to the http: scheme, used for secure HTTP data transmission. The https: URL indicates that it uses HTTPS, but HTTPS has a default port different from HTTP and an encryption/authentication layer (between HTTP and TCP). This system was initially developed by Netscape, providing authentication and encrypted communication methods, and is now widely used for security-sensitive communications on the World Wide Web, such as in transaction payments.
2. The Encryption Principle of HTTPS
2.1 First, let’s introduce some principles used in the encryption process:
2.1.1 Symmetric Encryption
Symmetric encryption refers to an encryption algorithm where the same key is used for both encryption and decryption. It requires the sender and receiver to agree on a key before secure communication. The security of symmetric algorithms depends on the key; if the key is leaked, anyone can decrypt the messages they send or receive, so the confidentiality of the key is crucial for communication.
Advantages and disadvantages of symmetric encryption algorithms:
Advantages: public algorithm, low computational load, fast encryption speed, high encryption efficiency.
Disadvantages: 1) Both parties use the same key, which does not guarantee security; 2) Each pair of users needs to use a unique key that others do not know each time they use the symmetric encryption algorithm, which leads to an exponential growth in the number of keys held by both sending and receiving parties, making key management a burden for users; 3) It can provide confidentiality but cannot provide verification and non-repudiation.
2.1.2 Asymmetric Encryption Algorithm
This type of encryption might be more difficult to understand; it refers to the generation of public and private keys. Data encrypted with the public key cannot be decrypted by the public key itself but requires the private key for decryption; data encrypted with the private key cannot be decrypted by the private key, requiring the public key for decryption. There are many algorithms of this type, with RSA being the most commonly used. The mathematical principle it is based on is that the product of two large prime numbers is easy to calculate, but determining which two prime numbers were multiplied to get this product is very complex. Interested readers can research the specific principles themselves.
Asymmetric encryption is more secure than symmetric encryption but has two obvious drawbacks:
1) It consumes a lot of CPU computational resources. During a complete TLS handshake, the computational load for asymmetric decryption during key exchange accounts for over 90% of the entire handshake process. In contrast, the computational load for symmetric encryption is only 0.1% of that for asymmetric encryption; if the application layer data also uses asymmetric encryption and decryption, the performance overhead becomes too large to bear.
2) Asymmetric encryption algorithms have limitations on the length of the encrypted content, which cannot exceed the length of the public key. For example, the commonly used public key length is 2048 bits, which means that the content to be encrypted cannot exceed 256 bytes.
Thus, public key encryption can currently only be used for key exchange or content signing, and is not suitable for encrypting application layer data transmission.
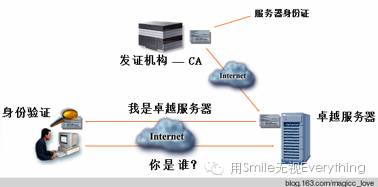
2.1.3 Identity Authentication (CA Digital Certificate)
The identity authentication part of the HTTPS protocol is completed by digital certificates, which consist of public keys, certificate subjects, digital signatures, and other content. After the client initiates an SSL request, the server sends the digital certificate to the client, which verifies the certificate and obtains the asymmetric key for key exchange.
Digital certificates serve two purposes:
1. Identity authorization. Ensure that the website accessed by the browser is a trusted website verified by the CA.
2. Public key distribution. Each digital certificate contains the public key generated by the registrant. During the SSL handshake, it is transmitted to the client through the certificate message.
The process of applying for a trusted digital certificate typically involves the following steps:
1. The end entity (which can be a terminal hardware or website) generates a public-private key pair and a certificate request.
2. RA (Registration Authority) checks the legitimacy of the entity. If it is an individual or a small website, this step is not mandatory.
3. CA (Certificate Authority) issues the certificate and sends it to the applicant.
4. The certificate is updated to a repository (responsible for storing and distributing digital certificates and CRL content), from which the terminal updates the certificate and queries the certificate status in the future.
Digital certificate verification:
After receiving the CA’s certificate and deploying it on the website server, how can the browser confirm that this certificate was indeed issued by the CA? How can we avoid third parties forging this certificate? The answer is digital signatures. A digital signature is a certificate’s anti-counterfeiting label. Currently, the most widely used digital signature is SHA-RSA (SHA for hash algorithm, RSA for asymmetric encryption algorithm). The process of creating and verifying digital signatures is as follows:
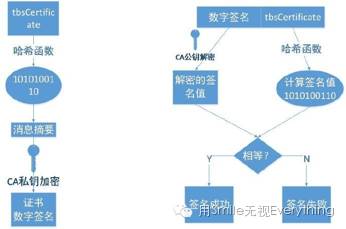
1) Issuing a digital signature. First, a hash function is used to securely hash the content to be signed, generating a message digest, which is then encrypted with the CA’s private key.
2) Verifying a digital signature. The CA’s public key is used to decrypt the signature, and the same signing function is used on the content of the certificate to be signed, comparing it with the signature content in the server’s digital signature. If they match, the verification is considered successful.
It is important to note:
1) The key pair used for issuing and verifying digital signatures is the CA’s own public-private key pair, unrelated to the public key submitted by the certificate applicant.
2) The process of issuing a digital signature is the opposite of the process of public key encryption, which uses the private key for encryption and the public key for decryption.
3) Major CAs now have certificate chains, which enhance security by keeping the root CA’s private key offline. The second benefit is convenience for deployment and revocation; if a certificate has issues, only the corresponding level of certificate needs to be revoked, while the root certificate remains secure.
4) Root CA certificates are all self-signed, meaning they complete the signing and verification process using their own public and private keys. Certificates on the certificate chain are signed and verified using the keys of the upper-level certificates.
5) How to obtain the key pairs of root CAs and multi-level CAs? Are they trustworthy? Of course, they are trustworthy because these vendors cooperate with browsers and operating systems, and their public keys are default-installed in browsers or operating system environments.
2.2 Detailed Process of Encryption
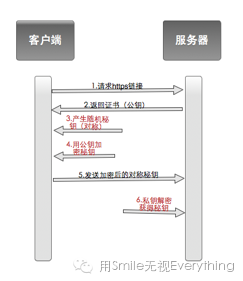
First, the server uses asymmetric encryption (RSA) to generate public and private keys. Then it sends the public key to the client; even if the path is intercepted, it is useless because only the private key can decrypt the file encrypted with the public key, and the private key will never leave the server. When the public key reaches the client, the client generates a secret key using symmetric encryption and encrypts it with the public key, sending it to the server. This secret key will be used for subsequent communication. When the server receives the public key encrypted secret key, it can use the private key to decrypt the public key and obtain the secret key. In this way, both the client and server obtain the secret key, making information exchange relatively secure. The flowchart is as follows:
It sounds quite secure, but in reality, there is a more malicious attack that this method cannot prevent, known as the “Man-in-the-Middle Attack.” During the identity authentication process, a “man-in-the-middle” intercepts our information, intending to know your messages. We refer to this man as M. When the server first sends the public key to the client, it passes through M. M knows that you are about to perform a key exchange; it intercepts the public key and pretends to be the client, forging a fake secret key (generated by symmetric encryption) and encrypts it with the public key sent by the server, sending it back to the server. The server believes it has completed the key exchange with the client, but in reality, it has exchanged keys with M (who now has the fake secret key). Meanwhile, M pretends to be the server and generates a fake public key and private key to perform key exchange with the client, obtaining the secret key sent by the client. Now the client holds the secret key, M holds the secret key and fake secret key, and the server holds the fake secret key. The entire communication process is as follows:

Simply put:
1) The client encrypts the information with the secret key and sends it to M;
2) M receives it, decrypts it with the secret key, obtains the information, and then encrypts it with the fake secret key, sending it to the server;
3) The server receives it and decrypts it with the fake secret key.
Thus, the man-in-the-middle M obtains all the communication information between the client and the server.
To counter this type of attack, we can add identity authentication: at this point, we need to introduce CA certificates, as explained in 2.1.3. The main contents included in the digital certificate are: personal information of the certificate holder, public key of the certificate holder, validity period of the public key, CA that issued the digital certificate, and the digital signature of the CA. Therefore, after both parties online verify each other’s digital certificates, there is no need to worry about the authenticity of each other’s identities, allowing for secure communication or granting access to resources.
In simpler terms, the server hands its public key to the CA certificate, which then wraps it up. (For specific principles, please refer back to 2.3) This wrapping means: ensuring that this certificate is from me (the server) to you (the client), and it is useless for anyone else.
Finally, you might wonder why, since asymmetric encryption can be so secure, we do not use it directly to encrypt information but rather to encrypt the keys for symmetric encryption?
This is because the time consumed for generating and encrypting with asymmetric encryption is relatively long. To save computation time for both parties, it is usually only used to exchange keys, not for direct data transmission (for specifics, see the disadvantages of asymmetric encryption above).
3. Using AFNetworking for Mutual Authentication
3.1 Client Authenticates Server Certificate
As shown in the figure above, when the client wants to authenticate the server, it first needs to match with the server’s digital certificate (server.cer). The specific method is as follows.
1) Import the certificate server.cer and the AFNetworking framework into the project;
2) Then override the + (instancetype)policyWithPinningMode:(AFSSLPinningMode)pinningMode method in AFSecurityPolicy.m:
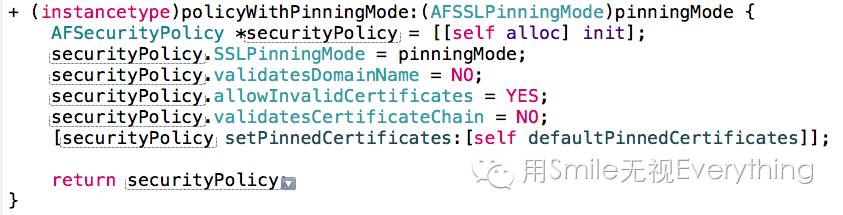
AFNetworking2 allows embedded certificates; by embedding certificates, AFNetworking2 verifies the connection’s server correctness by comparing the server’s certificate, the embedded certificate, and the site domain name. If the above two conditions are met, it will automatically scan the .cer files in the bundle and include them, thus allowing the use of self-signed certificates to verify server uniqueness.
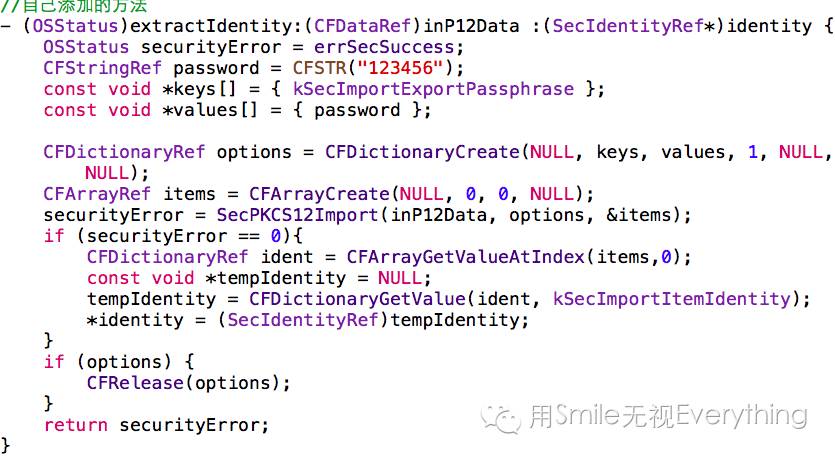
3.2 Server Authenticates Client
1) The server verifies the client certificate. First, import the server’s client.p12 certificate into the server’s key store and the project;
2) Add the following method in AFURLConnectionOperation.m:
3) Override the – (void)connection:(NSURLConnection*)connection method in AFURLConnectionOperation.m:
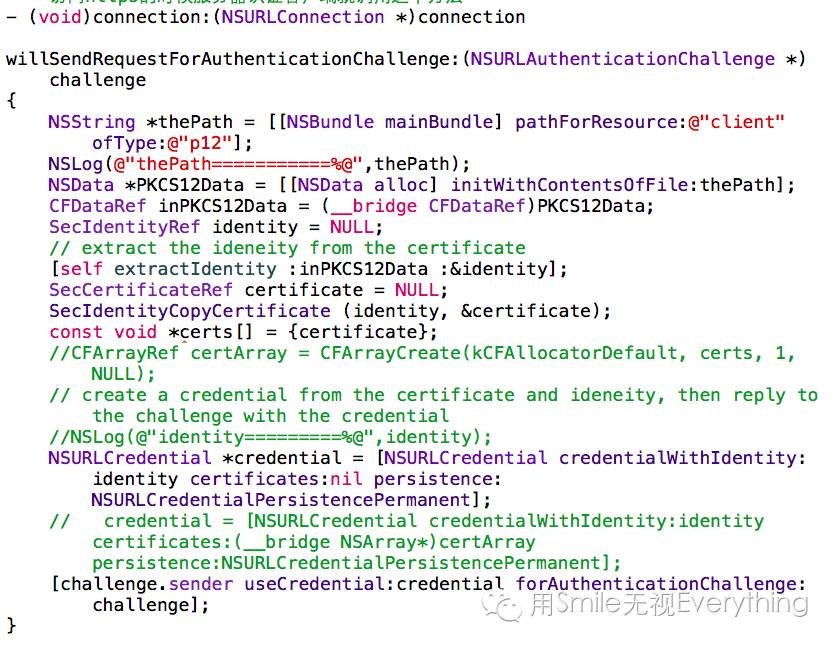
When authentication is required, it will call the challenge method first instead of didReceiveResponse; NSURLAuthenticationChallenge is an authentication challenge class, requiring the client to provide a challenge credential (username and password, client certificate, trusted server certificate, or proxy). iOS provides a class NSURLCredential to represent the challenge credential. The challenge credential can be established through the following function. Thus, when accessing HTTPS, the server authenticates the client by calling this method.
These two code segments verify the server through the p12 file, and the only thing that needs to be modified is the password in 2): CFStringRefpassword = CFSTR(“123456”); this is the password for the p12 certificate, which should be replaced with your own p12 certificate password.
4.3 How to Request in the Controller
With the mutual authentication between our client and server set up in 4.1 and 4.2, in the controller, simply call the method manager.securityPolicy = [AFSecurityPolicy policyWithPinningMode:AFSSLPinningModePublicKey]; to perform mutual authentication:
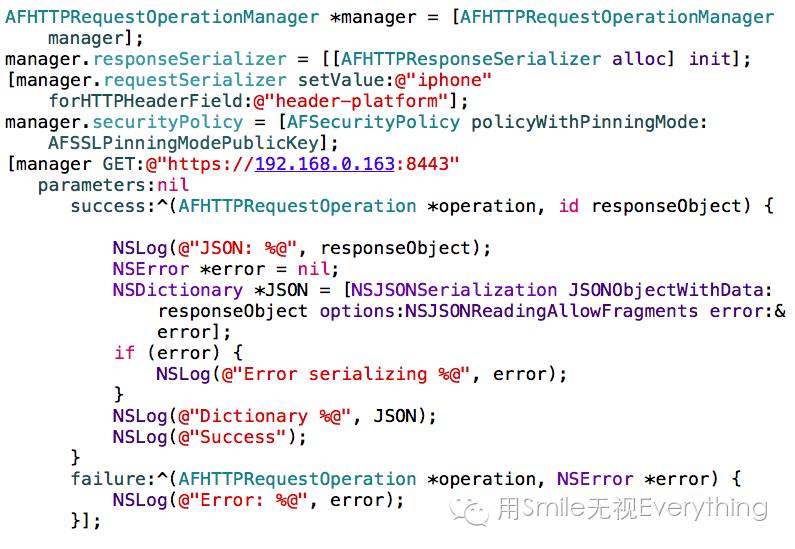
Then you can access the HTTPS server.