2014.03.29/Write
Yesterday, I finally prepared to start bare-metal development on the S3C6410. I wrote the program and compiled it into an .axf file. Everything was going smoothly, and I was ready to use JLINK for online debugging when suddenly I felt that success was just around the corner. JLINK was recognized by the computer normally, and the settings related to JLINK in AXD were also fine. The CPU was detected, so I loaded the image and started debugging. However, when I selected ‘go’, I found that the development board was unresponsive. What could be the issue?
While stepping through the debugging process, I found that the program could run from the startup file to the main function, but after reaching main, it could not step through any further. Sometimes it reported errors like “can not read register 26(R13_SVC) while CPU is running”. In any case, the program was not executing correctly. The program was a simple example, so it shouldn’t have failed. I searched online and found that many others had encountered similar issues. Some had responses, but most went unanswered. I finally gathered that it might be related to a pirated version of JLINK, which necessitated re-flashing the firmware. Therefore, let’s organize the steps for flashing JLINK firmware.
(This indicates that if there are issues with JLINK firmware, it’s not just the familiar PC prompts of unrecognized USB devices or the JLINK light not being on; it could also be that JLINK suddenly cannot step through debugging, causing the debugging program to fail, while the light is still on. This situation can waste time in identifying the problem.)
A: Prepare the necessary software and firmware, including:
a: Install AT91-ISP v1.13.exe – Download tool software for J-LINK V8 firmware
b: J-LINK v8.bin – J-LINK V8 firmware
c: Setup_JLinkARM_v422g.exe – JLINK V8 driver
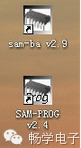
B: Install Install AT91-ISP v1.13.exe software, which will generate two icons: sam-ba v2.9 and SAM-PROG V2.4 (this works on WINXP, WIN7 may not work). Next, install the Setup_JLinkARM_v422g.exe JLINK driver.
C: Erase the chip and put it into programming mode
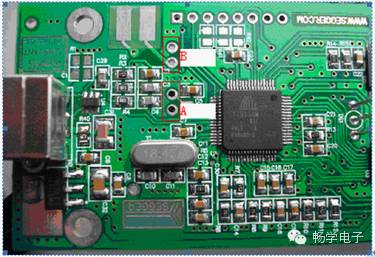
As shown in the image, there are two red boxes A and B. A is the ERASE jumper, and B is the RESET jumper (the positions may vary for different JLINKs).
a: Connect JLINK to the PC with a USB cable to provide power;
b: Short the two vias at A for more than 25 seconds, then disconnect the short;
c: Disconnect the USB connection between JLINK and the PC;
d: Short the two vias at B;
e: Connect JLINK to the PC with a USB cable to provide power for more than 20 seconds, then disconnect the power;
f: Disconnect the short at B. (The order cannot be mixed up)
D: Update the firmware
a: Run SAM-PROG v2.4 programming software and set it as follows:
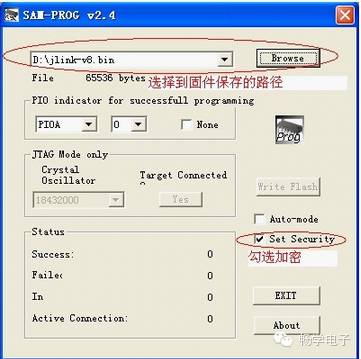
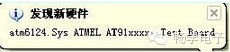
b: Connect JLINK to the PC with a USB cable. At this point, if it’s the first time flashing the firmware, the computer will generally prompt you to install a new hardware driver. Be sure to install the driver by clicking the automatic search option. If the installation is successful, it will appear as shown in the image below; otherwise, the write flash option in the software will still be ineffective. If everything goes smoothly, the write flash option will become active, and active connection will change to 1. Installing the driver at this step is crucial.
c: Click write flash to program the firmware. After the programming is complete, Active Connection will change to 1.
d: Remove the USB cable; the firmware update is now complete.
E: Automatic firmware update
Find SEGGER -> J-Link ARM V4.34 -> J-Link Commander in the computer’s start menu and open it. If your previous operations were correct, it will first prompt you to update the firmware. I directly selected the option for automatic firmware update.
(For this step, some users suggested first selecting ‘no’ to not update the firmware, then entering the command Exec SetSN=20140328, with the latter being the current time. This can overwrite the last firmware time, then re-run J-Link Commander, and at this point agree to update the firmware. I did this, but it prompted “cannot overwrite the original SN”. As for why, I didn’t delve into it.)
(Some users also suggested re-flashing the firmware to JLINK by opening the original V8.bin firmware with Winhex, finding the offset address 0xff00 as the starting address, and modifying the first 4 bytes to another value, as long as it’s not the original 11111117 or 805306163. This is because the updated firmware performs a strict check on these two firmware SNs. Modifying to another value can perfectly resolve the issue; also, change the GDBFull corresponding to 0xff30 to GDBFULL, where the ASCII code is 47 44 42 46 55 4C 4C, to skip the GDBFull check. I checked with winhex and found that the latest version of the 2012 firmware bin file already meets this requirement, so no modifications are needed.)
F: Successful phenomenon – The JLINK indicator light flashes first, then turns solid green.
(Some say that JLINK firmware often fails, so we need to be prepared for a long-term struggle with it.)