
Currently updated to the point where we can write a calculator [The interface can be seen at the end].
① This tutorial is suitable for

Recommended readers: Beginners in VS + QT.
② Prerequisite installation
VS2019 or 2022 Community Edition (This is too simple, so I won’t write it here!) It is recommended to refer to the previous article: https://zhuanlan.zhihu.com/p/682531067
③ Register and log in to your Qt account
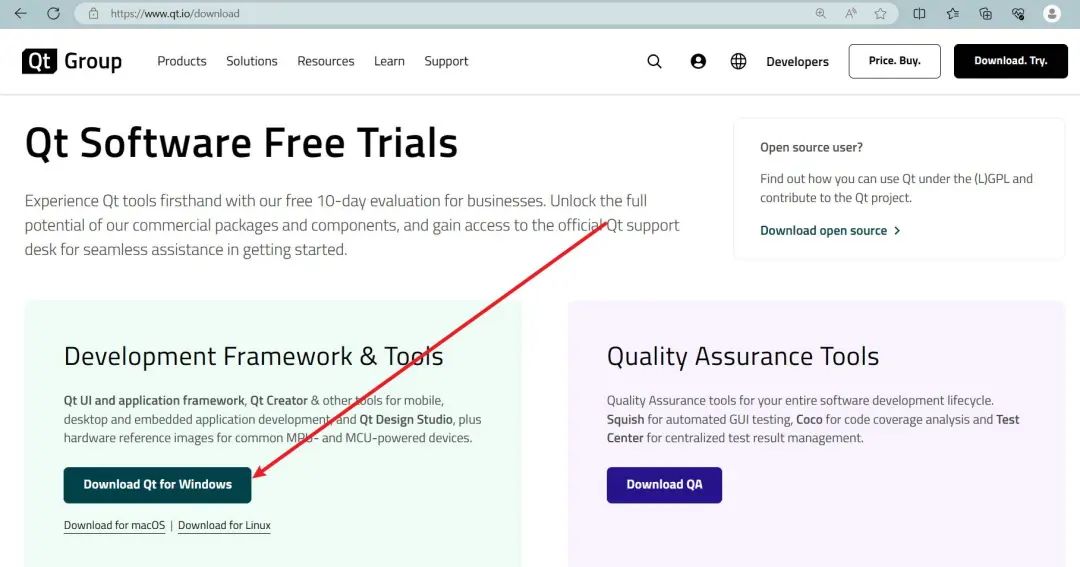
Try Qthttps://www.qt.io/download-dev
④ Download Qt
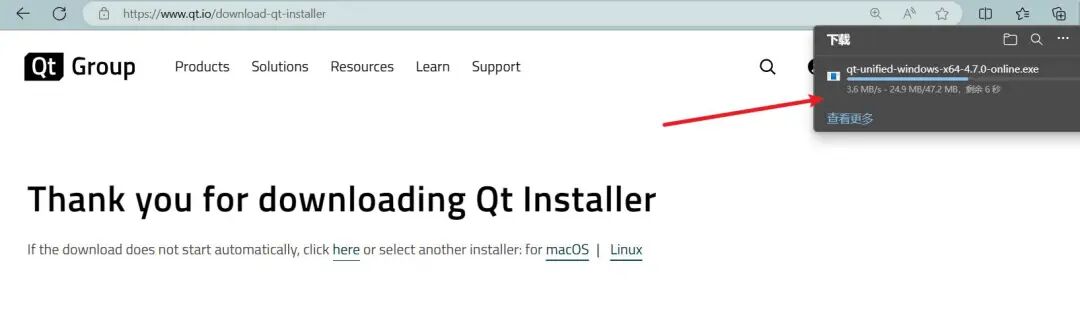
After logging in, go to the Qt official download page https://www.qt.io/download, download the Qt Online Installer (my computer is Windows).
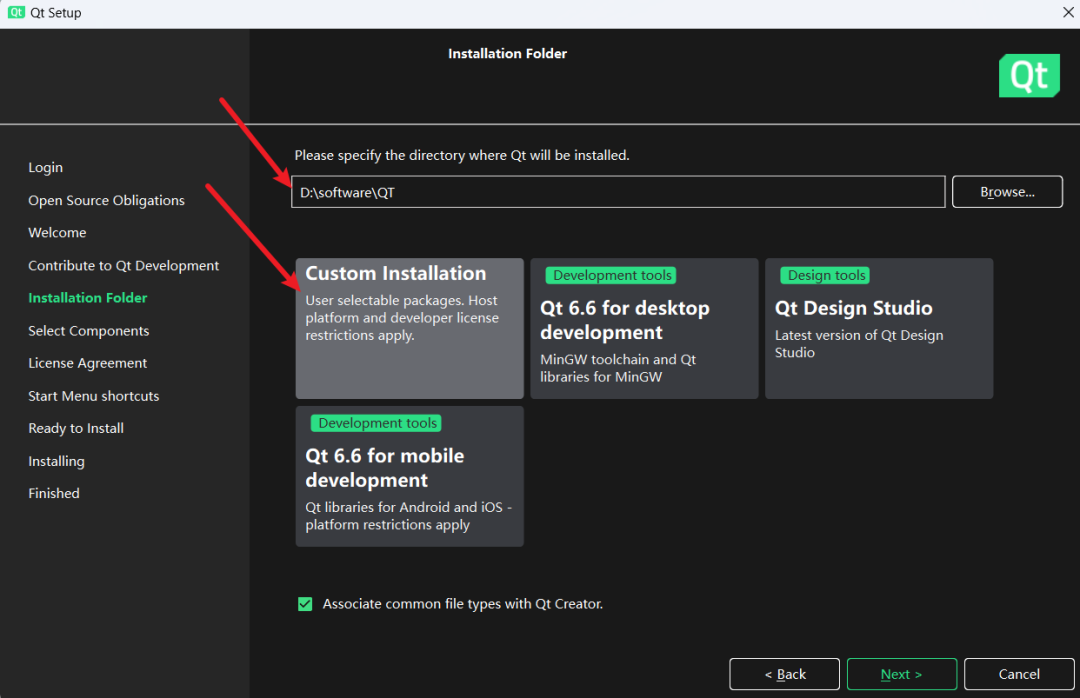
⑤ Install Qt
Run the installer, this process requires entering the company name.
Key Step 1: It is recommended to choose the first option (Custom Installation).
Key Step 2: Choose D drive, do not choose the default C drive.
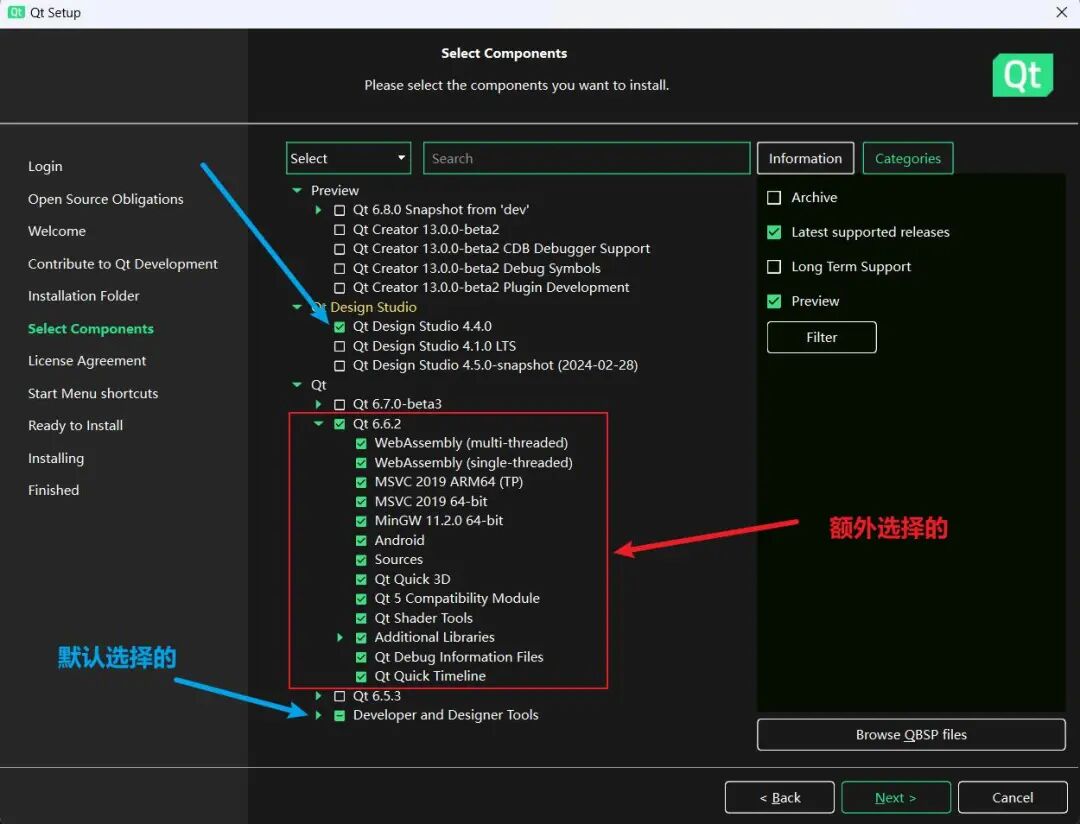
1. Preview
Meaning:
This part contains the preview components of Qt (new versions or features that have not been officially released), usually used to provide early access to the latest technologies in Qt for developers to test and adapt to new features in advance.
Usage:
Suitable for developers who want to try cutting-edge technologies in their projects or participate in the Qt community to provide feedback on new versions. However, considering stability and compatibility, preview components may not be suitable for production environments.
2. Qt
Meaning:
This is the core part of the Qt framework, including all officially released libraries and APIs. Qt provides cross-platform application development capabilities, supporting the development of desktop, embedded, and mobile platform applications.
Usage:
This part is necessary for most Qt developers to install. It includes all the basic tools and libraries required for application development, such as Qt Widgets for desktop application development, Qt Quick for creating dynamic UIs, and other modules like networking, databases, graphics view, etc.
3. Qt Design Studio
Meaning: Qt Design Studio is a design and development tool that allows designers and developers to work closely together to translate design visuals into working Qt Quick code. It provides a set of tools, including UI design, animation production, and prototyping.
Usage: This component is suitable for teams that require close collaboration between designers and developers in their projects. It helps bridge the gap between design and development, making the transition from design to actual application more efficient and seamless.
When installing Qt, how to choose the appropriate components?
-
If you need access to the latest features and technologies of Qt, you can install Preview.
-
For most development projects, the Qt part is essential, as it provides all the core functionalities needed for development.
-
If your project involves complex UI design and requires close collaboration between designers and developers, you can choose the Qt Design Studio tool.
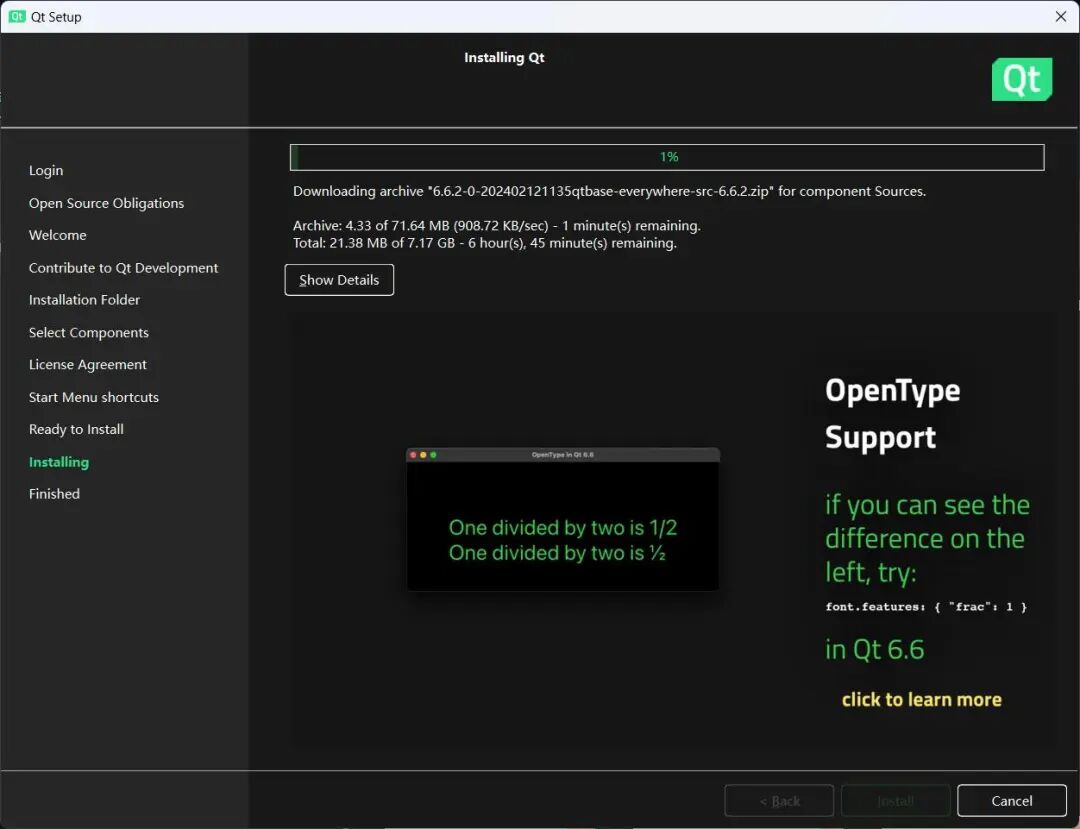
Click Next to proceed with the installation (this step may take a bit longer, requiring over 6 hours, in reality, it took a day and a half, during which it may get stuck and require manual clicks to retry).
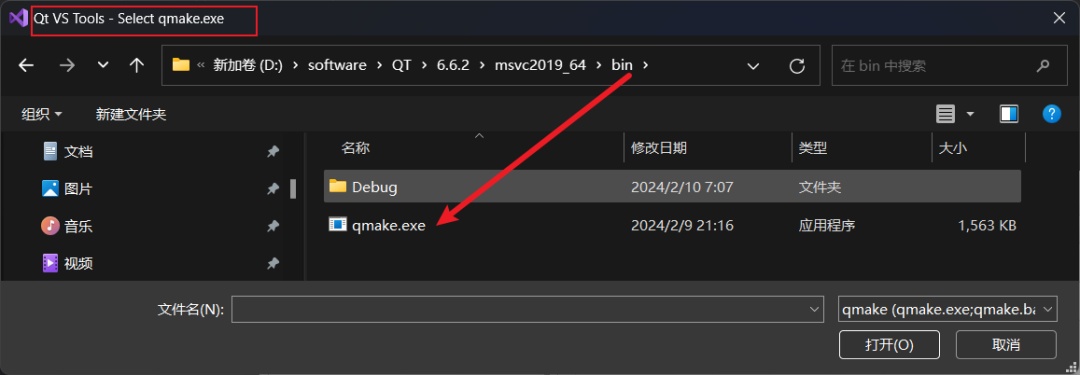
⑥ Install Qt plugins
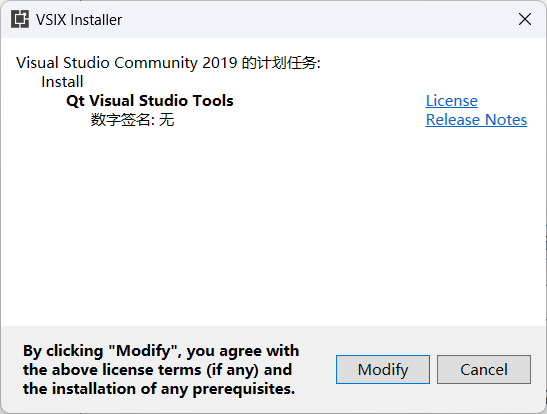
Open VS, in the Extensions and Updates window, first select Online (i.e., search for plugins online), then enter the query keyword “qt”, find the “Qt Visual Studio Tools” item in the result list and click to download.
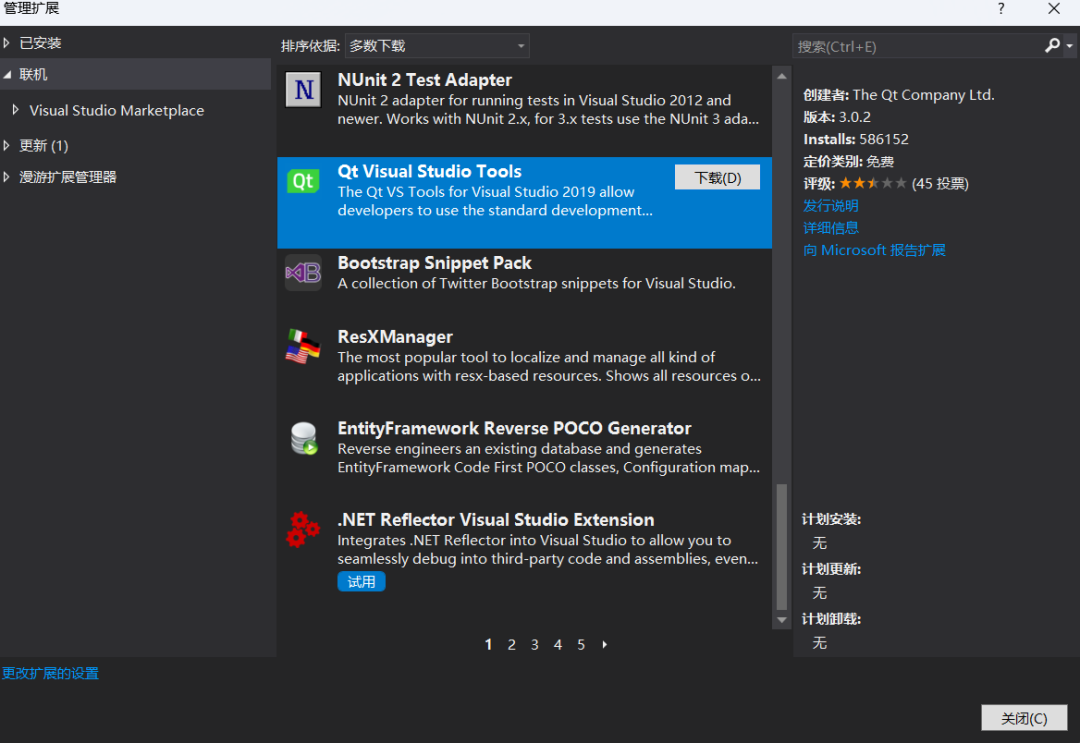

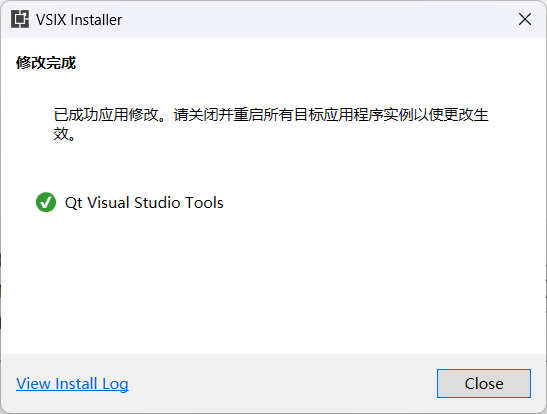
Therefore, we click “Close”, then click “Modify” in the pop-up window, and the installation will proceed automatically.
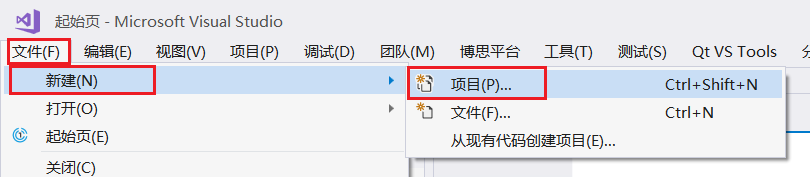
 Next, you need to open VS and configure the development environment.
⑦ Create a Qt project in VS
1. Create a new project
Select File, New Project.
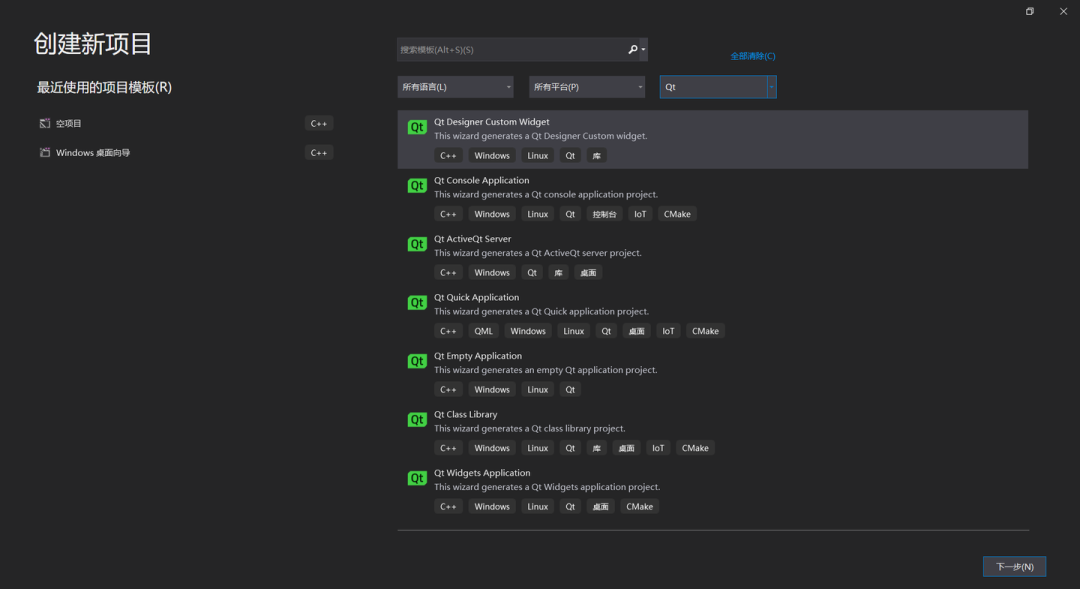
2. Template selection
Let’s talk about:
1. Qt Designer Custom Widget template
-
Used to create custom Qt Designer widgets.
-
If you plan to create a custom control that can be reused in Qt Designer, you can choose this template.
2. Qt Console Application template
-
Console application template, suitable for applications that do not require a graphical user interface (GUI) and only run in the command line interface (CLI).
-
If you only need a program that runs in the terminal or command prompt, then this option is appropriate.
3. Qt ActiveQt Server template
-
ActiveQt is a module of Qt used for integration with Microsoft’s COM technology.
-
Used to create an ActiveQt server project.
-
If you want to create an application that can serve as a COM component, you can choose this template.
4. Qt Quick Application template
-
Used to create QML-based Qt Quick applications.
-
Qt Quick is a technology for building applications with dynamic user interfaces.
-
If you plan to create a modern, highly interactive GUI application, then this template is appropriate.
5. Qt Empty Application template
-
Creates an empty Qt application project, with no pre-set UI or other specific settings.
-
If you want to build your application from scratch and want complete control over the entire project structure, then this option is best for you.
6. Qt Class Library template
-
To create a Qt class library, which is a set of classes (functions, data structures, etc.) that can be shared and reused across multiple Qt programs.
-
If your goal is to create a library that provides specific functionalities or services, rather than a complete application, you should choose this template.
-
Libraries can be linked and used by other Qt applications, and they are often used to encapsulate business logic or a set of common functionalities.
7. Qt Widgets Application template
-
Used to create a standard GUI application based on Qt Widgets.
-
Widgets are a set of UI components provided by Qt for creating traditional desktop applications, such as buttons, text boxes, labels, etc.
-
If you want to create an application that looks like traditional desktop software, such as a file editor, graphic tool, or any other software that requires standard windows and controls, then this template is appropriate.
3. Making an analogy
Qt Widgets Application
Is like the main building of a shopping mall. It is the most traditional structure, including all the basic facilities, such as elevators, stairs, and corridors. In Qt, Widgets are traditional GUI components used to build applications with standard interface elements like buttons, dialog boxes, input boxes, etc.
Qt Quick Application
Is like a modern shopping mall, which has an open floor design with high-tech interactive screens and dynamic lighting. This is built using QML and Qt Quick technology, particularly suitable for applications that require highly dynamic and visually appealing interfaces.
Qt Console Application
Is like the warehouse or logistics office of a shopping mall. It is not visible to customers, but it is key to the smooth operation of the entire operation. Similarly, console applications run in the command line interface without a graphical user interface, suitable for background processing and programs that do not require a GUI.
Qt Designer Custom Widget
Is like a display window customized by an internal designer for a specific brand in a shopping mall. This is a custom control created specifically for Qt Designer, which you can reuse in your application or other projects.
Qt Empty Application
Is like an empty plot in a shopping mall, waiting to be developed. You can build it entirely according to your own planning. This template provides a blank canvas for you to build your Qt application from scratch.
Qt Class Library
Is like multiple stores in a shopping mall. Each store offers various goods and services that can be used by any store within the mall. Libraries are like a set of functionalities or services that can be used by multiple programs.
Qt ActiveQt Server
Is like an information kiosk in a shopping mall that interacts with external services (like COM objects) to provide services to customers (other programs). If your program needs to integrate with Windows’ COM technology, you can choose this template to create an ActiveQt server project.
If you are new to Qt and want to develop an application with a graphical user interface, it is recommended to start with “Qt Quick Application” or “Qt Empty Application”.
In this course, we will take Qt Quick Application as an example for demonstration.
Note: For important differences between Qt Quick Application and Qt Widgets Application, please see the following.
https://zhuanlan.zhihu.com/p/694439595
4. Select Qt Quick Application
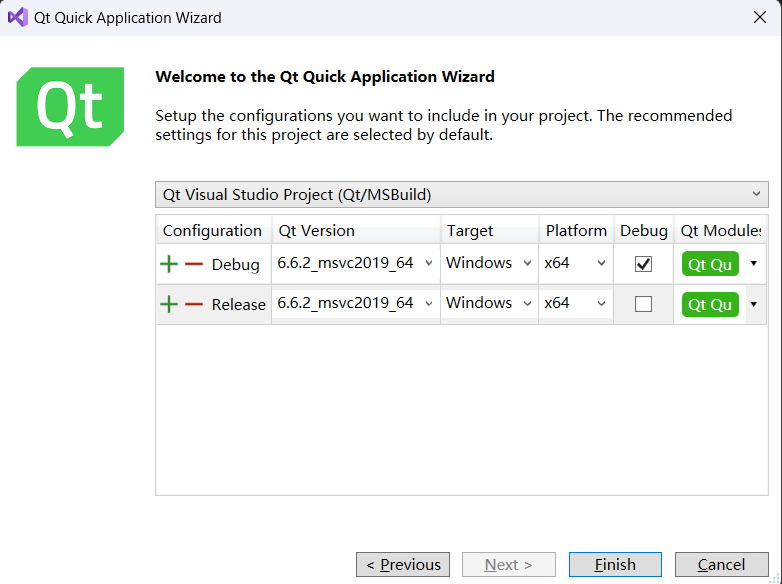
Click install, enter the following interface, and click Next.
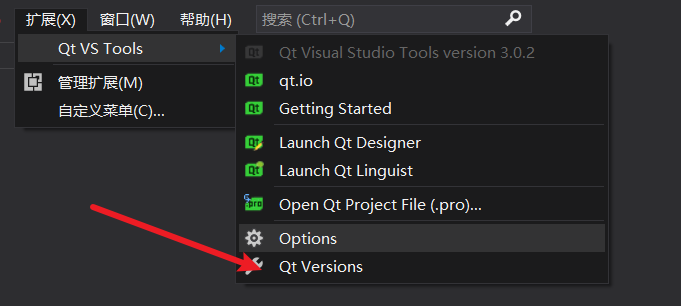
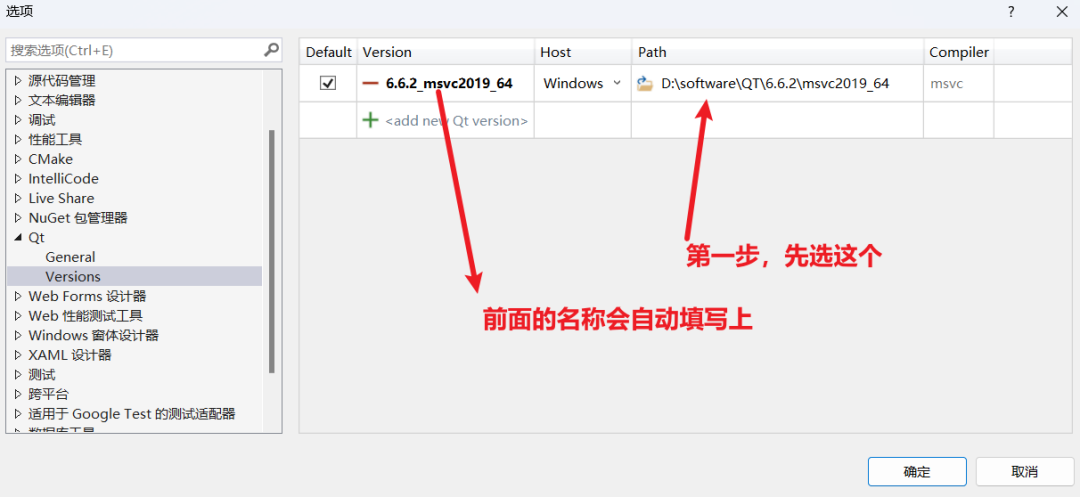
Close the wizard, open VS → Extensions → QT VS TOOLS → Qt Version → add new version
5. Configure your Qt project
1. Configuration
Here are two configurations listed: Debug and Release.
Debug: This is the configuration used during the development and debugging process. The compiled program contains debugging information, runs slower, but provides detailed debugging information when issues arise.
Release: This is the configuration used when you are ready to release the application. It optimizes the code, removes debugging information, runs faster, but does not provide detailed debugging information if the program crashes.
Typically, you will set both configurations. Use Debug during development and switch to Release when preparing to release your application.
2. Qt Version
This specifies the version of Qt. 6.6.2 msvc2019_64 is the selected version, which means it is the 64-bit version of Qt 6.6.2 compiled with Microsoft Visual Studio 2019.
3. Target
This refers to the target operating system. In this case, Windows is selected.
4. Platform
This indicates the architecture of the target platform. x64 represents the 64-bit architecture. If your users run their programs on a 64-bit operating system, then you should choose this option. If you need to support 32-bit systems, you will need to select or add the corresponding 32-bit configuration.
5. Debug column
This column allows you to choose whether to build a debug version for each configuration.
Generally, the Debug configuration should be checked for debugging, while the Release configuration is usually not checked.
6. Qt Module
Here you can select Qt modules, such as QtCore, QtGui, QtNetwork, etc. In your case, “Qt Qu” may be an abbreviation or a specific set of modules. Make sure you select all necessary modules required for your project.
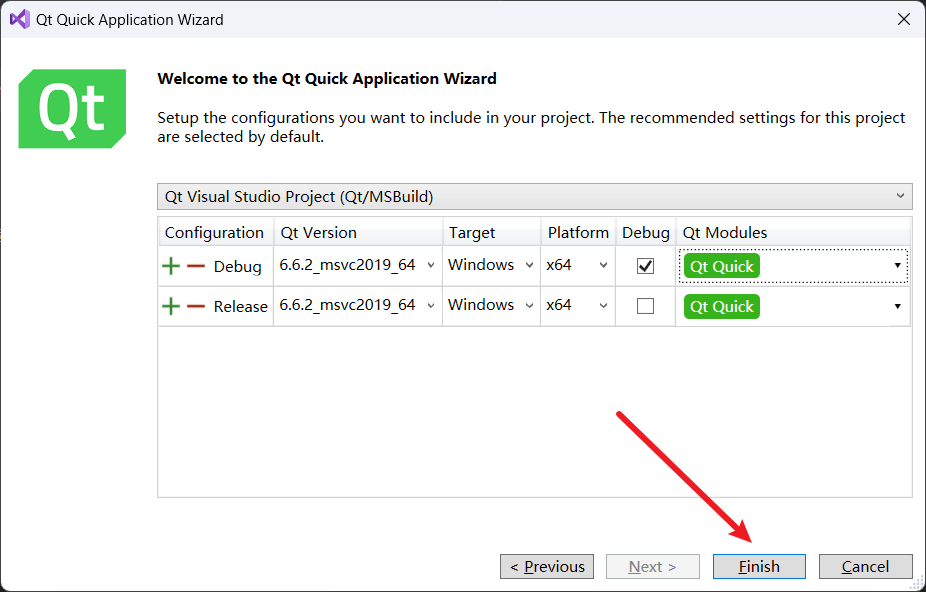
After completing these settings, you can click “Finish” to create the project. Usually, the default settings are sufficient to start a new project. Only when special configurations are needed, such as for a specific Qt version or target platform, do you need to change these settings.
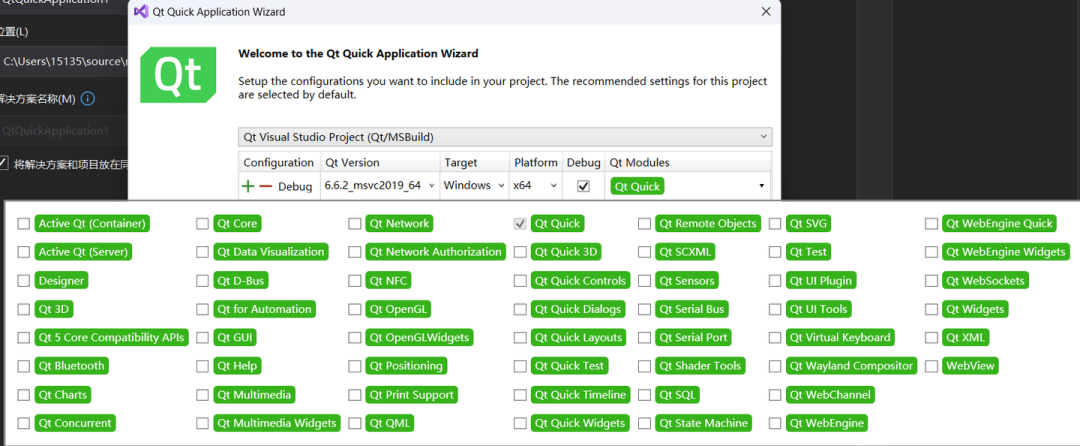
When we expand Qt Module, we will find many modules to choose from, as shown in the following image.Here, the default selection is sufficient, and you can also add more through project properties later.
-
QtCore: Provides core non-GUI functionalities. This module is the foundation of most Qt applications, including event loops, basic types, object models, etc.
-
QtGui: Provides basic graphical components and classes, such as windows, painting, and event handling.
-
QtWidgets: Provides Widgets for creating classic desktop-style user interfaces.
-
QtQuick: A module for developing dynamic user interfaces using the QML language.
-
QtNetwork: Provides networking programming capabilities, such as TCP/IP, UDP, etc.
-
QtMultimedia: Used for handling multimedia content, such as audio and video.
-
QtSql: Used for handling databases.
-
QtTest: Used for testing Qt applications and libraries.
By default, a Qt Quick application will include the “Qt Quick” module, as it provides all the infrastructure needed to develop modern, smooth user interfaces.
If you need additional functionalities, such as network support or database connections, you will need to add the corresponding modules. Typically, you should only include the modules required for the project to avoid unnecessary dependencies and increase project size.
For most Qt Quick applications, the “Qt Quick” module is sufficient, but if your application has specific needs, you can choose more modules based on those needs.
To be verified: In the Qt project settings in Visual Studio, you need to manage these modules through the settings of the Qt Visual Studio Tools plugin, or manually add the required modules in the project file (like .pro or CMakeLists.txt). If anyone has verified this, please share in the comments! Thank you!
Then, we click Finish!
⑧ Project structure
Next, let’s discuss the structure of the Qt Quick Application project in detail, as shown in the image.
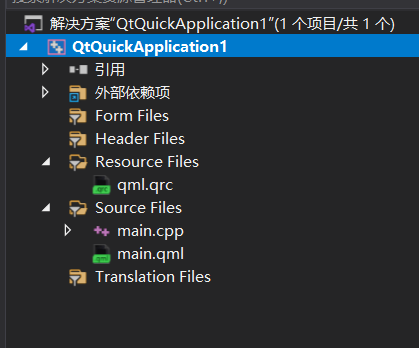
References: This part usually includes references to other projects or libraries. For example, if your project depends on other sub-projects or third-party libraries, they will be listed here.
External dependencies: This lists the external libraries and frameworks that the project depends on, such as Qt modules and other libraries that may be linked.
Note: Distinguish between third-party libraries and external dependencies!
External Dependencies:Usually refers to: other components or libraries that the project must depend on to run, which are often part of the system-level or standard library, such as libraries provided by the operating system or the standard library of the programming language.In a Qt project, this may include Qt’s own modules (like Qt Core, Qt GUI, Qt QML, Qt Quick, etc.).These dependencies are usually closely related to your development environment (like compiler, linker) and runtime environment (like the user’s operating system).
Third-Party Libraries:
This usually refers to code libraries provided by other teams or organizations, which are not written by the project developers themselves.
Third-party libraries may not be part of the standard library of the programming language or the operating system, and they may be software packages that provide specific functionalities, such as image processing libraries, mathematical computation libraries, etc.
When using third-party libraries, developers usually need to download the source code or binary files of these libraries themselves and integrate them into their projects.
Form files: If your project uses Qt Widgets, this part will contain UI files created by Qt Designer (.ui). However, in a Qt Quick application, this part is usually empty because the UI is defined through QML files.
Header files: Stores C++ header files (.h), where you will define classes, function prototypes, enums, structures, etc.
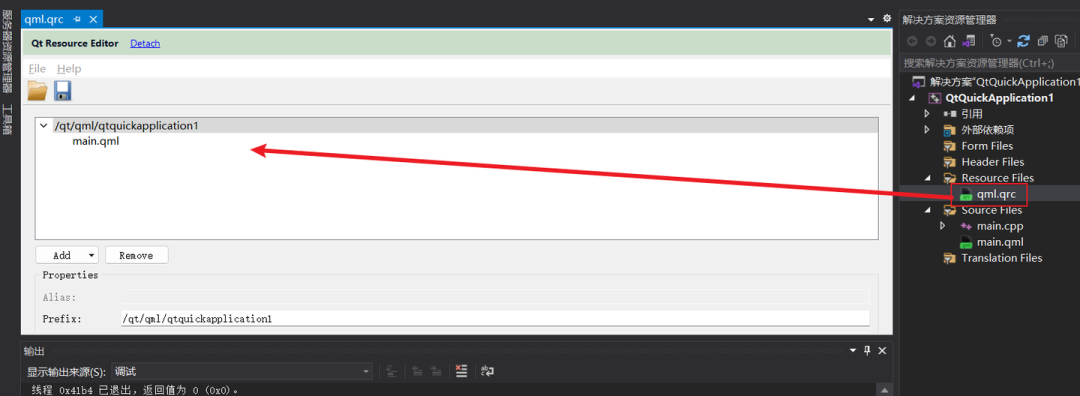
Resource files: This resource folder contains the qml.qrc file, which is an XML format Qt resource file used to define resource prefixes and paths, embedding resources (such as images, QML files, audio files, etc.) into the executable file of the application.
Source files: Stores C++ source code files (.cpp), which contain the specific implementations of classes and functions.
QML files (under qml.qrc): Stores QML files used to define the user interface. It is the starting point of the UI, the first QML file to be loaded.<span>main.qml</span>
Note!!!! In a Qt Quick application, most UI-related work will be done in QML files, while the C++ part is used to implement more complex backend logic or interact with the system’s lower-level.
⑨ Write a calculator
Requirement description
Let’s first write a simple software: a calculator (input two numbers to perform addition, subtraction, multiplication, and division). [Note: OpenCV is not needed for this project, but I am a CV engineer, so I must install it. We will use OpenCV in the following projects!]
Step 1: OpenCV
1. Set up OpenCV
In Visual Studio, we need to configure the project to link the OpenCV library.
First, download and build or install the OpenCV library, the steps are as follows.
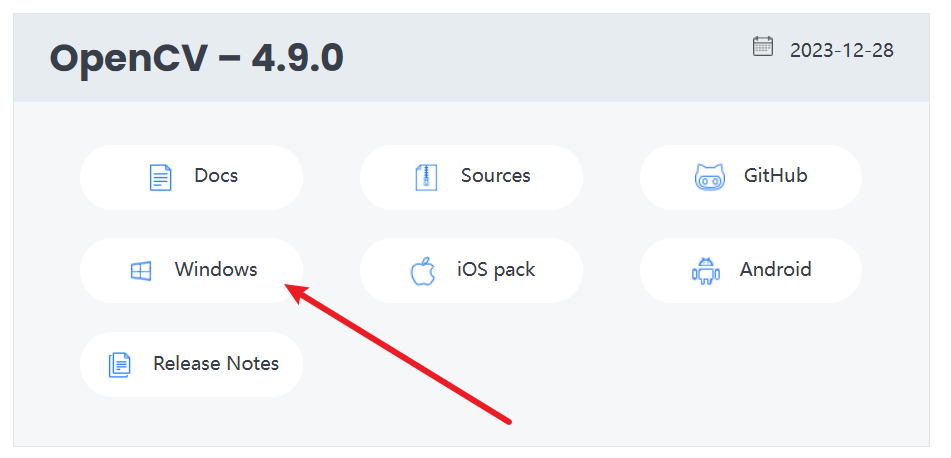
Click to enter the official website Releases – OpenCV https://opencv.org/releases/
Select Windows (you can choose according to your computer system. Mine is Windows), and the download will start.
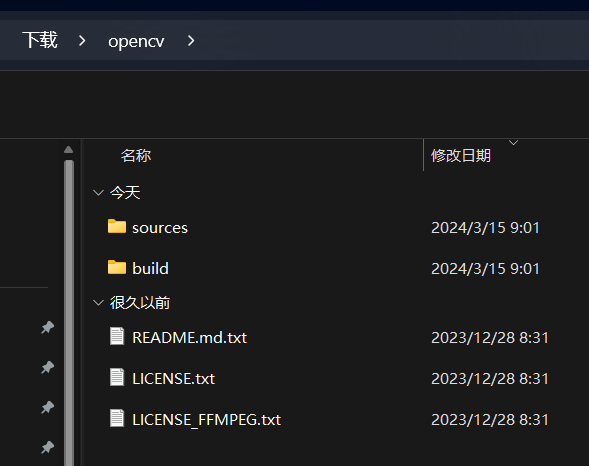 Among them:
sources indicates: OpenCV’s source code; build indicates: compiled binary files, containing all files generated during the compilation process. The file usually contains an overview and basic information about the project or software. The file contains license information, telling you how you can use the software. The file specifically provides information about FFMPEG licensing, which is a popular multimedia framework that OpenCV may use to process video streams.
<span>README.md.txt</span><span>LICENSE.txt</span><span>LICENSE_FFMPEG.txt</span>
We mainly use the contents in the build folder, and we also explain:
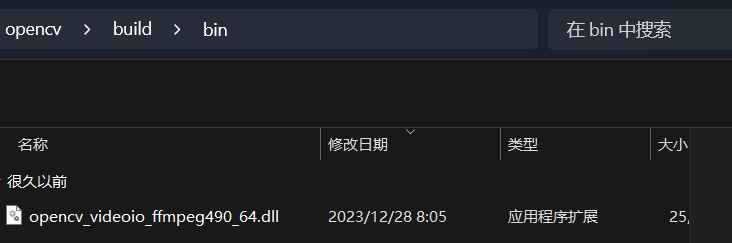
<span>bin</span>: This folder contains executable files, including test programs or sample applications.
<span>java</span>: Contains interface files for the OpenCV library compiled for the Java language.
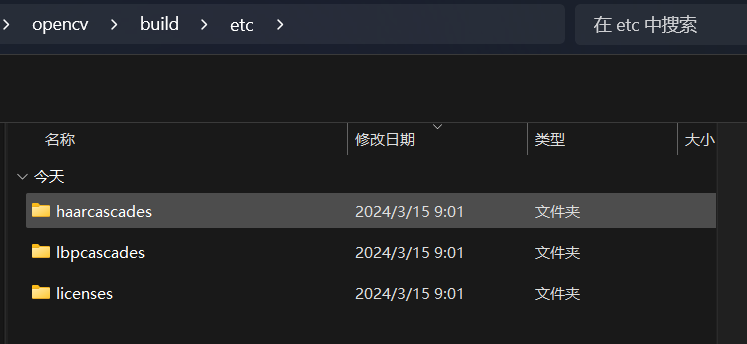
<span>etc</span>: This contains other auxiliary documents.
-
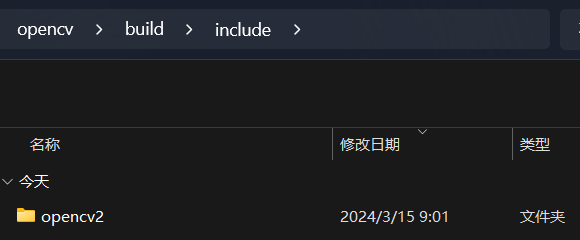
<span>haarcascades</span>: This folder usually contains XML files of cascade classifiers using Haar features. These are trained models used to detect faces, vehicles, or other objects in images.<span>lbpcascades</span>: Similar to Haar, but this contains classifiers using LBP (Local Binary Pattern) features. LBP classifiers are usually faster than Haar but may be less accurate.<span>haarcascades</span><span>licenses</span>: This folder may contain some specific license files that detail the terms of use for the contents of the folder.<span>etc</span><span>include</span>(Important): Contains header files that need to be included when writing programs using OpenCV.
<span>python</span>: Contains the OpenCV interface for the Python language, which may be compiled Python modules or packages.
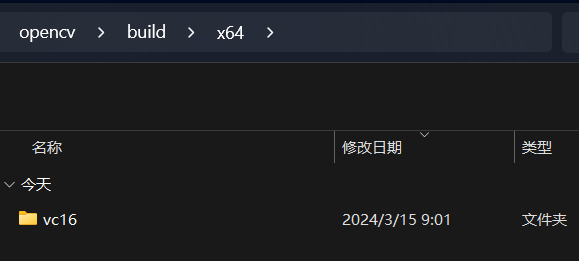
<span>x64</span>(Important): This is the specific compiled product for 64-bit systems, usually containing library files (like and files).<span>.lib</span><span>.dll</span>
<span>OpenCVConfig.cmake</span>: This is a CMake configuration file used to find and use OpenCV in other projects.
<span>setup_vars_opencv4.cmd</span>: This is a batch file used to configure environment variables to use OpenCV on Windows systems.
<span>OpenCVConfig-version.cmake</span>: It specifies the OpenCV version information for CMake to use when configuring projects.
<span>LICENSE</span>: This file contains the license information for OpenCV.
2. Configure include directories (include) and library directories (lib) in project propertiesFirst, let’s explain the difference between library directories and include directories?“Include Directories” and “Library Directories” are two different types of configurations that point to different file types, used in different build stages.
Include DirectoriesWhen your code includes header files, such as using the directive `#include <filename.h>`, the compiler needs to know where these header files are. Include directories are where the compiler looks for header files during the preprocessing stage. These directories usually do not contain executable code, but only declarations, such as class, function, and variable definitions. If the compiler cannot find the referenced header files in the include directory list, it will throw an error.In Visual Studio project settings, these are usually configured under `C/C++` -> `General` -> `Additional Include Directories`.
Library DirectoriesWhen your program uses external libraries (like OpenCV or other third-party libraries), after compilation, the linker needs to find the implementations of these libraries, which are usually in `.lib` files (on Windows). Library directories are where the linker looks for these library files during the linking stage. Library files contain compiled code, and they can be static libraries (.lib) or import libraries for dynamic link libraries (.dll) (also .lib).In Visual Studio project settings, these are usually configured under `Linker` -> `General` -> `Additional Library Directories`.
SummaryInclude directories: Tell the compiler where to look for `.h` or `.hpp` files.Library directories: Tell the linker where to look for `.lib` or `.dll` import libraries (`.lib`).When developing in C++, it is crucial to set these two directories correctly to ensure header files can be found and compiled correctly, and library files can be found during linking to generate a runnable program.
My OpenCV include location is:
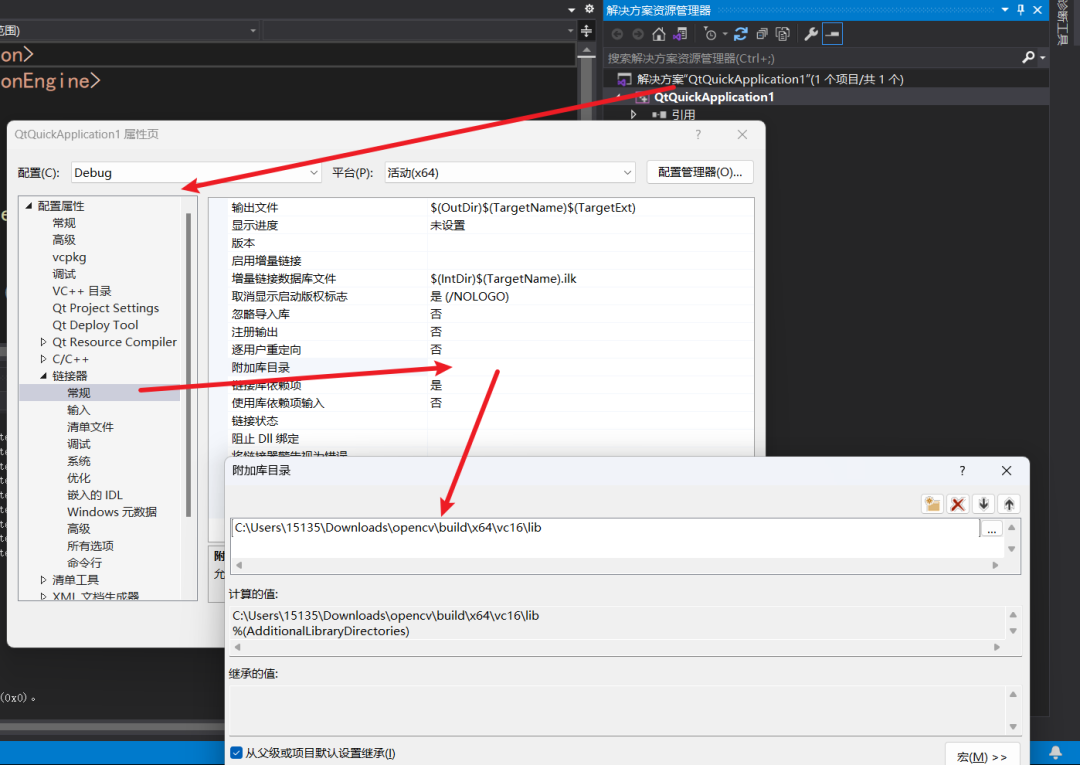
C:\Users\15135\Downloads\opencv\build\include, added to C/C++ –> General –> Additional Include Directories.
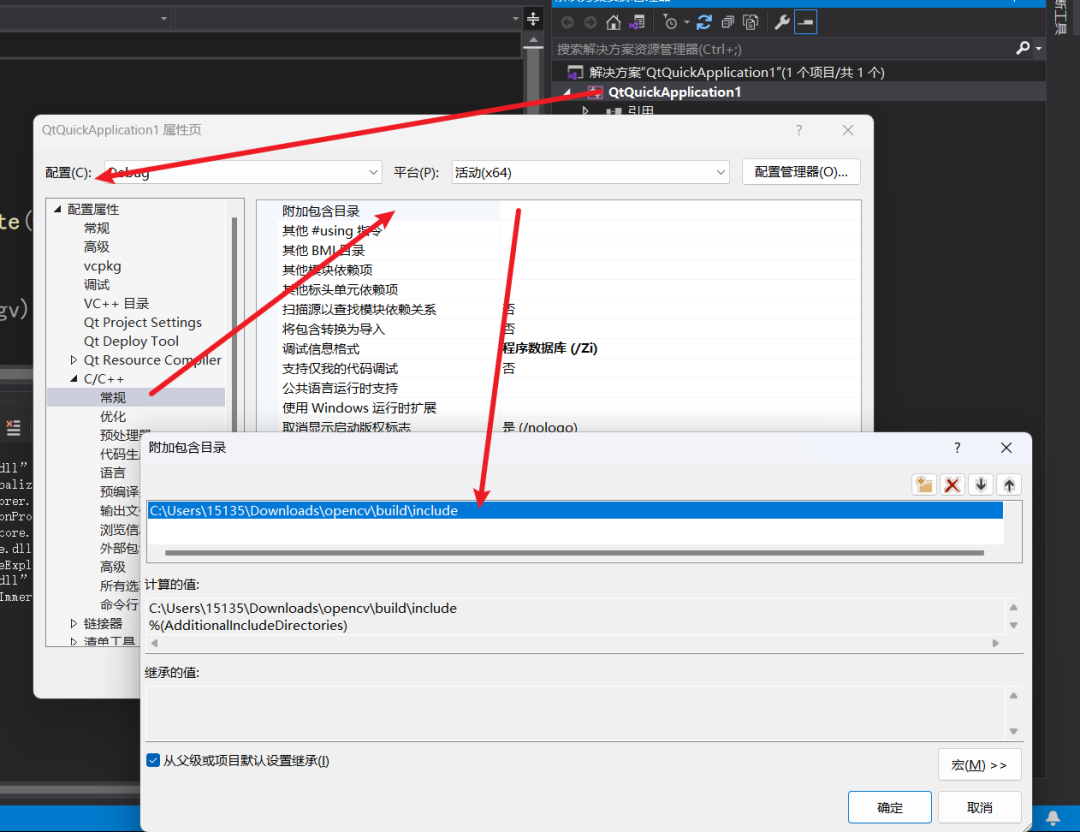
C:\Users\15135\Downloads\opencv\build\x64\vc16\lib, added to Linker –> General –> Additional Library Directories.
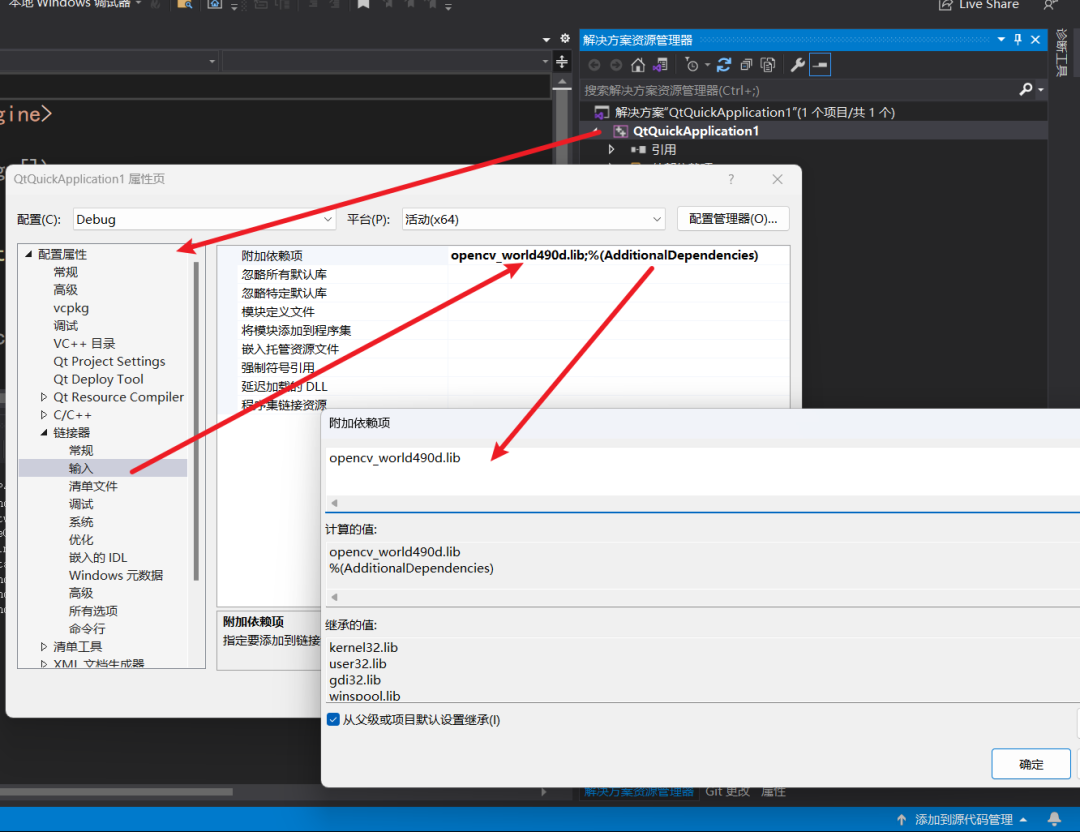
<span>opencv_core490d.lib</span><span>490</span><span>d</span>What is the difference between opencv_core.lib and opencv_world.lib?They are library files used by OpenCV (Open Source Computer Vision Library) on the Windows platform, and they are important components for C++ development. These two library files differ in functionality, mainly in the range of features they provide and how they are linked.opencv_core.lib: This library contains the core functionalities of OpenCV, such as basic data structures, drawing functions, file operations, etc. It is the most fundamental part of OpenCV, and almost all OpenCV programs require this library. The `core` module is the lowest-level module in OpenCV, providing the infrastructure for the entire library.opencv_world.lib: Starting from OpenCV version 3.x, OpenCV introduced the `opencv_world` module, which is a merged library that contains the functionalities of all OpenCV modules (including `opencv_core`). Using `opencv_world.lib` can simplify the linking process, as you only need to link one library file instead of multiple library files. This is useful for simplifying build configurations and reducing build complexity. However, using `opencv_world` may increase the size of the final application because it includes all functionalities of the entire OpenCV library, not just the part you need.
Which one to choose?
If your project uses multiple modules of OpenCV and you want to simplify the build process, `opencv_world.lib` is a good choice. If you only need a small part of OpenCV’s functionality, or if you are very sensitive to the size of the final application, then choosing to link specific module libraries (like `opencv_core.lib` plus other modules you need) may be more appropriate.
Overall, these two libraries provide different levels of convenience and flexibility, and developers can choose which one to use based on their needs.
Here, we take opencv_world490d.lib as an example, the specific operation is as follows:
Step 2: Design the UI interface in QML
Use Qt Quick (QML) to design the calculator interface. We will add buttons, text input boxes, and other elements in the QML file to create the user interface.
When we open the main.qml file, we find that its default content is as follows:
import QtQuick 2.9import QtQuick.Window 2.2Window { visible: true width: 640 height: 480 title: "QtQuickApplication1" Text { anchors.fill: parent horizontalAlignment: Text.AlignHCenter verticalAlignment: Text.AlignVCenter font.bold: true font.pointSize: 42 text: "Hello World!" }}In the default main.qml file, we need to make some modifications.
import QtQuick 2.15import QtQuick.Controls 2.15ApplicationWindow { visible: true width: 240 height: 320 title: "calculator" Column { spacing: 10 anchors.centerIn: parent TextField { id: input1 placeholderText: "number 1" } TextField { id: input2 placeholderText: "number 2" } Row { spacing: 10 Button { text: "+" onClicked: calculate("add") } Button { text: "-" onClicked: calculate("subtract") } Button { text: "*" onClicked: calculate("multiply") } Button { text: "/" onClicked: calculate("divide") } } Label { id: resultLabel text: "result: " } } function calculate(operation) { var num1 = parseFloat(input1.text); var num2 = parseFloat(input2.text); var result; switch(operation) { case "add": result = num1 + num2; break; case "subtract": result = num1 - num2; break; case "multiply": result = num1 * num2; break; case "divide": if (num2 !== 0) { result = num1 / num2; } else { result = "The divisor cannot be 0"; } break; } resultLabel.text = "result: " + result; }}Step 3: Edit main.cpp
Register the ImageProcessor class in main.cpp and ensure that the QML environment can call it.
However, the default content in main.cpp is as follows:
#include <QGuiApplication>#include <QQmlApplicationEngine>int main(int argc, char *argv[]){#if defined(Q_OS_WIN) QCoreApplication::setAttribute(Qt::AA_EnableHighDpiScaling);#endif QGuiApplication app(argc, argv); QQmlApplicationEngine engine; engine.load(QUrl(QStringLiteral("qrc:/qt/qml/qtquickapplication1/main.qml"))); if (engine.rootObjects().isEmpty()) return -1; return app.exec();}In this calculator project, we will not modify main.cpp!
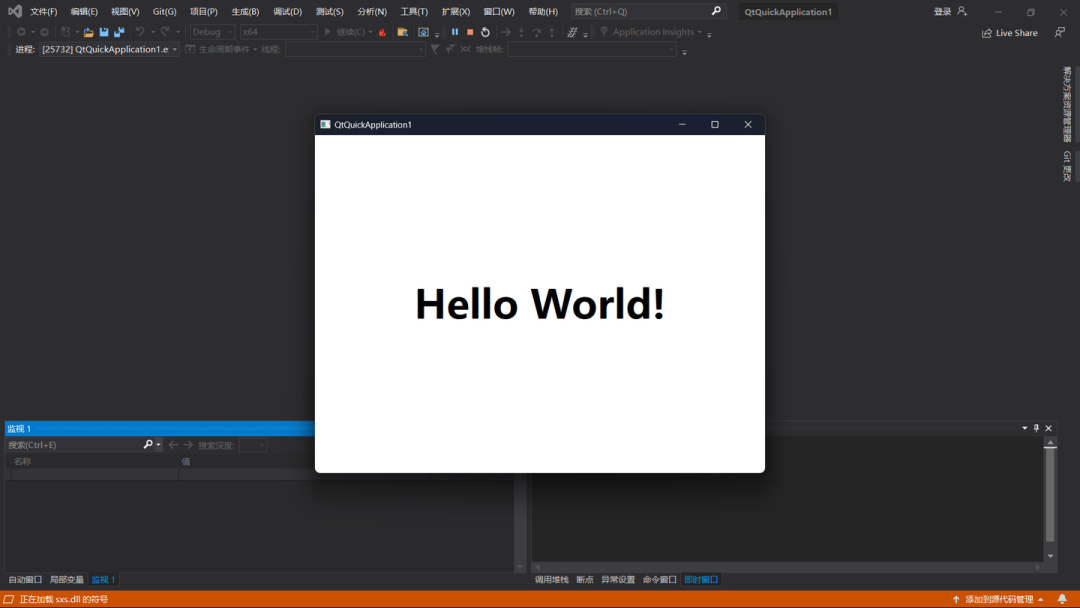
Step 4: Compile and run
Build the project in Visual Studio and check for any compilation errors. Fix any errors that may occur and ensure that all necessary libraries are correctly referenced.
After running the application, you will see:
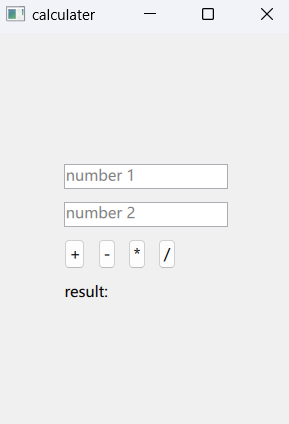
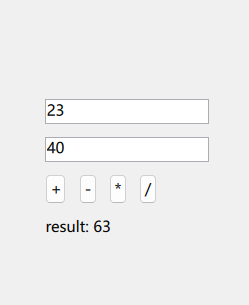
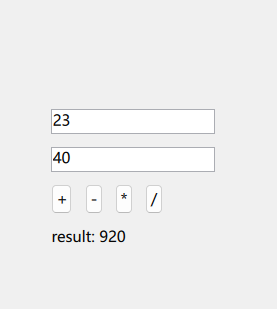
Isn’t it fun! Next, we will write a project that will use OpenCV functionality [Stay tuned]!
THE END
Editor:Deeply Engaged in Computer Science
Review: Git Code Farmer Academy
Click the card | Help your coding advancement~