Click on “ Technical Training ” above and select “Pin to Top”
Over 130,000 industrial control professionals follow this WeChat platform: technical sharing, learning exchanges, industrial control videos
We all know that HMI touch screens may experience touch offset due to various factors such as installation or on-site environment, meaning the touch point does not align with the actual action point, right? So when HMI experiences touch offset, how do we troubleshoot the issue and how do we handle it?
Below, we will introduce how to check if the issue is caused by the bolts being too tightly installed, which may cause the surface panel to deform. If this factor is ruled out, we need to perform touch calibration on the HMI.
If the system setting password for the HMI hardware is lost, it can be restored to factory settings through system initialization. There are four ways to enter HMI touch calibration, while OS system initialization can only be done via DIP switch.
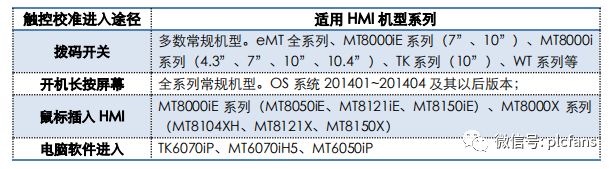
1. Touch Calibration and System Initialization via DIP Switch
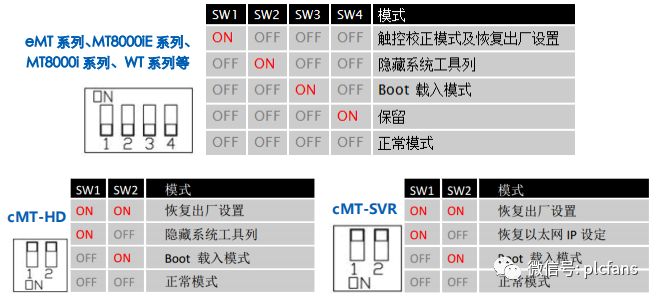
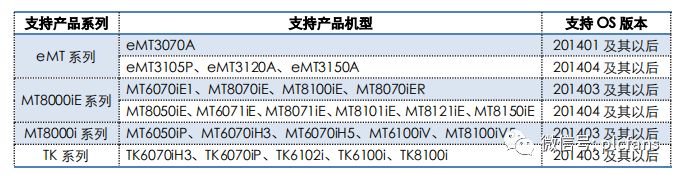
For the entire eMT series, MT8000iE series, MT8000i series, TK series, WT series, etc., there is a group of reset buttons and DIP switches behind the HMI. Switching modes can trigger corresponding functions.
If the HMI experiences touch offset or the system setting password is lost, you can adjust the DIP switch to perform touch calibration or restore to factory settings. The detailed setting steps are as follows:
1. Set DIP switch 1 to ON, keep the rest OFF, then restart the HMI to enter touch calibration mode.

Below are the DIP switch settings for each model, please refer to the relevant installation manual
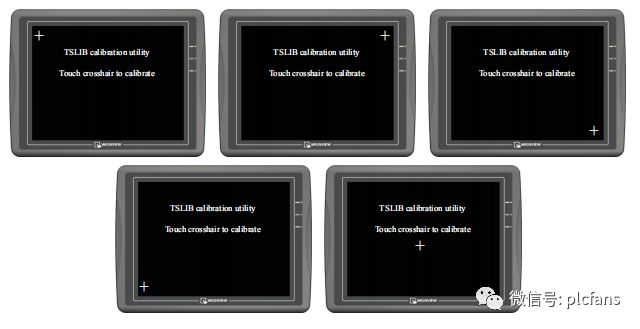
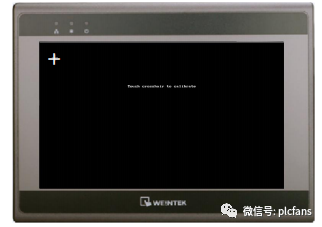
2. A “+” cursor will appear on the HMI. Use a stylus or finger to tap the center of the “+” cursor (hold for about 2 seconds and then release) to perform five-point calibration: top left, top right, bottom right, bottom left, and center. Once all “+” points are accurately touched, the “+” cursor will disappear. The calibration parameters will be retained in the system.
3. After completing the calibration action, the system will ask the user whether to restore the HMI’s system setting password to factory settings.
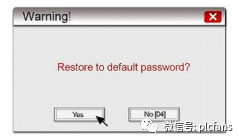
If only performing touch calibration, press “NO”; if no selection is made within 10 seconds, the password will not be initialized;
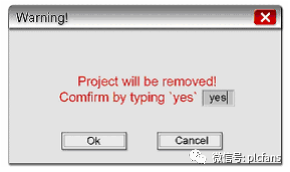
4. If you want to perform system initialization, press “YES”. The system will confirm whether the user wants to restore the HMI’s system setting password to factory settings. After entering [yes] and pressing [OK], all project files and historical data in the HMI will be cleared.
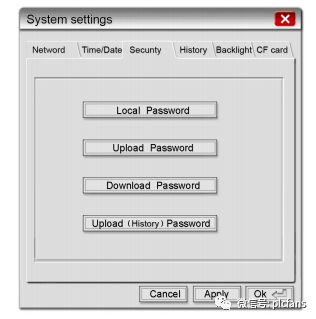
5. After initialization, the [Local Password] system setting password will be restored to the preset password 111111. However, other passwords, including those used for download and upload, must be re-entered after selecting to restore factory values to perform correct upload and download of Project;
2. Long Press Screen on Boot to Enter Touch Calibration
[Applicable Models] All regular product models (excluding cMT series and cMT-HD series)
[Operation Steps]
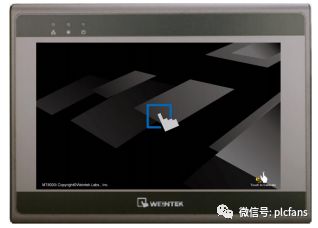
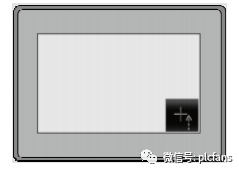
Step 1: Long press any position on the screen during boot. If the HMI boot screen shows a finger icon or “long press to calibration touch panel” in the bottom right corner, it indicates that this function is supported.
Step 2: Touch calibration. When the “+” cursor appears on the calibration interface, tap to calibrate in sequence (tap the “+” cursor, hold for about 2 seconds and release, performing five-point calibration. Once all “+” points are accurately touched, calibration is complete).
Step 3: Confirm whether to save the results. 1. Press OK to save the calibration and enter the project screen; 2. Press RETRY to re-enter five-point calibration.
Note:
1. If the user does not click the OK button within the last ten seconds, recalibration is required.
2. Within ten seconds, the user can touch the screen to measure their calibration offset.
3. The touch calibration program also supports vertical mode;
3. Enter Touch Calibration via Mouse
[Applicable Models] MT8050iE, MT8121iE, MT8150iE, MT8104XH, MT8121X, MT8150X
[Operation Steps]
1. Insert the mouse into the HMI;
2. When the HMI starts, click the “+” touch calibration mode icon in the bottom right corner of the screen.
3. In the pop-up “Continue to touch panel calibration?” window, click [YES] with the mouse;
4. Perform five-point touch calibration: a “+” cursor will appear on the screen. Use a stylus or finger to tap the center of the “+” cursor for calibration.
Once all “+” points are accurately touched, the “+” will disappear, indicating calibration is complete, and it will return to the project screen.
4. Enter Touch Calibration via Computer Project Manager Software
[Applicable Models] TK6070iP, MT6070iH5, MT6050iP
[Operation Steps]
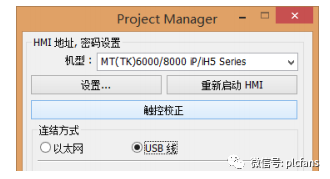
1. In the computer Project Manager, select MT(TK)6000/8000 iP/iH5 Series, a “Touch Calibration” button will appear below;
2. Connect the computer and HMI via Ethernet or USB cable, click the “Touch Calibration” button, and the HMI device will enter the touch calibration screen.
3. Perform five-point touch calibration: a “+” cursor will appear on the screen. Use a stylus or finger to tap the center of the “+” cursor for calibration. Once all “+” points are accurately touched, the “+” will disappear, indicating calibration is complete, and it will return to the project screen.
Have you mastered these common methods for performing touch calibration and system initialization on Weicon touch screens?
Share with friends to broaden knowledge 
ClickRead the Original to learn about electrical engineering, PLC, variable frequency servo, CNC robots, and more.