Today, I will share with you the hardware UART peripheral debugging output mechanism under IAR.
In the embedded world, outputting print information is a very common auxiliary debugging method. With the help of print information, we can easily locate and analyze program issues. There are many ways to implement print information output in embedded application design. This series will introduce one by one the methods of printing information output under the ARM Cortex-M core MCU in the IAR environment.
This is the first article, and we will first introduce the most common way of outputting print information, which is to utilize the hardware UART peripheral within the MCU chip. This article is not specifically about how to use the UART peripheral module, but rather focuses on analyzing how the printf() function defined in the C standard header file stdio.h is linked with the underlying driver functions of the UART peripheral in the IAR environment.
Note: The version of IAR EWARM software used in this article is v9.10.2.
1. Overall Block Diagram of Print Output
First, let’s introduce the overall software and hardware block diagram of the print output method. The hardware mainly consists of a PC host, an MCU target board, and a connecting cable (there are two types of connecting cables: one is an RS232 serial cable, and the other is a TTL serial to USB module board).
On the software side, the PC needs to install a serial port debugging assistant software, and the MCU application program on the target board needs to include print output related code. When the MCU program runs, the UART peripheral inside the chip drives the physical transmission of printed character data (hello world.) and the print information can be seen in the serial port debugging assistant software on the PC.
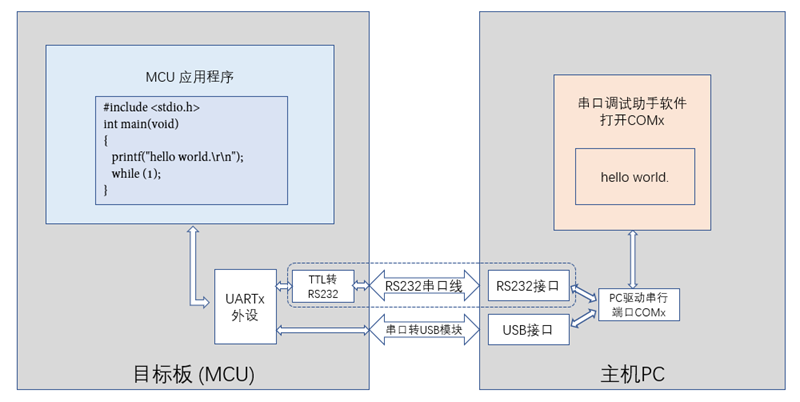
The MCU application program in the above image is compiled and linked in the IAR environment, so our focus is on how the printf() in the stdio.h header file is linked with the UART peripheral driver functions in IAR.
2. C Standard Header File stdio.h
Friends familiar with embedded engineering should know that the stdio.h header file is not in the user project folder, and we do not need to manually add this file to the project directory. This file is a standard header defined by the C standard and is automatically provided by the toolchain.
stdio.h is the standard library header file for input and output provided by the C language, and its predecessor was the “Portable Input Output Library” written by Mike Lesk in the 1970s. All input and output in C language is accomplished through an abstract byte stream, and access to files is also done through associated input or output streams.
stdio.h prototype: https://cplusplus.com/reference/cstdio/
Most people learn C language in Visual Studio / C++ environment. In this environment, the functions defined in stdio.h are implemented by Visual Studio software directly, and we usually do not need to care about the implementation details.
In the embedded IAR environment, most of these standard C defined header files are also supported. We can find them in the following IAR software directory. When we add #include <stdio.h> and other statements in the project code, we are actually adding the files from the IAR software directory into the project for compilation.
\IAR Systems\Embedded Workbench 9.10.2\arm\inc\c\stdio.hHowever, we need to pay attention to the specific implementation of functions like printf() defined in the stdio.h file under the IAR directory, as we need to compile and link to generate specific machine code to download to the MCU for execution. But where is the prototype of the printf() function? Let’s keep that a mystery for now.
3. UART Peripheral Driver Functions
Speaking of UART peripheral driver functions, everyone should be quite familiar with them. Let’s take the NXP i.MXRT1060 model (ARM Cortex-M7 core) as an example. In its official SDK package, there are corresponding LPUART driver files:
\SDK_2.11.0_EVK-MIMXRT1060\devices\MIMXRT1062\drivers\fsl_lpuart.h
\SDK_2.11.0_EVK-MIMXRT1060\devices\MIMXRT1062\drivers\fsl_lpuart.c
The LPUART driver library’s LPUART_WriteBlocking() and LPUART_ReadBlocking() functions can complete the sending and receiving of user data packets. In fact, simply using the LPUART_WriteBlocking() function can also achieve print information output, but it does not have the powerful formatting output capabilities of the printf() function.
status_t LPUART_Init(LPUART_Type *base, const lpuart_config_t *config, uint32_t srcClock_Hz)
status_t LPUART_WriteBlocking(LPUART_Type *base, const uint8_t *data, size_t length)
status_t LPUART_ReadBlocking(LPUART_Type *base, uint8_t *data, size_t length)
4. IAR Support for C Standard I/O Library
It is clear that IAR supports the C standard I/O library; otherwise, we would not be able to use the printf() function in the project. But how can we easily discover this support? Today, I will teach you a method: check the .map file generated after the project is compiled and linked. This map file will list all the functions in the project and their sources.
4.1 Introducing the Low-Level Interface __write()
Taking the project \SDK_2.11.0_EVK-MIMXRT1060\boards\evkmimxrt1060\demo_apps\hello_world\iar as an example, we need to make a simple modification to the main() function in the hello_world.c file, deleting all the original code (the original print output involves the encapsulation of the NXP SDK, which is not necessary for us to care about its implementation). Just the following line of print is sufficient:
#include <stdio.h>
int main(void)
{
    printf("hello world.\r\n");
    while (1);
}
Then pay attention to the following three settings related to Library implementation in the project options. The Library option configures the functionality of the runtime lib, with Normal and Full options (select as needed); the Printf formatter option determines the details of the formatting output functionality, with Full, Large, Small, and Tiny options (select as needed).
The Library low-level interface implementation option determines the low-level I/O implementation. Here we select None, meaning the user will implement it.

After configuring the Library, compiling the project will result in the following error. Based on this error, we can guess that dl7M_tln.a is the C/C++ library compiled by IAR, which implements the printf() function and its dependent putchar() function, while the putchar() function provides the low-level I/O interface function, which is called __write(). This is the function that needs to be implemented by the user in conjunction with the chip’s UART peripheral for sending data.
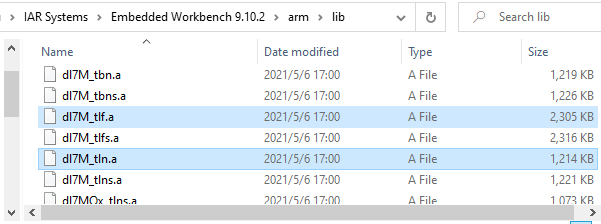
Error[Li005]: no definition for "__write" [referenced from putchar.o(dl7M_tln.a)]We can find the path of the dl7M_tln.a file in the IAR directory. After testing, we find that the Normal and Full options in the project Library settings actually correspond to whether to link dl7M_tln.a or dl7M_tlf.a into the user project.
4.2 DLIB Low-Level I/O Interface Design
We found the __write() function, but what is its prototype? How should we implement it? At this point, we need to refer to the comprehensive manual located at \IAR Systems\Embedded Workbench 9.10.2\arm\doc\EWARM_DevelopmentGuide.ENU, searching for the term __write can lead us to the following design: it turns out that all the C standard I/O interfaces we call in the code are implemented by the precompiled DLIB provided by IAR, which also leaves the lowest-level hardware-related interface functions for users to implement.
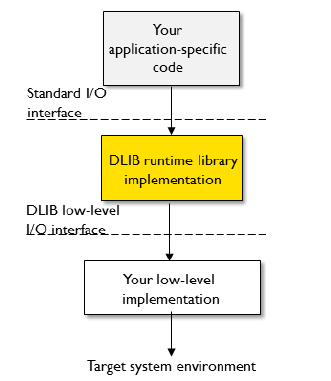
IAR has created template source files for those lowest-level I/O interface functions in DLIB. In these template files, we can find their prototypes, so we found the prototype of __write() and its example implementation in the write.c file.
size_t __write(int handle, const unsigned char * buffer, size_t size)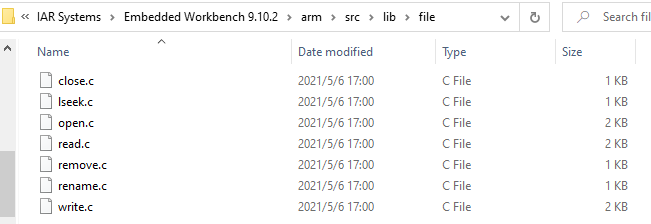
4.3 DLIB Library I/O Related Source Code Implementation
With the prototype and example code of __write(), we can easily implement it using the LPUART_WriteBlocking() function. Adding this code to the hello_world project for compilation will not cause errors (of course, to actually test the print functionality on the board, the main function must also include LPUART initialization code).
#include "fsl_lpuart.h"
size_t __write(int handle, const unsigned char *buf, size_t size)
{
    // Assume using LPUART1 for output
    (void)LPUART_WriteBlocking(LPUART1, buf, size);

    return 0;
}
After the project is compiled, checking the generated hello_world.map file, we can find information about the dl7M_tln.a part, which consists of many .o files (with rich functionality), and the source code of these .o files can be found in the IAR installation directory.
*******************************************************************************
*** MODULE SUMMARY
***

    Module                ro code  ro data  rw data
    ------                -------  -------  -------
dl7M_tln.a: [10]
    abort.o                     6
    exit.o                      4
    low_level_init.o            4
    printf.o                   40
    putchar.o                  32
    xfail_s.o                  64                 4
    xprintfsmall_nomb.o     1'281
    xprout.o                   22
    -----------------------------------------------
    Total:                  1'453                 4
The source code related to I/O in the DLIB library is located in the following directory. Those interested can check the specific implementations. It is particularly worth mentioning that the xprintf folder under formatters has many different source file implementations, which actually correspond to the different configurations in the project option Printf formatter.
\IAR Systems\Embedded Workbench 9.10.2\arm\src\lib\dlib\file
\IAR Systems\Embedded Workbench 9.10.2\arm\src\lib\dlib\formatters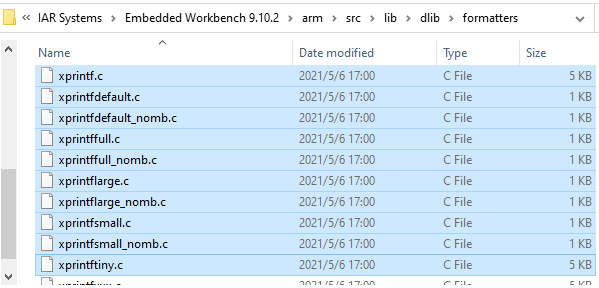
Thus, the hardware UART peripheral debugging output mechanism under IAR has been introduced by Pi Zi Heng.

END