Click Mushroom Cloud Creation to follow us
Fatigue Driving AI Alert System
While cars bring us convenience, they also pose hidden dangers. The number of cars in our country has reached 300 million. With such a large number of vehicles, traffic accidents frequently occur. It is reported that the number of deaths each year due to this can reach as high as 100,000.
Everyone knows the dangers of fatigue driving. It is essential not to drive when tired, as accidents caused by fatigue driving are numerous.
According to relevant legal provisions, if a person drives for more than 4 hours, it is considered fatigue driving. When a driver is in a state of fatigue or drowsiness, their judgment ability decreases, and they cannot make decisions as quickly as a normal driver in dangerous situations. Moreover, it can lead to sluggish operational abilities, and a driver might mistakenly press the accelerator instead of the brake. Some drivers may even fall asleep while driving, ultimately losing control of the vehicle and causing fatal accidents.
Project Functions
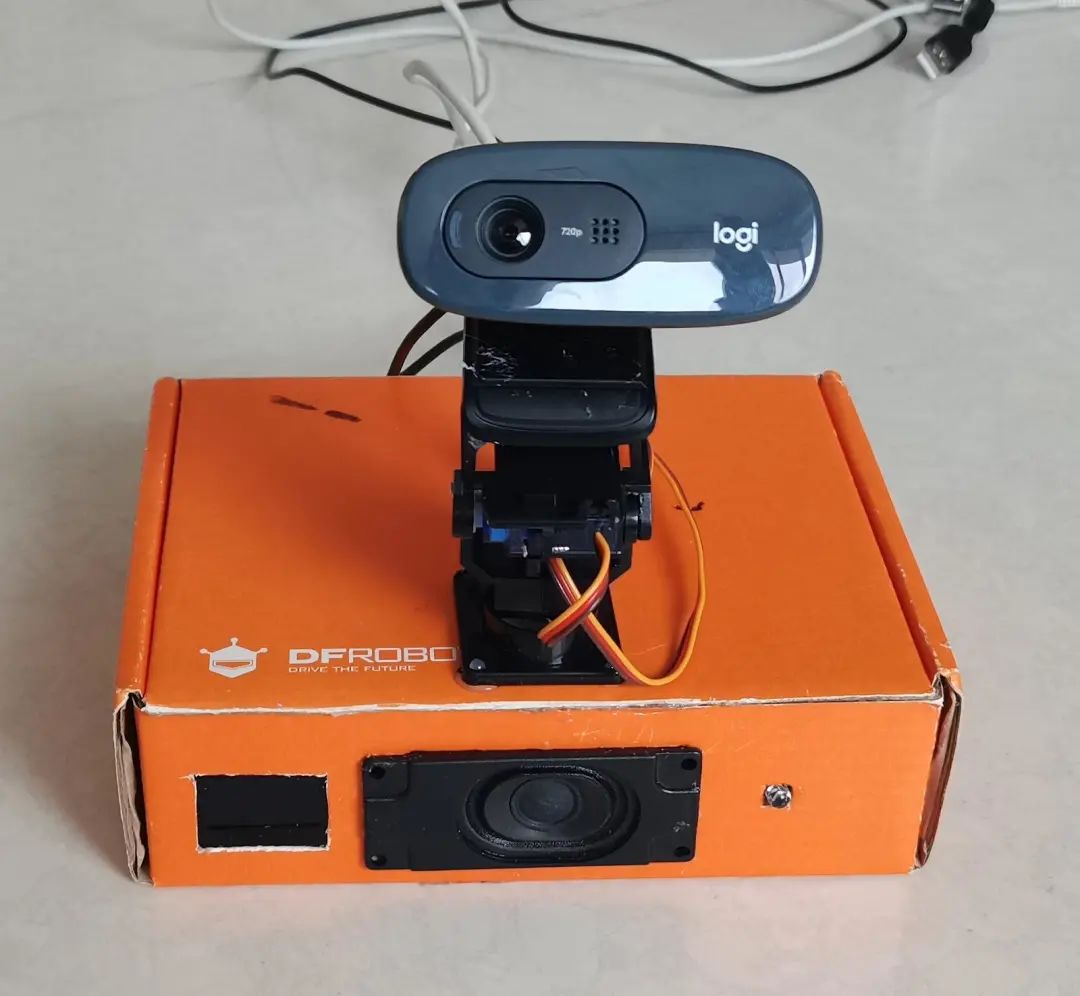
The fatigue driving alert system we designed uses artificial intelligence technology to monitor the driver’s facial and eye movements in real-time, detecting fatigue driving and promptly issuing voice and light warnings to remind the driver to drive safely.
Design Concept
This project uses the Mind+Python model. A PC connects to a camera (which can later be replaced with a Raspberry Pi or Panda board) to capture the driver’s facial images. Using a facial recognition library and EAR algorithm, it determines if the driver is drowsy. The Pinpong library connects to Micro:bit to control lighting and sound, reminding the driver to take timely breaks.
Required Libraries for Installation
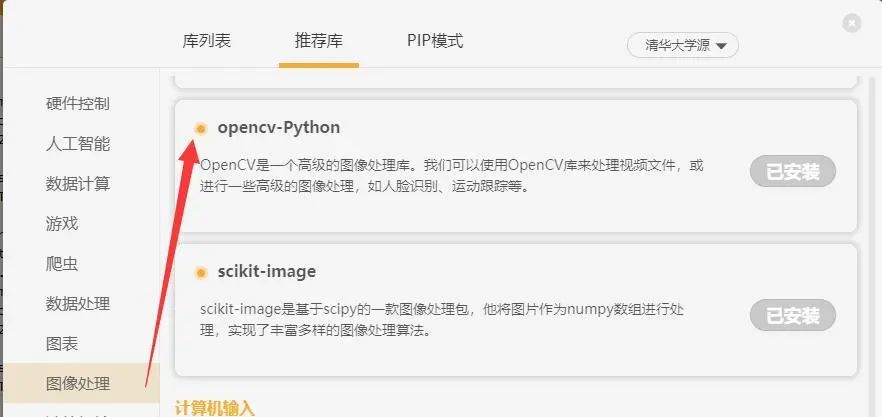
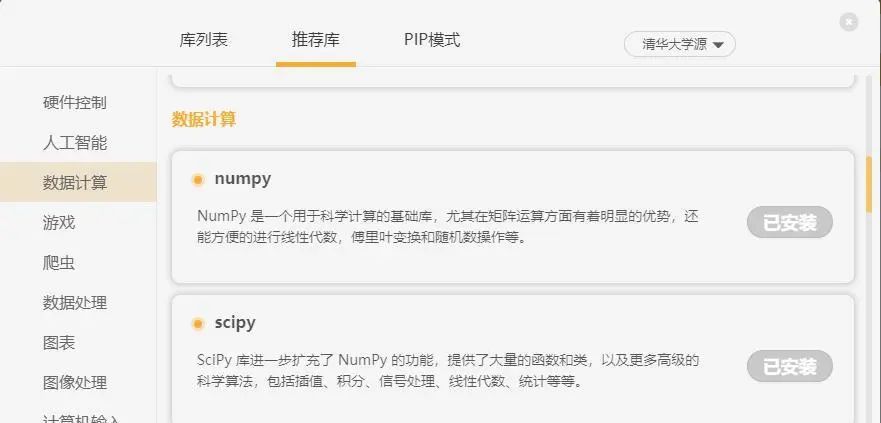
Under the Mind+Python model, install the corresponding libraries through “Library Management”.

1. Install opencv-python for computer vision.
opencv-python
2. Install Numpy, an open-source numerical computing extension for scientific computing, data analysis, and processing.
“Numpy”
3. Install Scipy, a distance computing library.
“Scipy”
4. Install pinpong, a Python library for controlling open-source hardware mainboards.
“pinpong”

Open Source Algorithm for Eye Fatigue Detection
The EAR (Eye Aspect Ratio) calculation function
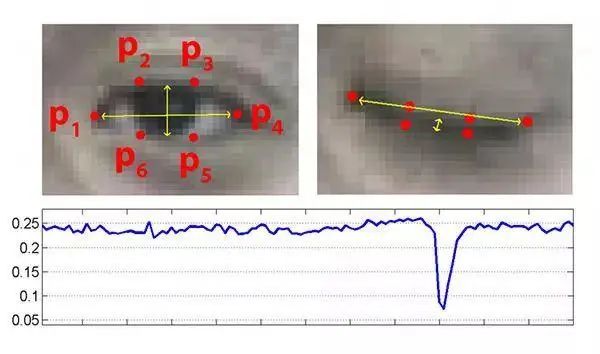
First, we need to determine the position of the eyes. After determining the eye position, we select 6 points to represent the eyes, as shown in the figure below:
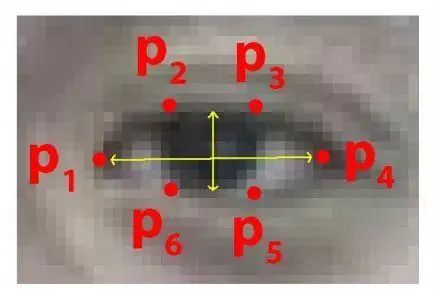
The numbering starts from the left corner of the eye, then proceeds clockwise around the eye.
Based on these six points, we can represent the state of the eye being open or closed. When open, the vertical yellow arrow in the above image will be relatively high, while when the eye is closed (fatigue state), this arrow will be shorter. However, due to different viewing distances, simply using height to represent the state lacks reference comparison. Therefore, we propose the following formula to represent the state:
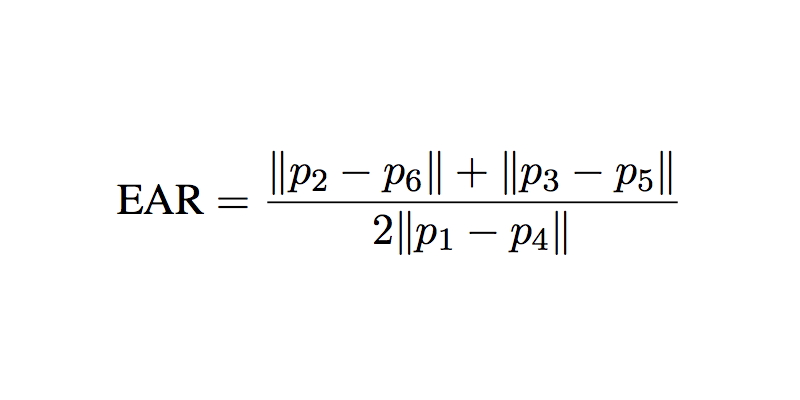
Using this data, we can relatively objectively represent the eye state. Through extensive testing, we found a statistical result: when EAR is less than 0.25 many times, it indicates a fatigue state.
Face Recognition Library
1. Installation
The face_recognition library is the world’s simplest face recognition library, allowing for recognition and manipulation of faces in Python or command line. It is built using dlib’s state-of-the-art face recognition technology and has deep learning capabilities.
Install it using the “PIP mode” in the “Library Management” of the Mind+Python model:

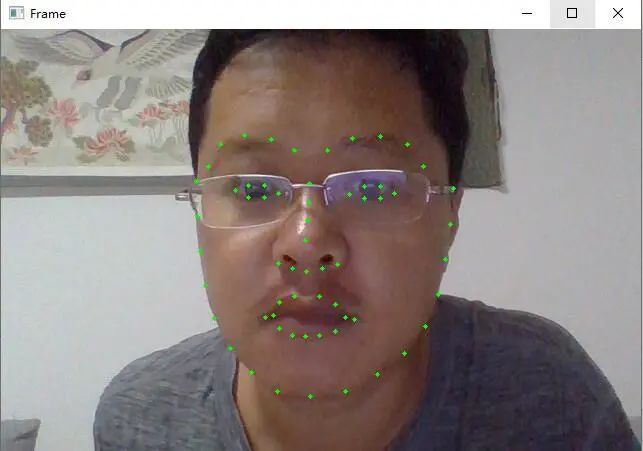
2. Recognizing Facial Key Points
After loading the image, calling face_recognition.face_landmarks(image) can recognize facial key point information, including eyes, nose, mouth, and chin. The parameter is still the loaded image, and the return value is a list containing dictionaries of facial features. Each item in the list corresponds to a face, including nose_bridge, right_eyebrow, right_eye, chin, left_eyebrow, bottom_lip, nose_tip, top_lip, and left_eye, with several feature points (x,y) in each part, totaling 68 feature points. The length of the list is the number of faces recognized in the image, and we can iterate through this list and the key-value pairs of the dictionary to print all facial feature points or draw them on the image. The code is as follows:
Swipe up to read more
import numpy as np
import cv2
import face_recognition
cap = cv2.VideoCapture(0)
while True:
ret, frame = cap.read()
frame = cv2.resize(frame, (0,0), fx=1, fy=1)
# Find all facial features in all the faces in the video
face_landmarks_list = face_recognition.face_landmarks(frame)
for face_landmarks in face_landmarks_list:
# Loop over each facial feature (eye, nose, mouth, lips, etc)
for name, list_of_points in face_landmarks.items():
hull = np.array(face_landmarks[name])
hull_landmark = cv2.convexHull(hull)
cv2.drawContours(frame, hull_landmark, -1, (0, 255, 0), 3)
cv2.imshow(“Frame”, frame)
ch = cv2.waitKey(1)
if ch & 0xFF == ord(‘q’):
break
cap.release()
cv2.destroyAllWindows()
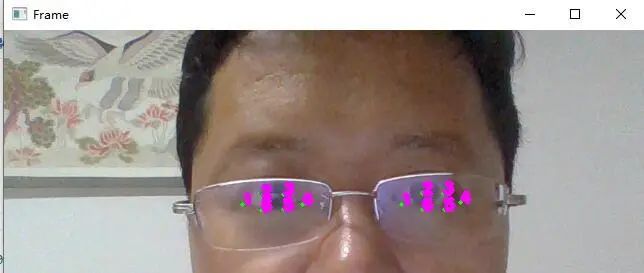
3. Extracting Eye Coordinates
Swipe up to read more
import numpy as np
import cv2
import face_recognition
cap = cv2.VideoCapture(0)
while True:
ret, frame = cap.read()
frame = cv2.resize(frame, (0,0), fx=1, fy=1)
# Find all facial features in all the faces in the video
face_landmarks_list = face_recognition.face_landmarks(frame)
for face_landmarks in face_landmarks_list:
# Loop over each facial feature (eye, nose, mouth, lips, etc)
for name, list_of_points in face_landmarks.items():
if name==’left_eye’:
print(list_of_points)
hull = np.array(face_landmarks[name])
hull_landmark = cv2.convexHull(hull)
cv2.drawContours(frame, hull_landmark, -1, (0, 255, 0), 3)
font = cv2.FONT_HERSHEY_SIMPLEX # Get built-in font
k=1
for points in list_of_points:
cv2.putText(frame,str(k), points, font, 0.5, (255,0,255), 4) # Call function to mark facial coordinates
k=k+1
if name==’right_eye’:
print(list_of_points)
hull = np.array(face_landmarks[name])
hull_landmark = cv2.convexHull(hull)
cv2.drawContours(frame, hull_landmark, -1, (0, 255, 0), 3)
font = cv2.FONT_HERSHEY_SIMPLEX # Get built-in font
k=1
for points in list_of_points:
cv2.putText(frame,str(k), points, font, 0.5, (255,0,255), 4) # Call function to mark facial coordinates
k=k+1
cv2.imshow(“Frame”, frame)
ch = cv2.waitKey(1)
if ch & 0xFF == ord(‘q’):
break
cap.release()
cv2.destroyAllWindows()
4. Eye Aspect Ratio (EAR) Function
# The numerator of this equation calculates the distance between vertical eye landmarks, while the denominator calculates the distance between horizontal eye landmarks. Since there is only one set of horizontal points and two sets of vertical points, the denominator is multiplied by 2 to ensure that the weights of the two sets of feature points are equal. Using this simple equation, we can avoid using image processing techniques and simply rely on the ratio of eye landmark distances to determine whether a person is blinking.
def eye_aspect_ratio(eye):
# Calculate distance, vertical
A = dist.euclidean(eye[1], eye[2])
B = dist.euclidean(eye[4], eye[5])
# Calculate distance, horizontal
C = dist.euclidean(eye[0], eye[3])
# ear value
ear = (A + B) / (2.0 * C)
return ear
Code for Determining Drowsiness
Swipe up to read more
import numpy as np
import cv2
import face_recognition
from scipy.spatial import distance as dist
cap = cv2.VideoCapture(0)
# Eye Aspect Ratio (EAR)
# The numerator of this equation calculates the distance between vertical eye landmarks, while the denominator calculates the distance between horizontal eye landmarks. Since there is only one set of horizontal points and two sets of vertical points, the denominator is multiplied by 2 to ensure that the weights of the two sets of feature points are equal. Using this simple equation, we can avoid using image processing techniques and simply rely on the ratio of eye landmark distances to determine whether a person is blinking.
def eye_aspect_ratio(eye):
# Calculate distance, vertical
A=dist.euclidean(eye[1],eye[5])
B=dist.euclidean(eye[2],eye[4])
# Calculate distance, horizontal
C=dist.euclidean(eye[0],eye[3])
# ear value
ear=(A+B)/(2.0*C)
return ear
close_eye=0 # Eye close count
ClOSE_EYE=25 # Close eye count threshold
EYE_EAR = 0.25 # EAR threshold
while True:
ret, frame = cap.read()
frame = cv2.resize(frame, (0,0), fx=0.5, fy=0.5)
# Find all facial features in all the faces in the video
face_landmarks_list = face_recognition.face_landmarks(frame)
left_eye_points=[]
right_eye_points=[]
for face_landmarks in face_landmarks_list:
# Loop over each facial feature (eye, nose, mouth, lips, etc)
for name, list_of_points in face_landmarks.items():
if name==’left_eye’:
left_eye_points=list_of_points
hull = np.array(face_landmarks[name])
hull_landmark = cv2.convexHull(hull)
cv2.drawContours(frame, hull_landmark, -1, (0, 255, 0), 3)
if name==’right_eye’:
right_eye_points=list_of_points
hull = np.array(face_landmarks[name])
hull_landmark = cv2.convexHull(hull)
cv2.drawContours(frame, hull_landmark, -1, (0, 255, 0), 3)
if len(right_eye_points)!=0 and len(left_eye_points)!=0:
# Calculate EAR values for both eyes
leftEAR = eye_aspect_ratio(left_eye_points)
rightEAR = eye_aspect_ratio(right_eye_points)
# Calculate an average EAR value
ear = (leftEAR + rightEAR) / 2.0
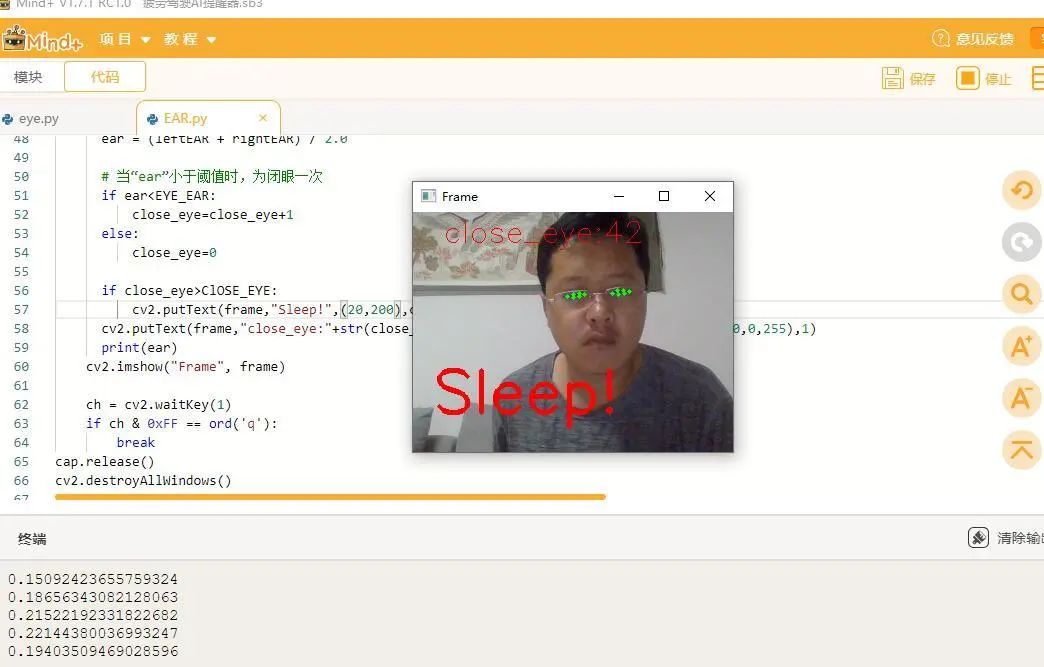
# When “ear” is less than the threshold, it counts as one close eye
if ear<EYE_EAR:
close_eye=close_eye+1
else:
close_eye=0
if close_eye>ClOSE_EYE:
cv2.putText(frame,”Sleep!”,(20,200),cv2.FONT_HERSHEY_SIMPLEX,2,(0,0,255),3)
cv2.putText(frame,”close_eye:”+str(close_eye),(30,30),cv2.FONT_HERSHEY_SIMPLEX,1,(0,0,255),1)
print(ear)
cv2.imshow(“Frame”, frame)
ch = cv2.waitKey(1)
if ch & 0xFF == ord(‘q’):
break
cap.release()
cv2.destroyAllWindows()
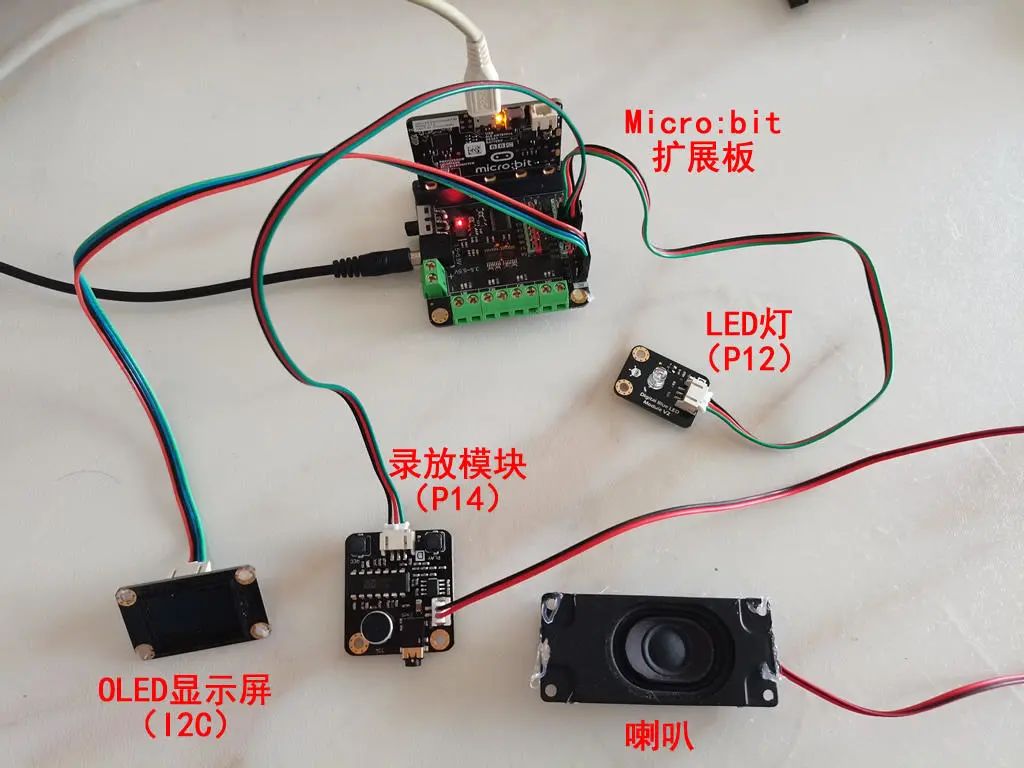
Hardware Connection
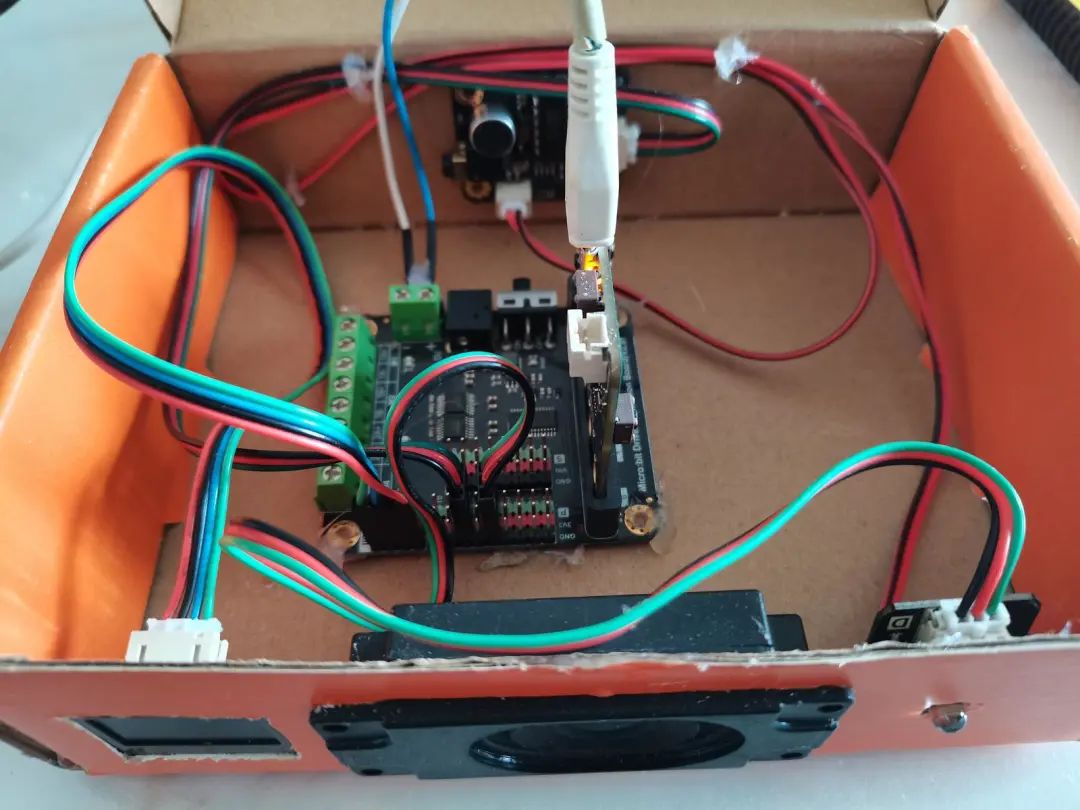
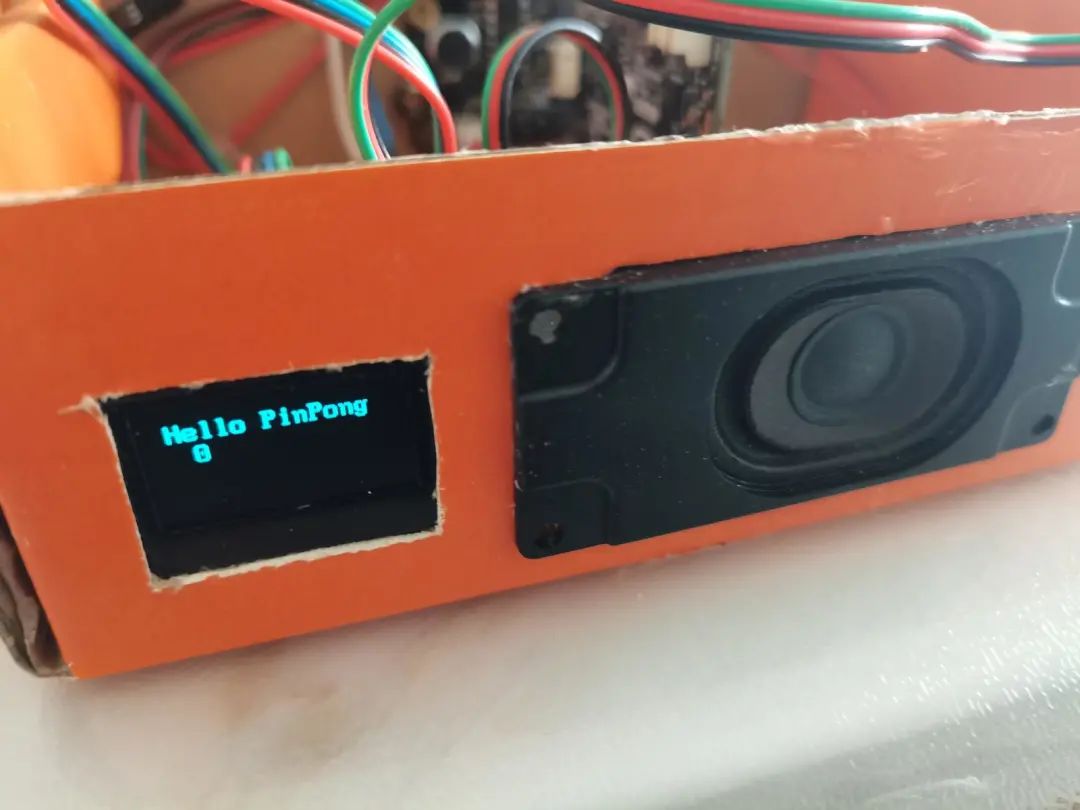
Pinpong Library Test Display Screen
Using the Micro:bit main control with an expansion board, the OLED display is connected to the IIC interface.
Swipe up to read more
# -*- coding: utf-8 -*-
# Experimental effect: I2C OLED2864 screen control
# Wiring: Connect an Arduino main control board to a Windows or Linux computer, the OLED2864 display connects to the I2C port SCL and SDA
import time
from pinpong.board import Board
from pinpong.libs.dfrobot_ssd1306 import SSD1306_I2C # Import ssd1306 library
Board(“microbit”).begin() # Initialize, select board type and port number, if no port number is input, it will automatically recognize
#Board(“uno”,”COM36″).begin() # Windows specify port initialization
#Board(“uno”,”/dev/ttyACM0″).begin() # Linux specify port initialization
#Board(“uno”,”/dev/cu.usbmodem14101″).begin() # Mac specify port initialization
oled=SSD1306_I2C(width=128, height=64) # Initialize screen, pass in screen pixel count
while True:
oled.fill(1) # Fill display completely
oled.show() # Display activation
print(“1”)
time.sleep(1)
oled.fill(0) # Fill completely off, clear screen
oled.show() # Display activation
print(“0”)
time.sleep(1)
oled.text(0) # Display number
oled.text(“Hello PinPong”,8,8) # Display text at specified position
oled.show() # Display activation
time.sleep(2)
Pinpong Library Test LED Light
Swipe up to read more
# -*- coding: utf-8 -*-
# Experimental effect: Control Arduino UNO board’s LED light to blink once every second
# Wiring: Connect an Arduino main control board to a Windows or Linux computer
import time
from pinpong.board import Board,Pin
Board(“uno”).begin()# Initialize, select board type and port number, if no port number is input, it will automatically recognize
#Board(“uno”,”COM36″).begin() # Windows specify port initialization
#Board(“uno”,”/dev/ttyACM0″).begin() # Linux specify port initialization
#Board(“uno”,”/dev/cu.usbmodem14101″).begin() # Mac specify port initialization
led = Pin(Pin.D12, Pin.OUT) # Initialize pin to output high level
k=0
while True:
k=1-k
led.value(k) # Blink light
time.sleep(1) # Wait 1 second to maintain state
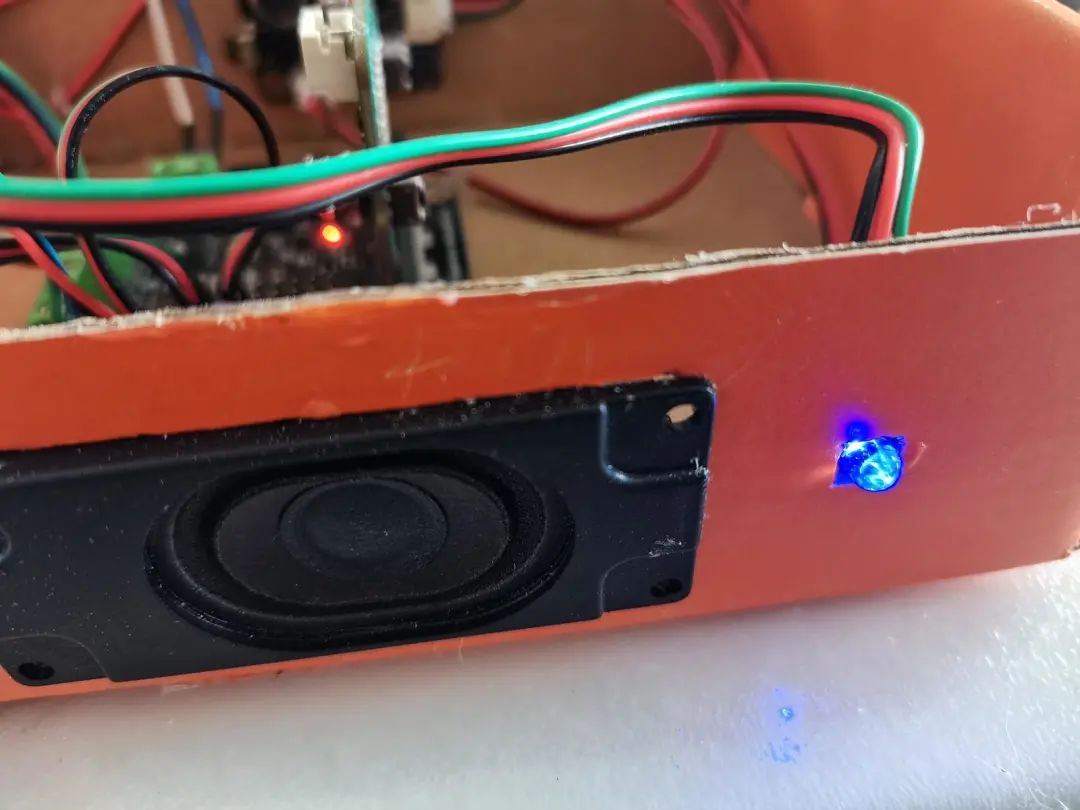
Pinpong Recording and Playback Module Test
Swipe up to read more
import time
from pinpong.board import Board,Pin
Board(“microbit”).begin()# Initialize, select board type and port number, if no port number is input, it will automatically recognize
#Board(“microbit”,”COM36″).begin() # Windows specify port initialization
#Board(“microbit”,”/dev/ttyACM0″).begin() # Linux specify port initialization
#Board(“microbit”,”/dev/cu.usbmodem14101″).begin() # Mac specify port initialization
sound = Pin(Pin.P14, Pin.OUT) # Initialize pin to output high level
while True:
sound.value(1) # Output high level
time.sleep(0.1) # Wait 0.1 seconds to maintain state
sound.value(0) # Output low level
time.sleep(3) # Wait 3 seconds to maintain state
Complete Program Code
Swipe up to read more
import numpy as np
import cv2
import face_recognition
from scipy.spatial import distance as dist
import time
from pinpong.board import Board,Pin
from pinpong.libs.dfrobot_ssd1306 import SSD1306_I2C # Import ssd1306 library
Board(“microbit”).begin() # Initialize, select board type and port number, if no port number is input, it will automatically recognize
oled=SSD1306_I2C(width=128, height=64) # Initialize screen, pass in screen pixel count
led = Pin(Pin.P12, Pin.OUT) # Initialize pin to output high level
sound = Pin(Pin.P14, Pin.OUT) # Initialize pin to output high level
k=0
cap = cv2.VideoCapture(1)
# Eye Aspect Ratio (EAR)
# The numerator of this equation calculates the distance between vertical eye landmarks, while the denominator calculates the distance between horizontal eye landmarks. Since there is only one set of horizontal points and two sets of vertical points, the denominator is multiplied by 2 to ensure that the weights of the two sets of feature points are equal. Using this simple equation, we can avoid using image processing techniques and simply rely on the ratio of eye landmark distances to determine whether a person is blinking.
def eye_aspect_ratio(eye):
# Calculate distance, vertical
A=dist.euclidean(eye[1],eye[5])
B=dist.euclidean(eye[2],eye[4])
# Calculate distance, horizontal
C=dist.euclidean(eye[0],eye[3])
# ear value
ear=(A+B)/(2.0*C)
return ear
close_eye=0 # Eye close count
ClOSE_EYE=25 # Close eye count threshold
EYE_EAR = 0.28 # EAR threshold
while True:
ret, frame = cap.read()
frame = cv2.resize(frame, (0,0), fx=0.5, fy=0.5)
# Find all facial features in all the faces in the video
face_landmarks_list = face_recognition.face_landmarks(frame)
left_eye_points=[]
right_eye_points=[]
for face_landmarks in face_landmarks_list:
# Loop over each facial feature (eye, nose, mouth, lips, etc)
for name, list_of_points in face_landmarks.items():
if name==’left_eye’:
left_eye_points=list_of_points
hull = np.array(face_landmarks[name])
hull_landmark = cv2.convexHull(hull)
cv2.drawContours(frame, hull_landmark, -1, (0, 255, 0), 3)
if name==’right_eye’:
right_eye_points=list_of_points
hull = np.array(face_landmarks[name])
hull_landmark = cv2.convexHull(hull)
cv2.drawContours(frame, hull_landmark, -1, (0, 255, 0), 3)
if len(right_eye_points)!=0 and len(left_eye_points)!=0:
# Calculate EAR values for both eyes
leftEAR = eye_aspect_ratio(left_eye_points)
rightEAR = eye_aspect_ratio(right_eye_points)
# Calculate an average EAR value
ear = (leftEAR + rightEAR) / 2.0
# When “ear” is less than the threshold, it counts as one close eye
if ear<EYE_EAR:
close_eye=close_eye+1
else:
close_eye=0
if close_eye>ClOSE_EYE:
cv2.putText(frame,”Sleep!”,(20,200),cv2.FONT_HERSHEY_SIMPLEX,2,(0,0,255),3)
sound.value(1) # Play reminder sound
sound.value(0)
oled.text(“close_eye:”+str(close_eye),0,8) # Display text at specified position
oled.show() # Display activation
for j in range(20):
k=1-k
led.value(k) # Blink light
time.sleep(0.2)
cv2.putText(frame,”close_eye:”+str(close_eye),(30,30),cv2.FONT_HERSHEY_SIMPLEX,1,(0,0,255),1)
print(ear)
cv2.imshow(“Frame”, frame)
ch = cv2.waitKey(1)
if ch & 0xFF == ord(‘q’):
break
cap.release()
cv2.destroyAllWindows()
Video Demonstration


Recommended Reading:
-
With the implementation of the “Double Reduction” policy, Mushroom Cloud helps educational training build a scientific and technological innovation education ecosystem!
-
The “Fourth National Youth Artificial Intelligence Innovation Challenge Microcontroller Creative Manufacturing Challenge” national challenge is here!
-
[Mind+Huskylens Fun AI Introduction] Series Course—04 Smart Cat Eye
-
[Mind+Huskylens Fun AI Introduction] Series Course—03 Facial Access Control
-
[Mind+Huskylens Fun AI Introduction] Series Course—02 Garbage Classification
-
[Mind+ Update] Mind+Python Programming and Intelligent Design Competition
-
[Mind+Huskylens Fun AI Introduction] Series Course—01 Singing Painting
-
The “Mind+Huskylens Fun AI Introduction” series course is now online!
-
[mind+ maixduino User Library] Network