Sometimes people like to joke about light bulbs, but in reality, lighting involves many technical aspects. The article below discusses the multi-technology stack of embedded Linux lighting, which I recommend to everyone.
Abstract: There are two directions in embedded development: one is embedded software development (MCU direction), and the other is embedded software development (Linux direction). The MCU direction mainly involves bare-metal development and RTOS development. The Linux development direction is further divided into driver development and application development. Application development is generally simpler than driver development because working with drivers requires interaction with the Linux kernel. Our typical microcontroller development is application development, which is not much different from Linux development, as microcontroller developers utilize libraries written by others, just like Linux application developers utilize driver programs written by others.
Many people follow a learning path from microcontrollers to RTOS, and then to Linux, which is a very good and gradual approach. Since you have learned microcontrollers, understanding RTOS will be easier. Microcontroller + RTOS also offers good job opportunities in the market. Because you learned RTOS, you will find that Linux driver development is very similar to RT-Thread driver programming; in fact, RT-Thread drivers are likely modeled after Linux drivers. Therefore, if you are currently learning RT-Thread, transitioning to Linux driver development will also be quite easy.
Of course, before diving into driver development, you should learn about the Ubuntu operating system, ARM bare-metal programming, and Linux system porting, all of which are foundational for learning embedded Linux driver development.
Without further ado, let’s start with a hello driver program.
In Linux, drivers are divided into three main categories:
-
Character Device Drivers -
Character device drivers are the most extensive category of drivers, as they are the most numerous. From the simplest light control to I2C, SPI, audio, etc., all belong to the character device driver type. -
Block Device Drivers -
Block device and network device drivers are more complex than character device drivers. Due to this complexity, semiconductor manufacturers typically provide us with pre-written drivers that can be used directly in most cases. -
A block device driver refers to the driver for storage devices, such as EMMC, NAND, SD cards, and USB drives. These storage devices are characterized by being based on storage blocks, hence the term block device. -
Network Device Drivers -
Network device drivers are easy to understand; whether wired or wireless, they fall under the category of network device drivers. A device can belong to multiple types of device drivers. For example, a USB Wi-Fi adapter uses a USB interface, thus classified as a character device, but it can also connect to the internet, making it also a network device driver.
I am using Linux kernel version 4.1.15, which supports device trees. The development board is the Linux-MINI board provided by ZTE, and using boards from other manufacturers will have no impact.
1. Introduction to Character Device Drivers
Character devices are the most fundamental type of device driver in Linux. A character device operates by reading and writing one byte at a time in a byte stream. Data is read and written in a sequential order. For example, the most common operations such as lighting, buttons, I2C, SPI, LCD, etc., are all character devices, and their drivers are called character device drivers.
So how do applications in Linux call driver programs? The process of calling drivers from Linux applications is illustrated in the following diagram:
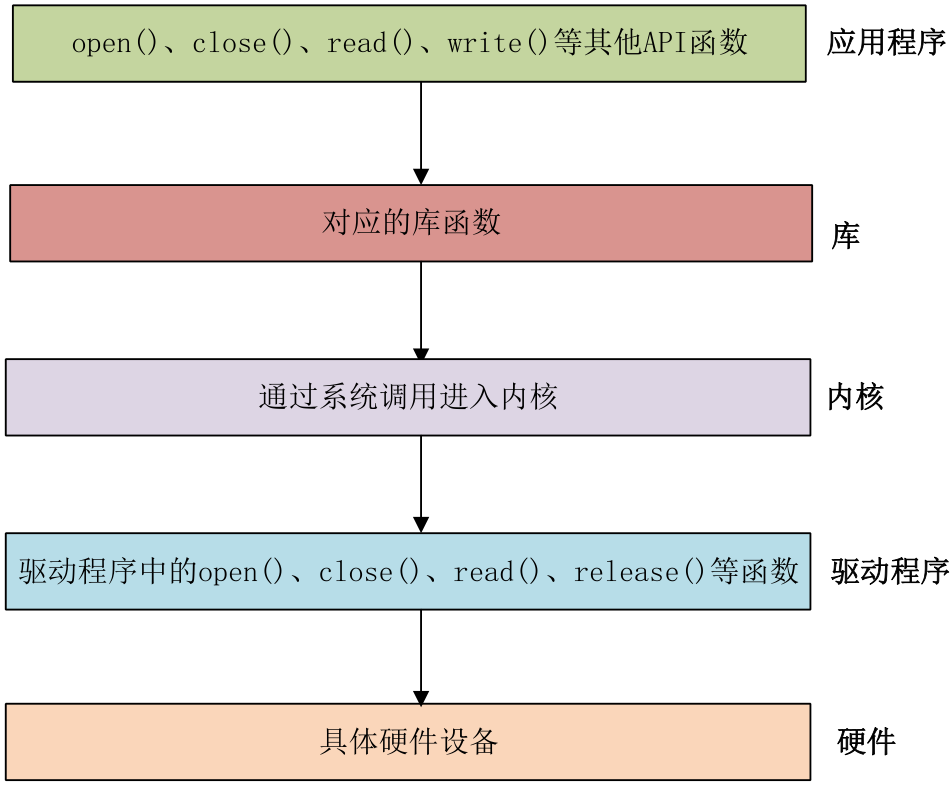
In Linux, everything is a file. Once a driver is successfully loaded, a corresponding file will be generated in the <span>/dev</span> directory. Applications can perform operations on this file named <span>/dev/xxx</span> (where xxx is the specific driver file name) to manipulate the hardware.
Those who write drivers must understand the Linux kernel, as driver programs are written based on kernel functions. Application developers do not need to understand the Linux kernel; they only need to be familiar with driver functions.
For example, if there is a driver file named <span>/dev/led</span>, which is the driver file for an LED light. The application program uses the open function to open the file <span>/dev/led</span>, and after use, it closes the file using the close function. The open and close functions are used to manage the LED driver. If you want to turn on or off the LED, you would use the write function to send data to the driver, which represents the control parameters for turning on or off the LED. To get the status of the LED, you would use the read function to read the corresponding status from the driver.
Application programs run in user space, while Linux drivers are part of the kernel; hence, drivers run in kernel space. When we want to perform operations on the kernel from user space, such as using the open function to open the /dev/led driver, since user space cannot directly operate on the kernel, we must use a method called “system call” to transition from user space to kernel space to perform operations on the lower-level driver.
Functions like open, close, write, and read are provided by the C library. In Linux systems, system calls are part of the C library. When we call the open function, the process is illustrated in the following diagram:

For the C library and how to transition into kernel space via system calls, we do not need to concern ourselves; our focus is on the application program and the specific driver. Functions used by the application program have corresponding functions in the specific driver program. For example, if the application program calls the open function, then the driver program must also have a function named open. Each system call has a corresponding driver function in the driver.
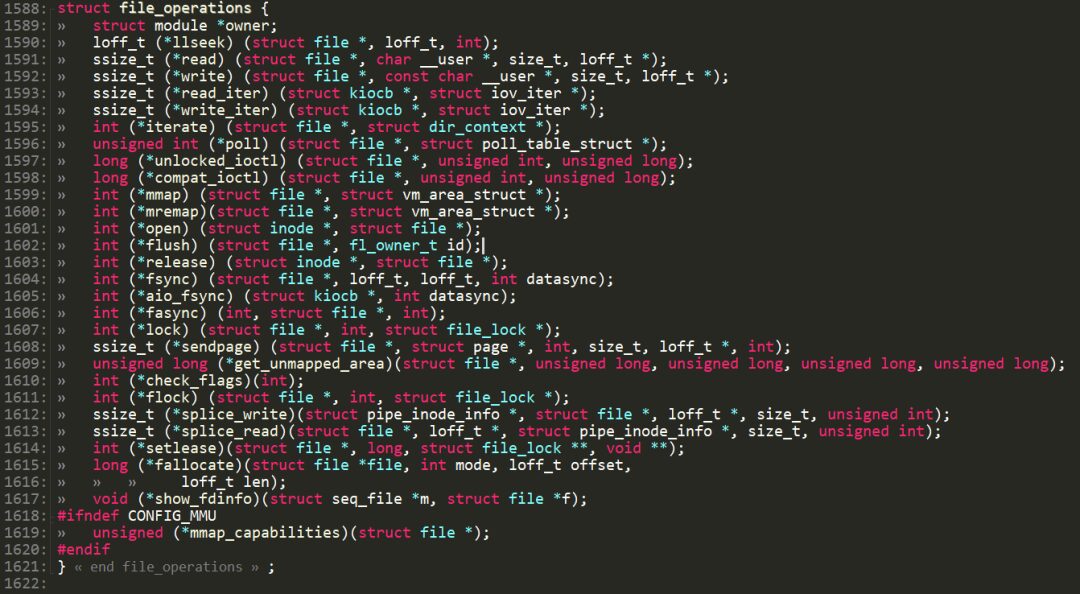
In the Linux kernel file include/linux/fs.h, there is a structure called file_operations, which is a collection of Linux kernel driver operation functions. We can download the Linux kernel file and open it with source insight to take a look. The content is as follows:
Click here to download the Linux kernel source code

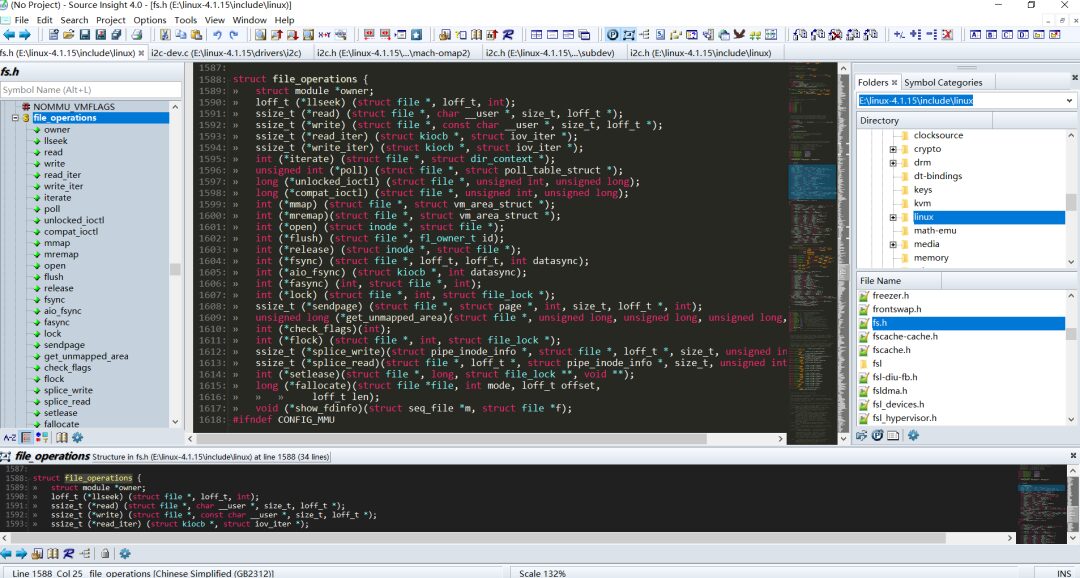
struct file_operations {
 struct module *owner;
 loff_t (*llseek) (struct file *, loff_t, int);
 ssize_t (*read) (struct file *, char __user *, size_t, loff_t *);
 ssize_t (*write) (struct file *, const char __user *, size_t, loff_t *);
 ssize_t (*read_iter) (struct kiocb *, struct iov_iter *);
 ssize_t (*write_iter) (struct kiocb *, struct iov_iter *);
 int (*iterate) (struct file *, struct dir_context *);
 unsigned int (*poll) (struct file *, struct poll_table_struct *);
 long (*unlocked_ioctl) (struct file *, unsigned int, unsigned long);
 long (*compat_ioctl) (struct file *, unsigned int, unsigned long);
 int (*mmap) (struct file *, struct vm_area_struct *);
 int (*mremap)(struct file *, struct vm_area_struct *);
 int (*open) (struct inode *, struct file *);
 int (*flush) (struct file *, fl_owner_t id);
 int (*release) (struct inode *, struct file *);
 int (*fsync) (struct file *, loff_t, loff_t, int datasync);
 int (*aio_fsync) (struct kiocb *, int datasync);
 int (*fasync) (int, struct file *, int);
 int (*lock) (struct file *, int, struct file_lock *);
 ssize_t (*sendpage) (struct file *, struct page *, int, size_t, loff_t *, int);
 unsigned long (*get_unmapped_area)(struct file *, unsigned long, unsigned long, unsigned long, unsigned long);
 int (*check_flags)(int);
 int (*flock) (struct file *, int, struct file_lock *);
 ssize_t (*splice_write)(struct pipe_inode_info *, struct file *, loff_t *, size_t, unsigned int);
 ssize_t (*splice_read)(loff_t *, struct pipe_inode_info *, size_t, unsigned int);
 int (*setlease)(struct file *, long, struct file_lock **, void **);
 long (*fallocate)(struct file *file, int mode, loff_t offset,
     loff_t len);
 void (*show_fdinfo)(struct seq_file *m, struct file *f);
#ifndef CONFIG_MMU
 unsigned (*mmap_capabilities)(struct file *);
#endif
};
-
Line 1589: owner points to the module that owns this structure, generally set to <span>THIS_MODULE</span>. -
Line 1590: The llseek function is used to modify the current read/write position of the file. -
Line 1591: read function is used to read from the device file. -
Line 1592: write function is used to write (send) data to the device file. -
Line 1596: poll is a polling function used to check if the device can perform non-blocking read/write. -
Line 1597: The unlocked_ioctl function provides control functionality for the device, corresponding to the ioctl function in the application program. -
Line 1598: compat_ioctl function has the same functionality as the unlocked_ioctl function, with the difference being that on a 64-bit system, 32-bit application calls will use this function. On a 32-bit system, 32-bit application calls will use unlocked_ioctl. -
Line 1599: The mmap function is used to map the device’s memory into the process space (i.e., user space). Generally, framebuffer devices will use this function, such as mapping the framebuffer (LCD memory) to user space, allowing the application to directly operate on the framebuffer without needing to copy data between user space and kernel space. -
Line 1601: open function is used to open the device file. -
Line 1603: release function is used to release (close) the device file, corresponding to the close function in the application program. -
Line 1604: The fasync function is used to refresh pending data, flushing data from the buffer to the disk. -
Line 1605: The aio_fsync function has similar functionality to fasync, but aio_fsync is for asynchronously flushing pending data.
2. Character Device Driver Development
When learning bare-metal programming or STM32, driver development involves initializing the corresponding peripheral registers. In Linux driver development, it is also necessary to initialize the corresponding peripheral registers, which is unquestionable. However, in Linux driver development, we need to write drivers according to the specified framework, so the key to learning Linux driver development is to understand its driver framework.
2.1 How Files Opened by APP Are Represented in the Kernel
When an APP uses the open function to open a file, it receives an integer known as a file handle. For each file handle in the APP, there is a corresponding <span>struct file</span> in the kernel.
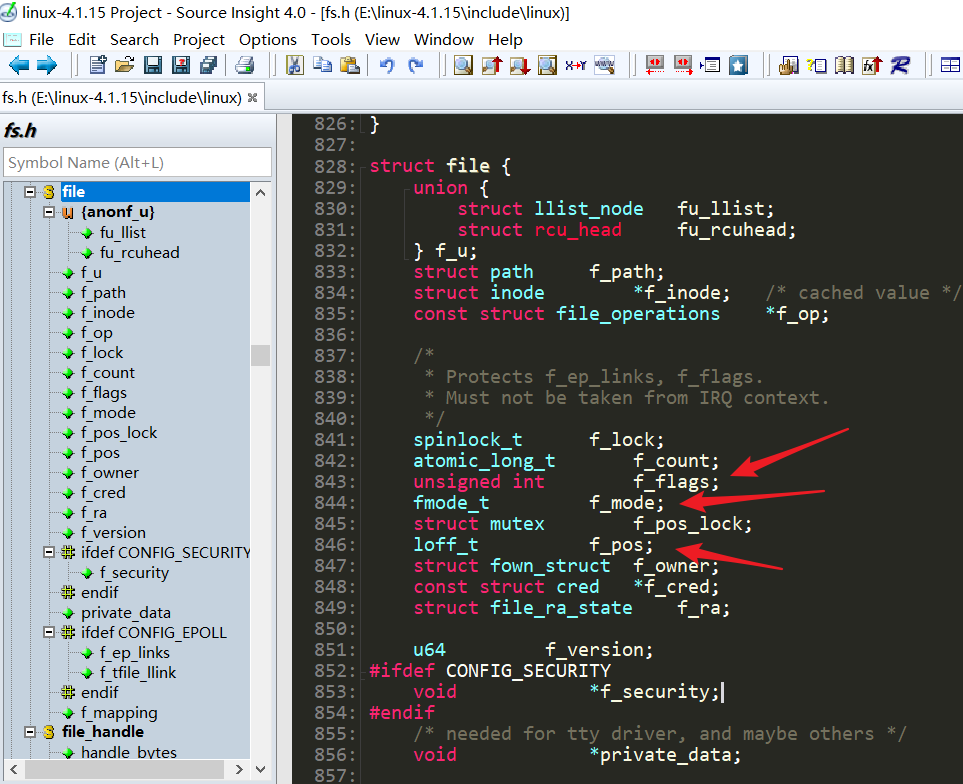
When we use open to open a file, the parameters passed in, such as flags, mode, etc., are recorded in the corresponding struct file structure in the kernel (f_flags, f_mode):
int open(const char *pathname, int flags, mode_t mode);
When reading or writing to the file, the current offset address of the file is also stored in the <span>struct file</span> structure’s <span>f_pos</span> member.
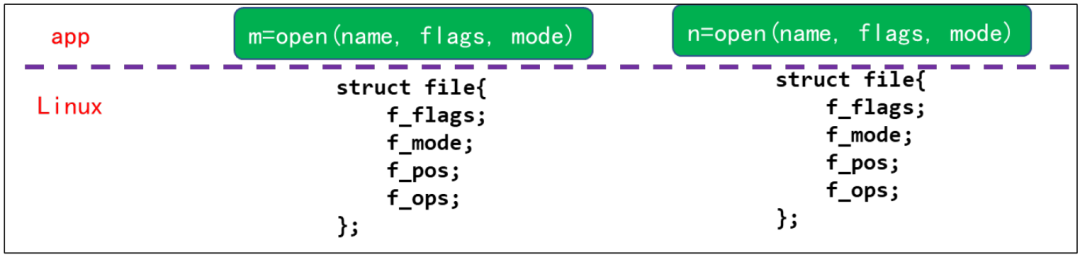
When opening a character device node, there is also a corresponding <span>struct file</span> in the kernel. Note the structure inside this structure:<span>struct file_operations *f_op</span>, which is provided by the driver program.
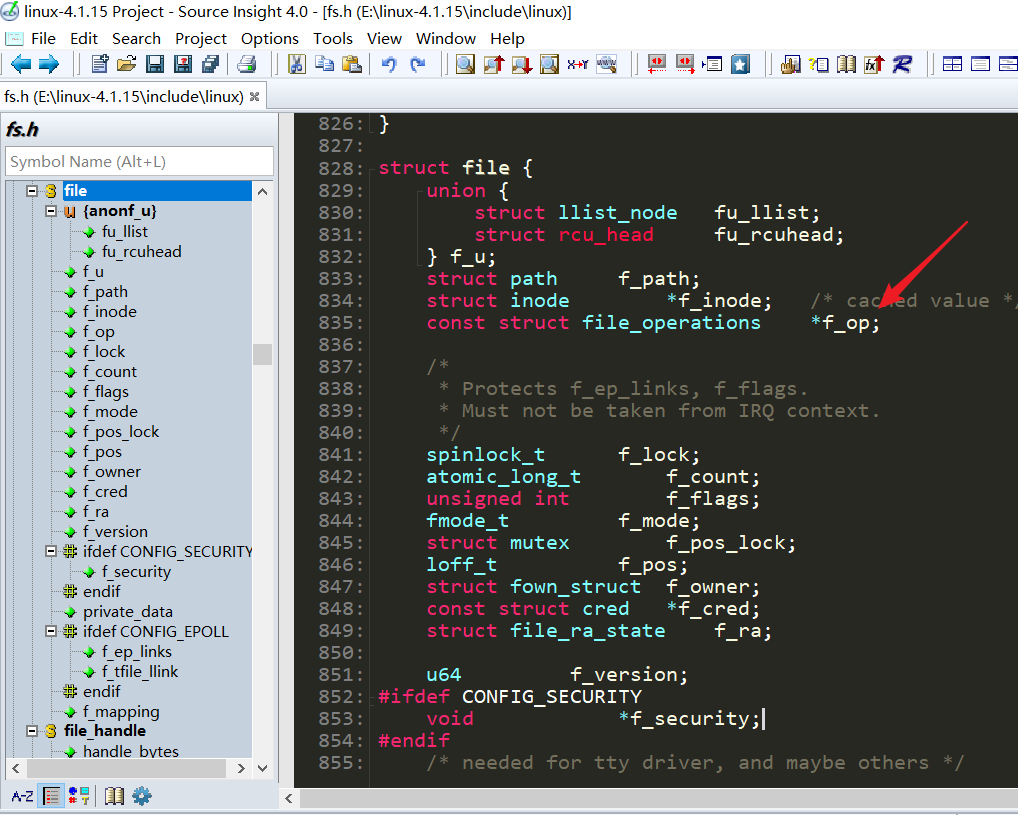

The definition of the structure <span>struct file_operations</span> is as follows, which we discussed earlier.

2.2 Steps to Write a Driver Program
-
1. Determine the major device number or let the kernel allocate it. -
2. Define your own <span>file_operations</span>structure. -
3. Implement corresponding <span>drv_open/drv_read/drv_write</span>functions and fill in the<span>file_operations</span>structure. -
4. Inform the kernel about the <span>file_operations</span>structure by using<span>register_chrdev</span>. -
5. Who registers the driver program? There must be an entry function: when installing the driver program, this entry function will be called. -
6. With an entry function, there should also be an exit function: when unloading the driver program, the exit function calls <span>unregister_chrdev</span>. -
7. Other enhancements: provide device information, automatically create device nodes: class_create, device_create.
2.3 Writing Test Programs
The application program calls the open function to open the hello_drv device. Once opened, it can use the write function to write data to the hello_drv’s write buffer (not exceeding 100 bytes), and can also use the read function to read data from the read buffer readbuf. After operations, the application program uses the close function to close the chrdevbase device.
hello_drv.c
#include <linux/module.h>

#include <linux/fs.h>
#include <linux/errno.h>
#include <linux/miscdevice.h>
#include <linux/kernel.h>
#include <linux/major.h>
#include <linux/mutex.h>
#include <linux/proc_fs.h>
#include <linux/seq_file.h>
#include <linux/stat.h>
#include <linux/init.h>
#include <linux/device.h>
#include <linux/tty.h>
#include <linux/kmod.h>
#include <linux/gfp.h>

/* 1. Determine the major device number*/
static int major = 200;
static char kernel_buf[1024];
static struct class *hello_class;

#define MIN(a, b) (a < b ? a : b)

/* 3. Implement corresponding open/read/write functions, fill in file_operations structure  */
static ssize_t hello_drv_read (struct file *file, char __user *buf, size_t size, loff_t *offset)
{
 int err;
 printk("%s %s line %d\n", __FILE__, __FUNCTION__, __LINE__);
 err = copy_to_user(buf, kernel_buf, MIN(1024, size));
 return MIN(1024, size);
}

static ssize_t hello_drv_write (struct file *file, const char __user *buf, size_t size, loff_t *offset)
{
 int err;
 printk("%s %s line %d\n", __FILE__, __FUNCTION__, __LINE__);
 err = copy_from_user(kernel_buf, buf, MIN(1024, size));
 return MIN(1024, size);
}

static int hello_drv_open (struct inode *node, struct file *file)
{
 printk("%s %s line %d\n", __FILE__, __FUNCTION__, __LINE__);
 return 0;
}

static int hello_drv_close (struct inode *node, struct file *file)
{
 printk("%s %s line %d\n", __FILE__, __FUNCTION__, __LINE__);
 return 0;
}

/* 2. Define your own file_operations structure*/
static struct file_operations hello_drv = {
 .owner  = THIS_MODULE,
 .open    = hello_drv_open,
 .read    = hello_drv_read,
 .write   = hello_drv_write,
 .release = hello_drv_close,
};

/* 4. Inform the kernel about the file_operations structure: register the driver program                */
/* 5. Who registers the driver program? There must be an entry function: when installing the driver program, this entry function will be called. */
static int __init hello_init(void)
{
 int retvalue;

 printk("%s %s line %d\n", __FILE__, __FUNCTION__, __LINE__);
 retvalue = register_chrdev(major, "hello_drv", &hello_drv);  /* /dev/hello */
 if(retvalue < 0){
  printk("chrdevbase driver register failed\r\n");
 }
 printk("chrdevbase init!\r\n");
 return 0;
}

/* 6. With an entry function, there should also be an exit function: when unloading the driver program, this exit function will be called */
static void __exit hello_exit(void)
{
 printk("%s %s line %d\n", __FILE__, __FUNCTION__, __LINE__);
 unregister_chrdev(major, "hello_drv");
}

/* 7. Other enhancements: provide device information, automatically create device nodes   */
module_init(hello_init);
module_exit(hello_exit);

MODULE_LICENSE("GPL");
MODULE_AUTHOR("zhiguoxin");
2.4 Writing a Makefile
KERNELDIR := /home/zhiguoxin/linux/IMX6ULL/linux-imx-rel_imx_4.1.15_2.1.0_ga_alientek
CURRENT_PATH := $(shell pwd)
obj-m := hello_drv.o

build: kernel_modules

kernel_modules:
 $(MAKE) -C $(KERNELDIR) M=$(CURRENT_PATH) modules
 $(CROSS_COMPILE)arm-linux-gnueabihf-gcc -o hello_drv_test hello_drv_test.c
clean:
 $(MAKE) -C $(KERNELDIR) M=$(CURRENT_PATH) clean
-
Line 1: KERNELDIR indicates the directory of the Linux kernel source used by the development board, using an absolute path, which should be filled in according to your actual situation. -
Line 2: CURRENT_PATH indicates the current path, which can be obtained by running the <span>pwd</span>command. -
Line 3: obj-m indicates that the <span>hello_drv.c</span>file will be compiled into the<span>hello_drv.ko</span>module. -
Line 8: The specific compilation command, where the modules indicate that the module is being compiled. The -C indicates switching the current working directory to the specified directory, which is the KERNELDIR directory. The M indicates the module source directory. By adding M=dir to the <span>make modules</span>command, the program will automatically read the module source from the specified dir directory and compile it into a<span>.ko</span>file. -
Line 9: Using the cross-compilation toolchain to compile <span>hello_drv_test.c</span>into an executable file that can run on the ARM board.
After writing the Makefile, enter the <span>make</span> command to compile the driver module. The compilation process is shown in the diagram.

Sometimes you may encounter the following error:
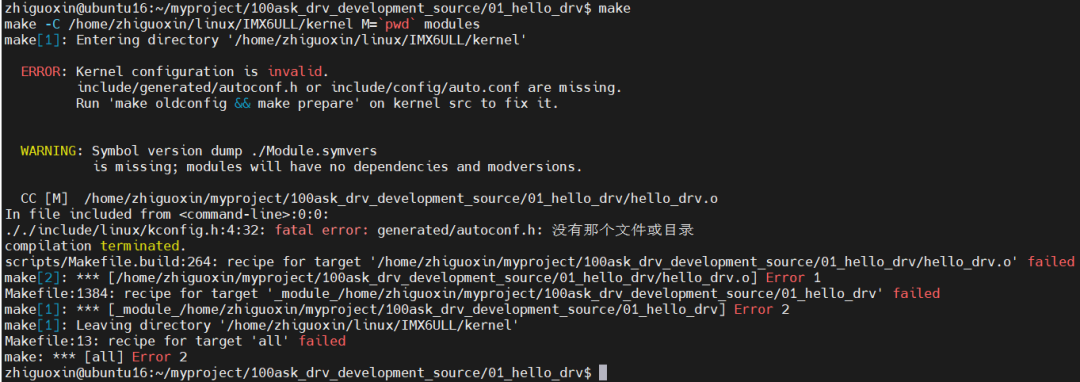
This error is caused by the Linux source code in Ubuntu not being compiled. Using the command below to compile the source code will resolve the issue.
make ARCH=arm CROSS_COMPILE=arm-linux-gnueabihf- distclean
make ARCH=arm CROSS_COMPILE=arm-linux-gnueabihf- imx_v7_defconfig
make ARCH=arm CROSS_COMPILE=arm-linux-gnueabihf- all -j16
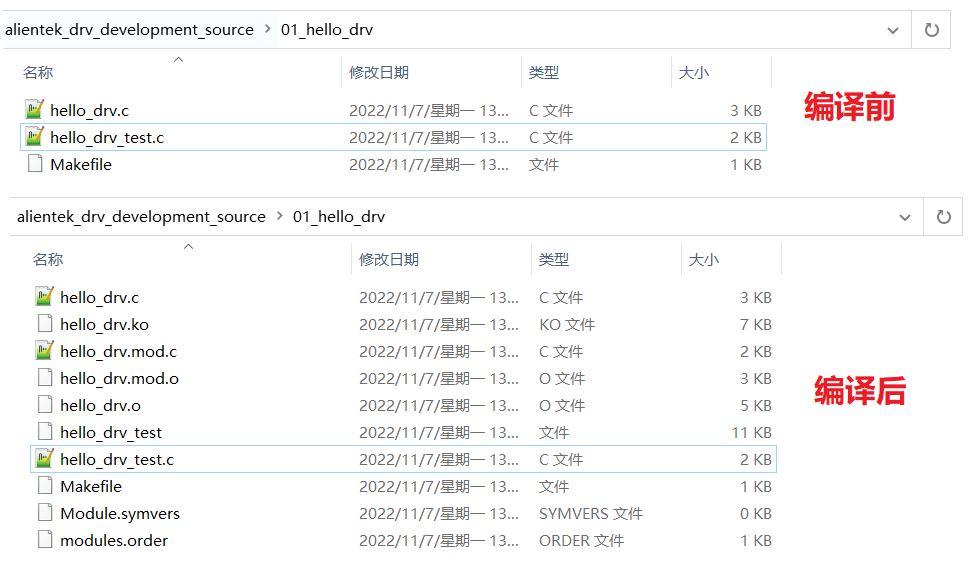
After a successful compilation, a file named <span>hello_drv.ko</span> will be generated. This file is the driver module for the <span>hello_drv</span> device. Thus, the driver for the <span>hello_drv</span> device has been successfully compiled.
2.6 Running Tests
2.6.1 Uploading Programs to Execute on the Development Board
After booting the development board, the corresponding files can be copied to the development board by mounting the Ubuntu directory via NFS. In simple terms, this means directly accessing files on the Ubuntu virtual machine from the development board through the network, as if they were local files.
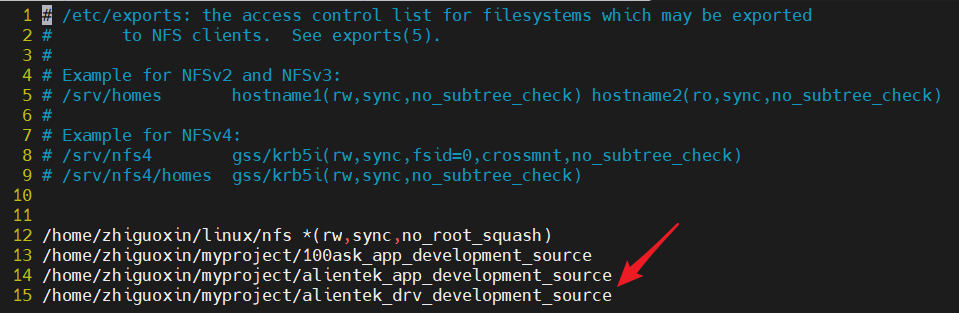
Since my code is stored in the <span>/home/zhiguoxin/myproject/alientek_drv_development_source</span> directory, we will share this directory as an NFS shared folder.
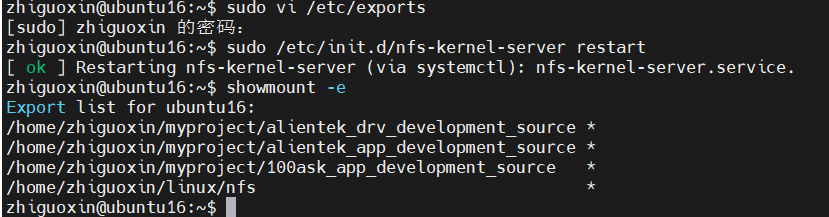
The Ubuntu IP address is 192.168.10.100, and it is typically mounted in the /mnt directory of the development board, which is specifically used for temporary mounts.
Then, use MobaXterm software to access the development board via SSH.
ubuntu ip:192.168.10.100
windows ip:192.168.10.200
development board ip:192.168.10.50
On the development board, execute the following command to mount:
mount -t nfs -o nolock,vers=3 192.168.10.100:/home/zhiguoxin/myproject/alientek_drv_development_source /mnt
This mounts the <span>mnt</span> directory of the ARM board to the <span>/home/zhiguoxin/myproject/alientek_drv_development_source</span> directory on Ubuntu. This way, we can modify files in Ubuntu and directly execute the executable files on the development board. Of course, the <span>/home/zhiguoxin/myproject/</span> and <span>windows</span> directories are shared, so I can also modify files directly on <span>windows</span> and synchronize files between Ubuntu and the development board.

2.6.2 Loading the Driver Module
The driver module <span>hello_drv.ko</span> and the executable file <span>hello_drv_test</span> are now ready, and the next step is to run tests. Here, I use the mounted method to mount the server’s project folder to the mnt directory of the ARM board. Navigate to the <span>/mnt/01_hello_drv</span> directory and enter the following command to load the <span>hello_drv.ko</span> driver file:
insmod hello_drv.ko

If the module loads successfully, there will be no prompt. If it fails, there will be a prompt. The error may be due to the version mismatch between your module and the ARM board version.
Enter the <span>lsmod</span> command to view the current modules in the system.
lsmod

Currently, the system only has the <span>hello_drv</span> module. Enter the following command to check if the <span>hello_drv</span> device exists in the system:
cat /proc/devices
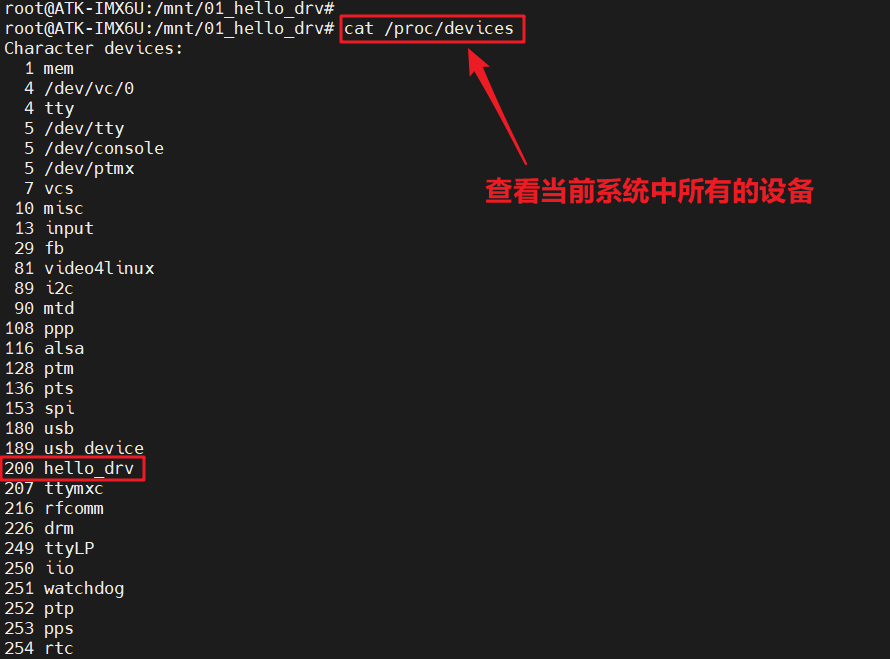
As can be seen, the <span>hello_drv</span> device currently exists in the system, with the major device number <span>200</span>, which is consistent with the major device number we set.
2.7 Creating Device Node Files
If the driver loads successfully, a corresponding device node file needs to be created in the <span>/dev</span> directory. The application program performs operations on this device node file to complete operations on the specific device. Enter the following command to create the <span>/dev/hello_drv</span> device node file:
mknod /dev/hello_drv c 200 0
Where <span>mknod</span> is the command to create a node, <span>/dev/hello_drv </span> is the node file to be created, <span>c</span> indicates that this is a character device, <span>200</span> is the major device number, and <span>0</span> is the minor device number. After creation, the <span>/dev/hello_drv </span> file will exist, and you can use the <span>ls /dev/chrdevbase -l</span> command to view it.
ls /dev/hello_drv -l

If the <span>hello_drv_test</span> wants to read/write the <span>hello_drv</span> device, it can directly perform read/write operations on <span>/dev/hello_drv</span>. Essentially, the <span>/dev/hello_drv</span> file represents the <span>hello_drv</span> device in user space. In Linux, everything is a file, including devices, and you should now have this concept down.
2.8 Testing the hello_drv Device Operations
Everything is ready. Use the <span>hello_drv_test</span> software to operate on the <span>hello_drv</span> device to check if read/write operations are normal. First, perform a write operation to input the string <span>www.zhiguoxin.cn</span> into the kernel.
./hello_drv_test -w www.zhiguoxin.cn
Then read the string just written from the kernel.
./hello_drv_test -r
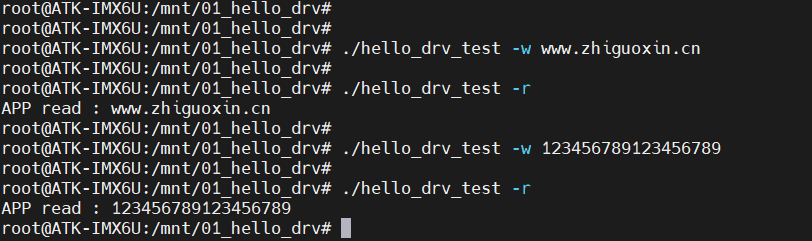
As can be seen, the read/write operations are normal, indicating that the <span>hello_drv</span> driver is functioning properly.
2.9 Unloading the Driver Module
If you no longer need a certain device, you can unload its driver. For example, enter the following command to unload the <span>hello_drv</span> device:
rmmod hello_drv.ko
After unloading, use the <span>lsmod</span> command to check if the <span>hello_drv</span> module still exists:
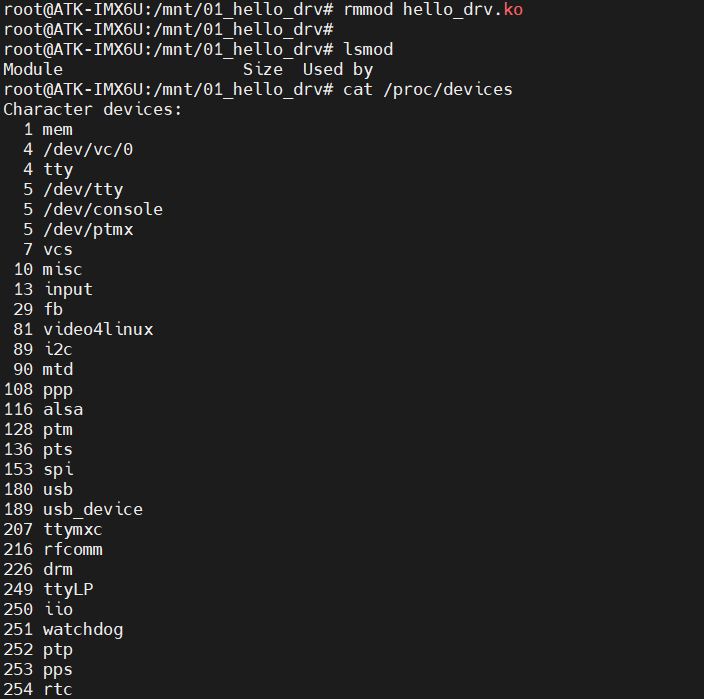
As can be seen, at this point, the system has no modules, and the <span>hello_drv</span> module no longer exists, indicating that the module has been successfully unloaded. Moreover, the <span>hello_drv</span> device is no longer present in the system.
Thus, the entire driver for the <span>hello_drv</span> device has been validated, and the driver works normally. Future character device driver experiments can use this as a template for writing.
Conclusion
The above is about character drivers in Linux. It may seem a bit difficult for beginners. I haven’t explained the code here because there’s not much to explain; it’s just the practical application of object-oriented programming and pointer functions that I’ve often mentioned in microcontroller development. Therefore, in embedded systems, it is essential to solidify your C language foundation, especially with structures, pointers, and linked lists. If you can understand these three well, Linux driver programming will be very easy, as driver development equals software architecture plus hardware operations. Software architecture requires a solid understanding of C language, while hardware operations involve the register manipulation you learned in microcontroller development. Of course, if you have learned RT-Thread, learning Linux drivers will also be very easy, as RT-Thread is kernel plus drivers, while FreeRTOS is merely a kernel.
end
Gua Gua Little Brother
Collection of Wonderful Articles
Article Recommendations
If you find it interesting, please click here↓↓↓