
In the face of the pandemic, we can support the frontline medical workers, researchers working tirelessly on the virus, and those in mask factories in various ways… Let’s cheer them on. I believe that during this fight against the pandemic, students can also feel the power of science and technology, as science is a tool that helps us break through the darkness.
Students who are learning at home should also strive to “learn wisely, play wisely, and live wisely.” Can we use our hands and brains to make our lives smarter? Many people enjoy gardening but find it labor-intensive to care for plants. If we can’t take care of them for a while, it can become a source of worry. Wouldn’t it be great if we could create a little helper to assist us in taking care of our plants?

Little Plant Guardian
The Little Plant Guardian is a smart watering system that can automatically water plants based on soil moisture, water them according to button commands, and even respond to voice commands. Making such a little helper is not difficult; let’s give it a try! (This activity is aimed at students with a certain foundation in Arduino programming.)
Required Materials
Arduino UNO, soil moisture sensor detection unit, soil moisture sensor adjustment module, relay module, water pump (5V), water pipe, sprinkler (plastic bottle or 3D print), water reservoir (plastic bottle or 3D print), utility knife, soldering iron, insulating tape, Phillips screwdriver, graduated cylinder, etc.
Production Requirements
This activity aims to create a simple smart watering system that can automatically water plants by detecting soil moisture and also allow for manual watering via a button.
Step 1: Debugging the Water Pump
1. Connect the power line of the water pump to the Dupont wire and secure it with insulating tape. Note: To prevent incorrect polarity when connecting the water pump to the Arduino later, use a red Dupont wire for the positive power line of the water pump and a black Dupont wire for the negative power line.
2. Connect the water pump, relay, and Arduino controller as follows:
① The positive terminal of the water pump connects to the normally open terminal of the relay.
② The negative terminal of the water pump and the GND terminal of the relay connect to the Arduino GND pin.
③ The VCC terminal of the relay and the common terminal of the relay connect to the Arduino 5V pin.
④ The IN terminal of the relay connects to Arduino pin 2.
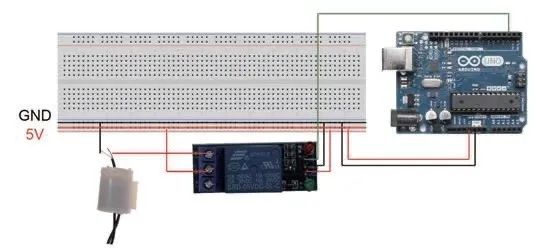
Figure 1: Connection diagram of the water pump, relay, and Arduino
Tips
Relay
The relay used here has two circuits – the control circuit on the Arduino side and the controlled circuit on the water pump side. The controlled circuit side has three terminals: normally open, normally closed, and common, which acts like a switch connecting the power supply and the water pump in series. In the connection diagram, the switch is in the off state by default (the common terminal and normally open terminal are disconnected). The control circuit side has three terminals: positive, negative, and enable (signal). When powered, the red light of the relay is always on, indicating that the relay is in working state. If a low level signal is given to the relay through the enable terminal, the green light of the relay lights up, and a crisp “click” sound is heard. At this point, the common terminal of the other circuit connects to the normally open terminal, and the water pump circuit becomes a closed circuit, starting the water pump. If a high level signal is given to the relay, the green light does not light up, the common terminal and normally open terminal are disconnected, and the circuit becomes an open circuit, stopping the water pump.
Step 2: Debugging the Soil Moisture Sensor
1. Connect the soil moisture sensor to the Arduino as follows:
① VCC connects to the Arduino 5V pin.
② GND connects to the Arduino GND pin.
③ DO connects to Arduino pin 3.
④ AO connects to Arduino pin A0.
Tips
Soil Moisture Sensor
The soil moisture sensor consists of a detection part and a data processing part. When using the soil moisture sensor, the detection part must be inserted into the soil, and its detection value will change with the soil moisture. Additionally, there is a potentiometer in the data processing part that can be adjusted to change the threshold value detected by the sensor. The Arduino sends a signal to the D0 terminal of the sensor to detect its value, and the reading port is A0.
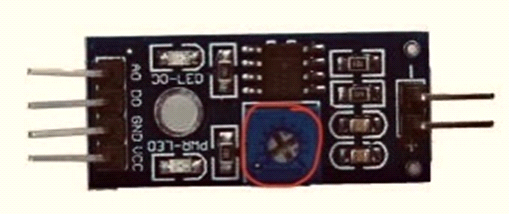
Figure 2: This potentiometer is used to adjust the detection threshold
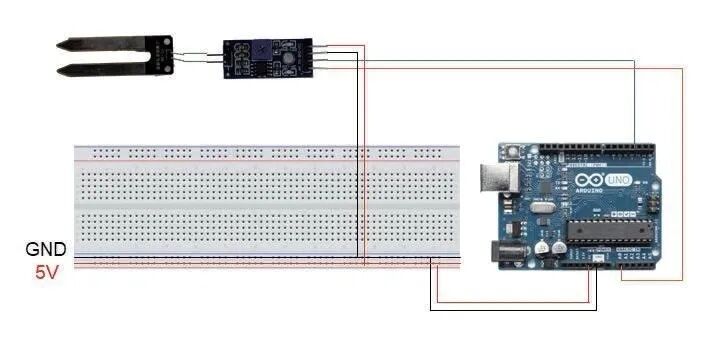
Figure 3: Connection diagram of the soil moisture sensor and Arduino
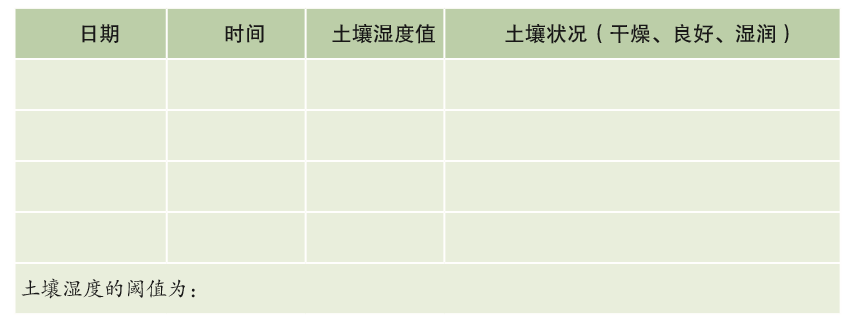
2. Insert the soil moisture sensor into the flower pot and analyze the threshold value needed for watering based on the detection value.
Step 3: Create and Debug the Watering System
1. Connect the water pump and soil moisture sensor to the Arduino. To facilitate wiring, a breadboard can be used. Additionally, to enable manual control of watering, a button switch needs to be added to the system.
2. Combine the previous water pump debugging code and soil moisture detection code, using the threshold analyzed in the previous stage to perform automatic watering operations, and optimize the threshold and watering amount through observation.

Figure 4: Download code, diagrams, and other materials
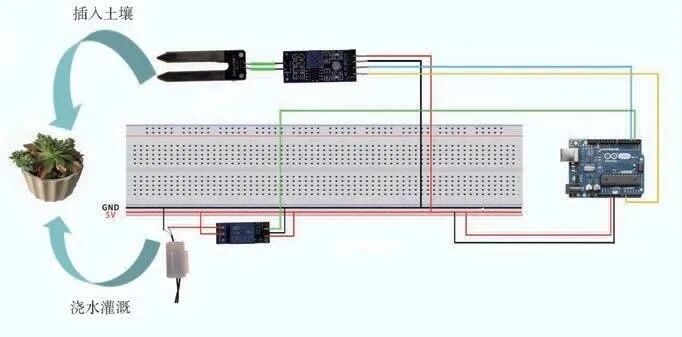
Figure 5: Connection diagram of the smart watering system
Step 4: Design of the Appearance of the “Little Plant Guardian”
1. Measure dimensions.
For aesthetic reasons, the electronic components will be placed inside the “Little Plant Guardian,” so it is necessary to clarify the dimensions of the “Little Plant Guardian” and related items.
2. Use prepared materials such as plastic bottles to create a replica of the “Little Plant Guardian.” Students with the capability can use 3D printing to design and create the little guardian.
Source:Shanghai Science and Technology Art Education Center