
The Raspberry Pi can be used to build a system from scratch or to play around with an existing system. For beginners, it is certainly easier to start with an existing system. Later on, one can compile the kernel, debug it, and build their own root filesystem (rootfs). I will also introduce some basic commands, learning and using them simultaneously, while sharing some Linux knowledge that I have gathered. Please point out any mistakes, dear readers.
To facilitate learning about the Raspberry Pi and Linux, and to communicate with some devices, I have installed Ubuntu on my PC (please don’t criticize me for not using Debian).
I am using Ubuntu version 14.04; I previously installed version 16.x but found that some things like scripts or Python were not compatible, so I switched back. Avoid installing too new a version.
To play with an existing system, the first step is to install the official system for the Raspberry Pi. There’s no need to deal with too much hardware; the system is flashed onto an SD card. The SD card is connected to the PC via a USB card reader. 1. Download the img image from the official website https://www.raspberrypi.org/downloads/. There are many pre-compiled IMG images available, including the official NOOBS and Raspbian. Below are third-party images. 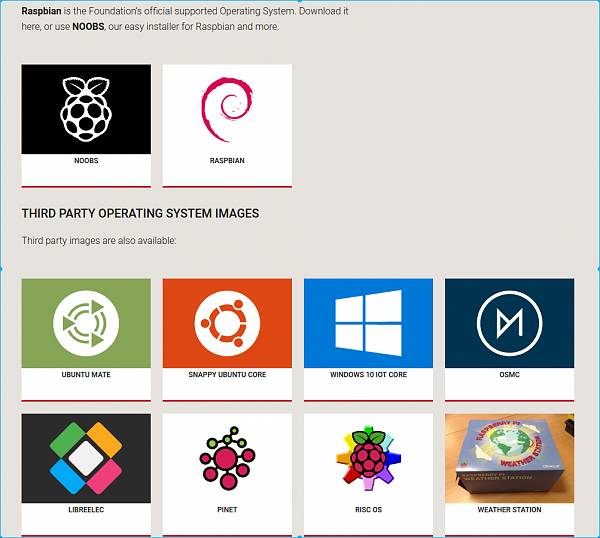 I chose Raspbian, which is the recommended option. The system is similar to my PC’s Ubuntu, and commands can be used interchangeably. Raspbian also comes in a full version and a lightweight (lite) version.
 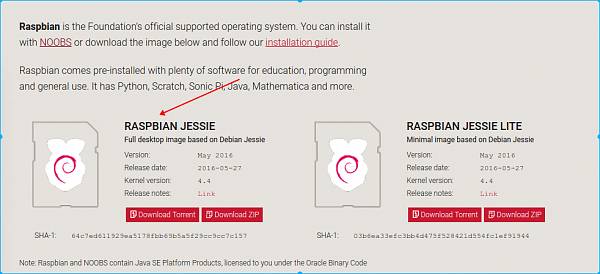 I chose the full version, which is the first option. The compressed file is quite small. After decompression, the image file is over 4GB. The version I downloaded is 2016-03-18-raspbian-jessie. After downloading, remember to verify the SHA1 checksum, which is provided below the image. If the image is incorrect, it is likely that the SD card will not boot. The verification is done on the compressed file, meaning the one you downloaded, not the decompressed one. The command for verification is #sha1sum filename
  2. Prepare to flash the system
First, understand that the image file after decompression should be an img file. This img file consists of two main parts: the first part is the boot partition, formatted as FAT32, which contains the Linux kernel, device tree, command line, and configuration files. This partition can be recognized and modified under Windows, allowing us to configure the Raspberry Pi by modifying these files. The second part is the root filesystem (rootfs), formatted as ext4. Double-clicking this img file will allow Ubuntu to recognize and mount it 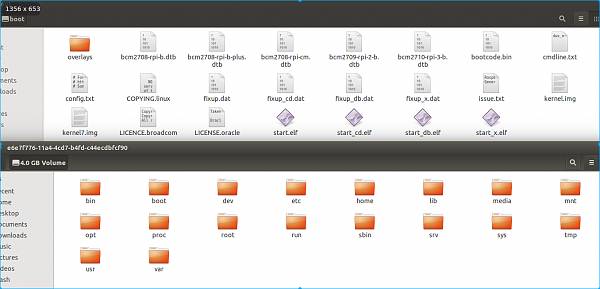 . You can also check using the fdisk command: #fdisk -l 2016-03-18-raspbian-jessie.img Disk 2016-03-18-raspbian-jessie.img: 4033 MB, 4033871872 bytes 255 heads, 63 sectors/track, 490 cylinders, total 7878656 sectors Units = sectors of 1 * 512 = 512 bytes Sector size (logical/physical): 512 bytes / 512 bytes I/O size (minimum/optimal): 512 bytes / 512 bytes Disk identifier: 0x8f1eafaf
The Raspberry Pi is an open-source development board, but it is not completely open source. The initial boot part is hard-coded in ROM and cannot be modified, so generally, unless the hardware is damaged, the Raspberry Pi will not be bricked.
It is necessary to understand the basic boot process of the Raspberry Pi to grasp the basic functions of various files: CPU power-up -> initial boot ROM code -> mount the first FAT32 boot partition -> load bootcode.bin -> call start.elf
start.elf reads config.txt for preliminary initialization, such as allocating memory to the GPU based on the configuration in config.txt, and then loads kernel.img, which is the Linux kernel, passing in cmdline.txt kernel command parameters to start the kernel. The kernel finds the rootfs based on the parameters and starts the entire system. The code in ROM and start.elf are not open source; they are provided in the firmware available on the official website, which is a point of contention for those who prefer completely open-source solutions.
After understanding the system boot process, let’s look back at some files in the first part:
-
overlays are device tree files for extended devices.
-
dtb files are device trees for different versions of the Raspberry Pi board.
-
Bootcode.bin is used to start start.elf.
-
Start.elf, etc., are used by the Raspberry Pi to load the kernel and perform basic initialization.
-
Kernel.img is the image of the Linux kernel (zImage + dtb boot file; not examined in detail yet; the official has tools to create kernel.img from zImage).
-
cmdline.txt contains the parameters for starting the Linux kernel.
-
Config.txt is the configuration file for the Raspberry Pi, such as how much memory to allocate to the GPU, and what mode to use for display output. If configured incorrectly, the display may not function properly when connected.
Different files are just to accommodate different boards; not all files are necessary. For example, my Raspberry Pi Model B only needs bcm2708-rpi-b.dtb, bootcode.bin, cmdline.txt, config.txt, kernel.img, and start.elf to boot.
3. Prepare to start flashing the system
Insert the SD card into the card reader and connect it to the PC.
How to find your device on Ubuntu? Before inserting the card reader, first use ls to view the local devices  . Linux disk devices are represented as sd[a-z][1-9]; [a-z] indicates the number of disks, and [1-9] indicates the number of partitions on the disk. Here we see /dev/sda, /dev/sdb, /dev/sdc, indicating that I have three hard disks (why three? One SSD of 250GB, two 1TB mechanical drives, one in the hard drive bay, and one in the optical drive bay). Next, insert the SD card. Use ls /dev/sd* again: /dev/sda, /dev/sda5, /dev/sdb2, /dev/sdc2, /dev/sdc5, /dev/sdc8, /dev/sdd2, /dev/sda1, /dev/sdb, /dev/sdc, /dev/sdc3, /dev/sdc6, /dev/sdd, /dev/sda2, /dev/sdb1, /dev/sdc1, /dev/sdc4, /dev/sdc7, /dev/sdd1. We notice that /dev/sdd has appeared, indicating that the newly inserted SD card is /dev/sdd. This step is crucial to determine the corresponding device for the SD card; do not accidentally flash another disk. Next, use the dd command to write the img to the device: #sudo dd if=2016-03-18-raspbian-jessie.img of=/dev/sdd bs=65536. An endless wait… dd does not provide feedback. Do not unplug the device midway. Wait until it’s done. if=input filename of=output filename bs specifies the number of bytes read or written at once. Here, a higher value does not necessarily mean faster; I generally set it to 64KB. The final result
  shows 5.7MB/S, which is quite slow. I am demonstrating with a regular SD card.
On Windows, the process is simpler.
Using Win32 Disk Imager, select your drive letter and the img file. Click write, and you can see the progress, which is an advantage over Linux.
If everything goes smoothly, after the flashing is complete, insert the SD card into the Raspberry Pi’s card slot. Power up the Raspberry Pi (a regular phone charger will suffice), and your Raspberry Pi should boot up. 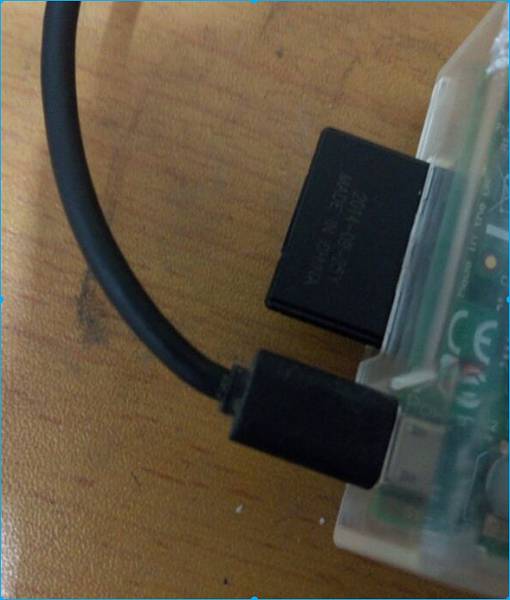 Image: Power supply and SD card 4. Check the status
Currently, we do not have any display to check the boot status. The only thing we can observe is the indicator lights on the Raspberry Pi. 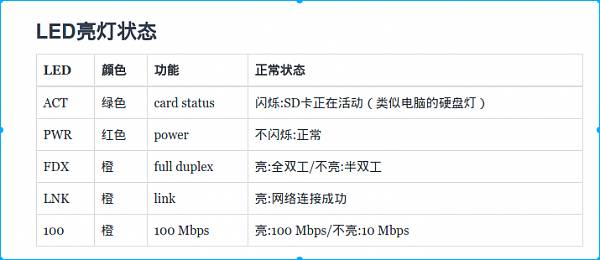
If the green light flashes continuously, it indicates that the SD card is being read. This should be okay. At this point, we can connect the network cable, or connect the network cable before powering on. If the orange LNK light is lit, it indicates network connectivity. Wait for two minutes, and when the system is stable, check again. The ACT light should flash occasionally, usually remaining off. The other four lights should be constantly lit. 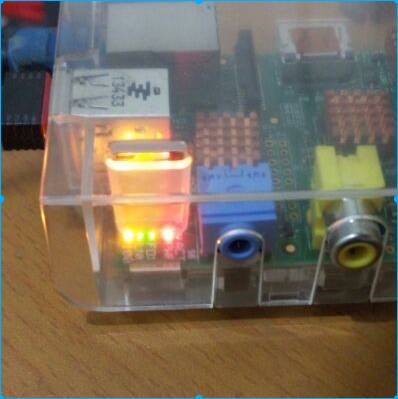 Although the effect is unclear, it can still be seen that all four lights are on. At this point, the ACT light is off. I log into the router to see if an IP has been assigned. Alternatively, I can use nmap to scan #nmap 192.168.1/24 according to your local network. Mine is 192.168.1.x. The results are as shown in the image
 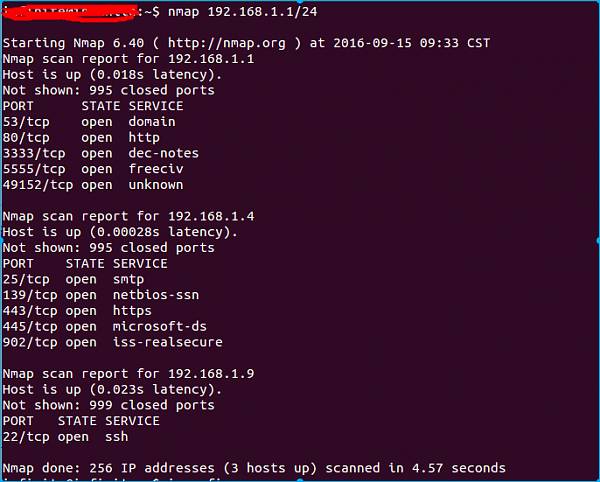 192.168.1.1 is the router, 192.168.1.4 is my PC running Ubuntu, and 192.168.1.9 is definitely the Raspberry Pi. The most convenient way is to log into the router to check the IP. I can see that the device has been recognized
  . Nmap can show that the default SSH port 22 is open. Let’s log in and check. The default username is pi and the password is raspberry. ssh username@ip #ssh [email protected] prompts to trust this connection. Type yes to continue
  Enter the password raspberry (note that when entering the password in Linux, the input is not visible; just type and press enter to confirm). OK, login successful.
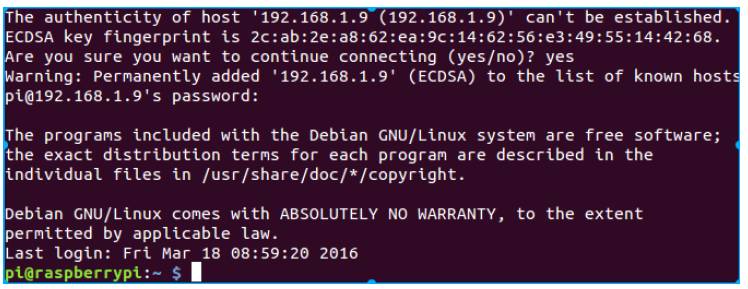
See the Kanxue Test: http://ce.kanxue.com
See the Kanxue Forum: http://bbs.pediy.com/

—– WeChat ID: ikanxue —–
Kanxue Security Continuously focusing on security for 16 years, professionally at your service!