

Click the blue text above to follow us


Introduction
Due to the numerous Linux distributions, most core commands are the same across different branches. Therefore, I will choose CentOS7, which is widely used among many services, and Ubuntu, which has a high market share, as examples! Most of the commands listed below can run normally on Ubuntu 20 and CentOS7!
Basic Information Gathering
System Architecture Information
-
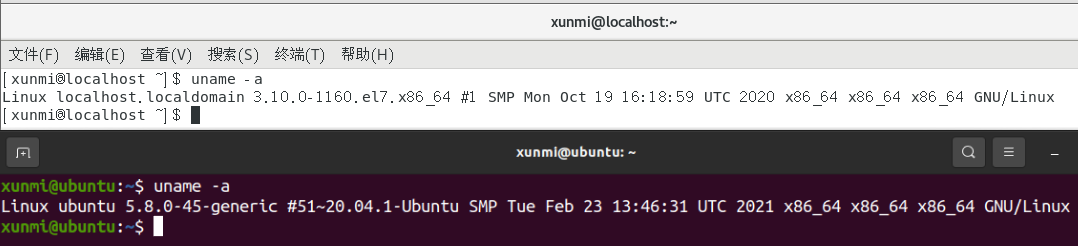
uname -a: This command can view the specific version of the current Linux kernel, the version of the distribution used, and the current processor architecture! (The architecture here is very important, as most Linux attack payloads require a clear understanding of the processor architecture to be used)
32-bit system (x86): i386, i686, x86, arm 64-bit system (x64): x64, x86_64, amd64, arm64, aarch64
Files Containing System Information
As we know, Linux is a file system, and all information exists in file form. Therefore, much of our system information can also be viewed directly in files! (Use the cat command to view files)
-
cat /etc/issue: The prompt displayed when connecting to the system, which generally contains the distribution name and other information (PS: Users may use this as a memo for storing some passwords) -
cat /etc/*-release: Detailed distribution system version information (the names may vary slightly across different distributions, and there may be multiple files; in this case, we can use the wildcard*to solve the problem). -
ls /etc | grep "release"can be used to see which files are specifically in this folder on your system! -
cat /proc/version: Detailed system kernel information, including the version of gcc used to compile the kernel and the time of kernel compilation. -
cat /proc/sys/kernel/version: System kernel information, equivalent touname -v(the/proc/sys/kernelfolder can monitor and adjust various activities within the Linux kernel! But it requires administrator privileges!)
Process Information
-
ps: Lists the processes running in the current terminal for this user -
ps -elf: Displays detailed (-l) information with UID, PPID, C, and STIME fields (-f) for all processes in the current terminal (-e) -
ps aux: Displays all processes for all users (a) in all terminals (x) in a user-oriented format (u)
Files Containing Process Information
/proc: The folders named with numbers in this directory represent the UID of the currently running processes. In addition to these UIDs, this folder also contains information such as system memory, installed devices, hardware configuration, etc! # View detailed information of all files and folders in this directory ls -al /proc/ # View detailed information of the process with uid 99 ls -al /proc/99 User and Group Information
-
id: Compared towhoami,idis more practical, as it not only shows who the current user is but also which group they belong to! Even if a user is not root, as long as they are in the root group, they are also a high-privileged administrator user!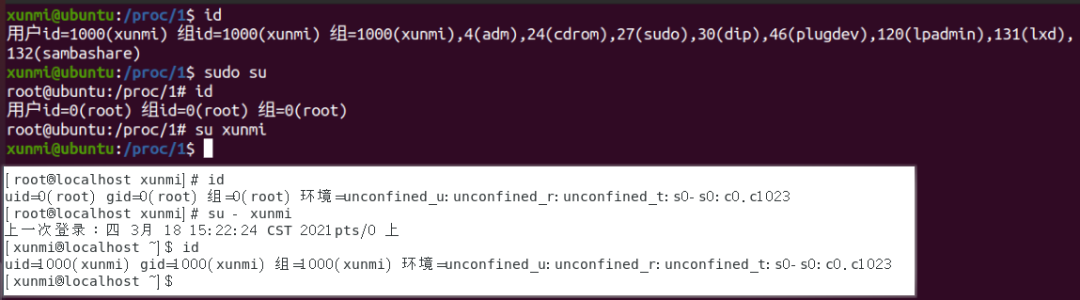
-
w: Displays the users currently logged into the server. -
last: User login records -
lastd: Records of failed login attempts -
lastlog: Last login logs for all users -
who: Information about currently logged-in users (shows the last login time and date for the current user)
Files Containing User Information
-
cat /etc/passwd: User identity information for the operating system that allows login or has currently running processes.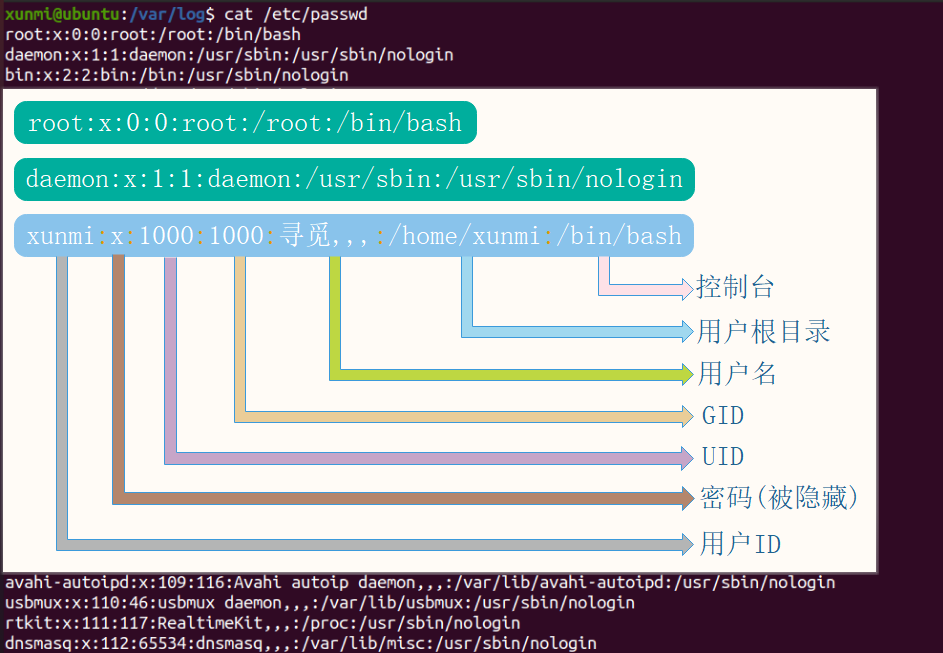
-
cat /etc/shadow: Password security policies for all users; generally, only superusers have access to this file!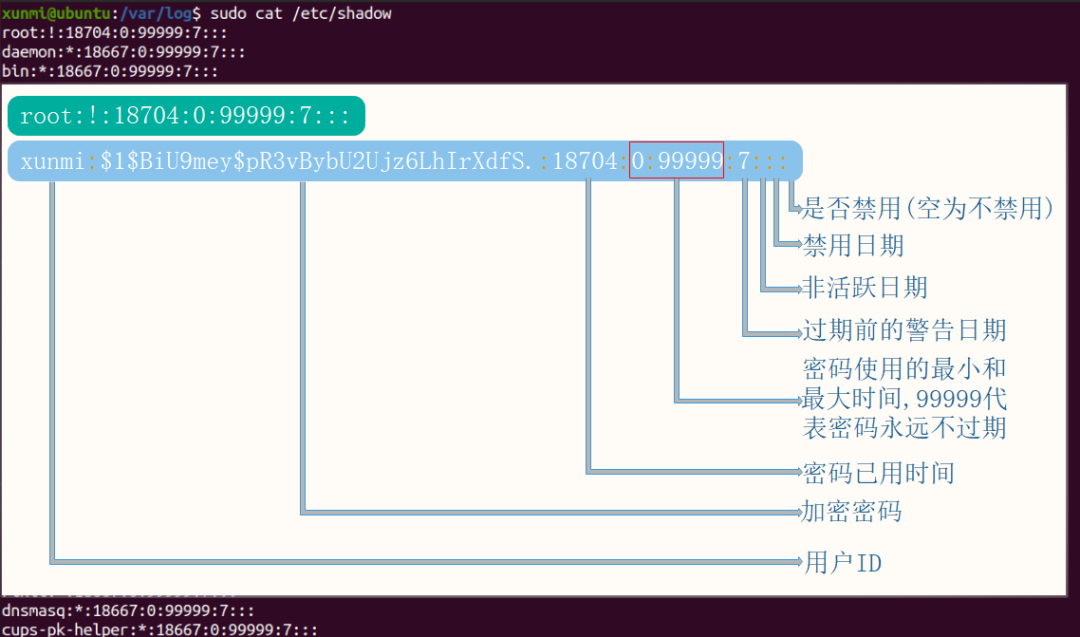
cat /etc/sudoers: Management of permission allocation -
sudo -V: Prints the sudo version string -
sudo -l: Lists the commands that the current user can and cannot execute (where(ALL:ALL) ALLrepresents all commands)
Network Information (System Communication)
-
ifconfig -a: View network and network card-related information -
hostname: Displays and sets the system’s hostname -
netstat -anutpornetstat -antpxornetstat -tulpn: View all programs’ identification codes and program names (-p) for TCP (-t) and UDP (-u) ports in use (-a) and the corresponding connection IP addresses (-n); where-xis equivalent to-A unix;-ldisplays the monitoring server’s Socket. Requires administrator privileges -
lsof -nPi: Lists the files currently using the network file system (net file system, abbreviated as NFS) with their PIDs (-P) and processes (-i)Requires administrator privileges. Uselsof -nPi:portto view information for a specific port! -
route -e: IP routing table
Files Containing Network Information
-
cat /etc/resolv.conf: Configuration file for domain name resolution service (DNS) -
cat /etc/hosts: Functions similarly to the host file in Windows, associating IP addresses with hostnames; we can use this file to attempt to find nearby targets
Automatic Ping Script
Sometimes, when we want to see if there are internal network hosts, we can use this script to automatically ping for a C-end scan!
#!/bin/bash for i in {2..254} do { ip=192.168.1.$i ping -c1 -W20 $ip >/dev/null if [ $? -eq 0 ];then echo "$ip"|tee -a ip.txt else echo "$ip failed!!" fi } done wait echo "Done" Privilege Escalation Notes
File System
Important System Files
Many important pieces of information in Linux are stored directly in files, and we can collect the data we need by checking information in these critical locations!
-
cat /etc/profile: Linux system environment and startup program. Contains information about starting consoles (bash,sh) etc. Users can switch machines and startup programs usingcat ~/.bash_profile -
cat /etc/bash*: Startup files for using the bash console. Common functions and aliases used widely in the system. (This could be/etc/bashrcor/etc/bash.bashrc, all using wildcards) -
cat ~/.bash_history: Prints the current user’s bash command history (can also directly inputhistoryto view) -
ls -al /var/log/: Lists all log files
File Permission Management
Permission Settings
chmod permission management Syntax: chmod [{ugoa}{+-=}{rwx}] [file or directory]chmod a+rwx filename/directoryname
u: owner g: group o: others a: all +: add permission -: remove permission =: assign permission r: read permission w: write permission x: execute permission
or: chmod [mode=421] [file or directory]chmod 777 filename/directoryname
r represents read permission, which can be represented by 4. w represents write permission, which can be represented by 2. x represents execute permission, which can be represented by 1. No permission can be represented by 0!
-R recursively modifies (it modifies permissions for files nested in many folders; without this, it can only modify permissions in the specified folder)
Permission Viewing
When we use ls -la, we can see the permission settings for all files and folders in the current directory.
Permissions consist of 10 characters, with the first character forming one group, and the subsequent 9 characters forming 3 groups. For example: d rwx r-x r-x
-
The first character has two situations: if it is “d”, it represents a folder; if it is “-“, it represents a file; -
The 2nd, 3rd, and 4th characters: these 3 characters together represent the file’s owner, which can be represented by u, having four permissions: r: read permission, w: write permission, x: execute permission, -: no permission; -
The 5th, 6th, and 7th characters: these 3 characters represent the file’s group, which can be represented by g, having four permissions: r: read permission, w: write permission, x: execute permission, -: no permission; -
The 8th, 9th, and 10th characters: these 3 characters represent all other users except the owner and the group, which can be represented by o, having four permissions: r: read permission, w: write permission, x: execute permission, -: no permission.
# Example: -rw---- (600) <--> Only the owner has read and write permissions. -rw-r--r- (644) <--> Only the owner has read and write permissions; while group users and others only have read permission. -rwx---- (700) <--> Only the owner has read, write, and execute permissions. -rwxr-xr-x (755) <--> The owner has read, write, and execute permissions; while group users and others only have read and execute permissions. -rwx--x--x (711) <--> The owner has read, write, and execute permissions; while group users and others only have execute permissions. -rw-rw-rw- (666) <--> All users have file read and write permissions. -rwxrwxrwx (777) <--> All users have read, write, and execute permissions.
Linux’s permission settings are quite complex. There is an online website (https://chmodcommand.com/) that provides an automatic permission management generation function.
Special Permissions
Special permissions include: setuid, setgid, and sticky bit
-
setuid: Allows the user executing the file to execute it with the permissions of the file’s owner. u+sor4 -
setgid: Allows the user executing the file to execute it with the permissions of the file’s group. g+sor2 -
Sticky bit: Only allows the creator (root user ignores this rule) to perform deletion and modification operations on the file. o+tor1
-rwxrwxrwx (777) <--> All users have read, write, and execute permissions. -rwsrwxrwx (4777) <--> All users have read, write, and execute permissions, and all users will run with the owner's identity. -rwxrwsrwx (2777) <--> All users have read, write, and execute permissions, and all users will run with the group's identity. -rwxrwxrwt (1777) <--> All users have read, write, and execute permissions, but only the owner has delete and modify permissions for this file. -rwsrwsrwt (7777) <--> All users have read, write, and execute permissions, running with both owner and group identities, and only the creator has delete and modify permissions for the file.For example, a file with permissions -rwxr-xr-x will change to -rwsrwsrwt after setting all special permissions, but if uppercase letters appear, it indicates that the specified group does not have execution permissions, causing special permissions to fail!
Find Specific Types of Files
# Sticky bit - Only the directory owner or file owner can delete or rename here. (-type d: directory type) find / -perm -1000 -type d # SGID (chmod 2000) - Files that run as the group, not the user starting them. (-type f: general file type) find / -perm -g=s -type f # SUID (chmod 4000) - Files that run as the owner, not the user starting them. find / -perm -u=s -type f # Find writable and executable directories find / -xdev -type d -perm -0002 -a ! -perm -1000 -print # Find files that are not owned find / -xdev -nouser -o -nogroup -print Scheduled Tasks
crond is a daemon process in Linux used to periodically execute certain tasks or wait for certain events to be processed. After installing the operating system, this service tool is installed by default and automatically starts the crond process, which checks every minute whether there are tasks to be executed. If there are tasks to be executed, it automatically executes them.
Input systemctl status cron* to check whether the current scheduled task service is running normally! (Because the cron service name may vary slightly across different systems, wildcards are used here to solve the problem!)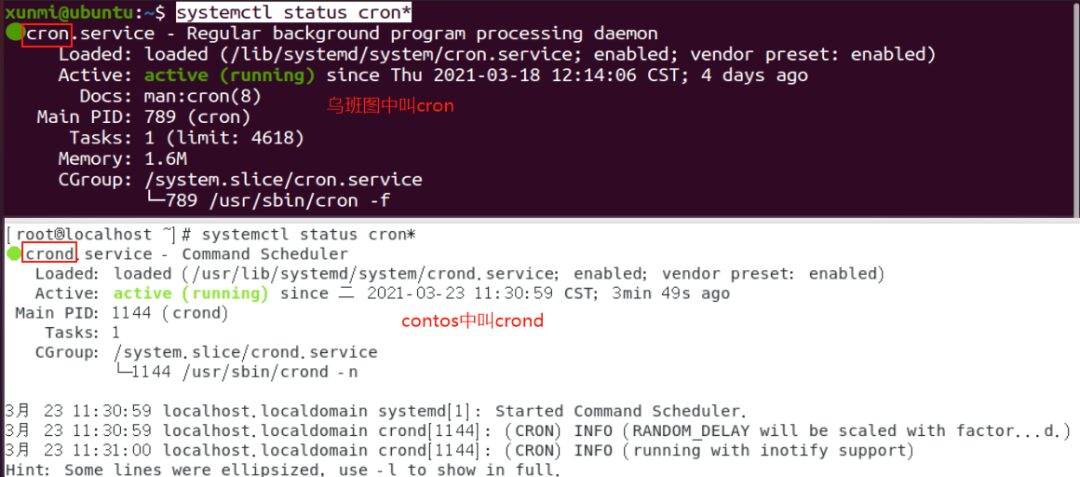 Input
Input crontab -l to view the currently set scheduled tasks for the user
Scheduled tasks are stored in the directory/file: /etc/crontab: This file is responsible for arranging maintenance systems and other tasks set by the system administrator!
/var/spool/cron: This directory stores crontab tasks for each user, including root; each task is named after its creator.
Setting Scheduled Tasks
# Set scheduled tasks crontab -e # or vim /etc/crontab # For example, between 11 PM and 7 AM every day, execute the /root/backup.sh script once an hour and export the output to /var/backup_log.txt * 23-7/1 * * * root /root/backup.sh >> /var/backup_log.txt -
Asterisk (*): Represents all possible values, for example, if the monthfield is an asterisk, it means that the command will be executed every month as long as the other fields’ conditions are met. -
Comma (,): Can specify a list of values separated by commas, for example, “1,2,5,7,8,9” -
Dash (-): Can represent a range of integers between integers using a dash, for example, “2-6” represents “2,3,4,5,6”. -
Slash (/): Can specify the frequency of intervals for time, for example, “0-23/2” means executing once every two hours. The slash can also be used with an asterisk, for example, */10, if used in the minutefield, it means executing every ten minutes.
Service Status
systemctl, service, and chkconfig are commands related to system services
Among them, systemctl is a command that replaces the functions of service and chkconfig, so newer Linux versions mainly use systemctl, while older versions are more suitable for service and chkconfig
-
service --status-all: View the status of all services -
systemctl list-units --type service -a: View all currently loaded services (replacelist-unitswithlist-unit-filesto view all installed services) -
service service_name startorsystemctl start service_name: Start a service (the service format we use withsystemctlisservice_name.service, but we do not need to include the suffix.servicewhen using it) -
service service_name stoporsystemctl stop service_name: Stop a service -
service service_name restartorsystemctl restart service_name: Restart a service -
service service_name statusorsystemctl status service_name: Current status of a service -
service service_name restartorsystemctl restart service_name: Restart a service -
systemctl try-restart service_name: Restart the service only if it is running -
systemctl reload service_name: Reload the service configuration file
Files Containing Service Status
-
cat /etc/services: Maps port numbers to specified services.
(You can use grep port_number /etc/services to query the service that the specified port is open for!)
SSH Service Information
Most operations connecting to Linux are done directly using the SSH service, which is not only efficient and secure but also has many convenient features.
One of the password-free login features is frequently utilized by us, allowing bypassing user login passwords to directly connect to the target host.
To implement this feature, we first need to check whether the target machine has enabled some necessary features:
# Configure the ssh service (the client is the ssh_config file) vim /etc/ssh/sshd_config # In the configuration file, enable the following options # Allow RSA authentication RSAAuthentication yes # Allow public key authentication PubkeyAuthentication yes # Allow root login PermitRootLogin yes # [Optional] Disable password login PasswordAuthentication no # After completing the above configuration, enter :wq to save and exit, then restart the ssh service service sshd restart After completing the above steps, we can first check whether the target machine has the ~/.ssh/ directory (if permissions are sufficient, we can directly check the /root/.ssh/ directory)
If this directory does not exist, it generally indicates that the password-free login key has not been generated! In this case, we need to use the command ssh-keygen to apply for a key.
This directory generally contains two files, namely the private key id_rsa and the public key id_rsa.pub, but in addition, it also requires an authorized_keys file.
We can think of the entire password-free process as a fingerprint lock, where the authorized_keys file is the database of this fingerprint lock, and the public key id_rsa.pub is your fingerprint data that can exist in the database, while the private key id_rsa is your finger.
There are two common methods to unlock this fingerprint lock.
-
Method 1: Use our public key saved in the target host’s authorized_keys
# Add our public key to the authorized_keys file echo public_key (content of our id_rsa.pub file) >> ~/.ssh/authorized_keys # Then directly use the local machine to ssh connect to the target This method is equivalent to recording our fingerprint into the target’s database, which means saving the id_rsa.pub file into the other party’s authorized_keys.
We also need to generate our own public key using ssh-keygen, and if it’s Windows, it’s fine.
Windows 10 and later systems come with ssh! The default path is C:\Users(Chinese version system is user)/username (everyone is different)\.ssh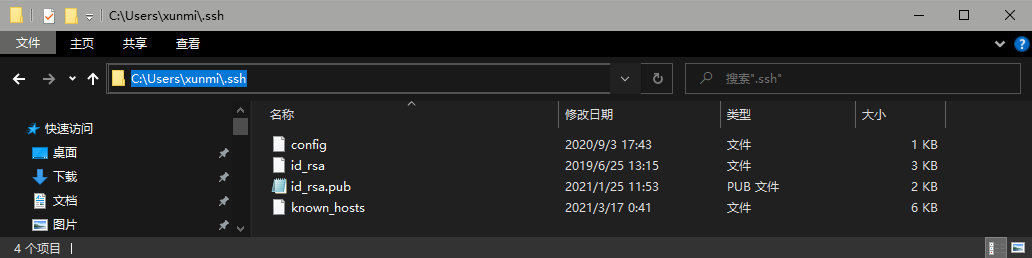
Method 2: Add the other party’s public key data to their authorized_keys, and then download their id_rsa to the local machine to forge the other party’s finger.
# Add the target machine's public key to the authorized_keys cat ~/.ssh/id_rsa.pub >> ~/.ssh/authorized_keys # We need to download the id_rsa file; there are many methods to download files, here is a Python method to download the target file # In the .ssh directory, using Python's service can open a directly accessible address to download the files we need python3 -m http.server # Use ssh to connect ssh target_username@target_address -i id_rsa # For example ssh [email protected] -i C:\Users\xunmi\Desktop\network_security\id_rsa This method is equivalent to forging an identical target fingerprint id_rsa
This method also has the advantage that if the target machine’s user is a system administrator, their private key may be able to log into many commonly used machines!
Security Services
The primary service installed in Linux systems is the packet-filtering firewall netfilter! We usually manage it using the tool iptables. iptables -L: Lists all rule chains (requires administrator privileges) iptables -F: Deletes all rules in the selected rule chain
Commonly Used Port Addition Commands for the Firewall
Parameter introduction: -A: Add ports; commonly used -A OUTPUT indicates output ports and -A INPUT indicates input ports -p: Protocol type; common protocol types include -p icmp, -p tcp, -p udp -m: Extended module (load extension); commonly used, for example, -m state --state NEW,RELATED,ESTABLISHED --sport port_number or -m protocol_type (like tcp) --sport port_number: Specify source port number --dport port_number or -m protocol_type (like tcp) --dport port_number: Specify destination port number -j: Action to execute when preconditions are met. For example, allow (-j ACCEPT); intercept (-j DROP, -j REJECT), where using -j DROP will return an error message, while -j REJECT will not.
Common Examples
# Allow all ports from the local machine to access the outside world iptables -A OUTPUT -j ACCEPT # Allow all external machines to access the local machine iptables -A INPUT -j ACCEPT # Allow external machines to access port 80 of the local machine using TCP protocol iptables -A INPUT -p tcp --dport 80 -j ACCEPT # Allow incoming UDP protocol from port 53 to access the local machine iptables -A INPUT -p udp -m udp --sport 53 -j ACCEPT # Allow the local machine to send out UDP protocol from port 53 iptables -A OUTPUT -p udp -m udp --dport 53 -j ACCEPT # Allow ping (icmp is the protocol used by ping) iptables -A INPUT -p icmp --icmp-type 8 -j ACCEPT # Allow all hosts to connect to port 9999 iptables -A INPUT -p tcp -m tcp --sport 9999 -j ACCEPT iptables -A OUTPUT -p tcp -m tcp --dport 9999 -j ACCEPT # Allow all internal machines in the 192.168.1.* network segment to access the local machine iptables -A INPUT -p all -s 192.168.1.0/24 -j ACCEPT # Allow the local machine to access all machines in the 192.168.1.* network segment iptables -A INPUT -p all -d 192.168.1.0/24 -j ACCEPT Reverse Shell Basics
Redirection
Under normal circumstances, we operate Linux by default from keyboard input, and the information that needs to be displayed will appear on our screen. However, we can use the redirection symbol to change this normal situation.
| Symbol | Meaning | Specific Function |
|---|---|---|
| < | Input Redirection | Read input from a file. |
| > | Output Redirection | Save output to a file. (Will overwrite existing files) |
| >> | Output Redirection | Append output to a file. (If the file exists, it will append, not overwrite) |
| | | Pipe | Send the output of one program as input to another program |
# For example, I want to save the output of ls to a file named `directory_status.txt` ls > directory_status.txt # Save another directory as well ## Append save ls ../ >> directory_status.txt ## Overwrite save ls ../ > directory_status.txt # Input redirection ## We write `directory_status.txt` into the `test` variable (variables do not support line breaks, so only the first line can be saved), 0 is the standard file operator for input read test < directory_status.txt # Pipe, can take the output of the previous command as input for the next command (wc is the command used to count words and lines!) echo "abc" | wc 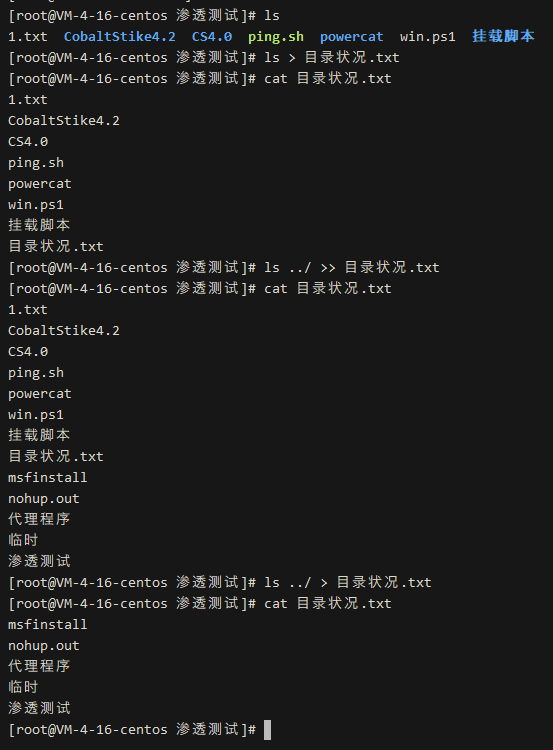

Standard File Descriptors
One of the basic philosophies of Linux is “everything is a file”. When Linux starts, it automatically opens three file descriptors (input, output, error output). Our interaction with Linux relies on these three file descriptors.
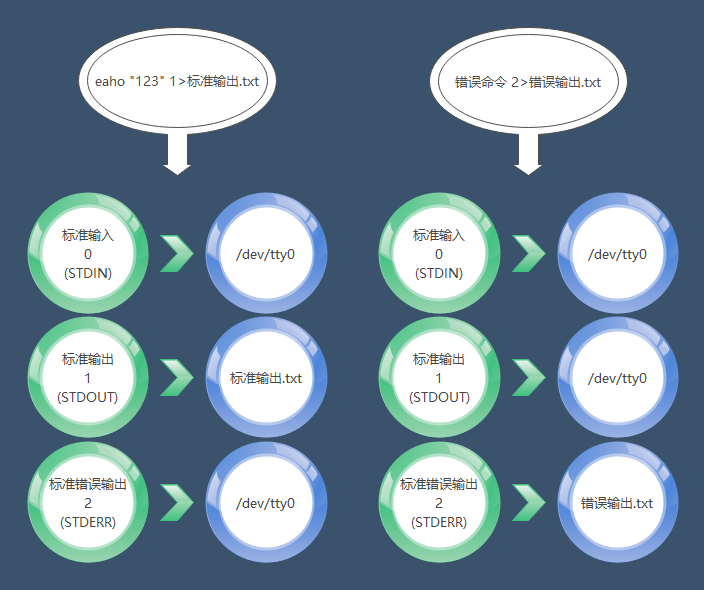
|File Descriptor|English Name|Description|Default Device| |–|–|–|–| |0|STDIN|Standard Input|Default keyboard device (/dev/tty0)| |1|STDOUT|Standard Output|Default display device (/dev/tty0)| |2|STDERR|Standard Error Output|Default display device (/dev/tty0)
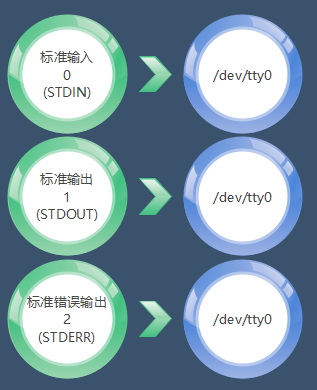
File Descriptor 0: The input operation we perform on the Linux system (for example, when I want to see the file list, I input ls). File Descriptor 1: The output returned to us by the Linux system (for example, after I input ls, the system returns the information of the files in the current directory). File Descriptor 2: The error output returned by the Linux system.
eaho "123" 1>standard_output.txt error_command 2>error_output.txt 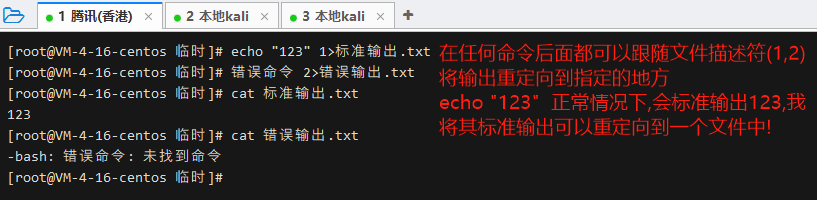
Standard Output in Redirection
-
>and>>are abbreviations for1>and1>>, meaning that by default, only standard output will be redirected, not error messages. -
If we want to redirect both standard output and error messages simultaneously, we need to use &>or>&(the effect is exactly the same).
find /run -perm -1000 -type d &> file_operator.txt find /run -perm -1000 -type d >& file_operator.txt 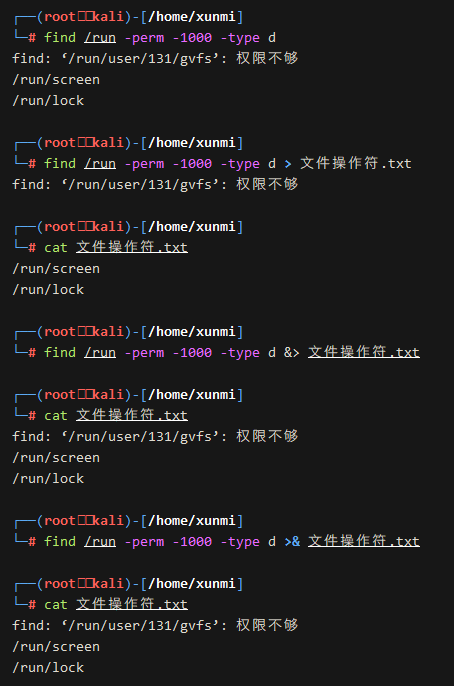

Custom File Descriptors
In addition to the three descriptors, we can also customize new file descriptors exec file_descriptor<>file
# For example, I customize a file descriptor 3 and point it to `my_file_descriptor` exec 3<>my_file_descriptor pwd >&3 cat my_file_descriptor 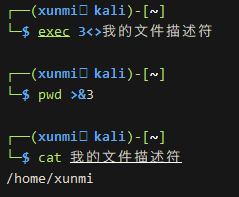
Special Files
Based on the Linux philosophy that everything is a file, we can find some very interesting files in Linux that can help us in penetration testing, and some files are very important for penetration testing!
TCP Connections
/dev/tcp/IP/port: In Linux, the TCP connections we establish also exist in file form, and most reverse shells in Linux utilize this feature to establish connections!
Terminal Devices
/dev/tty: The terminal we use to log in via the ssh command line also exists as a file in Linux. Each time we connect to a terminal, a new terminal file is created, for example, when establishing the first one, it is /dev/tty1, and there is a very special terminal pointing file /dev/tty0 that points to the terminal we are currently using. By default, all our file operators point to this terminal /dev/tty0. The files related to /dev/tty are owned by tty, and even the root user has no permission to operate them.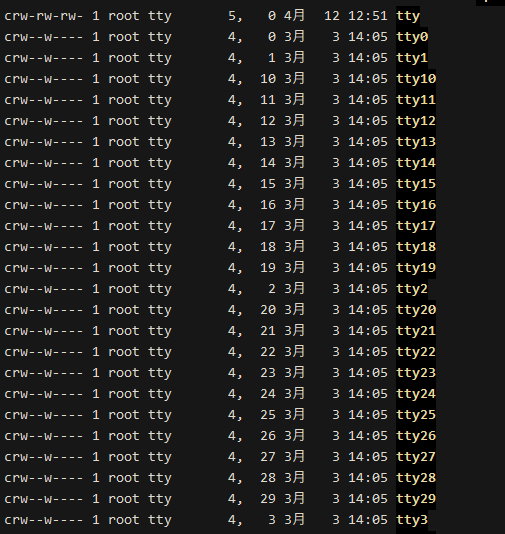
Null Files
/dev/null: (there is also a special file /dev/zero that we temporarily do not need, interested parties can search for it) a black hole file, just like its name, it will consume any content that enters it and return a success signal, but in fact, the content saved into it is discarded. A common usage is 2>/dev/null, which sends all errors to the black hole, so that only non-error content will be output!
echo "123" 2>/dev/null error_content 2>/dev/null 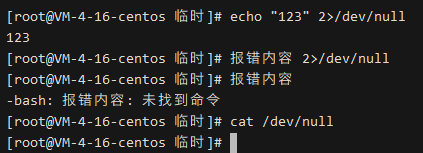 For example, when we perform privilege escalation operations, we may need to check a command for specific file permissions
 find / -perm -1000 -type d
However, this will generate many permissions errors, which are of no use to us.
Instead, it will affect our ability to find the information we need. In this case, we can use the above null file to delete all error messages find / -perm -1000 -type d 2>/dev/null
References
[0] Reference article:https://xunmi.blog.csdn.net/article/details/114970239
[30] Online website:https://chmodcommand.com/

If you want to systematically learn network security technology
Join the Knowledge Planet course
“60 Days to Get Started with Network Security Penetration Testing”
From entry to case studies, closely aligned with practical applications
Easy to understand, fun, and practical
Limited time offer
 Knowledge Planet
Value for money | Let’s learn network security together! Teaching someone to fish is better than just giving them fish!


 EventCoupon

Follow the60-day introductory learning pathto learn together
Looking forward to your arrival!

Previous Recommendations
From entry to prison technology, it can be learned; do not misuse it!
Network security learning directions and resource organization (recommended for collection)
A basic learning plan for web security engineers
Resource | Penetration Testing Engineer Entry Tutorial (Limited Time Offer)
5-year veterans recommend 10 must-have websites for playing Python!
Ten recommended must-have websites for becoming a penetration testing expert in network security!
Those secrets that social engineers do not want others to know…
For more content, please follow the public account
Network Security Self-Study Room


Click to view your best look
