1. Introduction
In today’s rapidly evolving technological landscape, automated operations and maintenance have become key factors for enterprises to enhance efficiency and competitiveness. As business scales expand and system complexities increase, ensuring the efficiency and reliability of operations and maintenance has become a significant challenge for every team. Ansible, as a leading open-source automation platform, has gained widespread acclaim and application globally due to its agentless architecture, simple YAML syntax, and robust module ecosystem. However, extending Ansible from a single control node to a high-availability deployment is not just a technical challenge but also a profound test of the entire operations and maintenance system architecture design thinking.
This article delves into Ansible’s high-availability deployment solutions, providing detailed steps to guide us in building an automated operations and maintenance engine that can handle large-scale concurrent tasks while ensuring service stability. Three practical examples are provided to help us apply these concepts more effectively.
2. Core Architecture of Ansible High Availability
A high-availability Ansible environment typically adopts an Active-Active architecture with multiple control nodes and load balancing to ensure there are no single points of failure. The core architecture is illustrated in the diagram below: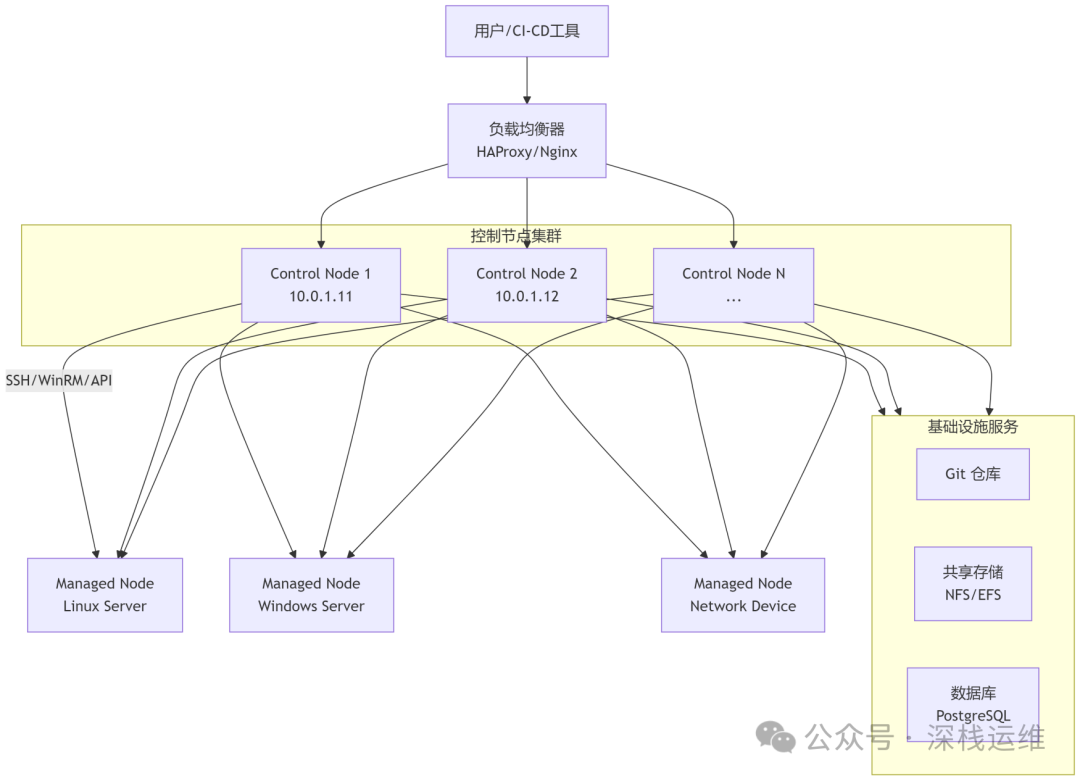
Core Component Descriptions:
1. Load Balancer
As a unified access point, it distributes requests to healthy control nodes, achieving traffic distribution and high availability.
2. Control Nodes
Multiple Ansible control machines that are consistently configured and actively handle requests simultaneously. They are stateless, meaning any node can handle any request.
3. Shared Storage
Used to store Ansible project directories (Playbooks, Roles, Inventories), ensuring that all control nodes execute automated content consistently. Typically, a network file system (like NFS) or real-time synchronization via Git is used.
4. External Database
For Ansible Tower/AWX, a high-availability external database (like a PostgreSQL cluster) is required to store state information.
5. Managed Nodes
Target servers, network devices, or cloud resources managed by Ansible, which are unaware of the high-availability mechanisms of the control nodes.
3. Detailed Steps for High Availability Deployment of Ansible Control Nodes
The following are the deployment steps based on the load balancing + multiple active control nodes solution.
3.1 Prerequisites and Preparation
-
Server Preparation: Prepare at least two (three recommended) Linux servers (such as RHEL 9, Rocky Linux 8/9, or Ubuntu 20.04/22.04), configure hostnames, IP addresses, and ensure network connectivity.
-
Basic Configuration:
# Configure SSH trust on all nodes (optional, for maintenance)ssh-keygen -t rsa -N '' -f ~/.ssh/id_rsa
ssh-copy-id root@<other-node-ip>
# Configure firewall (if enabled)firewall-cmd --permanent --add-service=ssh
firewall-cmd --reload
# Disable SELinux (or configure appropriate policies)setenforce 0
sed -i 's/^SELINUX=.*/SELINUX=permissive/' /etc/selinux/config
# Ensure time synchronization
dnf install chrony -y  # or apt install chrony -ysystemctl enable --now chronyd
3. Install Load Balancer (using HAProxy as an example): Choose a dedicated server or reuse existing infrastructure to deploy HAProxy.
dnf install haproxy -y # or apt install haproxy -y3.2 Deployment Steps
-
Install Ansible on all control nodes:
# For RHEL/Rocky/AlmaLinux
dnf install epel-release -ydnf install ansible -y
# For Ubuntu
apt update
apt install software-properties-common -y
add-apt-repository --yes --update ppa:ansible/ansible
apt install ansible -y
2. Configure Shared Storage (using NFS as an example):
NFS Server Side (on one server):
dnf install nfs-utils -ymkdir -p /srv/ansiblechmod 755 /srv/ansible
echo '/srv/ansible *(rw,sync,no_root_squash)' >> /etc/exports
systemctl enable --now nfs-server
exportfs -av
NFS Client (on all control nodes):
dnf install nfs-utils -ymkdir -p /opt/automation
echo "<nfs-server-ip>:/srv/ansible /opt/automation nfs defaults 0 0" >> /etc/fstab
mount -a
3. Initialize Ansible Project Structure (on shared storage)
mkdir -p /opt/automation/{inventories,group_vars,host_vars,roles,library,module_utils,filter_plugins}
mkdir -p /opt/automation/playbooks
4. Configure Load Balancer (HAProxy) Edit <span><span>/etc/haproxy/haproxy.cfg</span></span>, add the following content:
frontend ansible_frontend    bind *:443    mode tcp    option tcplog    default_backend ansible_backend
backend ansible_backend    mode tcp    balance roundrobin    option tcp-check    server control-node-1 10.0.1.11:22 check    server control-node-2 10.0.1.12:22    # Add more nodes...
Restart HAProxy:<span><span>systemctl restart haproxy</span></span>
5. Test High Availability
1. Execute test commands through the load balancer’s VIP or DNS name:
# Use -e 'ansible_ssh_common_args="-o StrictHostKeyChecking=no"' to avoid host key confirmation on first connection
ansible -i /opt/automation/inventories/production all -m ping -u remote_user --ssh-common-args="-o StrictHostKeyChecking=no"
2. Simulate a failure: Stop the SSH service on one control node (<span><span>systemctl stop sshd</span></span>), observe whether requests automatically switch to other healthy nodes.
6. Implement Configuration Synchronization (recommended using Git)Although shared storage is used, it is strongly recommended to include the <span><span>/opt/automation</span></span> directory in Git repository management, and set up scheduled tasks (like Cron) or Webhooks on each control node to automatically pull the latest code, ensuring version control and eventual consistency.
# Example Cron job on all control nodes (pull every 5 minutes)*/5 * * * * cd /opt/automation && git pull origin main4. In-Depth Practical Examples
Example 1: Automated Deployment of LVS + Keepalived High Availability Load Balancing Cluster
1. This example demonstrates how to use Ansible to automate the deployment of a high-performance, high-availability Layer 4 load balancing cluster.
2. Scenario and Value: LVS (Linux Virtual Server) provides high-performance Layer 4 load balancing, combined with Keepalived to achieve high availability and automatic failover (VIP drift), commonly used to carry critical business traffic. Automated deployment ensures configuration consistency and rapid delivery, reducing manual configuration errors.
3. Key Technology Stack:<span><span>lvs</span></span> (IPVS), <span><span>keepalived</span></span>, <span><span>ansible.builtin</span></span> core modules, Jinja2 templates.
4. Playbook Design Highlights:
4.1 Inventory Grouping:
[load_balancers]lvs-dr-01 ansible_host=192.168.1.10 priority=150
lvs-dr-02 ansible_host=192.168.1.11 priority=100
[web_servers]web-01 ansible_host=192.168.1.20
web-02 ansible_host=192.168.1.21
4.2 Variable Definitions (<span><span>group_vars/all.yml</span></span>):
virtual_ip: 192.168.1.100
virtual_router_id: 51
auth_pass: secure_password_123
web_servers_port: 80
4.3 Role Tasks (<span><span>roles/keepalived/tasks/main.yml</span></span>):
- name: Install Keepalived and IPVS tools  package:    name: "{{ item }}"    state: present  loop: [keepalived, ipvsadm]
- name: Configure Keepalived  template:    src: keepalived.conf.j2    dest: /etc/keepalived/keepalived.conf  notify: restart keepalived
- name: Enable and start Keepalived  service:    name: keepalived    state: started    enabled: yes
4.4 Jinja2 Template (<span><span>roles/keepalived/templates/keepalived.conf.j2</span></span>):
global_defs {    router_id LVS_{{ ansible_hostname | upper }}
}
vrrp_instance VI_1 {    state {% if priority == 150 %}MASTER{% else %}BACKUP{% endif %}    interface eth0    virtual_router_id {{ virtual_router_id }}    priority {{ priority }}    advert_int 1    authentication {        auth_type PASS        auth_pass {{ auth_pass }}    }    virtual_ipaddress {        {{ virtual_ip }}    }}
virtual_server {{ virtual_ip }} {{ web_servers_port }} {    delay_loop 6    lb_algo wrr    lb_kind DR    protocol TCP
    {% for server in groups['web_servers'] %}    real_server {{ hostvars[server].ansible_host }} {{ web_servers_port }} {        weight 1        TCP_CHECK {            connect_timeout 3            nb_get_retry 3            delay_before_retry 3            connect_port {{ web_servers_port }}        }    }    {% endfor %}
4.5 Handlers (<span><span>roles/keepalived/handlers/main.yml</span></span>):
- name: restart keepalived service: name: keepalived state: restarted async: 30 poll: 04.6 Deployment Execution and Verification:
ansible-playbook -i inventories/production playbooks/deploy_lvs_keepalived.yml# Verification: Use curl VIP (192.168.1.100) on any machine, and simulate a primary LVS node failure to observe whether the business is interrupted and whether the VIP drifts.Example 2: High Availability Application Cluster Based on Corosync + Pacemaker
This example demonstrates how to use Ansible to deploy and configure a complex, multi-node application high-availability cluster system.
1. Scenario and Value: Corosync provides cluster membership and message communication, while Pacemaker acts as a cluster resource manager, capable of handling complex high-availability scenarios for any application (such as Nginx, Apache, databases, etc.), including failover, resource constraints, and sticky control. Automating such complex configurations is crucial.
2. Key Technology Stack:<span><span>corosync</span></span>, <span><span>pacemaker</span></span>, <span><span>crmsh</span></span> (or <span><span>pcs</span></span><span><span>), </span></span><code><span><span>ansible.builtin</span></span> modules.
3. Playbook Design Highlights:
3.1 Inventory and Variables:
[cluster_nodes]node1.cluster.local
node2.cluster.local
# group_vars/cluster_nodes.yml
cluster_name: my_application_cluster
cluster_members: "{{ groups['cluster_nodes'] | join(' ') }}"
expected_votes: 23.2 Basic Configuration and Software Installation (<span><span>roles/corosync/tasks/main.yml</span></span>):
- name: Install cluster stack  package:    name: "{{ item }}"    state: present  loop: [corosync, pacemaker, pcs]
- name: Configure Corosync  template:    src: corosync.conf.j2    dest: /etc/corosync/corosync.conf  notify: restart corosync
- name: Start and enable services  service:    name: "{{ item }}"    state: started    enabled: yes  loop: [pcsd, corosync, pacemaker]
3.3 Cluster Boot and Configuration (<span><span>roles/pacemaker/tasks/main.yml</span></span>):
- name: Set hacluster password  user:    name: hacluster    password: "{{ 'secure_password' | password_hash('sha512') }}"
- name: Authorize nodes (on one node only)  command: pcs cluster auth {{ cluster_members }} -u hacluster -p secure_password --force  run_once: true  delegate_to: "{{ groups['cluster_nodes'][0] }}"
- name: Setup cluster (on one node only)  command: pcs cluster setup --name {{ cluster_name }} {{ cluster_members }} --force  run_once: true  delegate_to: "{{ groups['cluster_nodes'][0] }}"
- name: Start cluster (on all nodes)  command: pcs cluster start --all
3.4 Configure Cluster Resources (for example, a floating IP and Apache service):
- name: Configure cluster resources (on one node only)  block:    - name: Create virtual IP resource      command: pcs resource create Cluster_VIP ocf:heartbeat:IPaddr2 ip={{ cluster_vip }} cidr_netmask=24 op monitor interval=30s
    - name: Create Apache resource      command: pcs resource create WebServer systemd:httpd op monitor interval=20s
    - name: Create resource group or colocation/order constraints      command: pcs constraint colocation add WebServer with Cluster_VIP INFINITY      command: pcs constraint order Cluster_VIP then WebServer  run_once: true  delegate_to: "{{ groups['cluster_nodes'][0] }}"
3.5 Deployment Execution and Verification:
ansible-playbook -i inventories/production playbooks/deploy_corosync_pacemaker.yml# Verification: Use the `pcs status` command to check the cluster and resource status. Simulate node failure (restart or shut down) and observe whether resources migrate as expected.Example 3: Automated Deployment of High Availability Kubernetes Cluster in the Cloud
This example demonstrates how to use Ansible to automate the deployment of a production-grade high-availability Kubernetes cluster, covering both control plane and worker nodes.
1. Scenario and Value: Kubernetes has become the de facto standard for container orchestration. Its control plane components (API Server, Scheduler, Controller Manager) themselves require high availability to ensure the stability and continuity of the cluster. Automating this process with Ansible can significantly reduce deployment complexity, improve efficiency, and ensure environmental consistency.
2. Key Technology Stack:<span><span>kubernetes</span></span> (kubeadm, kubelet, kubectl), <span><span>containerd</span></span>/<span><span>docker</span></span>, <span><span>haproxy</span></span> (for load balancing multiple API Servers), <span><span>ansible.builtin</span></span> modules.
3. Playbook Design Highlights:
3.1 Inventory Grouping:
[ha_proxy]lb-01 ansible_host=10.0.0.10
lb-02 ansible_host=10.0.0.11
[kube_control_plane]master-01 ansible_host=10.0.1.10
master-02 ansible_host=10.0.1.11
master-03 ansible_host=10.0.1.12
[kube_workers]worker-01 ansible_host=10.0.2.10
worker-02 ansible_host=10.0.2.11
[kube_cluster:children]kube_control_planekube_workers
3.2 Global Variables (<span><span>group_vars/all.yml</span></span>):
kube_version: "1.28.5"
container_runtime: containerd
pod_network_cidr: "10.244.0.0/16"
service_cidr: "10.96.0.0/12"
api_server_vip: "10.0.0.100"
api_server_port: 6443
3.3 Core Process Tasks
Basic Preparation: Disable swap on all nodes, configure the firewall, install the container runtime, and install kubeadm/kubelet/kubectl.
Configure HAProxy: Configure HAProxy on the load balancer node, with the backend pointing to all <span><span>kube_control_plane</span></span> nodes’ <span><span>6443</span></span> port.
Initialize Control Plane: Use <span><span>kubeadm init</span></span> on the first master node and specify <span><span>control-plane-endpoint</span></span><span><span> as </span></span><code><span><span>api_server_vip:api_server_port</span></span>.
Join Other Control Plane Nodes: Join other master nodes to the cluster using <span><span>kubeadm join</span></span> to form a high-availability control plane.
Join Worker Nodes: Add worker nodes to the cluster.
Deploy Network Plugin: Such as Calico or Flannel.
3.4 Deployment Execution and Verification:
ansible-playbook -i inventories/production playbooks/deploy_k8s_cluster.yml# Verification: Use `kubectl get nodes -o wide` and `kubectl get pods -n kube-system -o wide` to check the cluster status. Simulate a master node failure and observe whether the API Server is still accessible via VIP and whether cluster operations are normal.5. Best Practices and Advanced Recommendations for Ansible High Availability
-
Dynamic Inventory:It is highly recommended to use dynamic inventory to automatically obtain host information from cloud platforms (AWS EC2, Azure VM), virtualization platforms (vSphere), or CMDB, rather than maintaining static
<span><span>ini</span></span>or<span><span>yaml</span></span>files. -
Secrets Management:Never store sensitive information such as passwords and API keys in plaintext in Playbooks or variable files. Use Ansible Vault, HashiCorp Vault, or cloud vendor key management services (such as AWS KMS, Azure Key Vault) to encrypt and manage secrets.
-
Configuration Drift Prevention: High-availability environments require high consistency. In addition to Ansible’s inherent idempotency, regularly run compliance check Playbooks or use Ansible-CMDB to generate configuration reports to promptly detect and fix configuration drift.
-
Monitoring and Logging: Monitor all control nodes and critical infrastructure managed by Ansible (such as Prometheus + Grafana). Centrally collect and analyze Ansible execution logs (such as using the ELK stack) for auditing and troubleshooting.
-
Testing and Iteration: Follow the CI/CD process to test Ansible Playbooks (such as using
<span><span>molecule</span></span>for role testing), and apply them to the production environment only after validation in a pre-production environment.
With the high-availability architecture, detailed steps, and three in-depth examples provided in this guide, you should now be able to build and manage a robust and reliable Ansible automation infrastructure, thereby providing stronger automation support for your business systems.