Controlling a Router Device Using U-Boot

Controlling a Router Device Using U-Boot

This article is a featured article from the Kanxue Forum, author ID: Q老Q

1

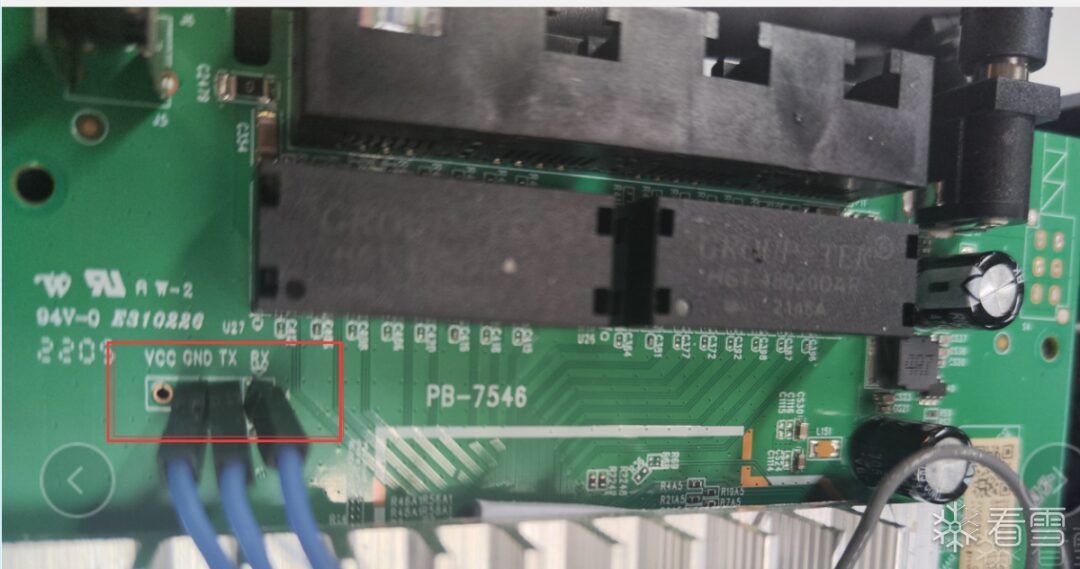
Entering U-Boot Shell from UART

Controlling a Router Device Using U-Boot
After opening a certain router device, locate the UART interface and connect the UART pins to the computer through TTL. Power on the router and observe the startup log.
Boot SPI NAND
start read bootheader
start read secondboot
non secure boot
Jump
ddr init enter, rate is 1333 mbps
ddr size is 0x10000000
U-Boot 2013.04 (Feb 14 2022 - 16:16:39)
......
eth0
Hit 1 to upgrade software version
Hit any key to stop autoboot:  1
......
*****************pc start*************************************
echo 5000 > /proc/sys/vm/min_free_kbytes
********************close console
From the startup log of the above device, it can be seen that the U-Boot shell can be interrupted. Quickly pressing any key after powering on the router can enter. After the router starts, the console has been closed, and it is not possible to log in to the router through the console. To facilitate subsequent reverse engineering work, it is best to enter the router system, but currently the console is closed, and no services such as telnet or ssh have been found, so we can only further analyze from the U-Boot shell as the entry point.
The router resets, and quickly pressing any key enters the boot shell, where the commands supported by the current U-Boot shell can be seen.
=> h?       - alias for 'help'
base    - print or set address offset
bdinfo  - print Board Info structure
boot    - boot default, i.e., run 'bootcmd'
bootd   - boot default, i.e., run 'bootcmd'
bootk   - boot kernel
bootm   - boot application image from memory
bootz   - boot Linux zImage image from memory
cmp     - memory compare
coninfo - print console devices and information
cp      - memory copy
dhcp    - boot image via network using DHCP/TFTP protocol
downver - upgrade software downloaded from TFTP server
echo    - echo args to console
erase   - erase FLASH memory
fdt     - flattened device tree utility commands
flinfo  - print FLASH memory information
go      - start application at address 'addr'
gpiotest- gpiotest dir [num] [in/out]
gpiotest value [num] [1/0]
gpiotest gvalue [num]
help    - print command description/usage
imxtract- extract a part of a multi-image
itest   - return true/false on integer compare
mcupg   -  multicast upgrade
md      - memory display
mii     - MII utility commands
mtddebug- mtddebug operate
mtest   - simple RAM read/write test
mw      - memory write (fill)
nand    - NAND sub-system
ping    - send ICMP ECHO_REQUEST to network host
printenv- print environment variables
protect - enable or disable FLASH write protection
reset   - Perform RESET of the CPU
run     - run commands in an environment variables
saveenv - save environment variables to persistent storage
setenv  - set environment variables
sleep   - delay execution for some times
number - Get or set serial number for zte boards
tftp    - boot image via network using TFTP protocol
version - print monitor, compiler and linker version
watchdog- watchdog reset && disable
xmodem  - xmodem

2

Modify Kernel Boot Parameters

Use printenv to view the current environment variables.
=> printenv
baudrate=115200
bome=aclcle)
root=/dev/mtdblock8 rw
rootfstype=jffs2
mem=256M
single
bootcmd=setenv bootargs console=$(console) root=/dev/mtdblock8 ro rootfstype=jffs2  mem=$(memsize);bootm 0x440001e0;
bootdelay=1
bootfile=uboot.bin
bootloaderfile=bootloader.bin
console=ttyAMA0,115200n8
ethact=eth0
ethaddr=00:41:71:00:00:50
fileaddr=44000000
filesize=13bfb78
gatewayip=192.168.1.1
ipaddr=192.168.1.1
linuzfile=vmlinuz.bin
loadaddr=0x44000000
memsize=256M
nand_erasesize=20000
nand_oobsize=40
nand_writesize=800
netmask=255.255.255.0
netretry=5
serverip=192.168.1.100
The bootargs are the kernel boot parameters. Here, the init parameter is not seen. Generally, the init parameter is set to specify the first script to be executed after the kernel starts. You can try setting init=/bin/sh to enter the Linux shell.
setenv bootcmd 'setenv bootargs console=$(console) root=/dev/mtdblock8 rw rootfstype=jffs2  mem=$(memsize) init=/bin/sh;bootm 0x440001e0;'
Use setenv to modify the bootcmd parameter and save the environment variables.
=> save
Saving Environment to NAND...
Erasing 0x180000 - 0x200000:<nand_erase_skip_bad_,1560>!
mtdpart=0x1,start=0x0,mtdpartoffset=0x180000,mtdPartsize=0x80000,length=0x80000        [Done]
Writing to Nand:<nand_write_skip_bad_,1455>!
mtdpart=0x1,offset=0x0,mtdpartoffset=0x180000,mtdPartsize=0x80000,length=0x20000        [Done]
bootm failed to start, reporting an error: can’t get kernel image!
=> bootm 0x440001e0
Wrong Image Format for bootm command
ERROR: can't get kernel image!
Download a U-Boot 2013 source code from the internet, search for the can’t get kernel image string, and locate the key code.
Controlling a Router Device Using U-Boot
U-Boot will first check the kernel’s uImage header information. If it is incorrect, it will output the above error. The kernel uImage adds a 64-byte header before the kernel image to describe the kernel version, loading position, etc. The uImage magic number is generally 0x27051956. It is obvious that the data at the address 0x440001e0 does not conform, so the loading fails.
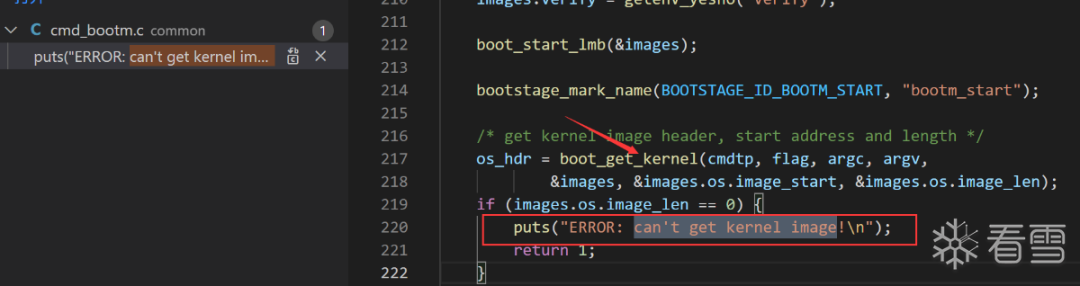
typedef struct image_header {
    __be32        ih_magic;    /* Image Header Magic Number    */
    __be32        ih_hcrc;    /* Image Header CRC Checksum    */
    __be32        ih_time;    /* Image Creation Timestamp    */
    __be32        ih_size;    /* Image Data Size        */
    __be32        ih_load;    /* Data     Load  Address        */
    __be32        ih_ep;        /* Entry Point Address        */
    __be32        ih_dcrc;    /* Image Data CRC Checksum    */
    uint8_t        ih_os;        /* Operating System        */
    uint8_t        ih_arch;    /* CPU architecture        */
    uint8_t        ih_type;    /* Image Type            */
    uint8_t        ih_comp;    /* Compression Type        */
    uint8_t        ih_name[IH_NMLEN];    /* Image Name        */
} image_header_t;
#define IH_MAGIC    0x27051956    /* Image Magic Number        */
#define IH_NMLEN        32    /* Image Name Length        */
Controlling a Router Device Using U-Boot
=> md.b 440001e0 100
440001e0: ff d7 ff ff bf fe fd f7 7f ff 7f df 5f bd ff ff    ............_...
440001f0: f6 a2 b7 f7 5f fe fe fe 77 f5 db ff 3f bf fa 76    ...._...w...?..v
44000200: fc ed ef fd 7f ff ff fd 7b ee ff ee fd 7b ff 75    ........{....{.u
44000210: 67 7d e8 bf ee ef ed a1 cd fb 63 fe 67 ee f7 9e    g}........c.g...
44000220: f3 df af f5 ea ff f7 fb 78 77 ea fd df ff ef fb    ........xw......
44000230: d3 dd e9 ff b3 3f e7 ef 76 f6 f6 ed cf b3 bd fb    .....?..v.......
44000240: bf eb 97 fb 9f ef ff ef d9 59 b9 3e 5f 3f ff 32    .........Y.>_?.2
Normally, the address 0x440001e0 should store the kernel’s uImage data. Here, for some reason, the kernel uImage has not been correctly loaded into memory. Here we will try to manually read the kernel from NAND flash into memory.
0x000000000000-0x000008000000 : "whole flash"
0x000000000000-0x000000200000 : "u-boot"
0x000006800000-0x000006b00000 : "parameter tags"
0x000000200000-0x000000700000 : "kernel0"
0x000000700000-0x000000c00000 : "kernel1"
0x000000c00000-0x000001400000 : "usercfg"
0x000001400000-0x000001500000 : "others"
0x000001500000-0x000001800000 : "wlan"
0x000001800000-0x000003800000 : "rootfs0"
0x000003800000-0x000005800000 : "rootfs1"
0x000005800000-0x000006000000 : "framework"
0x000006000000-0x000006800000 : "framework1"
0x000006b00000-0x000008000000 : "apps"
In the normal startup log of the router, we can see the 13 partitions of NAND flash, where 0x000000200000-0x000000700000 and 0x000000700000-0x000000c00000 store the kernel data, one of which should be for backup.
Use nand dump to view the kernel data in NAND flash, the uImage starts from 0x2001e0.
=> nand dump 0x200000
Page 00200000 dump:    99 99 99 99 44 44 44 44  55 55 55 55 aa aa aa aa    00 00 00 00 00 00 00 00  00 00 00 00 00 00 00 00    00 00 00 00 56 31 2e 30  2e 31 2e 32 32 30 33 31    35 2e 31 37 30 39 33 33  00 00 00 00 00 00 00 00    00 00 00 00 00 00 00 00  00 00 00 00 00 00 00 00    01 00 00 00 00 5a 64 01  17 58 24 00 e0 01 00 00    dc e0 50 82 00 00 3c 01  00 5a 24 00 d2 2c 67 09    00 00 20 00 00 00 50 00  00 00 80 01 00 00 00 02    00 00 70 00 00 00 50 00  00 00 80 03 00 00 00 02    5a 58 49 43 20 33 36 30  54 36 47 56 32 20 55 4e    49 20 56 31 2e 30 2e 31  2e 32 32 30 33 31 35 2e    31 37 30 39 33 33 00 00  00 00 00 00 00 00 00 00    00 00 00 00 00 00 00 00  00 00 00 00 00 00 00 00    00 00 00 00 00 00 00 00  00 00 00 00 00 00 00 00    00 00 04 00 00 5a 60 01  31 52 b8 ea 56 32 5f 56    32 2e 00 00 00 00 00 00  00 00 00 00 00 00 00 00    01 00 00 00 47 9b 29 1d  32 30 32 32 30 33 32 31    31 38 32 35 32 31 00 00  00 00 00 00 ff ff ff ff    ff ff ff ff 00 00 00 10  ff ff 01 00 56 31 2e 30    00 00 00 00 00 00 00 00  00 00 00 00 33 36 30 54    36 47 56 32 00 00 00 00  00 00 00 00 15 56 24 56    5a 58 30 31 03 30 00 00  00 e0 00 02 43 57 46 57    31 37 30 33 32 38 31 30  30 31 00 00 ff ff ff ff    ff ff ff ff ff ff ff ff  ff ff ff ff ff ff ff ff    ff ff ff ff ff ff ff ff  ff ff ff ff ff ff ff ff    ff ff ff ff ff ff ff ff  ff ff ff ff ff ff ff ff    ff ff ff ff ff ff ff ff  ff ff ff ff ff ff ff ff    ff ff ff ff ff ff ff ff  ff ff ff ff ff ff ff ff    27 05 19 56 3c 35 3b 72 62 38 52 83 00 24 57 d7    40 00 80 00 40 00 80 00  cc 1f fd e3 05 02 02 00    4c 69 6e 75 78 20 4b 65 72 6e 65 6c 20 49 6d 61
Use nand read to load the kernel partition data from NAND flash into memory, where addr is the RAM address, off refers to the NAND flash address, and size indicates the size of the data to be read from NAND flash.
nand read - addr off|partition size =>nand read 0x44000000 0x200000 500000
NAND read: device 0 offset 0x200000, size 0x500000 5242880 bytes read: OK=> md.b 0x440001e0
60440001e0: 27 05 19 56 3c 35 3b 72 62 38 52 83 00 24 57 d7    '..V<5;rb8R..$W.
440001f0: 40 00 80 00 40 00 80 00 cc 1f fd e3 05 02 02 00    @...@...........
44000200: 4c 69 6e 75 78 20 4b 65 72 6e 65 6c 20 49 6d 61    Linux Kernel Ima
44000210: 67 65 00 00 00 00 00 00 00 00 00 00 00 00 00 00    ge..............
44000220: 00 00 a0 e1 00 00 a0 e1 00 00 a0 e1 00 00 a0 e1    ................
44000230: 00 00 a0 e1 00 00 a0 e1 00 00 a0 e1 00 00 a0 e1    ................
=> bootm 0x440001e0
## Booting kernel from Legacy Image at 440001e0 ...   Image Name:   Linux Kernel Image   Image Type:   ARM Linux Kernel Image (uncompressed)   Data Size:    2381783 Bytes = 2.3 MiB   Load Address: 40008000   Entry Point:  40008000   Verifying Checksum ... OK   Loading Kernel Image ... OK
OK----------------------|-->setup versioninfo tag... Starting kernel ...
After trying bootm again, it successfully boots, but when the kernel attempts to start with the added boot parameter init=/bin/sh, it fails to enter the Linux shell. Then, it restarts using the default boot parameters.
Set_Trap_Pkt_Pps_Limit is NULL.
VFS: Mounted root (jffs2 filesystem) on device 31:9.
Freeing unused kernel memory: 176K (c05b4000 - c05e0000)
This architecture does not have kernel memory protection.
Kernel panic - not syncing: Requested init /bin/sh; failed (error -2).
CPU: 1 PID: 1 Comm: swapper/0 Not tainted 4.1.25 #2
Adding the init parameter failed to start successfully. Later, I tried to modify the filesystem, enable the console, and change the root password. The modified filesystem was uploaded to the device via TFTP.

3

Setting Up TFTP Communication Environment in U-Boot

The U-Boot shell supports TFTP communication functionality. Here, we first install the TFTP service on an Ubuntu 18 PC.
sudo apt install tftpd-hpa
Check whether the tftpd-hpa service is running.
sudo systemctl status tftpd-hpa
Controlling a Router Device Using U-Boot
The default configuration file for the tftpd-hpa server is /etc/default/tftpd-hpa. TFTP_DIRECTORY is the directory accessed by the TFTP server.
Controlling a Router Device Using U-Boot
To allow the creation of new files or uploading new files to the TFTP server, add the –create option to the TFTP_OPTIONS option.
Controlling a Router Device Using U-Boot
Modify the access properties of /var/lib/tftpboot.
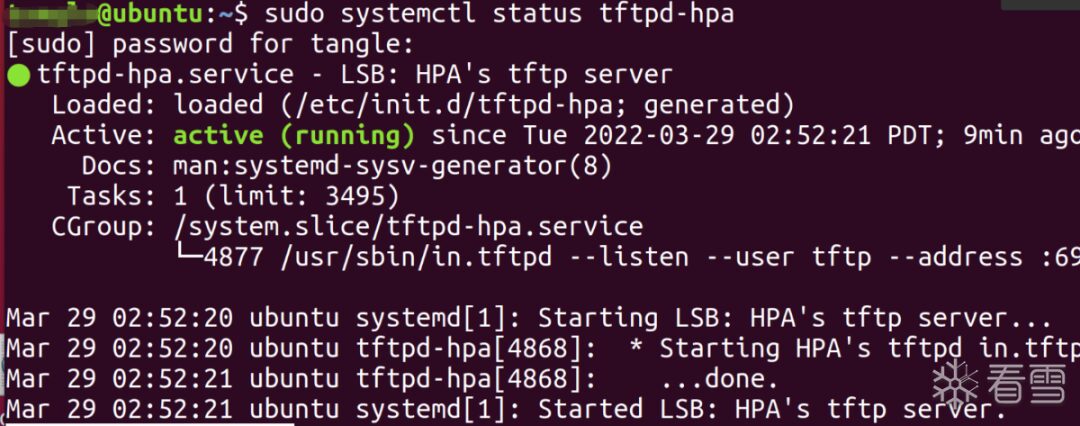
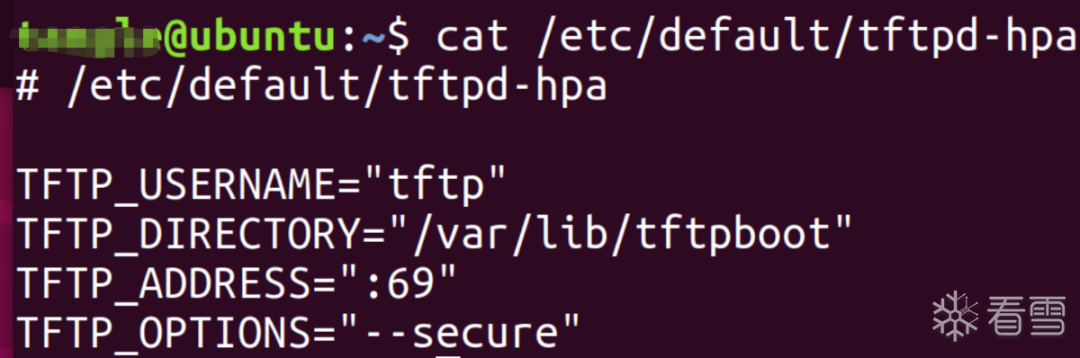
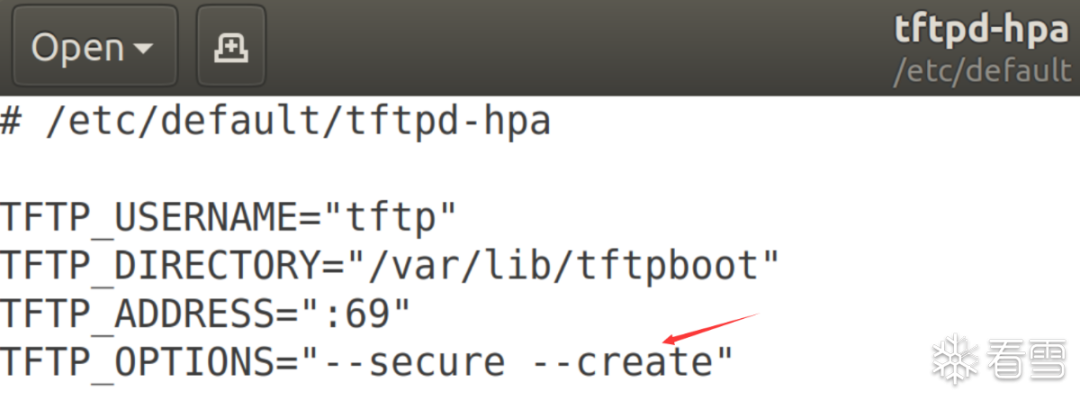
chmod 777 /var/lib/tftp
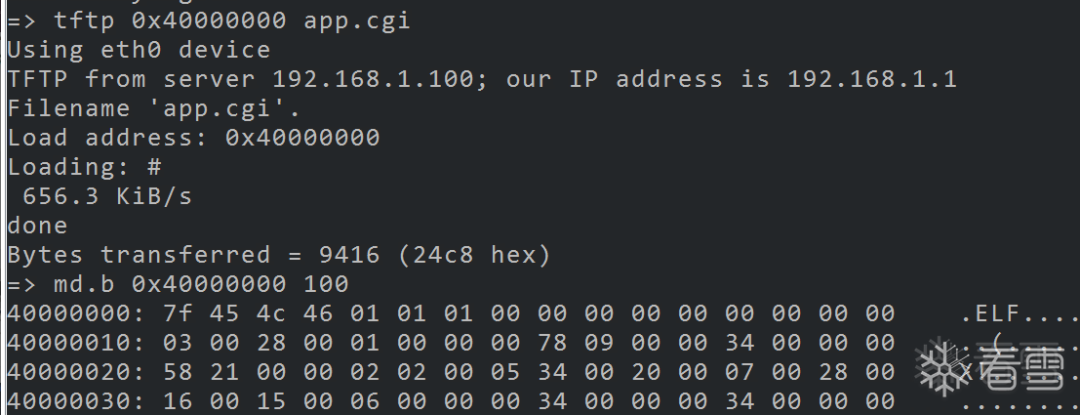
In the U-Boot shell environment variables, the default TFTP server IP is 192.168.1.100. Here, we directly set the IP address of the Ubuntu machine with the TFTP server to 192.168.1.100.
The PC and router are connected via a network cable. Successfully download the test file app.cgi to U-Boot from the TFTP server. Thus, the TFTP communication environment has been established, and the next step is to modify the filesystem and upload it to U-Boot.
Controlling a Router Device Using U-Boot

4

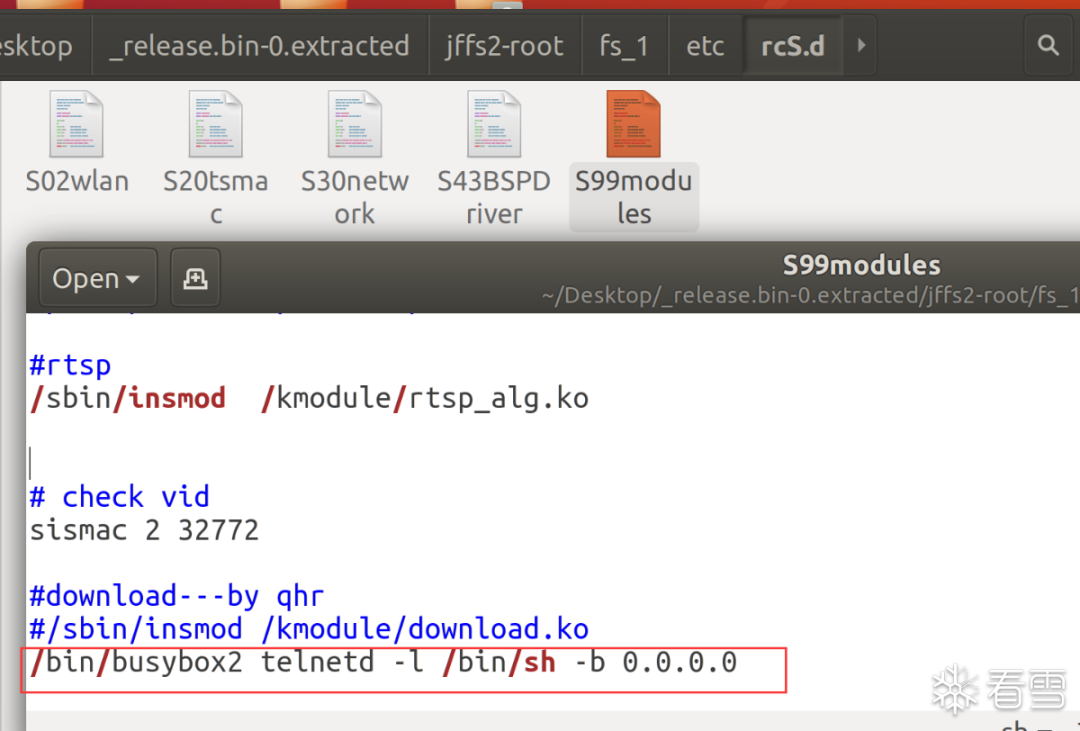
Modify Filesystem to Enter Linux Shell

I have downloaded the device firmware from the internet, and also, through U-Boot, I can dump the filesystem from the flash rootfs partition. Currently, I want to enable the console and change the login password by modifying the firmware, repackaging the modified firmware, and uploading it to U-Boot via TFTP, and finally flashing it to the NAND flash filesystem partition.
From previous information, we learned that during normal startup of the router, the serial log printed close console at the end, indicating that the root filesystem directly closed the console after starting, which prevents logging into the Linux shell via the serial port. By unpacking the device firmware and searching for the close console string in the program, it was found in the /bin/cspd program.
Controlling a Router Device Using U-Boot
Find the code that closes the console and directly patch it. After enabling the console, to log into the Linux shell, you also need to know the username and password. You can consider directly emptying the password field of the root user in the /etc/passwd file, so that later when logging in, you can directly enter the username root to log in.
From the above environment variable information, it can be seen that the device uses the jffs2 filesystem. Repackage the modified file into jffs2 format, and download the packaged filesystem to U-Boot via TFTP. At this time, the filesystem is still only in RAM. Power failure or reboot will result in data loss, so later we also need to write the filesystem data in RAM to the NAND flash filesystem partition using the nand write command.
mkfs.jffs2 -d ./fs_1/ -l -e 0x20000 -o jffs2.img --no-cleanmarkers
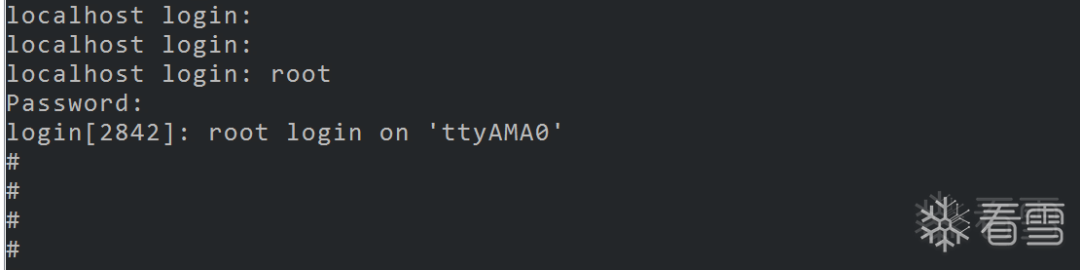
After following the above steps to flash the modified filesystem into the NAND flash filesystem partition, restart the device, successfully enable the console, and enter the Linux shell.
Controlling a Router Device Using U-Boot

5

Porting Telnet Server

Through the above modification of the filesystem, access to the Linux shell from the local console has been achieved. The device does not have a telnet service by default. To facilitate subsequent management of the device, consider porting a telnet server to the device.
Check the program information in the firmware and find that the program was compiled using Buildroot. Therefore, attempt to use Buildroot 2017.05 to compile a busybox with telnetd to port to the device.
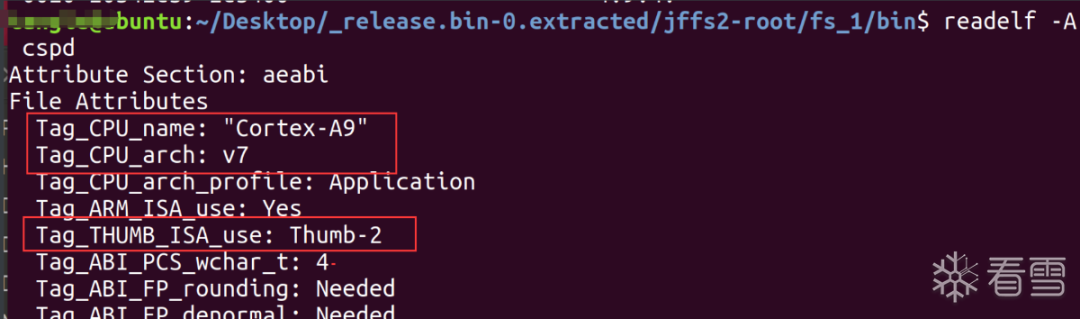
objdump -s --section=.comment Simulator
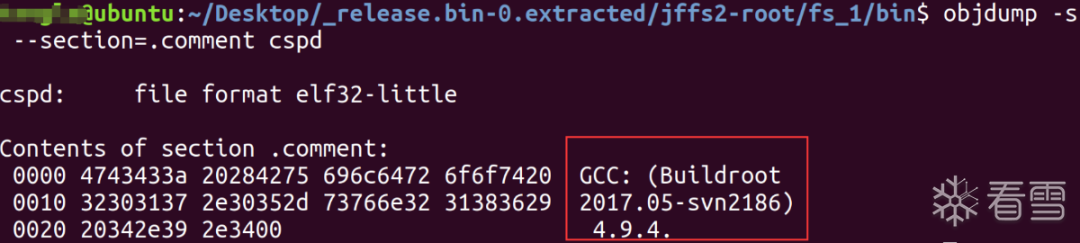
Controlling a Router Device Using U-Boot
Download Buildroot version 2017.05 from https://buildroot.org/downloads/.
make menuconfig
Enter the compilation configuration interface.
Controlling a Router Device Using U-Boot
Configure the options in the configuration interface mainly based on the information of the files in the firmware, such as ARM, ELF32, LSB, EABI5, etc., and ld-linux.so.3 indicates the use of the glibc library.
Controlling a Router Device Using U-Boot
Next, set the related options for busybox and add telnetd.
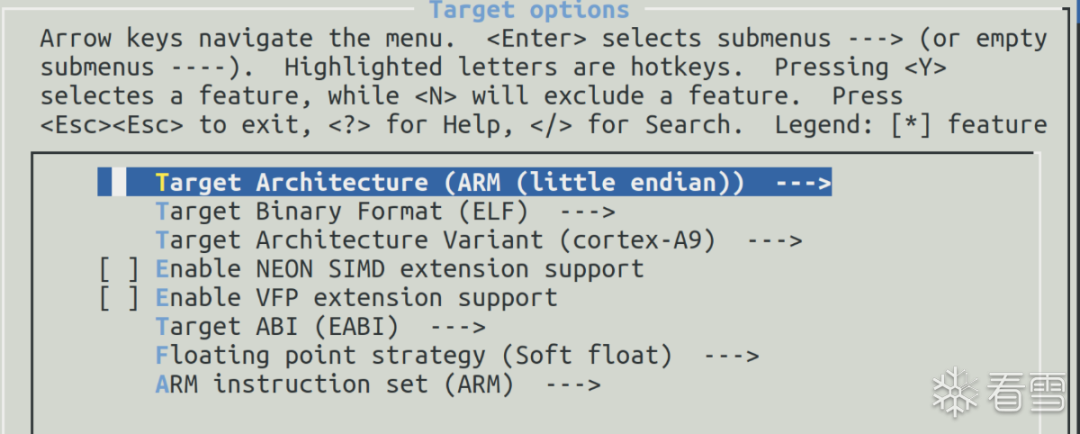
make busybox-menuconfig
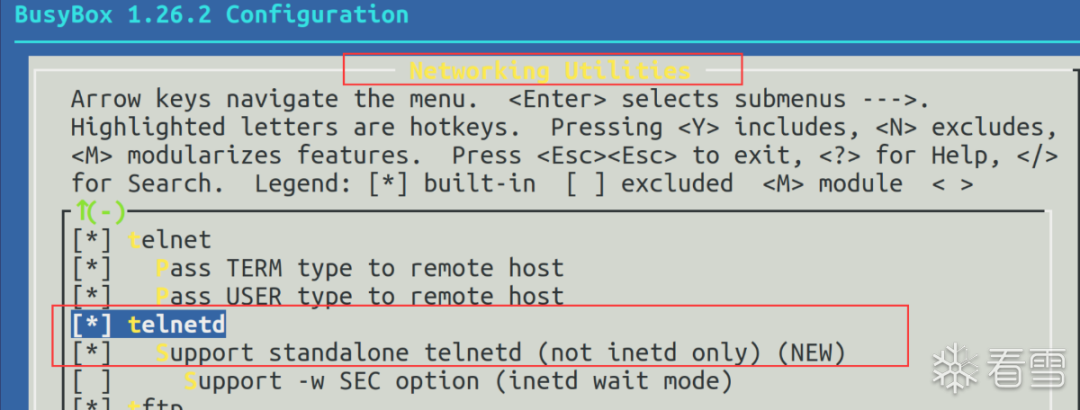
Controlling a Router Device Using U-Boot
After completing the above settings, execute make to compile. After the compilation is complete, an output folder will be generated in the current directory, and the compiled busybox will be in the output folder. The generated telnetd is linked to busybox, so we can directly port the generated busybox to the router. Copy the compiled busybox to the firmware filesystem /bin directory and rename it to busybox2.
Find a file in the router filesystem autostart directory /etc/rcS.d, and add the startup command for busybox2 telnetd.
Controlling a Router Device Using U-Boot
After completing the above modifications, repackage the files into a jffs2 filesystem, then download it to U-Boot via TFTP, and finally use nand write to write it to the NAND flash filesystem. After rebooting the device, the telnet service will start automatically, and you can successfully connect to the router via the telnet client. The subsequent dynamic debugging and porting of gdbserver can also use a similar method.
Controlling a Router Device Using U-Boot

6

Summary

By interrupting U-Boot through UART to enter the U-Boot shell, adding the init parameter to the kernel boot parameters did not succeed in starting. By searching for key strings in the startup log, we located the program that closes the console, patched the binary program to enable the console, modified the root password, repackaged the modified files, and downloaded them to U-Boot via TFTP. Finally, we used nand write to write to the NAND flash filesystem partition, enabling access to the Linux shell from the local console. Lastly, we compiled a busybox with telnetd using Buildroot and ported it to the device, achieving telnet login to the device.

Controlling a Router Device Using U-Boot

Kanxue ID: Q老Q

https://bbs.pediy.com/user-home-839055.htm

*This article is originally from the Kanxue Forum by Q老Q, please indicate the source from the Kanxue community if reprinted.

Controlling a Router Device Using U-Boot

# Previous Recommendations

1. PWN from Experiment to Principle of Heap and UAF

2. Analysis of Frida InlineHook Principle and Simple Design of AArch64 InlineHook Tool

3. PWN Study Notes [Format String Vulnerability Practice]

4. Analysis of the Symbol Recovery Process of Il2Cpp

5. Record a Vulnerability Discovery of a Security Product

6. CVE-2016-3309 Privilege Escalation Vulnerability Study Notes

Controlling a Router Device Using U-Boot

Share

Controlling a Router Device Using U-Boot

Like

Controlling a Router Device Using U-Boot

Watching

Leave a Comment