Create a Basic Python Web Server Using Flask

Flask is a Python-based micro-framework for creating web pages. It can be used to render a web-based interface on the Pi and is relatively easy to set up. Creating a dashboard is useful; I first encountered it while searching for a way to create my paddle pool control panel.
This Tutorial will guide you on how to create a basic site to get you started. Once you have an example, the official documentation can be used to move on to more advanced topics.
I am using Python 3 in this tutorial. It should be the same with Python 2, but you will need to replace all references to “python3” with “python”.
Create a new SD card
To avoid conflicts with other software you may have installed, I recommend using a new SD card to boot by writing the latest Raspbian image. I used Etcher to write the Raspberry Pi image, and for initial experiments with Flask, I used the Jessie Lite image from the official download page.
Enable SSH
By default, SSH is disabled. If you want to configure the Pi from another computer over the network, you can enable it in the following ways:
-
Create an empty file named “ssh” in the boot partition (this is the only partition accessible in Windows).
-
Enable SSH using the raspi-config utility with a monitor and keyboard connected to the Pi.
For more details, refer to the guide on enabling SSH on the Pi.
Find the IP address
Find out the IP address of your Pi. If you are using a monitor and keyboard, you can run:
ifconfig
This will likely be in the form of 192.168. At the time of writing this tutorial, my Pi was using 192.168.1.19.
If you are connecting via SSH, you can use an IP scanner to find it, or it will be listed somewhere in your router settings.
Update and change the password
When enabling SSH, I strongly recommend changing the default password from “raspberry”!
Use:
passwd
to set a new password, then run:
sudo raspi-config
Select “Advanced” and then “Expand Filesystem”.
To ensure we will install the latest packages, run the following two commands:
sudo apt-get update
This process may take 5-10 minutes.
Install pip
Before we can install Flask, we need to install pip, the Python package manager:
sudo apt-get -y install python3-pip
Install Flask
Now it’s time to install Flask
sudo pip3 install flask
I received some errors in the output, but it ultimately reported “Successfully installed Flask”.
Create a test Flask application
Now that Flask is installed, we need to create a small test site to check that everything is working. In this tutorial, I will assume the test site is called “testSite”. You can use any name you like, but you will need to replace all references to “testSite” with your chosen name. Create a new folder:
cd ~
Navigate to the new folder and create a new Python script with the following command:
cd testSite
Then paste the following code:
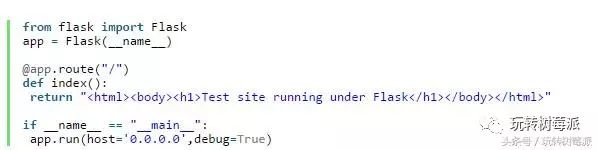
Press “CTRL-X”, “Y”, and “Enter” to save and return to the command prompt.
This script defines a simple one-page website.
You can now run the script with the following command:
python3 testSite.py
If you visit your Pi’s IP address in your browser, the test site should be visible:
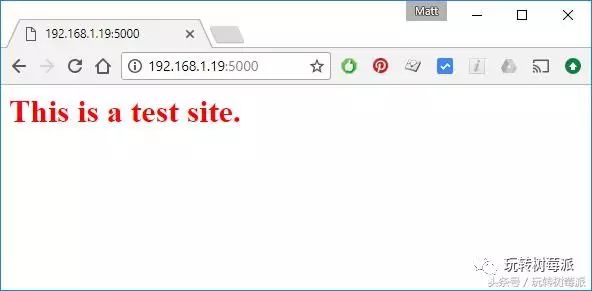
Note that Flask uses port 5000 by default, and you will need to replace 192.168.1.19 with your Pi’s actual IP address.
Add additional pages
The script can be modified to add additional “pages”. See the example below:
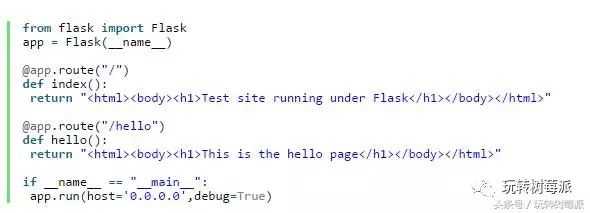
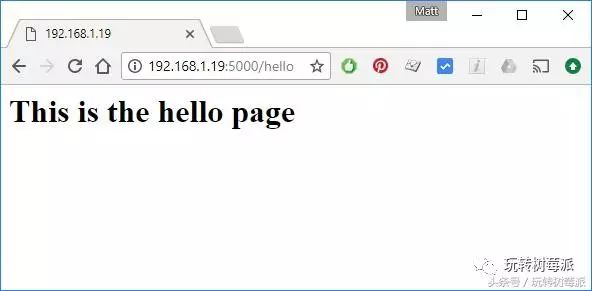
This adds an additional “route” named “hello”. When you visit the hello subdirectory, this page will be displayed:
More routes
You can also pull information from the URL into the script to create more refined page combinations. In this example, we add /user/
Input
Using template pages
Instead of defining HTML pages in the script, you can use template files to hold most of the HTML. This makes the script easier to manage when your pages become more complex.
Flask looks for templates in the “templates” directory. Create a new directory for templates:
mkdir /home/pi/testSite/templates
Then paste this example template:

Then update testSite.py:
nano testSite.py
Replace the content with:
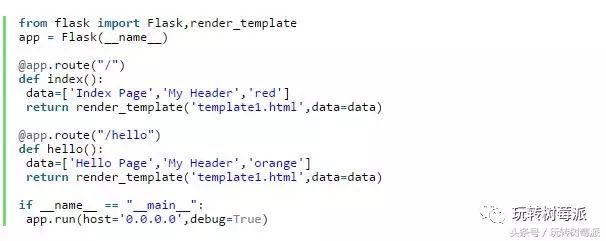
When both “routes” are activated, the same template is used, but the values passed to it are different. Thus, visitors see slightly different pages.
You can enhance templates with HTML and CSS. The benefit of templates is that they keep the main Python script focused on functionality while leaving layout and aesthetics to the template files.
Debug mode
In these examples, the “debug” flag is set to True. This runs Flask in debug mode, automatically reloading Flask when you update the script. It also provides error messages if the page fails to load. If the site is exposed to the internet, the debug flag should be set to False.
Automatically run the script on startup
If you want the Python script to run automatically on Pi startup, you can use this technique:
crontab -e
If prompted to select an editor, I prefer to use “nano”. Insert the following line at the bottom of the comment block:
@reboot /usr/bin/python3 /home/pi/testSite/testSite.py &
Press “CTRL-X”, “Y”, and “Enter” to save and return to the command prompt.
When you reboot, “testSite.py” will run. The “&” ensures it runs in the background.
sudo raspi-config
Select “Boot Options” and “Desktop/CLI”. Choose “Console Autologin”. This means that when the Pi starts, it will automatically log in as the Pi user.
Reboot using:
sudo reboot
Your web page should be available at your Pi’s IP address on your network.
Download scripts
The example scripts and templates from this tutorial are available in my BitBucket repository. You can download them using the following links: testSite1.py testSite2.py testSite3.py testSite4.py template1.py
You can download directly to your Pi using:
wget
where
Official documentation and other resources
For more information on Flask, refer to the official documentation page.
Also, check out the Raspberry Pi Foundation – Build a Python Web Server Using Flask tutorial.