Introduction
This sharing is just an entry-level tutorial for controlling an LED using the CC2530 microcontroller.
As the first code tutorial in this Zigbee series, there are a few points to explain:
-
This is my first time encountering Zigbee, so I will share while learning, and the sharing intervals will become uncertain.
-
I am using IAR EW10.10 software (other versions are roughly the same).
-
I am using the Windows 11 operating system (other systems are roughly the same).
-
The development board I am using is a Zigbee board based on CC2530.
-
I am using the Text f simulator.
-
If there are any other questions, they will be updated in subsequent articles in real time.
1. Today’s Objective
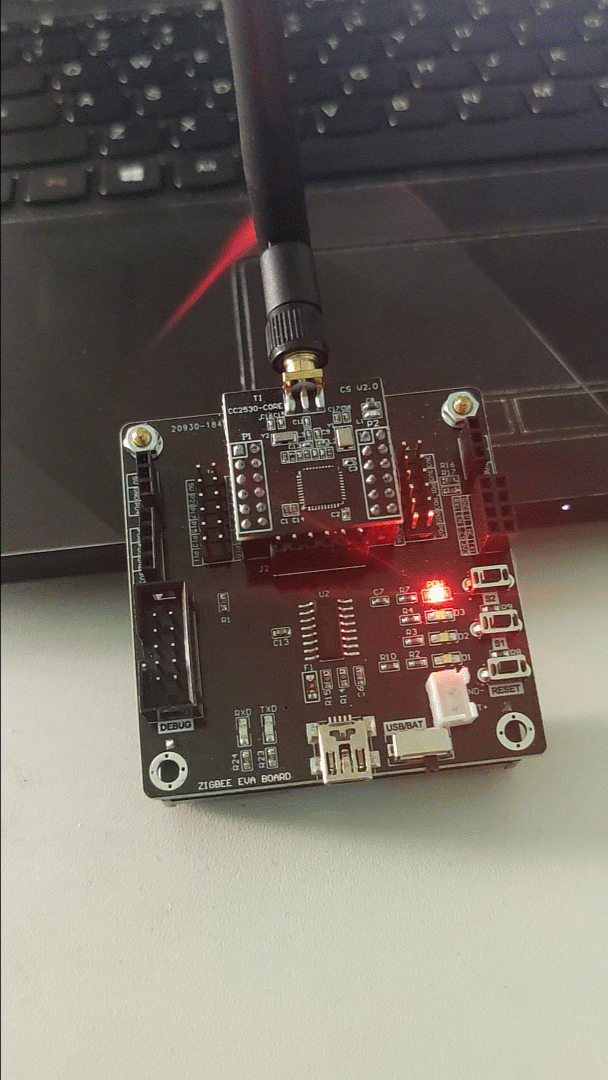
The effect we want to achieve today is shown in the image above. The code is relatively simple and mainly helps us understand the usage of the I/O ports.
2. Code Example
#include "iocc2530.h"

void sleep(int);

int main( void )
{
  P1SEL &= 0xfe;    // Set P1.0 as a normal I/O
  P1DIR |= 0x01;    // Set P1.0 as output direction
  while(1){         // LED blinking loop
    P1_0 = !P1_0;   // Toggle the state of D1(P1.0)
    if(P1_0){
      sleep(1000);
    }else{
      sleep(500);
    }
  }
}

void sleep(int delay){ // A vague delay effect
  for(int i = 0; i < delay; i++){
    for(int j = 0; j < delay; j++);
  }
}
3. Coding Process
-
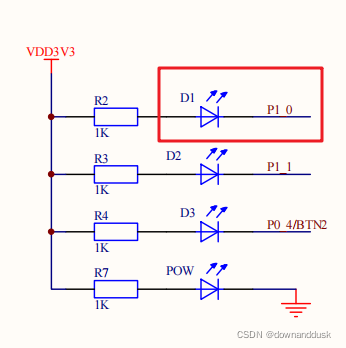
Now find the LED light to control in the schematic provided by the vendor and its corresponding pin
-
Open the CC2530 data sheet, find the I/O pin section, and locate the configuration items corresponding to P1. Since we want to light the LED, we only need to provide a low level;
So our goal becomes to let P1.0 output a low level. If we want to achieve a blinking effect, the pin needs to output a square wave with high and low levels. 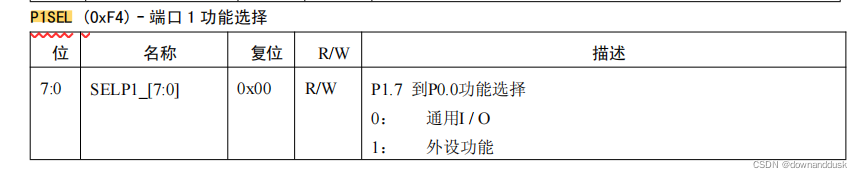 From the image above, we can see that to configure P1.0 as a general I/O, we need to modify bit 0 to 0 and leave the other bits unchanged. Thus, we conclude that setting bit 0 to zero, in binary form is
 1111 1110, which means we need to AND the original register value with 0xfe, resulting in the expression:
P1SEL &= 0xfe;-
Since we want to output a level, we also need to set the I/O direction of P1.0 to output

 Similarly, to set P1.0 as output direction, we just need to set bit 0 to 1, leaving the other bits unchanged. Using the OR operation, we can derive the expression:
P1DIR |= 0x01;-
At this point, the configuration output for P1.0 has been completed. Since we want to light the LED, we just need to use the assignment operator to assign 0 to the P1_0 register to light it up; similarly, assigning 1 will turn it off.
P1_0 = 0; // Light on
P1_1 = 1; // Light off-
Thus, we have completed the LED lighting operation. As a non-ordinary step-by-step tutorial, we certainly cannot stop here. Next, we will implement the blinking effect, which is relatively simple.
-
Thinking about it, the general process is to let the light stay on for a while, then off for a while, which involves a delay, that is, light on – delay – light off – delay, and so on. Since this is a basic tutorial, we haven’t calculated the approximate time in detail, so here is a rough delay function that can be copied and called directly:
void sleep(int delay){ // A vague delay function
  for(int i = 0; i < delay; i++){
    for(int j = 0; j < delay; j++);
  }
}-
With the delay function in place, we just need a loop, so
whilecomes into play.
  while(1){         // LED blinking loop
   P1_0 = 0;   // Light on
   sleep(500);
   P1_0 = 0;   // Light off
   sleep(1000);
 }
-
This creates a blinking LED effect.
4. Conclusion
The code provided today is just a simple entry-level project.
The next article will demonstrate “How to Control the Light On and Off by Pressing a Button”.
If there are others interested in Zigbee, we can explore and learn together. You are welcome to join the group for communication;
Public account -> Bottom right corner -> WeChat -> Note key information -> Group for enthusiasts.