Many people focus on the size, appearance, and resolution when buying a monitor, but of course, the budget is the most important factor. In addition to these, there are many technical reference indicators for monitors that need attention. Among these complex technical indicators, I have selected the most important points to explain further, which I believe will help in choosing monitors and even laptops.
By| Overload

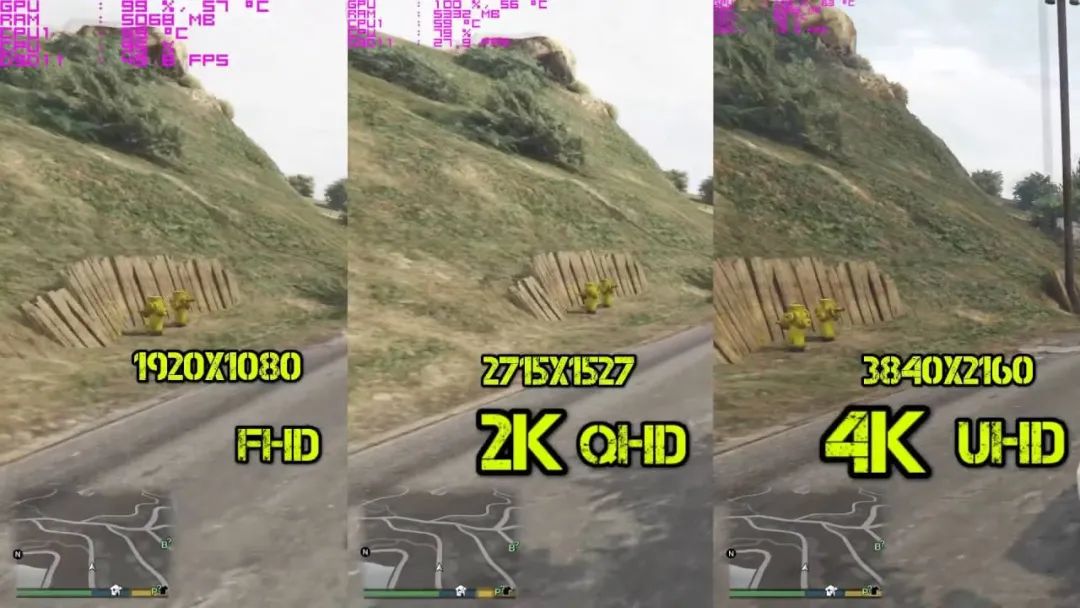
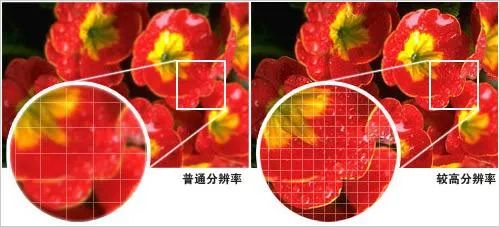
Many monitors or laptops emphasize high-definition screens in their promotions, and it is often assumed that high-definition = good color, which is actually incorrect. High definition only represents the degree of resolution, and there is a small ambiguity to understand. Full HD refers to 1080P (1920×1080), while a 2K screen is defined as having a resolution greater than 2560×1440, generally marked as QHD; as for 4K monitors, their resolution must reach at least 3840×2160, often labeled as “UHD”. However, all these are merely resolutions and do not involve color performance at all.
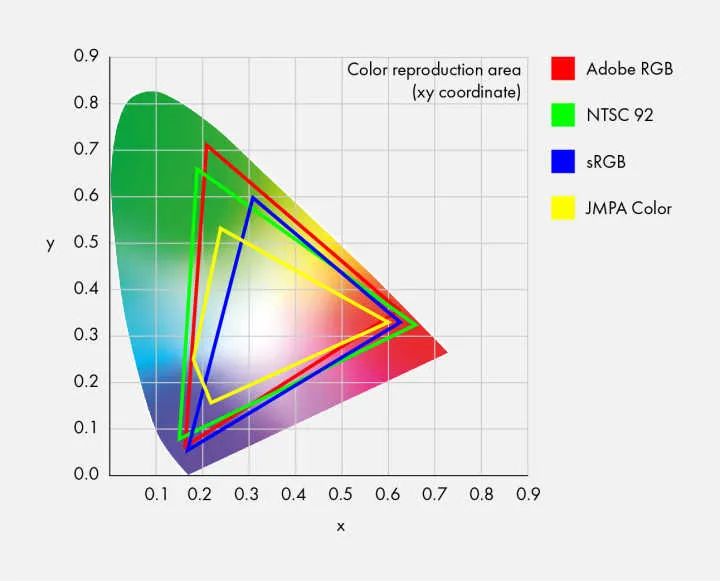
To demonstrate the quality of their colors, monitor manufacturers often state how much of the sRGB color space their products can cover, usually over 90%. However, achieving over 90% sRGB color coverage is not difficult for general monitors. Therefore, if a monitor does not even mention sRGB, its color performance is likely not that good. The true standard for measuring the excellence of a monitor’s colors is actually the NTSC color gamut. The sRGB color gamut mentioned earlier only corresponds to about 72% of the NTSC color gamut, so do not be misled. Additionally, there is the concept of color accuracy, which many monitors are now emphasizing; this is also an important reference for judging a monitor’s display effect. Simply put, a color accuracy of ΔE ≤ 3 is considered the benchmark for excellent monitors.

Glossy screens indeed have the advantage of color transparency, but they also have a fatal flaw—glare. The glare from glossy screens can be very uncomfortable for the eyes, and sometimes when the screen is displaying an image, one can see themselves and their surroundings reflected on the screen. This not only affects the observation of the monitor’s content but also makes it easier to feel eye fatigue. Therefore, when choosing a monitor or laptop, one should think twice about glossy screen products.


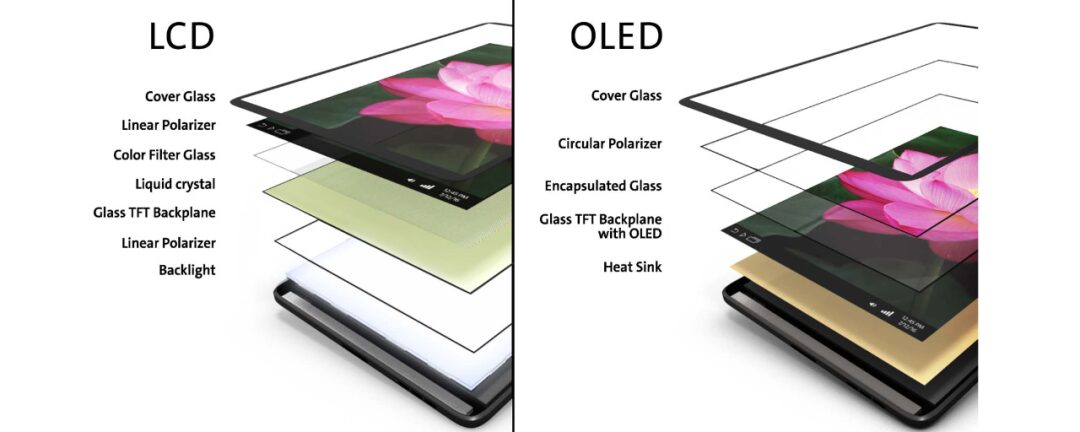
The most important aspect of a monitor is, of course, the screen panel. Different brands’ monitor panels vary in technology and quality, which can be categorized into different grades. Note that, regardless of the type of screen, the vast majority (except OLED) currently belong to a type of LCD screen, and there is no fundamental difference in technology. The cheapest are TN panels, which have no advantages apart from being low-cost; the era of low-end monitors using TN panels is also gone, as many cost-effective monitors are now using IPS panels. The most direct characteristic of TN panels is that they are relatively soft, commonly referred to as soft screens.
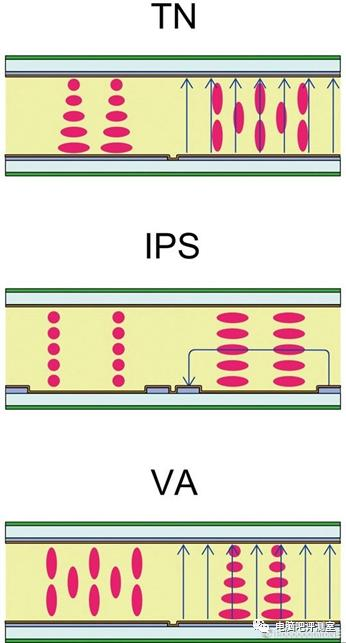
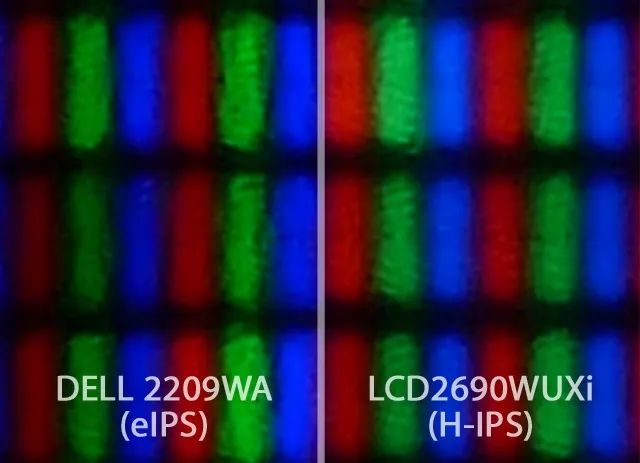
Next is the IPS panel. IPS is actually a general term for LG panels (BOE and Chi Mei also belong to this camp), which can be categorized into three types: E-IPS, S-IPS, and H-IPS. Currently, S-IPS is basically gone, with E-IPS and H-IPS being the main types, generally having a cooler color tone and fast response times. The two main characteristics of these screens are that they are hard screens and generally have light leakage issues, where irregular light leakage can be seen at the edges in a fully black display.
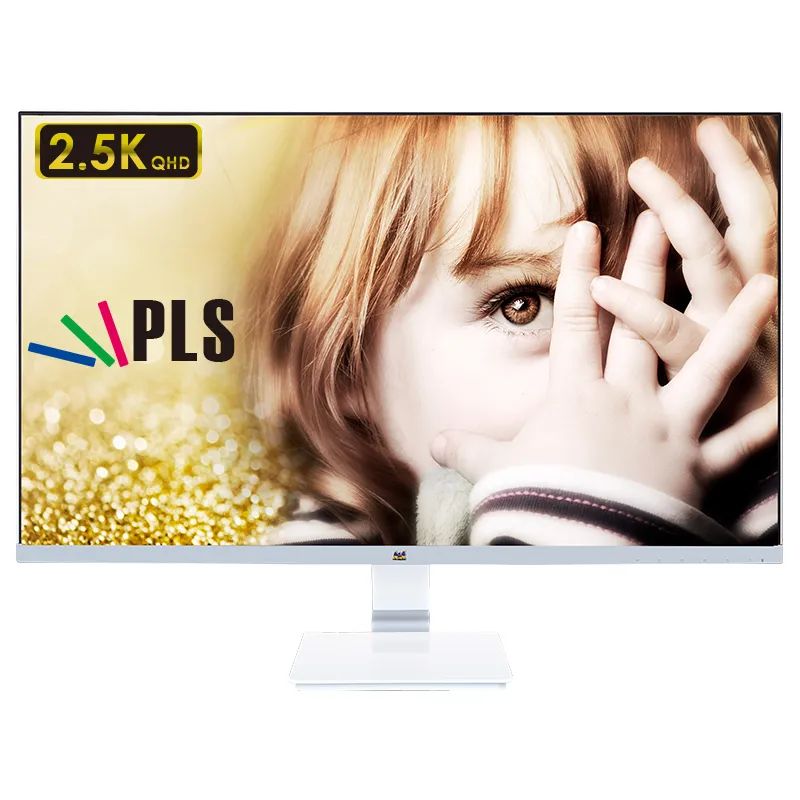
Another type of IPS is PLS, which is essentially very similar to IPS. It can be said that the two IPS screens represented by Samsung and LG occupy the vast majority of monitors in the world. PLS is Samsung’s proprietary technology, characterized by higher brightness. The display effect of this screen is quite good, but it also has a certain degree of light leakage, which can only be said to be improved.

The concept of LED and LCD has been miscommunicated in monitors for a long time. All liquid crystal displays = LCD, and LED is just a backlight source; the two are not parallel concepts. The emergence of LED (light-emitting diode) was to replace the old CCFL lamps (similar to fluorescent lights) for illuminating LCD panels.
Additionally, OLED is not an evolution of LED but rather a flat-panel display technology parallel to LCD. OLED stands for organic light-emitting diode, which emits light and color by itself, thus not requiring a backlight.

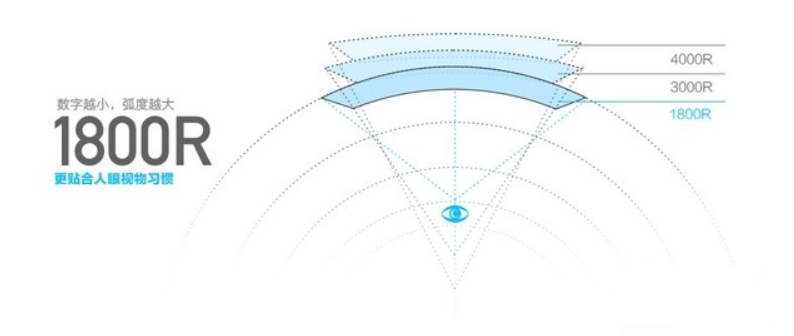
In addition to the monitor panel, size, and color, there is now a type of monitor: the curved screen. Curved screens are further divided into specifications such as 4000R, 3000R, and 1800R. So what does this curvature mean? Curvature refers to the degree of bending of a curve at a certain point, and in the field of monitors, it is represented by the radius of the circle to which the curve belongs. For example, 1800R indicates the degree of bending of an arc on a circle with a radius of 1.8m, which makes it easier to understand. Currently, curved screens mainly appear on large-sized monitors.

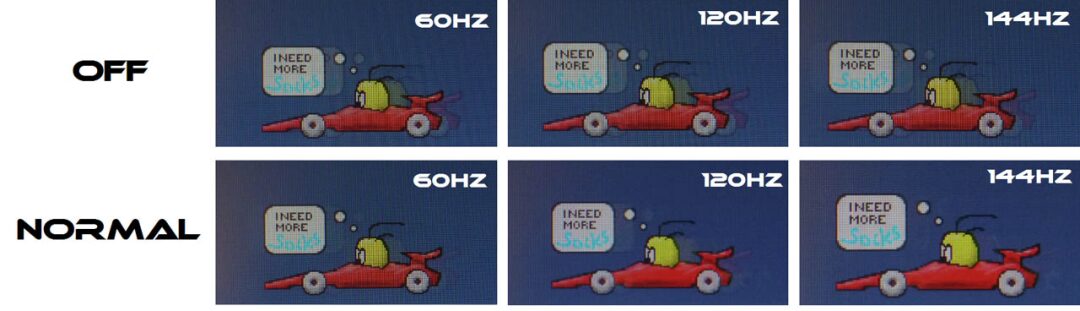
Good color does not necessarily mean good gaming performance; color relates to the ability of the screen to cover colors, as mentioned earlier, and we won’t dwell on that here. Gaming demands more continuity in images and response times, so fundamentally, these are two unrelated demands. Taking the technical indicator most needed by gamers—the refresh rate—as an example, the higher the refresh rate, the smoother the image; the lower the refresh rate, the more jitter and tearing occur, leading to increased eye fatigue, hence the emergence of high-refresh monitors.
Before discussing high-refresh monitors, we first need to talk about vertical synchronization, or V-Sync. Typical LCD monitors operate at 60Hz (59Hz); for example, if the V-Sync function is enabled in the game (or graphics card driver), it will request a frame from the graphics card (GPU) every 1/60 seconds. If the graphics card’s performance is sufficient, it can ensure that a frame is supplied to the monitor for display within that 1/60 second. However, in high-complexity scenes in games, frame drops are inevitable; once a delay occurs, the monitor cannot receive a frame within that 1/60 second, and must wait for the next 1/60 second, resulting in a pause of 1/30 seconds, which manifests as a momentary stutter in the image. What happens when V-Sync is turned off? Unfortunately, because the graphics card-generated image and the monitor’s refresh timing are always out of sync, the game’s display will suffer, with frequent misalignment or tearing of the image and frame drops.
Where there are problems, there will be solutions. NVIDIA and AMD have introduced their synchronization technologies—G-Sync and Free-Sync, respectively. Simply put, G-Sync and Free-Sync are graphics card-led technologies that control the monitor’s refresh rate, meaning the monitor needs to adapt to the graphics card’s speed; for every frame the graphics card provides, the monitor displays one frame, rather than the monitor needing a frame from the graphics card. In contrast, V-Sync is monitor-led.
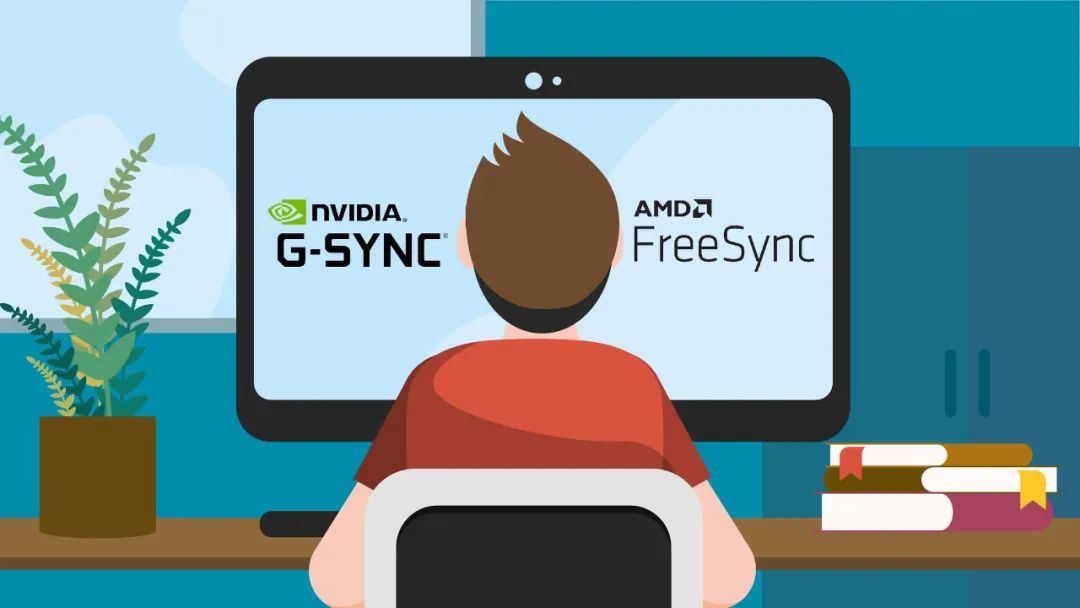
V-Sync can cause tearing when the frame rate is too low, while G-Sync and Free-Sync do not; V-Sync has issues with image lag, while G-Sync and Free-Sync do not; V-Sync typically operates at 60Hz or 30Hz, while G-Sync and Free-Sync can reach up to 144Hz.
The emergence of 144Hz high-refresh LCD monitors is closely related to synchronization technology, as enabling synchronization technology yields the best performance. However, some 144Hz monitors do not support G-Sync or Free-Sync (one must choose between the two, with Free-Sync being free and G-Sync requiring special chip support). The key difference is that when G-Sync and Free-Sync are not supported, the monitor relies on V-Sync to control the graphics card, while with support for these technologies, the graphics card controls the monitor.
Gamers are recommended to buy 144Hz monitors, but there are some considerations. Users with NVIDIA graphics cards may consider purchasing a 144Hz monitor with G-Sync support to fully utilize their graphics card (at least GeForce 10 series or higher is required); for users with AMD graphics cards, Free-Sync standard 144Hz high-refresh monitors are more suitable.

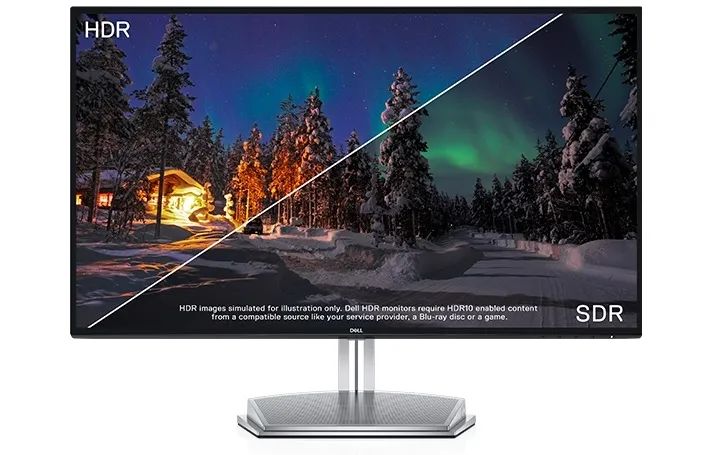
Finally, let’s talk about HDR. HDR is not a new technology; it has long been applied in photography and television. HDR stands for High-Dynamic Range, which refers to high dynamic lighting rendering images. HDR can achieve a broader dynamic range, providing better contrast and color accuracy. For example, in dark scenes, a regular monitor may appear as a solid black, but on an HDR monitor, that solid black actually displays very precise images, making it very suitable for movie buffs and gamers.
However, to implement HDR technology, the monitor must have the corresponding hardware design. Thus, HDR has three levels of standards. If you plan to purchase a monitor with HDR technology, you might refer to these standards for selection—DisplayHDR 1.0 standard targets over 99% of LCD monitors on the market, defining three different levels with varying requirements for monitor brightness, color gamut, color depth, etc. However, all must have true 8-bit color display panels (market share about 15%). Specifically:
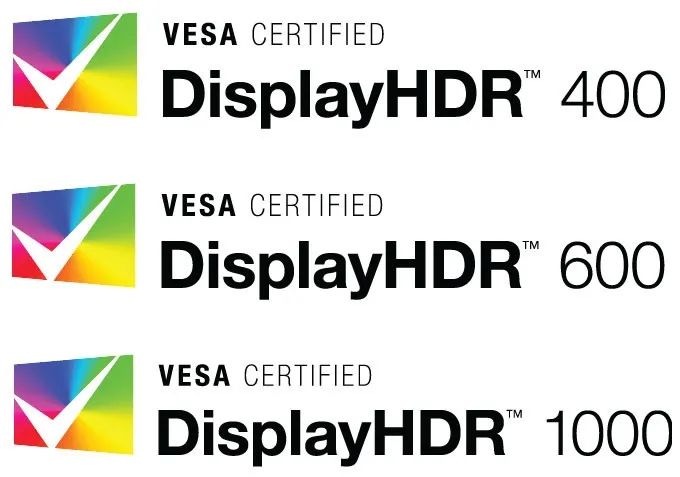
1. DisplayHDR 400: supports global dimming, peak brightness not less than 400nit, sustained brightness not less than 320nit, ITU-R BT.709 color gamut coverage not less than 95%, and supports HDR-10;
2. DisplayHDR 600: aimed at high-end monitors and laptops, requiring the screen to have 10-bit processing capability, peak brightness of 600nit, sustained brightness of 350nit, black and white brightness response time not exceeding 8 frames, color gamut coverage of 99% ITU-R BT.709, 90% DCI-P3 65;
3. DisplayHDR 1000: aimed at professional monitors, peak brightness of 1000nit, sustained brightness of 600nit, with a significant improvement in color gamma value.

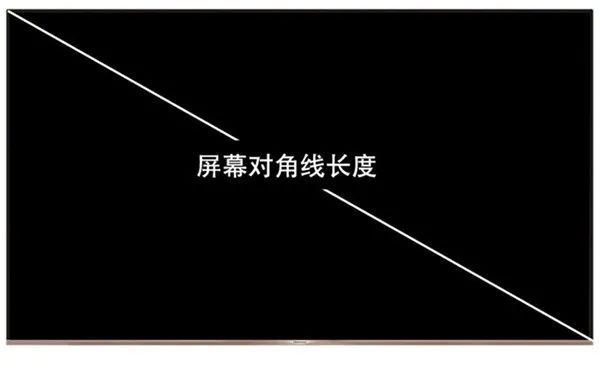
Clearly, size is a particularly important factor in purchasing a monitor, which is usually measured by the diagonal length of the screen. Currently, the main monitor sizes on the market are 21.5 inches, 23.6 inches, 23.8 inches, 25 inches, 27 inches, and 30 inches. Readers may have noticed that 22-inch and 24-inch monitors have become much less common, replaced by non-integer-sized products. This is due to panel manufacturers cutting the sizes in the most economical way, and visually, there is little difference between 22-inch and 24-inch monitors.
In my view, 21.5 inches is currently the most basic entry-level product size; smaller screens are completely impractical, suitable for those on a limited budget. Additionally, this size mostly features low-end IPS panels.
Next is the category of 24-inch products; 23.6 inches and 23.8 inches are currently the mainstream sizes, with the vast majority being 1080P screens, and the prices are quite affordable, suitable for everyday home use.
For the above sizes of monitors, viewing distance should also be particularly mentioned. The minimum distance should not be less than 30cm, as this distance can help avoid eye fatigue. The maximum distance should not exceed 60cm, as being too far makes it hard to see clearly.
As for 25-inch to 27-inch monitors, some of these sizes feature 1080P resolution screens, while others have 2K resolution screens, and there are also many 4K screens. In terms of size, I believe that a 27-inch monitor is suitable for both office work and gamers. In terms of viewing distance, a 25-inch monitor is reasonable at 40cm, while for a 27-inch monitor, I recommend maintaining a distance of at least 50cm.
As for 30-inch monitors and curved screens, I truly believe that they are currently suitable for high-end gamers and professional users, and the necessity for general users is not that high.

Dot pitch is often an easily overlooked aspect, but it is closely related to our sensory experience.
21.5 inches (1920×1080): 0.248mm
23 inches (1920×1080): 0.265mm
23.6 inches (1920×1080): 0.2715mm
23.8 inches (1920×1080): 0.2745mm/0.275mm
24 inches (1920×1080): 0.27675mm/0.277mm
25 inches (1920×1080): 0.28mm
27 inches (1920×1080): 0.311mm
27 inches (2560×1440): 0.2331mm
27.9 inches/28 inches (3840×2160): 0.16mm
29 inches/28.75 inches (2560×1080): 0.2628mm
31.5 inches (1920×1080): 0.36375mm
31.5 inches (2560×1440): 0.273mm
32 inches (2560×1440): 0.2767mm

This is the main size dot pitch I have compiled for monitors. Simply put, current display screens consist of densely packed light-emitting dots. The so-called resolution can be understood as the number of dots in length × the number of dots in width, hence the dot pitch issue. The smaller the panel size or the higher the resolution, the more dots there are, and the smaller the dot pitch; conversely, the larger the panel size and lower the resolution, the fewer dots there are, and the larger the dot pitch.
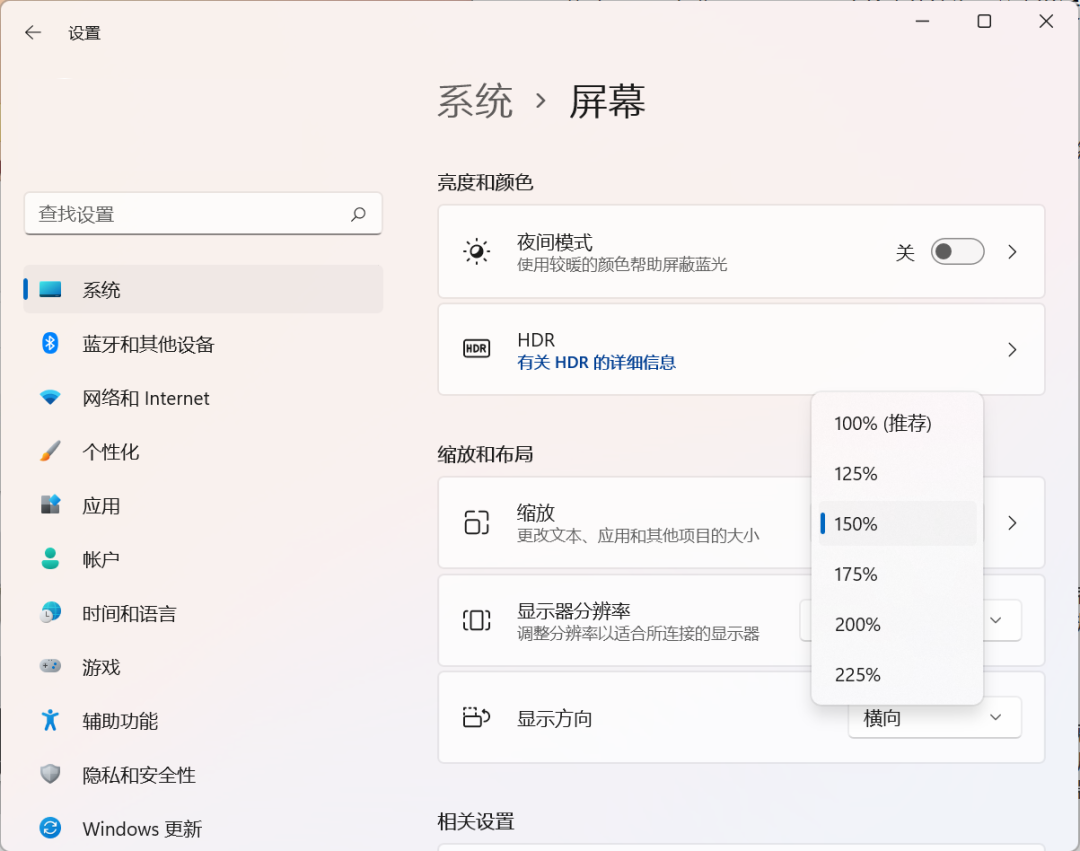
To ensure the image is aesthetically pleasing and the text is clear enough, it is generally considered that a dot pitch of around 0.5mm to 0.27mm is optimal at a common viewing distance of 50cm. Of course, as the viewing distance increases, the comfortable dot pitch can also be adjusted accordingly. Additionally, screens that involve more graphic applications are suitable for smaller dot pitches, while those with more text content or poor vision are suitable for larger dot pitches. It is also essential to use the operating system’s scaling function to achieve the best viewing effect on the monitor.

Monitor manufacturers stipulate that for bright spots, dead spots, and dark spots, no more than three in the central area and no more than eight across the full screen are considered qualified products. Therefore, before purchasing, be sure to ask whether returns or exchanges are supported. Additionally, some online merchants offer services to ensure there are no bright spots, which involves selecting models without bright or dead spots before sale, which naturally incurs additional costs; it depends on your acceptance level. I suggest that if there are no more than three bright spots in the center, the monitor can still be kept, as it does not significantly affect visual experience.
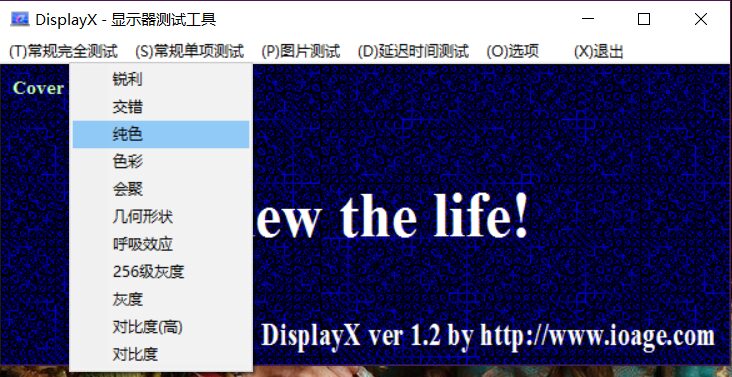
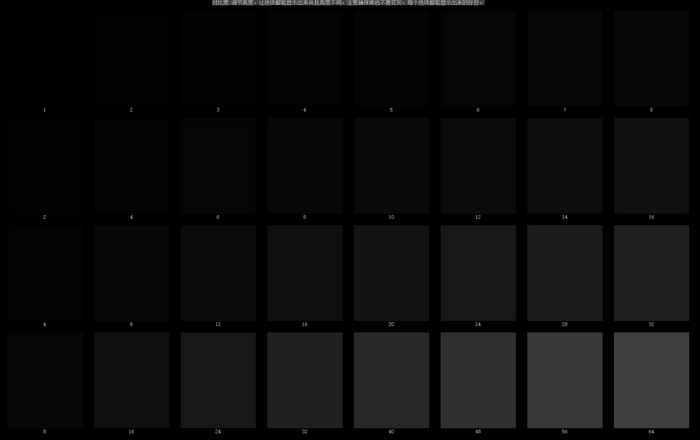
First, download the DisplayX software (download link: https://pc.qq.com/detail/2/detail_2222.html), install and run the software, find the “General Single Item Test” section, and select “Pure Color” (Figure 24). Each left-click will switch to a different color, with a total of seven colors: black, red, green, blue, pink, yellow, cyan, and white. I recommend checking for dead spots, bright spots, and dark spots under red, green, and blue.
Bright spots: Can only display two of the three colors normally (or display white); these are bright spots.
Dead spots: Cannot display any of the three colors; these are dead spots (not emitting light).
Dark spots: At a certain position, when switching between the three colors, not emitting light in one of the colors; these are dark spots.

Once the basic quality issues of the monitor are checked, further adjustments to contrast and brightness are necessary. Many people blindly adjust or do not adjust at all, using the monitor as is (not utilizing the various built-in display modes). Poor brightness adjustment leads to unsatisfactory display effects, and the most significant issue is the impact on vision, so this step cannot be overlooked.
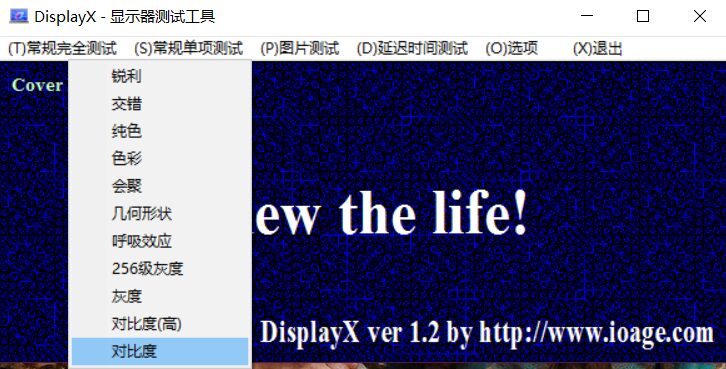
Run the DisplayX software, find the “General Single Item Test” section, and select “Contrast”. Click the left mouse button. Then, on the monitor, find the buttons to adjust contrast and brightness. First, set the brightness to 0, then adjust the contrast until the black block in the upper left corner is barely visible (Figure 26). Next, adjust the brightness gradually to a comfortable level (generally low brightness with high contrast). Note that brightness and contrast should not be too high (except for professional users with strict color requirements).

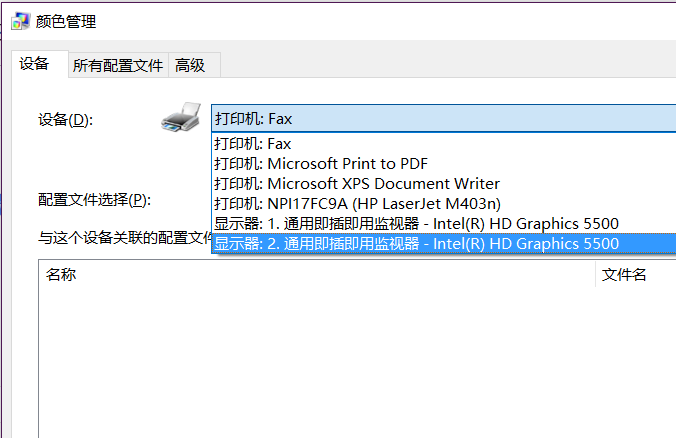
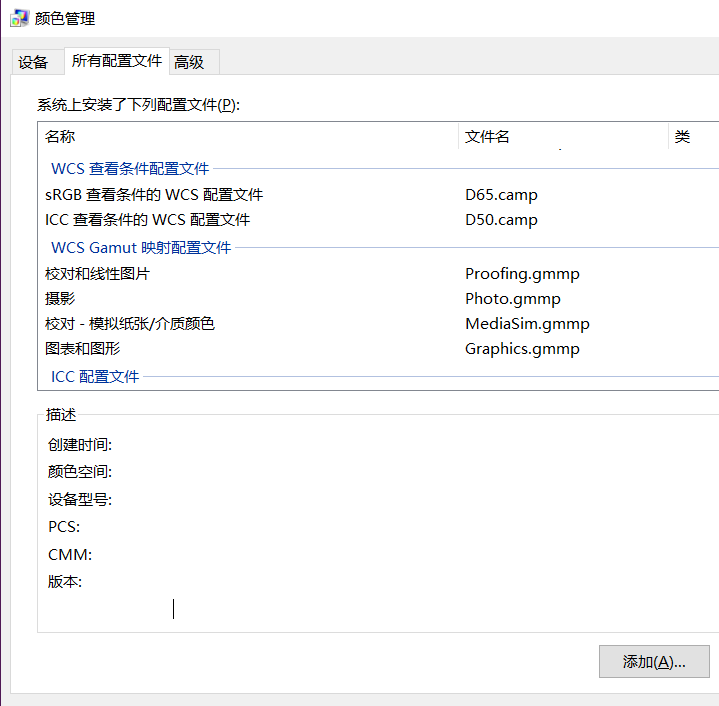
One often overlooked aspect is that many major brand monitors provide color configuration files, which can be understood as the “driver” for the monitor’s colors. Installing the color configuration file can significantly improve color performance, and it is highly recommended to install it (generic monitors and some laptop screens may not have this feature).
First, find the corresponding model’s color configuration file on the brand’s official website, download and unzip it. In the control panel, find Color Management, select the monitor you want to configure in the “Devices” tab, then switch to “All Profiles”, click “Add” below, and select the directory of the unzipped file.
Using the color configuration file will significantly improve color performance. If you have even higher demands, you will need to use a professional color calibration device to adjust.
Original article published in the October 15, 2022 issue of “Computer Enthusiast” No. 20
END
For more exciting content, stay tuned…
