Have you ever thought about building your own personal server using a computer the size of a credit card? This is not a scene from a science fiction movie, but a reality! With the Raspberry Pi, you can easily create a private cloud storage, media center, AI inference platform, or an automated office assistant.
This article will provide you with a complete Raspberry Pi Personal Server Construction Guide, suitable for beginner geeks and developers interested in open-source hardware to reference, learn, and use.
🧠 1. Why Choose Raspberry Pi?
The Raspberry Pi is a small single-board computer based on Linux, with the following advantages:
✅ Affordable (starting at about $35)
✅ Low power consumption, can run continuously
✅ Supports various operating systems (such as Raspbian, Ubuntu, Armbian)
✅ Highly expandable, supports USB peripherals, cameras, GPIO interfaces
✅ Active community with abundant resources, suitable for DIY and learning
It is not only a toy for programming enthusiasts but also an ideal device for building a personal server!
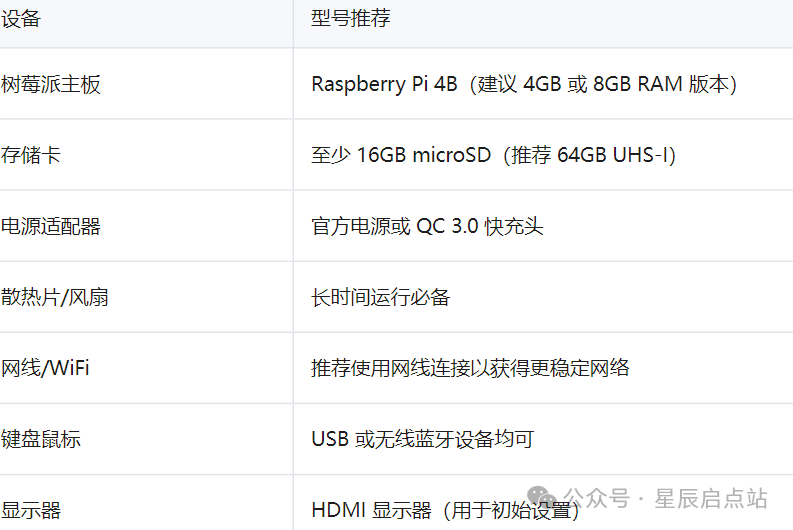
🛠️ 2. Preparation Material List
📦 3. Installing the Operating System: Starting from Scratch
Step 1: Download the system image
Recommended systems:
Raspberry Pi OS Lite (headless version) – lighter, suitable for server use
Ubuntu Server for Raspberry Pi
Armbian – more suitable for advanced users or specific scenarios
Official website:
https://www.raspberrypi.com/software/operating-systems/
Step 2: Write the system to the SD card
Use the official tool Raspberry Pi Imager:
Download and install Raspberry Pi Imager
Insert the microSD card
Select the system → Select the SD card → Write
✅ Tip: You can enable SSH, set Wi-Fi, and default account password in Settings for “out-of-the-box” use.
Step 3: Start the Raspberry Pi
Insert the microSD card into the Raspberry Pi
Connect the monitor, keyboard, and power
After booting, you will enter the command line interface
🔐 4. Configure Remote Access (SSH + VNC)
Method 1: Enable SSH (recommended)

Select Interfacing Options → SSH → Enable
Then you can connect remotely from another computer:

The default password is raspberry
Method 2: Install VNC (Graphical Remote Control)

Install VNC Viewer on your computer and enter the IP address for remote graphical operation.
🌐 5. Deploy Your Personal Server Functional Modules
Here are several common personal server application scenarios and deployment methods:
1. File Server + Private Cloud Storage: Nextcloud
Feature Highlights:
Similar to Baidu Cloud, but data is completely under local control
Supports synchronization, sharing, calendar, contacts, etc.
Installation Steps:

Access http://Raspberry Pi IP:80 to configure the account and storage path.
📌 It is recommended to use an external hard drive to increase storage capacity.
2. Video Streaming Media Server: Plex / Jellyfin
Feature Highlights:
Build your own video library at home
Supports multi-device access (mobile, TV, PC)
Automatically recognizes subtitles, cover images, actor information
Install Plex (recommended Jellyfin):
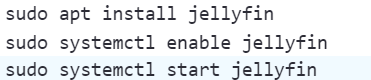
Access http://Raspberry Pi IP:8096 to configure the media library.
3. Git Private Repository: GitLab CE
Feature Highlights:
Have your own code hosting platform
Supports CI/CD pipelines
No need to rely on GitHub/Gitee
Install GitLab CE (suitable for Raspberry Pi 4B):

Access http://Raspberry Pi IP:80 to log in to GitLab, the default admin account is root.
4. AI Inference Server: Ollama + Llama3
Feature Highlights:
Deploy models like Llama3, Mistral on Raspberry Pi
For local Q&A, writing assistance, knowledge base queries
No reliance on OpenAI, protecting privacy
Install Ollama (ARM64 version):

Download and run the model:

⚠️ Note: It is recommended to use the quantized version (such as GGUF) when running Llama3 on Raspberry Pi 4B, as insufficient memory may affect performance.
5. Personal Blog/Website Server: WordPress + MySQL
Feature Highlights:
Build a personal blog, technical notes site, portfolio display page
All data is stored locally, no reliance on WordPress.com
Can combine with Let’s Encrypt for HTTPS encrypted access
Install WordPress:
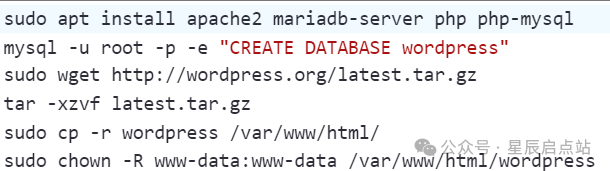
Access http://Raspberry Pi IP/wordpress to complete the installation.
🛡️ 6. Security and Optimization Tips
✅ Set a static IP address (fixed access within the local network)
Edit /etc/dhcpcd.conf and add the following content:
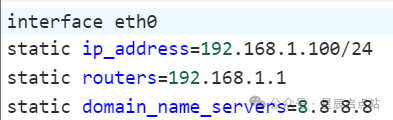
Effective after reboot:

✅ Enable Firewall (UFW)
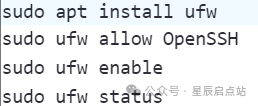
✅ Use Reverse Proxy (Nginx + Let’s Encrypt)

Let your personal server have HTTPS access capability, making it more professional and secure.
✅ Regular Backups (rsync + cron)
Create an automatic backup script:

Set up a scheduled task:

Add:

Automatically back up every day at 3 AM.
📱 7. Advanced Play: Build a Smart Home Hub
Recommended projects:
Home Assistant: Build a home automation control system
OpenHAB: Supports Z-Wave, Zigbee, MQTT, and other protocols
Node-RED: A visual flow engine suitable for IoT development
Install Home Assistant:
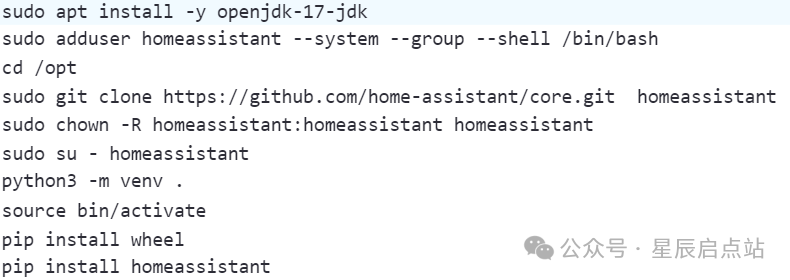
Start the service:

Access http://Raspberry Pi IP:8123 to enter the Home Assistant control panel.
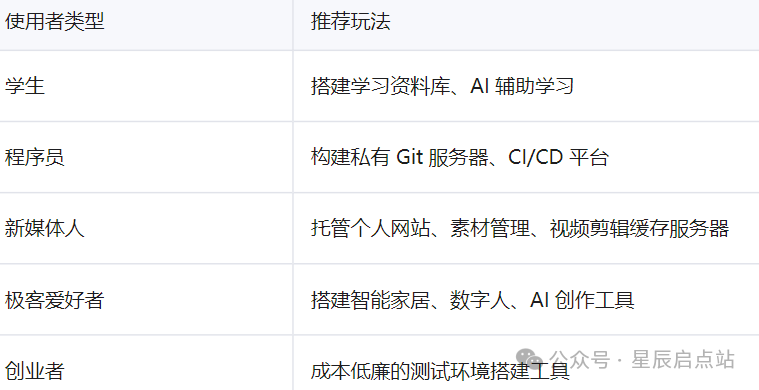
🎯 8. Target Audience for Raspberry Pi Servers
💡 9. Conclusion: A “Micro Data Center” for Everyone
Although small, the Raspberry Pi can carry many powerful functions. Whether as an AI inference server, private cloud platform, or smart home control hub, it can handle it all.
In this era where data sovereignty is increasingly valued, having your own server not only enhances privacy awareness but also stimulates our interest and creativity in technology.
“Technology is not an unreachable professional term, but a way of life that can be built by hand.”