Last time, I wrote a small tool for converting a single data file, but I found that for a large number of NC format files—such as monthly temperature and precipitation data—manually converting each to TIF is very inefficient! Today, I will share the complete solution for batch converting NC to TIF using Matlab, suitable for various raster data such as temperature, PET, and precipitation.
1. Data Processing
Step 1: Check the “Key Information” of the NC File
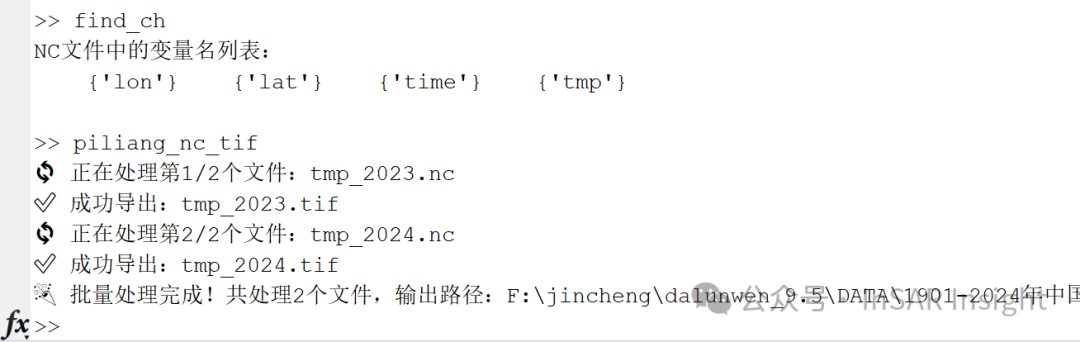
Before batch processing, you must first confirm the variable names and dimensions of the NC files (I forgot to change the variable name the first time I processed it, which caused an error, so if you don’t know the variable names, you need to run the program below first). For example, the variable name for temperature data is not <span>etp</span>, but rather <span>tmp</span>/<span>t2m</span>; if you get it wrong, it will prompt “Variable not found”.
% Replace with the path of one of your NC files
nc_filepath = 'F:\jincheng\dalunwen_9.5\DATA\1901-2024年中国1km分辨率逐月平均气温数据集\tmp_2023.nc';
info = ncinfo(nc_filepath);
var_names = {info.Variables.Name};
disp('List of variable names in the NC file:');
disp(var_names);
Step 2: Batch NC to TIF Conversion in Matlab (modify the variable names obtained above)
Taking monthly temperature data as an example, the code supports automatic folder traversal, splitting the time dimension (for example, exporting separate TIFs for each month), and handling abnormal files. You can directly copy and use it:
%% ---------------------- Batch NC to TIF Parameter Settings ----------------------
input_folder = 'F:\jincheng\dalunwen_9.5\DATA\1901-2024年中国1km分辨率逐月平均气温数据集';  % Folder storing NC files (English path recommended)
output_folder = 'F:\jincheng\dalunwen_9.5\DATA\1901-2024年中国1km分辨率逐月平均气温数据集\output_tif'; % TIF output folder (automatically created)
target_variable = 'tmp';  % Target variable name to extract from NC file (e.g., pet/precip/temp)
time_slice = 1;  % If NC contains a time dimension, extract which time slice (e.g., first layer: 1, last layer: end)
%% ---------------------- Initialization Settings ----------------------
% Create output folder (if it does not exist)
if ~exist(output_folder, 'dir')
    mkdir(output_folder);
end
% Get all .nc files in the folder
nc_files = dir(fullfile(input_folder, '*.nc')); total_files = length(nc_files);
if total_files == 0
    disp('⚠️ No .nc files found in the input folder!');
    return;
end
%% ---------------------- Batch Loop Processing ----------------------
for i = 1:total_files
    % Get the current NC file path
    nc_filename = nc_files(i).name;
    nc_filepath = fullfile(input_folder, nc_filename);
    disp(['🔄 Processing file ' num2str(i) '/' num2str(total_files) ': ' nc_filename]);
    try
        %% 1. Read NC file information
        nc_info = ncinfo(nc_filepath);
        var_names = {nc_info.Variables.Name};
        % Check if the target variable exists
        if ~ismember(target_variable, var_names)
            warning(['❌ Variable ' target_variable ' not found in file ' nc_filename ', skipping!']);
            continue;
        end
        %% 2. Read data and geographic coordinates
        data = ncread(nc_filepath, target_variable);  % Read target variable
        lat = ncread(nc_filepath, 'lat');  % Latitude (modify if variable name is different, e.g., latitude)
        lon = ncread(nc_filepath, 'lon');  % Longitude (modify if variable name is different, e.g., longitude)
        %% 3. Process multidimensional data (if it contains a time dimension)
        data_dim = ndims(data);
        if data_dim == 3  % If data is [longitude, latitude, time]
            data = data(:, :, time_slice);  % Extract specified time slice
        elseif data_dim > 3  % If more dimensions (e.g., height + time), expand processing logic as needed
            warning(['⚠️ File ' nc_filename ' has more than 3 dimensions, defaulting to the first two dimensions + time slice ' num2str(time_slice)]);
            data = data(:, :, time_slice);
        end
        %% 4. Correct data orientation (optional, adjust based on NC data)
        data = flipud(data);  % Uncomment if TIF displays upside down
        %% 5. Create geographic reference object
        raster_ref = georasterref('RasterSize', size(data), ...
            'LatitudeLimits', [min(lat), max(lat)], ...
            'LongitudeLimits', [min(lon), max(lon)]);
        %% 6. Generate output TIF file name (retain original NC file name, replace extension)
        tif_filename = strrep(nc_filename, '.nc', '.tif');
        tif_filepath = fullfile(output_folder, tif_filename);
        %% 7. Export as GeoTIFF
        geotiffwrite(tif_filepath, data, raster_ref);
        disp(['✅ Successfully exported: ' tif_filename]);
    catch ME
        % Catch errors to avoid interrupting batch processing due to a single file failure
        disp(['❌ Failed to process file ' nc_filename ': ' ME.message]);
        continue;
    end
end
disp(['🎉 Batch processing completed! A total of ' num2str(total_files) ' files processed, output path: ' output_folder]);
Processing Results
2. Code Usage Guide (Must Read for Beginners)
-
Three Steps to Modify Parameters:
<span>input_folder</span>: Fill in the path of your NC file folder (do not include Chinese characters!);<span>target_variable</span>: Replace with the variable name found in step one (for example, for temperature, fill in<span>tmp</span>);<span>is_time_series</span>: For time series data (monthly/daily), fill in<span>true</span>, for single file data, fill in<span>false</span>.
File Name Adaptation: The code defaults to extracting the year from the file name (e.g., <span>tmp_2023.nc</span> → 2023), if your file name is <span>temp_202301.nc</span> (with year and month), you can change the line for <span>year_str</span> to:
year_month_str = regexp(nc_filename, '\d{6}', 'match'); % Extract 6-digit numbers like 2023013. Common Issues & Solutions
-
“Variable xxx not found”: Use the code from step one to recheck the variable name, ensure that
<span>target_variable</span>matches the one in the NC file (for example, precipitation data is<span>precip</span>, PET is<span>etp</span>). -
TIF opens with “upside down”: The code already includes
<span>flipud(data_slice)</span>, if it is still upside down, replace it with<span>fliplr(data_slice)</span>(for left-right flipping). -
TIF lacks coordinate information: Check if the coordinate variable names in the NC file are
<span>lat</span>/<span>lon</span>, if they are<span>latitude</span>/<span>longitude</span>, modify the code accordingly. -
Single file error interrupts: The
<span>try-catch</span>in the code will automatically skip error files and prompt the reason, so don’t worry about batch processing failures~
4. Conclusion
With this batch code, processing NC files is very convenient! Whether it’s temperature, precipitation, or remote sensing raster data, you can adapt it by changing a few parameters. Remember the core steps: Check variable names → Modify parameters → Run the code!!