Add the author’s WeChat to join the discussion group:

Introduction
The previously mentioned “Spear and Shield: The Eternal Cyber Warfare Series” is no longer available, as it may overlap with my work. Recently, I have been learning assembly language, and one of the results of my studies is the article “C2 Implant Assembly Implementation Process and Detection Countermeasures Research.” Since most assembly tutorials on the market are obscure and difficult to understand, I believe it is necessary to write a series of articles from a beginner’s perspective to learn assembly language, which can help everyone and reinforce my own knowledge. This series will start from scratch to learn assembly language through a Windows x64 C2 implant project. Of course, I will selectively omit certain parts to prevent malicious use; I will remove critical command executions, as the goal is to learn assembly, not to write malware. I also want to avoid any legal risks. Those who know me are aware that I am quite cautious, haha. Now, let’s begin the main content.
Objectives of This Article
Understand what assembly language is, configure the development environment for assembly, and, following the traditional learning approach, run a “Hello World” program.
What is Assembly Language?
Programming languages have different levels of abstraction:
- Python/Java (High-level languages): A single line of code can accomplish many tasks, close to human thinking.
- C/C++: Lower level, can directly manipulate memory and pointers.
- Assembly (Low-level language): Each instruction corresponds to a simple CPU operation.
- Machine Code: Binary (010101…), the instructions executed directly by the CPU.
Note: Don’t come to me looking for grammatical errors; some say C/C++ is also a high-level language, but I am just abstracting for easier understanding.
In simple terms: Assembly is the human-readable language closest to machine code.
Same Task, Different Languages
Objective: Calculate 5 + 10Python (High-level language):
result = 5 + 10
C Language (Intermediate):
int result = 5 + 10;
Assembly (Low-level):
mov rax, 5      ; Move 5 into the RAX register
add rax, 10     ; RAX = RAX + 10
                ; Result is in RAX
Machine Code (Executed by the computer):
48 C7 C0 05 00 00 00    ; mov rax, 5
48 83 C0 0A             ; add rax, 10
Overview of My Project Series
C/S Architecture, Commands Issued by Server Executed by Implant:
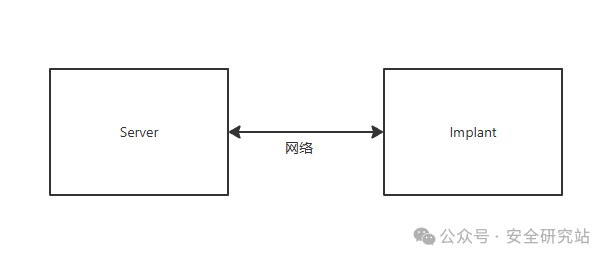
Working Principle
Server (You can write a script in Python as the server; don’t ask me why, thanks to the large model, it can be done quickly):
- Listen on port 4444
- Wait for client connection
- Send commands
- Receive results
Client (This Project):
- Connect to the server
- Receive commands
- Execute commands
- Return results
- Repeat…
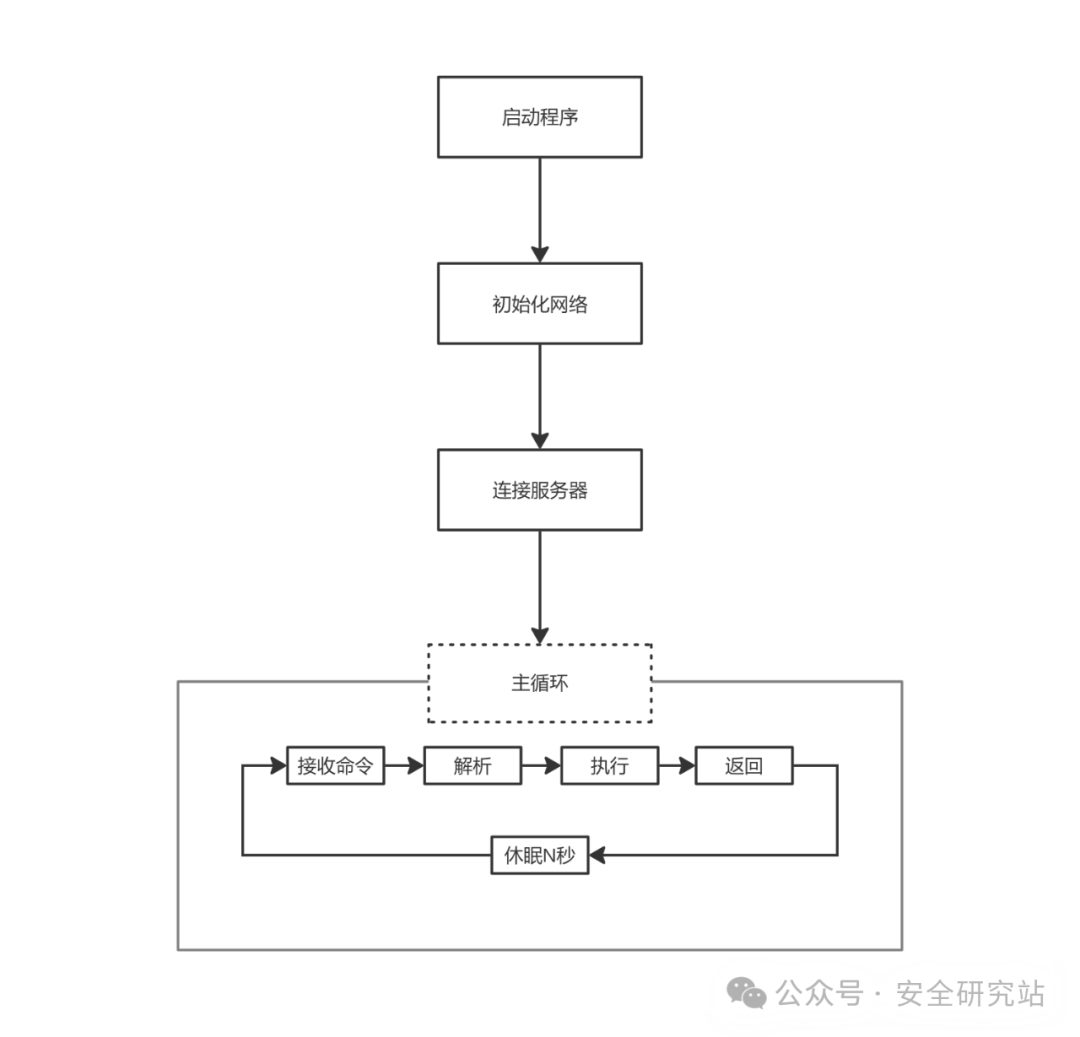
Overall Process:
Installing Development Tools
There are two essential tools, and an editor that can be installed optionally
- NASM: Assembler (.asm → .obj)
- MSVC: Linker (.obj → .exe)
1. Install NASM
NASM = Netwide Assembler (Assembler)
Download:
- https://www.nasm.us/pub/nasm/releasebuilds/
- Select the latest version
<span>win64.zip</span> - For example:
<span>nasm-2.16.01-win64.zip</span>
Installation:
1. Unzip to C:\nasm
2. Add to PATH:
   - Win key → Search "Environment Variables"
   - System Variables → Path → Edit
   - New → Enter C:\nasm
   - Confirm
Verification:
nasm -v
# Should display the version number
2. Install Visual Studio
Some may wonder why such a heavy tool is needed for writing assembly?
- Provides
<span>link.exe</span>linker - Provides Windows SDK
- Provides C runtime library
Download:
- https://visualstudio.microsoft.com/downloads/
- Visual Studio 2022 Community (Free)
Installation:
1. Run the installer
2. Check "Desktop development with C++"
3. Install
Verification:
# Open x64 Native Tools Command Prompt for VS 2022
# Or run manually:
"C:\Program Files\Microsoft Visual Studio\2022\Community\VC\Auxiliary\Build\vcvars64.bat"

link
# Should display linker help information
Editor
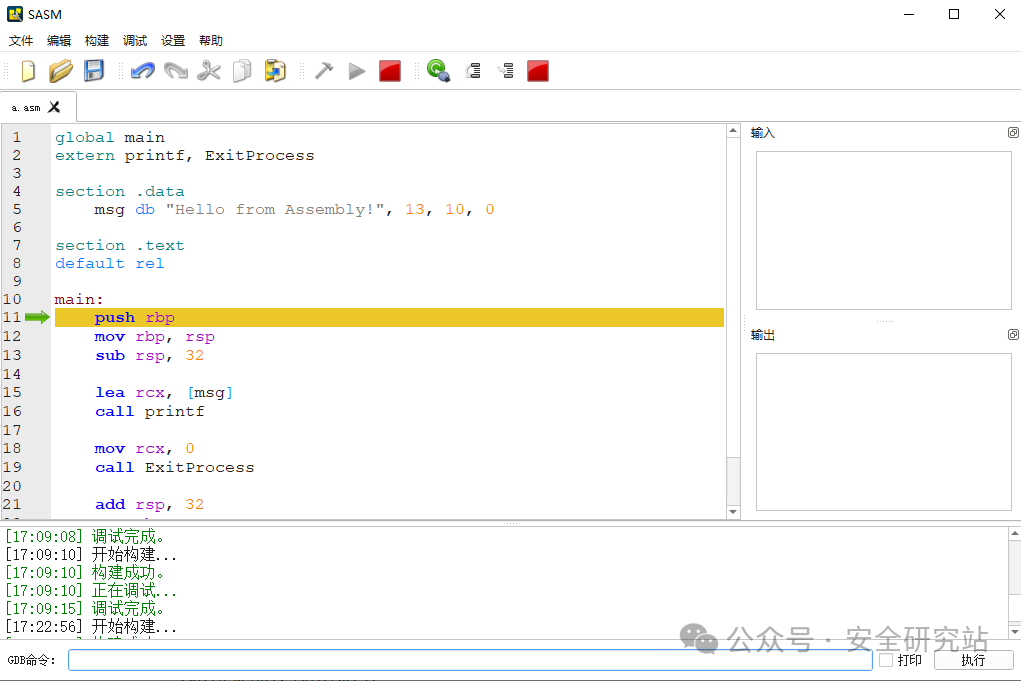
You can choose any editor; if you prefer, using Notepad is fine, but I recommend using Sasm or Vscode. For example, Sasm can automate building and running, supports x86 and x64 architectures, and supports NASM, GAS, FASM, MASM. However, this tutorial uses NASM. People online generally say it is because it is closer to human syntax and cross-platform, but I think it is just because everyone is using it, and language, syntax, and assembler are just tools; there is no need to get too hung up on them. The main thing is to understand the concepts. For reverse learning, what you see in IDA and Ghidra is quite similar to this; I have included a screenshot below:
1.4 First Assembly Program
Hello World
Create <span>hello.asm</span>:
global main
extern printf, ExitProcess

section .data
    msg db "Hello world!", 13, 10, 0

section .text
default rel

main:
    push rbp
    mov rbp, rsp
    sub rsp, 32

    lea rcx, [msg]
    call printf

    mov rcx, 0
    call ExitProcess

    add rsp, 32
    pop rbp
    ret
Code Explanation
For now, I will provide a simple explanation of what each part does; you can choose to read it or not. A more detailed explanation of assembly basics will be provided later, but if you’re interested, you can take a look at this:
Part 1: Declarations
global main              ; Export main function
extern printf, ExitProcess  ; Use external functions
Important Note: Differences Between Assembly and C/C++
In C/C++, using external functions requires including header files first:
#include <stdio.h>     // Must declare function prototypes before use
printf("Hello");
But in assembly,you do not need header files; you can directly declare using <span>extern</span>, andonly link them later by specifying the library through linker parameters <span>/defaultlib:libcmt.lib</span>; you only need to know the function name without needing to know the parameter types (but you must adhere to calling conventions when calling).
Principle:
Part 2: Data Segment
section .data
    msg db "Hello from Assembly!", 13, 10, 0
    ; db = define byte (define byte)
    ; 13, 10 = \r\n (newline)
    ; 0 = string terminator
Part 3: Code Segment
section .text
default rel     ; Use relative addressing

main:
    push rbp        ; Save stack frame
    mov rbp, rsp    ; Establish new stack frame
    sub rsp, 32     ; Allocate shadow space (required by Windows x64)

    lea rcx, [msg]  ; First parameter = address of msg
    call printf     ; Call printf

    mov rcx, 0      ; Exit code = 0
    call ExitProcess

    add rsp, 32     ; Release stack space
    pop rbp         ; Restore stack frame
    ret
Compiling and Running
Manual Compilation (Understanding the Process)
# 1. Initialize MSVC environment
"C:\Program Files\Microsoft Visual Studio\2022\Community\VC\Auxiliary\Build\vcvars64.bat"

# 2. Assemble
nasm -f win64 hello.asm -o hello.obj

# 3. Link (this step links the implementation of external functions)
link /subsystem:console /entry:main /out:hello.exe hello.obj ^
     kernel32.lib ucrt.lib libcmt.lib legacy_stdio_definitions.lib ^
     /IGNORE:4210
# The role of the libraries:
#   kernel32.lib                 - Windows core API (ExitProcess, etc.)
#   ucrt.lib                     - Universal C Runtime (stdio low-level functions)
#   libcmt.lib                   - C runtime library (printf, etc.)
#   legacy_stdio_definitions.lib - Compatibility support for printf
# /IGNORE:4210 - Ignore CRT initialization warnings (we directly use /entry:main)

# 4. Run
hello.exe
Tip: Manually typing commands helps understand the compilation process. If you find it cumbersome, you can use the general compilation script in Appendix A.
You should see
Hello from Assembly!
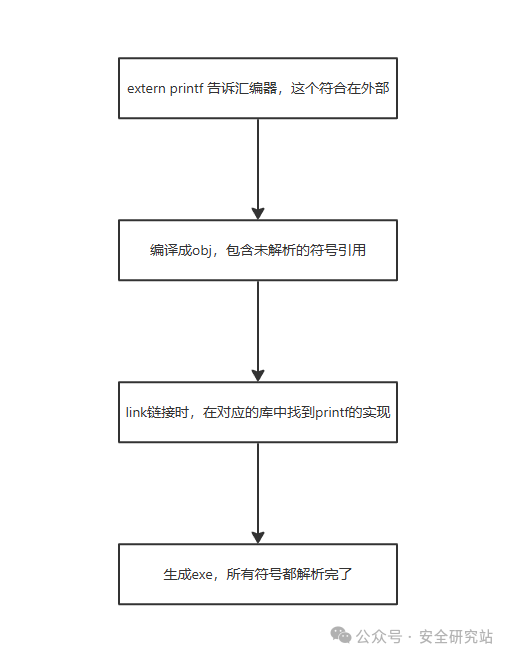
1.5 Understanding the Compilation Process
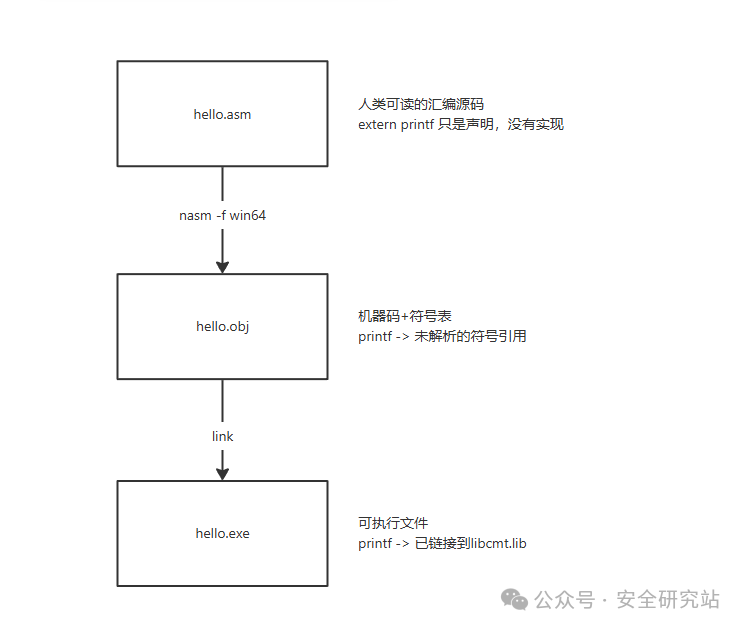
NASM: Translates assembly → machine code (external symbols are retained as references)
LINK: Assembles into a complete program, adds startup code, and resolves external symbols
Linking Process of External Functions
C/C++ Method:
#include <stdio.h>
Checks function prototypes at compile time; the compiler knows what parameters printf needs, and links the implementation from the library.

Assembly Method:
extern printf
Just tells the assembler "this is external"; you are responsible for passing parameters according to calling conventions (the compiler does not check), and links the implementation from libcmt.lib.
Key Points:
- C/C++ header files = function prototype declarations (checked at compile time)
- Assembly’s extern = symbol reference declaration (not checked, more flexible but also more dangerous)
- The actual function implementations are in .lib files, linked in only at link time
Note: I have written about special issues like functions with the same name in different libraries in my own articles, but to avoid confusion, I won’t elaborate here; I find this WeChat editor a bit uncomfortable.
1.6 Project Compilation
View build.bat
The project’s <span>build.bat</span> is similar to the above, but:
- Compiles multiple .asm files
- Links all .obj files
Core Part:
nasm -f win64 asm\main.asm -o asm\main.obj
nasm -f win64 asm\util.asm -o asm\util.obj
nasm -f win64 asm\network.asm -o asm\network.obj
...

link /out:main.exe asm\main.obj asm\util.obj asm\network.obj ... ^
     /defaultlib:ws2_32.lib /defaultlib:libcmt.lib ...
Compile the Project
cd C:\Users\Administrator\Desktop\asm
.uild.bat
If successful, it will generate <span>main.exe</span>.
1.7 Common Issues
Q1: Cannot find nasm command
A: Not added to PATH; re-add the environment variable and restart the terminal.
Q2: Cannot find link.exe
A: You need to run <span>vcvars64.bat</span> to initialize the environment:
"C:\Program Files\Microsoft Visual Studio\2022\Community\VC\Auxiliary\Build\vcvars64.bat"
Or run it in the “x64 Native Tools Command Prompt”.
Q3: Link error: unresolved external symbol
- Check if all .obj files are included
- Check if the required libraries are linked (e.g.,
<span>ws2_32.lib</span>)
Q4: Runtime crash
- Check if shadow space is allocated (
<span>sub rsp, 32</span>) - Check if the stack is correctly restored (
<span>add rsp, 32</span>)
Next Chapter Preview
Chapter 2: Basic Knowledge of Assembly
Before analyzing the project, let’s learn the basics:
- What are registers?
- The 5 most commonly used instructions
- Calling conventions
- Using the stack
Build a solid foundation to understand the project!
Appendix A: General Compilation Script
Design Concept
To allow a script to compile various different .asm files (some require network libraries, some require GUI libraries), I use the method of declaring dependencies in the source code; this is not a universal practice, I am just being lazy and found this method. I am not sure how others do it, so please don’t ask me~
Three Usage Modes
Mode 1: Do not write @libs (use basic libraries)
; Do not write @libs comment, automatically use basic libraries
global main
extern printf, ExitProcess
...
Link:<span>kernel32.lib ucrt.lib libcmt.lib legacy_stdio_definitions.lib</span>
Mode 2: Add extra libraries (basic libraries + extra libraries)
; @libs: ws2_32.lib
; Add network library in addition to basic libraries

global main
extern printf, WSAStartup, ExitProcess
...
Link:<span>kernel32.lib ucrt.lib libcmt.lib legacy_stdio_definitions.lib ws2_32.lib</span>
Mode 3: Use only specified libraries (use ! to disable basic libraries)
; @libs: !user32.lib kernel32.lib
; ! at the beginning means "only use these libraries, do not use basic libraries"

global main
extern MessageBoxA, ExitProcess
...
Link:<span>user32.lib kernel32.lib</span>
Mode 4: Completely do not link libraries (advanced usage)
; @libs: !
; Only ! without a library name, do not link any libraries at all

global _start
; Directly use syscall, do not call any library functions
...
Do not link any libraries
build.bat Script
Create <span>build.bat</span> (place it in the root directory of the working directory):
@echo off
setlocal enabledelayedexpansion

REM Enable ANSI color support (Windows 10+)
for /F "tokens=1,2 delims=#" %%a in ('"prompt #$H#$E# & echo on & for %%b in (1) do rem"') do set "ESC=%%b"

REM Define color codes
set "RESET=%ESC%[0m"
set "RED=%ESC%[91m"
set "GREEN=%ESC%[92m"
set "YELLOW=%ESC%[93m"
set "BLUE=%ESC%[94m"
set "CYAN=%ESC%[96m"
set "GRAY=%ESC%[90m"

echo %CYAN%==================================================
echo General Assembly Compilation Script
echo Usage: build.bat ^<filename.asm^>
echo Example: build.bat hello.asm  (supports Tab completion)
echo.
echo Add dependency declarations at the beginning of the .asm file:
echo   ; @libs: ws2_32.lib kernel32.lib
echo ==================================================%RESET%
echo.

if "%~1"=="" (
    echo %RED%[!] Error: Missing parameter%RESET%
    echo Usage: build.bat ^<filename.asm^>
echo Example: build.bat hello.asm
    exit /b 1
)

set "ASMFILE=%~1"
set "BASENAME=%~n1"
set "VCVARS=C:\Program Files\Microsoft Visual Studio\2022\Community\VC\Auxiliary\Build\vcvars64.bat"

echo %YELLOW%[*] Checking source file...%RESET%
if not exist "%ASMFILE%" (
    echo %RED%[!] Error: Cannot find %ASMFILE%%RESET%
    exit /b 1
)
echo %GRAY%    Source file: %ASMFILE%%RESET%
echo.

echo %YELLOW%[*] Initializing MSVC environment...%RESET%
call "%VCVARS%" >nul 2>&1
if errorlevel 1 (
    echo %RED%[!] Error: Cannot find Visual Studio%RESET%
    echo %RED%    Please modify the VCVARS path in the script%RESET%
    exit /b 1
)
echo %GRAY%    MSVC environment loaded%RESET%
echo.

echo %YELLOW%[*] Reading library dependencies...%RESET%
set "LIBS="
for /f "tokens=2* delims=:" %%a in ('findstr /i ";@libs:" "%ASMFILE%"') do (
    set "LIBS=%%a"
    goto :libs_found
)
:libs_found

set "BASIC_LIBS=kernel32.lib ucrt.lib libcmt.lib legacy_stdio_definitions.lib"

if not "!LIBS!"=="" (
    for /f "tokens=*" %%b in ("!LIBS!") do set "LIBS=%%b"

    set "FIRST_CHAR=!LIBS:~0,1!"
    if "!FIRST_CHAR!"=="!" (
        set "CUSTOM_LIBS=!LIBS:~1!"
        for /f "tokens=*" %%c in ("!CUSTOM_LIBS!") do set "CUSTOM_LIBS=%%c"

        if "!CUSTOM_LIBS!"=="" (
            echo %BLUE%    Mode: Disable all libraries%RESET%
            set "ALL_LIBS="
        ) else (
            echo %BLUE%    Mode: Use only specified libraries%RESET%
            echo %GRAY%    Libraries: !CUSTOM_LIBS!%RESET%
            set "ALL_LIBS=!CUSTOM_LIBS!"
        )
    ) else (
        echo %BLUE%    Mode: Basic libraries + extra libraries%RESET%
        echo %GRAY%    Extra libraries: !LIBS!%RESET%
        set "ALL_LIBS=!BASIC_LIBS! !LIBS!"
    )
) else (
    echo %BLUE%    Mode: Use basic libraries%RESET%
    set "ALL_LIBS=!BASIC_LIBS!"
)
echo.

echo %YELLOW%[*] Compiling %ASMFILE%...%RESET%
nasm -f win64 "%ASMFILE%" -o "%BASENAME%.obj"
if errorlevel 1 (
    echo %RED%[!] Compilation failed%RESET%
    exit /b 1
)
echo %GREEN%    ✓ Compilation successful%RESET%
echo.

echo %YELLOW%[*] Linking %BASENAME%.obj...%RESET%
if "!ALL_LIBS!"=="" (
    link /subsystem:console /entry:main /out:"%BASENAME%.exe" "%BASENAME%.obj" ^
         /machine:X64 /IGNORE:4210 >nul 2>&1
) else (
    link /subsystem:console /entry:main /out:"%BASENAME%.exe" "%BASENAME%.obj" ^
         !ALL_LIBS! /machine:X64 /IGNORE:4210 >nul 2>&1
)
if errorlevel 1 (
    echo %RED%[!] Linking failed, detailed errors below:%RESET%
    echo.
    if "!ALL_LIBS!"=="" (
        link /subsystem:console /entry:main /out:"%BASENAME%.exe" "%BASENAME%.obj" /machine:X64 /IGNORE:4210
    ) else (
        link /subsystem:console /entry:main /out:"%BASENAME%.exe" "%BASENAME%.obj" !ALL_LIBS! /machine:X64 /IGNORE:4210
    )
    del "%BASENAME%.obj" 2>nul
    exit /b 1
)
echo %GREEN%    ✓ Linking successful%RESET%
echo.

del "%BASENAME%.obj" 2>nul

echo %GREEN%========================================
echo [+] Compilation successful!
echo [+] Generated file: %BASENAME%.exe
echo ========================================%RESET%
echo.
echo %CYAN%Run the program: %BASENAME%.exe%RESET%
echo.
echo %YELLOW%[*] Program automatic run result:%RESET%
echo %GRAY%----------------------------------------%RESET%
%BASENAME%.exe
echo %GRAY%----------------------------------------%RESET%
Cleanup Script (Optional)
Create <span>clean.bat</span>:
@echo off
echo [*] Cleaning up compilation artifacts...
del /q *.obj *.exe 2>nul
echo [+] Cleanup complete
I have deleted a lot of content that I feel is not suitable for beginners~ I will keep it for my own research. I will leave two exercises:
- Modify hello.asm to make the program output your name, for example:
Hello, I am Zhang San!
- Multi-line output, write a program to output 3 lines of text:
Welcome to learn assembly language!
This is the second line
This is the third line
3. Create a simple program and use the general compilation script in Appendix A to compile it.
This concludes the first article~ I will supplement it later. Those in the group know that I have written about 13 articles in this series~ I will release them when I have time. Everyone remember to like and follow, give me a little motivation to keep going~ If no one is watching, I will stop updating~