Previously, I wrote a basic article on shellcoding, detailing the fundamentals of C++ shellcoding. Now, I will complete the advanced section. Without the knowledge from the basic article, understanding the advanced section can be quite difficult. With a foundation in shellcoding, one can gradually implement advanced features.
The main purpose of shellcoding is to prevent others from cracking it. To make it difficult for others to crack, I believe one must invest a significant amount of time and effort into instruction obfuscation, instruction virtualization, and other techniques. This can be quite mentally taxing and time-consuming. Here, I will discuss some quick-start anti-debugging techniques, with increasing difficulty levels.
Main Tools: VS2017, x64dbg, OD
Experimental Platform: Windows 10 64-bit
Implemented Features: Anti-debugging, IAT Encryption, Hash Encryption, Dynamic Decryption
1. Anti-Debugging
As the name suggests, anti-debugging is about preventing others from debugging the program. In the PEB structure, there is a BegingDebugged flag specifically used to detect whether the program is in a debugging state. If it is set to 1, it indicates that the program is being debugged. Let’s test the following program using VS2017:
#include "pch.h"
#include <iostream>
#include <windows.h>

// Anti-debugging 1
bool PEB_BegingDebugged()
{
    bool BegingDebugged = false;
    __asm
    {
        mov eax, fs:[0x30]; // Get PEB
        mov al, byte ptr ds : [eax + 0x2];// Get Peb.BegingDebugged
        mov BegingDebugged, al;
    }
    return BegingDebugged; // If 1, it indicates being debugged
}

int main()
{
    if (PEB_BegingDebugged())
    {
        MessageBoxA(0, "正在被调试", 0, 0);
        return 0;
    }
    std::cout << "Hello World!\n";
    getchar();
}
After typing the code, press Ctrl+F5 to run it directly, which will output Hello World! If you run the program in debug mode by pressing F5, an anti-debugging window will pop up, indicating that this method successfully detects whether it is being debugged!
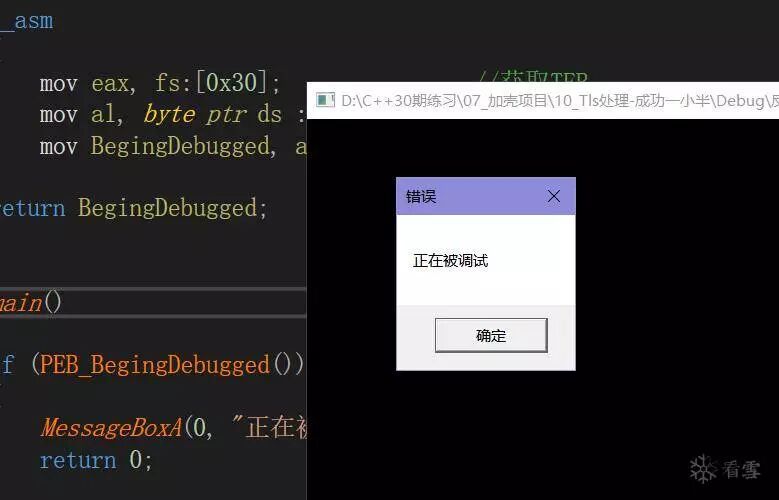
However, the bad news is that using certain forums’ OD to run this program still allows it to run normally, failing to detect the anti-debugging. Currently, most platforms’ OD have a plugin called StrongOD, which can eliminate all anti-debugging flags in the PEB! Therefore, the above method is essentially obsolete.
Thus, I will introduce a method that can also perform anti-debugging in OD. There is a function called NtQueryInformationProcess that can run in both ring 0 and ring 3. Its main purpose is to view various information related to processes, and we will use it to detect debugging.
We pass ProcessDebugPort as the second parameter. When the output query information is 0xFFFFFFFF, it indicates that this program is in a debugging state. The code is as follows:
#include "pch.h"
#include <iostream>
#include <windows.h>
#include <winternl.h>
#pragma comment(lib,"ntdll.lib")

// Anti-debugging 2
bool NQIP_ProcessDebugPort()
{
    int nDebugPort = 0;
    NtQueryInformationProcess(
        GetCurrentProcess(),// Target process handle
        ProcessDebugPort, // Type of information to query
        &nDebugPort, // Output queried information
        sizeof(nDebugPort), // Size of query type
        NULL);
    return nDebugPort == 0xFFFFFFFF ? true : false;
}

int main()
{
    if (NQIP_ProcessDebugPort())
    {
        MessageBoxA(0, "正在被调试", 0, 0);
        return 0;
    }
    std::cout << "Hello World!\n";
    getchar();
}
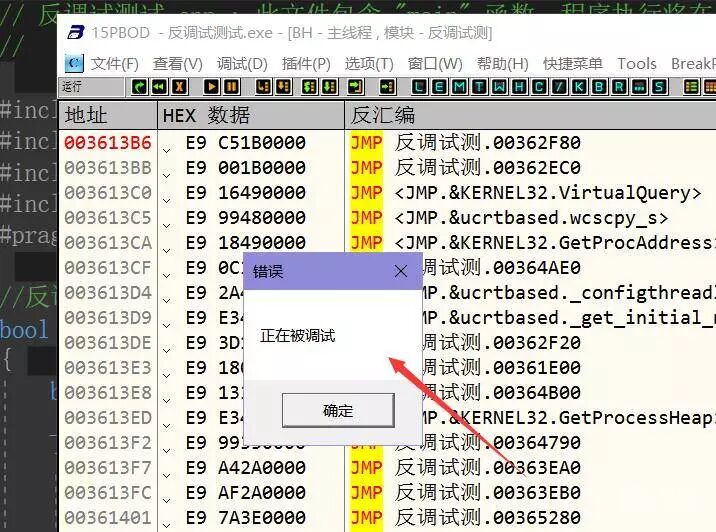
After compiling and generating the program, open it with OD and run it. A window will pop up, indicating successful anti-debugging. I have tested it with both 15PB’s OD and the one from Wuai Crack, and it works effectively. Having mastered the anti-debugging methods, we can place them in various corners of the shell code. If debugging is detected, the program will exit immediately. By placing several traps, we can increase the difficulty of cracking!
2. IAT Encryption
To perform IAT encryption, one must be familiar with PE files.
IAT refers to the Import Address Table, which is filled with function addresses after the program is loaded into memory. Using OD, open any EXE file; I will open QQ.exe and find the first HEX data starting with FF15, which is a CALL instruction. Right-click to view the memory address.
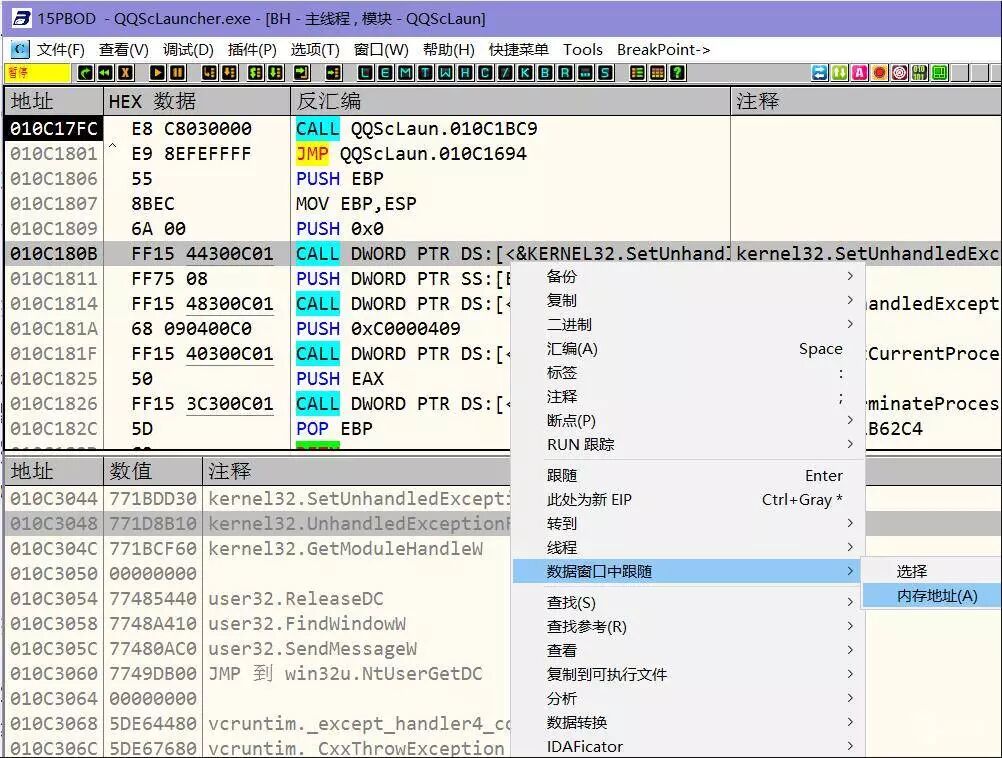
From the image, we can see that if the IAT is not encrypted, the disassembled code clearly shows which APIs are being used. The purpose of encryption is to ensure that even if a function is called, it is not immediately obvious which function is being called (with string hints).
The memory window shows the addresses of each element in the IAT, and the values column contains the data stored in the IAT, with comments explaining what API addresses they correspond to.
The principle of IAT encryption is as follows:
-
Traverse the import table to obtain the IAT address of each function (corresponding to the values in the memory column of the image above).
-
Retrieve the content at the IAT address, which is the function’s address (the value in the memory column of the image above), encrypt that function address to obtain a data value (I used XOR with a value of 0x13973575 for encryption).
-
Allocate a segment of memory to store the decrypted data to obtain the true address, and then call the code at that address.
-
Place the allocated memory address into the corresponding value of the IAT address. After completing the above steps, the IAT is encrypted. Of course, during step 3, appropriate obfuscation and instruction decoration can make it even harder for others to detect.
After encryption, if we check the disassembled code, there will be no string hints, and if we check the memory data at that address, there will also be no string annotations. The effect is shown below:
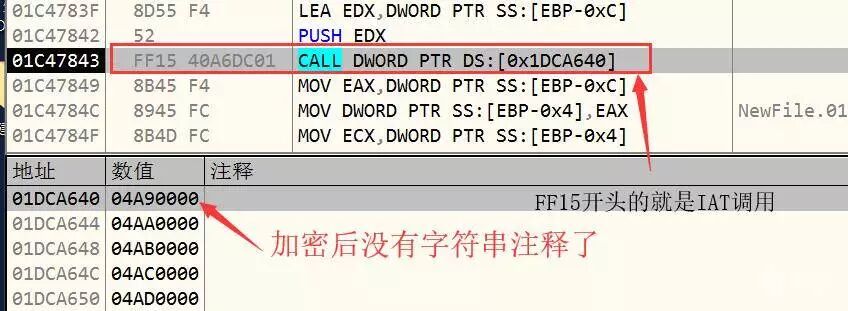
In the assembly window, press Ctrl+G and enter 04A90000 to view the code, which contains decorated instructions as shown below:
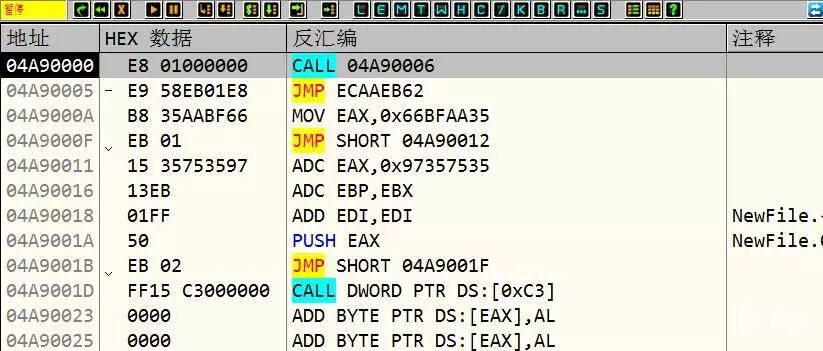
After removing the decorated instructions, the final assembly code successfully calls the actual function address, which is:
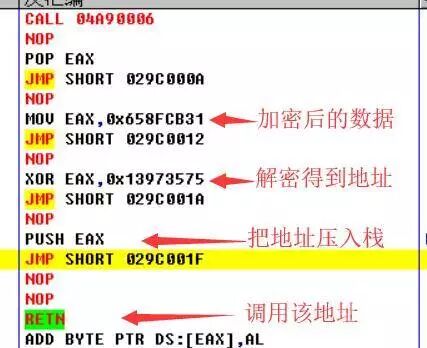
The specific operation is to decompress the shell code, decrypt it, and then perform IAT repair and encryption. I will not explain traversing the IAT code.
IAT encryption source code:
// Repair and encrypt IAT
void MendIAT()
{
    HMODULE hBase = (HMODULE)g_hModule;
    auto pImport = (PIMAGE_IMPORT_DESCRIPTOR)(g_Sc.dwImportRVA + (DWORD)hBase);

    // Outer loop to traverse modules
    while (pImport->Name)
    {
        // Get current module address
        HMODULE hModule = MyLoadLibraryExA((char*)(pImport->Name + (DWORD)hBase), 0, 0);
        if (pImport->FirstThunk)
        {
            // IAT address
            PDWORD IAT = PDWORD(pImport->FirstThunk + (DWORD)hBase);
            DWORD ThunkRva = 0;
            if (pImport->OriginalFirstThunk == 0)
                ThunkRva = pImport->FirstThunk;
            else
                ThunkRva = pImport->OriginalFirstThunk;
            PIMAGE_THUNK_DATA pThunk = (PIMAGE_THUNK_DATA)(ThunkRva + (DWORD)hBase);

            // Function name
            char * dwFunName = 0;
            // Inner loop to traverse functions in the module
            while (pThunk->u1.Ordinal)
            {
                // Ordinal import
                if (pThunk->u1.Ordinal & 0x80000000)
                {
                    dwFunName = (char*)(pThunk->u1.Ordinal & 0x7fffffff);
                }
                // Name import
                else
                {
                    PIMAGE_IMPORT_BY_NAME pImportByName = (PIMAGE_IMPORT_BY_NAME)
                    (pThunk->u1.Ordinal + (DWORD)hBase);
                    dwFunName = pImportByName->Name;
                }
                // Get each function's address
                DWORD dwFunAddr = (DWORD)SysGetProcAddress(hModule, dwFunName);
                // ** Encrypt function address **
                dwFunAddr ^= 0x13973575;
                LPVOID AllocMem = (PDWORD)MyVirtualAlloc(NULL, 0x20, MEM_COMMIT | MEM_RESERVE, PAGE_EXECUTE_READWRITE);

                // Construct a series of decorated instructions for decryption
                byte OpCode[] = { 0xe8, 0x01, 0x00, 0x00,
                    0x00, 0xe9, 0x58, 0xeb,
                    0x01, 0xe8, 0xb8, 0x8d,
                    0xe4, 0xd8, 0x62, 0xeb,
                    0x01, 0x15, 0x35, 0x75,
                    0x35, 0x97, 0x13, 0xeb,
                    0x01, 0xff, 0x50, 0xeb,
                    0x02, 0xff, 0x15, 0xc3 };
                // Write dwFunAddr into the decryption shellcode
                OpCode[11] = dwFunAddr;
                OpCode[12] = dwFunAddr >> 0x8;
                OpCode[13] = dwFunAddr >> 0x10;
                OpCode[14] = dwFunAddr >> 0x18;

                // Copy data to allocated memory
                MyRtlMoveMemory(AllocMem, OpCode, 0x20);

                // Modify protection attributes
                DWORD dwProtect = 0;
                MyVirtualProtect(IAT, 4, PAGE_EXECUTE_READWRITE, &dwProtect);
                // Fill the encrypted function address into the import address table
                *(IAT) = (DWORD)AllocMem;
                MyVirtualProtect(IAT, 4, dwProtect, &dwProtect);

                ++IAT;
                ++pThunk;
            }
        }
        ++pImport;
    }
}
3. Hash Encryption
Why perform hash encryption? Because during the reverse engineering process, string information is crucial for reverse engineers. If they see a string for an API function, they can easily deduce the general functionality of that code and crack it effortlessly. To prevent such events, hash encryption plays a significant role.
As is well known, 1 byte is 8 bits, which represents 2 to the power of 8 possibilities, or 256 different values. If we represent a piece of data as a function in a system (API), it is equivalent to assigning a number to the function. Thus, 1 byte can store information for 256 functions, while 2 bytes can store 2 to the power of 16, or 65536 API functions. This is excellent news, as there are only a few thousand API functions in the Windows system, making 2 bytes more than sufficient to store all API function information.
To represent a function with these 2 bytes of data, we call this data the hash value. Therefore, we need to design an algorithm. The method I designed is to define a 2-byte type (short) data, left shift the nHash value by 11 bits, right shift it by 5 bits, add them together, and then add the ASCII code of a character from the API function. This process is repeated for all characters in the API function to obtain the desired hash value.
In the previous basic shellcoding article, I mentioned that the API in the shell code is dynamically obtained. Therefore, using hash values during dynamic acquisition can further enhance concealment, making it harder for crackers to discover which function we intend to use.
The specific hash encryption code is as follows:
#include "pch.h"
#include <iostream>

int main()
{
    while (true)
    {
        // Variable to store hash value
        unsigned short nHash = 0;
        char arr[50] = {}, *p;
        p = arr;
        printf("请输入API: ");
        scanf_s("%s", arr, 50);
        while (*p)
        {
            // Left shift by 11 bits, right shift by 5 bits, add, then add ASCII of the character
            nHash = ((nHash << 11) | (nHash >> 5));
            nHash = nHash + *p;
            p++;
        }
        printf("Hash值为:0x%X\n", nHash);
    }
    return 0;
}
The usage method is to first use the above code to hash the API function we need, obtaining the hash value. Then, we write a function to compare the hash value with the string (decryption). Using this value and the system’s API functions, we can determine which function’s address to retrieve. This way, we have subtly obtained the address of the required function.
The hash decryption code is as follows, requiring two parameters: one is the address of the function to compare, and the other is the hash value:
/****************Hash Comparison************************************/
_Hash_CmpString://(char* strFunName, int nDigest)
    push ebp;
    mov ebp, esp;
    sub esp, 0x4;
    push ebx;
    push ecx;
    push edx;
    mov dword ptr[ebp - 0x4], 0;
    xor eax, eax;
    xor ecx, ecx;
    mov esi, [ebp + 0x8];// strFunName
_Start:
    mov al, [esi + ecx];
    test al, al;
    jz _End;
    mov edi, [ebp - 0x4];
    shl edi, 0xb; // 11 in hexadecimal is b
    mov edx, [ebp - 0x4];
    shr edx, 0x5;
    or edi, edx;
    add edi, eax;
    mov[ebp - 0x4], edi;
    inc ecx;
    jmp _Start;
_End:
    mov esi, [ebp + 0xc];// Get hash value
    and edi, 0xffff; // Get low 16 bits
    cmp edi, esi;// Compare hash
    mov eax, 0x1;
    je _Over;
    xor eax, eax;
_Over:
    pop edx;
    pop ecx;
    pop ebx;
    mov esp, ebp;
    pop ebp;
    ret 0x8;
The above code has significant optimization potential, but I am too lazy to do it.
With hash encryption and decryption, we can implement our own GetProcAddress function. After this, to obtain any API function, we can use our self-implemented GetProcAddress function, achieving a more concealed method of obtaining API functions. Once we master hash encryption and decryption, we will no longer be a novice.
The code is as follows, with parameter 1 being the base address of the required API module, and parameter 2 being the hash value: (pure assembly acquisition can better hone basic skills!)
// Custom GetProcAddress
DWORD MyGetProcAddress(HMODULE hModule, int nDigest)
{
    DWORD GetProcAddr = 0;
    __asm
    {
        jmp _Start_Fun;
        /***************** Custom GetProcAddress *************************************/
        _Fun_GetProcAddress://(dword ImageBase,int nDigest)
        push ebp;
        mov ebp, esp;
        sub esp, 0xc;
        push edx;// Save register
        push ebx;
        mov edx, [ebp + 0x8]; // DLL base address like kernel32
        mov esi, [edx + 0x3c]; // Dos header e_lfanew
        lea esi, [edx + esi]; // PE header VA (NT header)
        mov esi, [esi + 0x78]; // Import table RVA .AddressOfFunctions
        lea esi, [edx + esi]; // Import table VA
        mov edi, [esi + 0x1c]; // EAT RVA .AddressOfFunctions
        lea edi, [edx + edi]; // EAT VA
        mov[ebp - 0x4], edi; // Save EAT VA to local variable 1
        mov edi, [esi + 0x20]; // ENT RVA AddressOfNames
        lea edi, [edx + edi]; // ENT VA
        mov[ebp - 0x8], edi; // ENT VA -> Local2
        mov edi, [esi + 0x24]; // EOT RVA
        lea edi, [edx + edi]; // EOT VA
        mov[ebp - 0xc], edi; // EOT VA -> Local3

        xor ecx, ecx;
        jmp _First;
        _Begin:
        inc ecx;
        _First:
        mov esi, [ebp - 0x8];// ENT
        mov esi, [esi + ecx * 4];// EN RVA
        lea esi, [edx + esi];// EN VA
        push[ebp + 0xc];
        push esi;
        call _Hash_CmpString;
        test eax, eax;
        jz _Begin;// If not equal, loop

        mov esi, [ebp - 0xc];// EOT
        xor ebx, ebx;
        mov bx, [esi + ecx * 2];// Function corresponding ordinal

        mov esi, [ebp - 0x4];// EAT
        mov esi, [esi + ebx * 4];// EA RVA
        lea eax, [edx + esi];// Function address
        pop ebx;
        pop edx;
        mov esp, ebp;
        pop ebp;
        retn 0x8;

        /**************** Hash Comparison ************************************/
        _Hash_CmpString://(char* strFunName, int nDigest)
        push ebp;
        mov ebp, esp;
        sub esp, 0x4;
        push ebx;
        push ecx;
        push edx;
        mov dword ptr[ebp - 0x4], 0;
        xor eax, eax;
        xor ecx, ecx;
        mov esi, [ebp + 0x8];// strFunName
        _Start:
        mov al, [esi + ecx];
        test al, al;
        jz _End;
        mov edi, [ebp - 0x4];
        shl edi, 0xb;
        mov edx, [ebp - 0x4];
        shr edx, 0x5;
        or edi, edx;
        add edi, eax;
        mov[ebp - 0x4], edi;
        inc ecx;
        jmp _Start;
        _End:
        mov esi, [ebp + 0xc];// Get hash value
        and edi, 0xffff;
        cmp edi, esi;// Compare hash
        mov eax, 0x1;
        je _Over;
        xor eax, eax;
        _Over:
        pop edx;
        pop ecx;
        pop ebx;
        mov esp, ebp;
        pop ebp;
        ret 0x8;

        _Start_Fun:
        pushad;
        push nDigest;
        push hModule;
        call _Fun_GetProcAddress;
        mov GetProcAddr, eax;
        popad;
    }
    return GetProcAddr;
}
4. Dynamic Decryption
Incorporating dynamic decryption into the shell undoubtedly enhances its strength. It allows the shell to dynamically decrypt code segments after the target program starts running. It first runs a segment of code to decrypt part of the code, then executes the decrypted code, and this process can loop back and forth. This way, crackers can only see the code that is currently running and nearby, while the distant code remains encrypted, requiring a significant amount of time to crack. Of course, achieving such high strength requires a lot of time to design and a deep understanding of x86 assembly language. Here, I will share my understanding of dynamic decryption.
Below, I will analyze the dynamic decryption process based on a case study:
To demonstrate the effect conveniently, I wrote a piece of code in assembly using dynamic API acquisition in VS, which pops up a window. The effect is shown in the image:
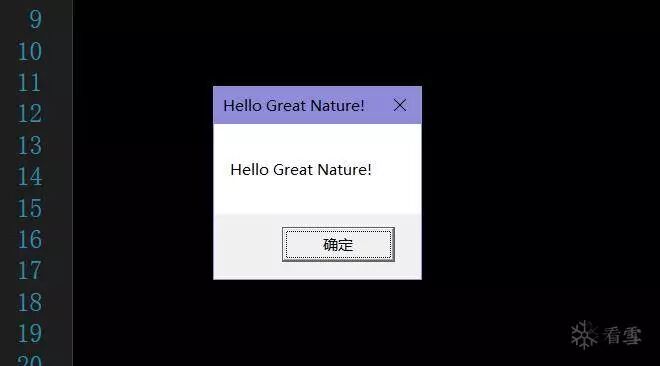
After generating the EXE file, open it with 0x32dbg (or OD) and find the assembly code for the pop-up function. Extract the hexadecimal bytes of that code. The extraction operation is done in x32dbg by selecting the code segment, right-clicking -> Copy -> Data -> C-style ShellCode string.
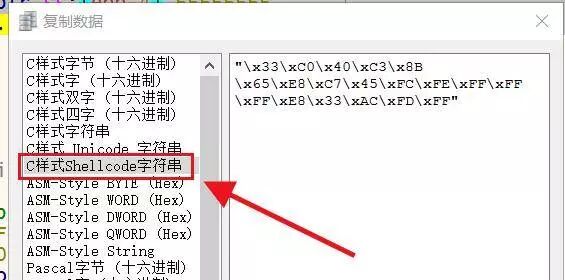
In OD, select the code, right-click -> Data Conversion -> C++ -> Bytes.
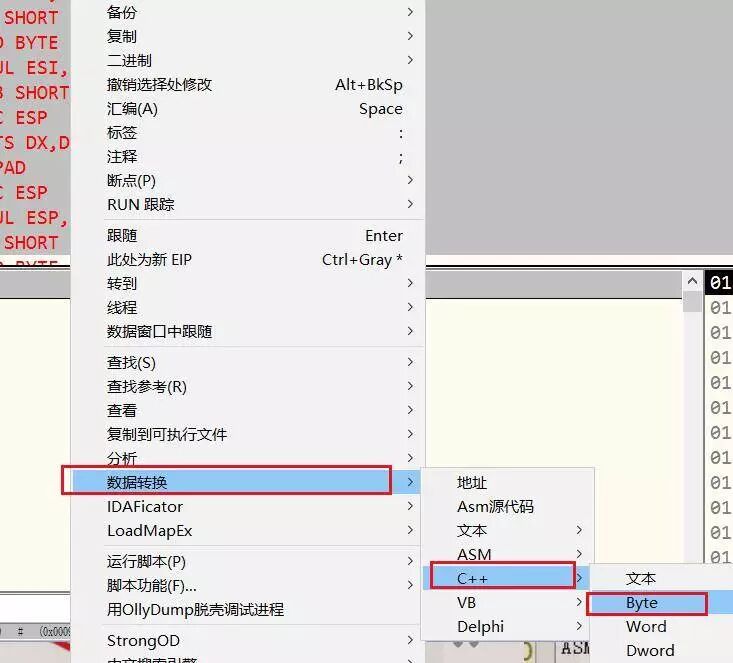
Store these bytes in a string array; you can directly use mine:
char ShellCode[] = "\x60\x83\xEC\x60\xEB\x55\x4D\x65\x73\x73\x61\x67\x65\x42\x6F\x78\x41\x00\x45\x78\x69\x74\x50\x72\x6F\x63\x65\x73\x73\x00\x4C\x6F\x61\x64\x4C\x69\x62\x72\x61\x72\x79\x45\x78\x41\x00\x47\x65\x74\x50\x72\x6F\x63\x41\x64\x64\x72\x65\x73\x73\x00\x75\x73\x65\x72\x33\x32\x2E\x64\x6C\x6C\x00\x48\x65\x6C\x6C\x6F\x20\x47\x72\x65\x61\x74\x20\x4E\x61\x74\x75\x72\x65\x21\x00\xD9\xEE\xD9\x74\x24\xF4\x5A\x64\x8B\x35\x30\x00\x00\x00\x8B\x76\x0C\x8B\x76\x1C\x8B\x36\x8B\x5E\x08\x52\x53\xE8\x5A\x00\x00\x00\x8B\xC8\x51\x52\x8D\x42\xC3\x50\x53\xFF\xD1\x5A\x59\x52\x50\x51\x53\xE8\x01\x00\x00\x00\x61\x55\x8B\xEC\x83\xEC\x0C\x8B\x55\x14\x33\xC9\x8D\x72\xE1\x51\x51\x56\xFF\x55\x10\x8B\x55\x14\x8D\x4A\xAB\x51\x50\xFF\x55\x0C\x33\xC9\x8B\x55\x14\x8D\x5A\xEC\x51\x53\x53\x51\xFF\xD0\x8B\x55\x14\x8D\x72\xB7\x56\xFF\x75\x08\xFF\x55\x0C\x51\xFF\xD0\x8B\xE5\x5D\xC2\x10\x00\x55\x8B\xEC\x83\xEC\x0C\x52\x53\x8B\x55\x08\x8B\x72\x3C\x8D\x34\x32\x8B\x76\x78\x8D\x34\x32\x8B\x7E\x1C\x8D\x3C\x3A\x89\x7D\xFC\x8B\x7E\x20\x8D\x3C\x3A\x89\x7D\xF8\x8B\x7E\x24\x8D\x3C\x3A\x89\x7D\xF4\x33\xC0\xEB\x01\x40\x8B\x75\xF8\x8B\x34\x86\x8D\x34\x32\x8B\x5D\x0C\x8D\x7B\xD2\xB9\x0E\x00\x00\x00\xF3\xA6\x75\xE7\x8B\x75\xF4\x33\xDB\x66\x8B\x1C\x46\x8B\x75\xFC\x8B\x34\x9E\x8D\x04\x32\x5B\x5A\x8B\xE5\x5D\xC2\x08\x00";In 0x32dbg (or OD), selecting the assembly code segment will display the size of the selected bytes in the lower right corner.
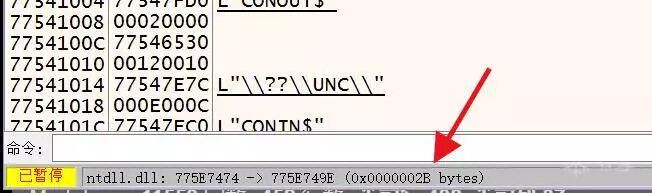
Next, write a code to encrypt this string. When compiling, configure the project properties in VS to disable security checks under “C/C++ -> Code Generation -> Security Check (Disable GS)” and turn off Data Execution Protection (DEP) under “Linker -> Advanced”.
// Encryption function
void Encoder(char* pData, int nSize)
{
    // Encryption key
    int nOutKey = 0x15;
    // Buffer for encrypted data
    unsigned char* pBuffer = NULL;
    pBuffer = (unsigned char*)new char[nSize + 1];
    // Encrypt each byte
    for (int j = 0; j < nSize; j++)
    {
        pBuffer[j] = pData[j] ^ nOutKey;
    }
    // Print each byte
    for (int i = 0; i < nSize; i++)
    {
        printf("\\x%02X",pBuffer[i]);
    }
}

int main()
{
    // Call ShellCode to check if it runs normally
    __asm {
        lea eax, ShellCode;
        push eax;
        ret;
    }
    // Encrypt
    Encoder(ShellCode, 257);
    getchar();
}
After encryption, a byte array will be generated. We copy it and store it in another array, then place it at the end of the decryption code.
Now, let’s write the decryption code, which is the core of dynamic decryption.
Here, I want to mention the GetPC technique, which translates to obtaining the pointer counter in Chinese. In x86 assembly, this is essentially the technique for obtaining the current code EIP. I use the call instruction, where the call xxx instruction pushes the next line’s EIP + jmp xxx. By directly modifying XXX to the address of the next line of instructions, we can obtain the current EIP. The inline assembly code is as follows:
// Decryption function
__asm {
    call _Next;// Jump to the next line and push EIP onto the stack
    _Next:
    pop eax;// Get current EIP
    lea esi, [eax + 0x22];// Generate the length of the decryption code from the previous line to the last line in OD
    xor ecx, ecx;
    mov cx, 0x13e;// Length of bytes to decrypt
    _DeCode:
    mov al, byte ptr ds : [esi + ecx];
    xor al, 0x15; // Decryption key
    mov byte ptr ds : [esi + ecx], al;
    loop _DeCode;
    xor[esi + ecx], 0x15;
    jmp esi;
}
It is important to note that this code must be closely followed by the encrypted code.
In actual shell code, after encrypting the required code, we assemble it with the decryption code to achieve dynamic decryption functionality.

– End –

Kanxue ID: Jiuyang Daoren
https://bbs.pediy.com/user-847228.htm
This article is original by Jiuyang Daoren from Kanxue Forum
Please indicate the source from Kanxue Community when reprinting
Popular Book Recommendations
Click Buy Now!
Popular Articles
1. Implementing Xposed Native Injection in Art Mode
2. Simple Reverse Analysis of Base64 (Part 2)
3. Introduction to Attacking Routers Using RouterSploit

Official WeChat ID: ikanxue
Official Weibo: Kanxue Security
Business Cooperation: [email protected]
↙ Click “Read the original text” below to see more valuable content