Recently, CLion has become free for non-commercial use, so I immediately downloaded the latest CLion 2025. Now, I will set up the CLion + GCC + CMake development environment for the domestic Wuhan Xinyuan Semiconductor’s CW32 microcontroller.
CLion is a cross-platform integrated development environment (IDE) developed by JetBrains, specifically designed for C and C++. It is known for its intelligent coding assistance, user-friendly project management, and powerful built-in tools (such as debuggers, static analysis tools, and unit testing frameworks), supporting remote collaboration and embedded development.
As an embedded engineer, I found that the coding experience in CLion is significantly better than in Keil (MDK), but when debugging external microcontrollers with external debuggers, it is indeed not as powerful as Keil (MDK).
Below is a table comparing the main differences:
(Source: https://gitee.com/lcsc/skystar-board-templates development documentation)
Feature
CLion
Keil MDK
Platform Support
🤩Cross-platform (Windows, macOS, Linux)
🙁 Mainly supports Windows
User Interface
🤩Modern, friendly, provides code auto-completion, smart hints, etc.
🙁 Traditional interface, weaker auto-completion, mainly focused on debugging and simulation
Debugging Features
🙁 Supports GDB debugging, but far less powerful than Keil MDK, and cannot even refresh variable and register values in real-time.
🤩Provides extremely powerful online debugging features, including real-time debugging and hardware breakpoints, with real-time refresh of all variables, and after connecting to the SWO pin, variables can be directly added to the software logic analyzer to view curves.
CMake Support
🤩Comprehensive built-in support, can also link to your installed version
🙁 Does not support CMake
Code Analysis and Refactoring
🤩Powerful code analysis and refactoring tools
🙁 Limited code analysis and refactoring features
Version Control
🤩Closely integrated with Git and other version control systems
🙁 Basic version control support, but users can use Git control themselves
Open Source Toolchain Support
🤩Supports various open-source toolchains (such as GCC, arm-none-eabi-gcc)
🙁 Mainly relies on Keil’s toolchain, compilers include AC5, AC6, etc.
Plugins and Extensibility
🤩Supports a large number of plugins and extensions, customizable functionality
🙁 Relatively few plugins, limited extensibility
Embedded Chip Support
🙁 Limited support for specific chips, such as domestic ARM series microcontrollers cannot directly generate projects.
🤩Optimized and supported for Arm Cortex-M series chips, almost all microcontroller manufacturers at home and abroad provide support packages for this environment.
Learning Curve
🙁 Using CMake and CLion requires a certain learning curve, and setting up the environment is a problem for beginners.
🤩Configuration tools and development environments are relatively easy to get started with, one-stop solution.
1. Software and Hardware Used for Environment Setup
1.1 Software Environment
1. Windows 10
2. CLion 2025 (Download link: https://www.jetbrains.com/clion/ download and install yourself)
3. GNU Arm Embedded Toolchain cross-compiler
4. Mingw-w64 GCC for Windows 64
5. CMake (comes with CLion by default)
1.2 Hardware Environment
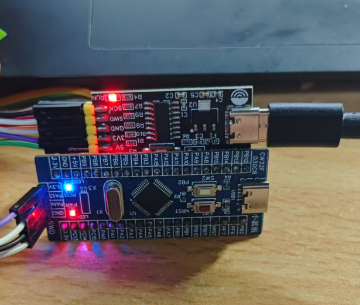
1. CW32F030 core board
2. WCH-Link DAP
2. Software Installation and Configuration
2.1 GNU Arm Embedded Toolchain Cross-Compiler
arm-none-eabi-gcc is a cross-compilation toolchain designed specifically for ARM architecture microcontrollers. The term “cross-compilation” refers to the process where the compilation occurs on one platform (such as your Windows or Linux development host), but the generated binary code is intended to run on another platform (such as ARM Cortex-M microcontrollers). The “none-eabi” part means that the generated code does not depend on any operating system and is suitable for running directly on hardware. For comparison, this arm-none-eabi-gcc is actually comparable to the AC5 and AC6 compilers in Keil (MDK). Overall, we mainly use this for compiling ARM architecture embedded system code, generating binary files that can run directly on ARM microcontrollers.
Go to the ARM developer website, scroll down to select and download the available ZIP compressed file (Of course, everyone can directly download the latest version, the current version used is not the latest)
Download link: Downloads | GNU Arm Embedded Toolchain Downloads – Arm Developer
https://developer.arm.com/downloads/-/gnu-rm
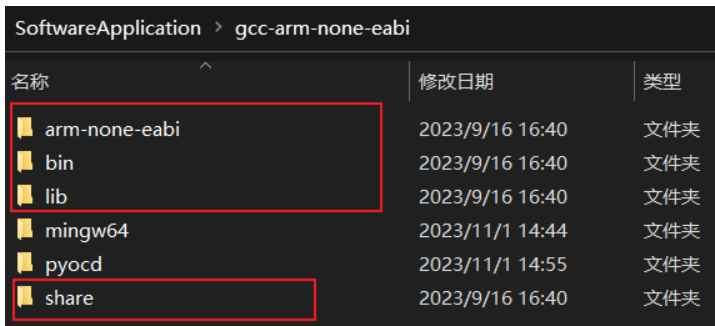
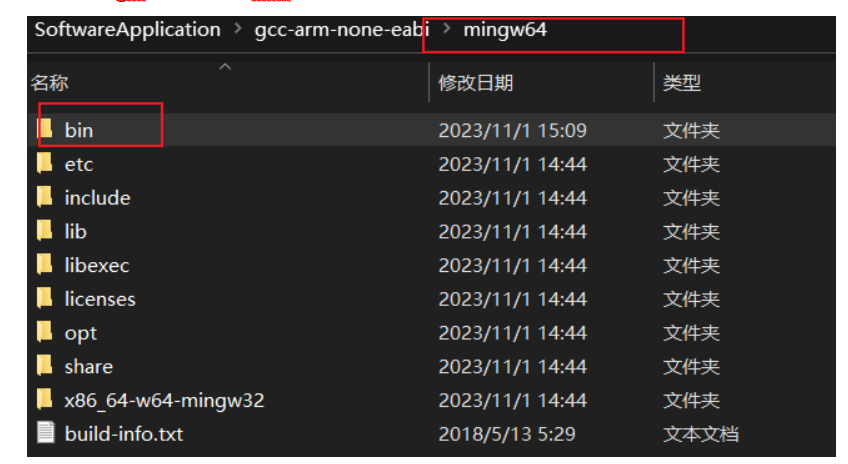
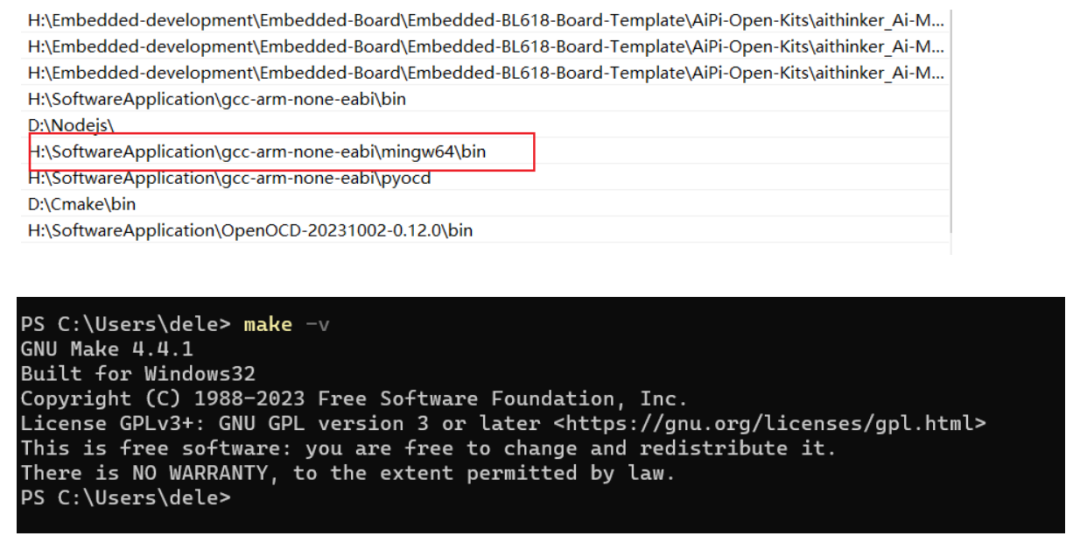
After downloading, extract the compressed file into the “gcc-arm-none-eabi” folder, and remember the path of the “bin” folder inside, as it needs to be added to the system environment variable Path later.
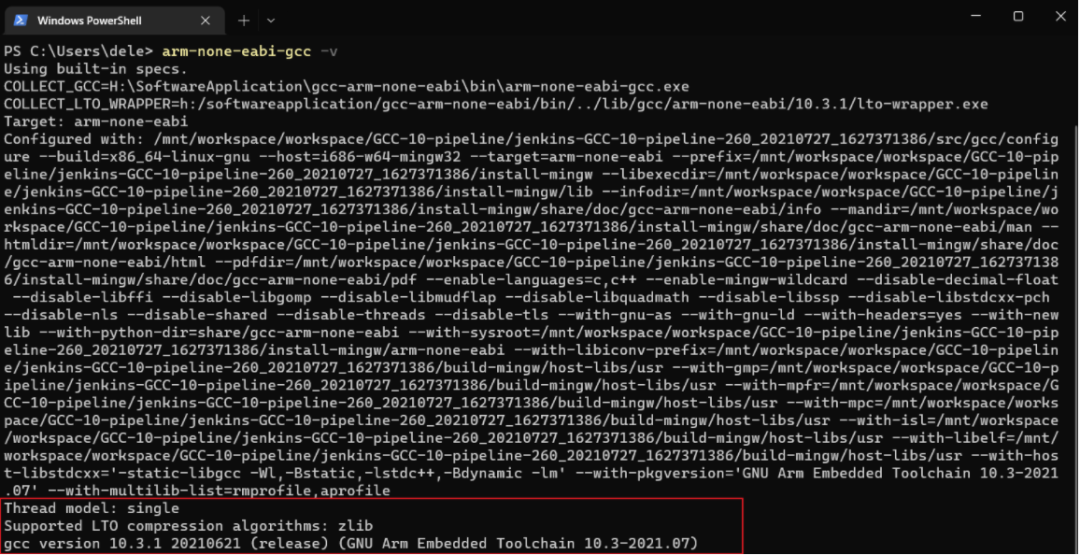
After adding the environment variable, perform a test to check if it is installed correctly.
2.2 Install Mingw-w64 GCC
MinGW is a compilation toolset used to compile and run applications on Windows. It supports compiling standard C/C++ code and is suitable for developing software that runs on the Windows platform.
Click the link to go to the SourceForge website, scroll down to find many versions of download links, and select the model in the red box. For specific differences between different prefixes and suffixes, please refer to
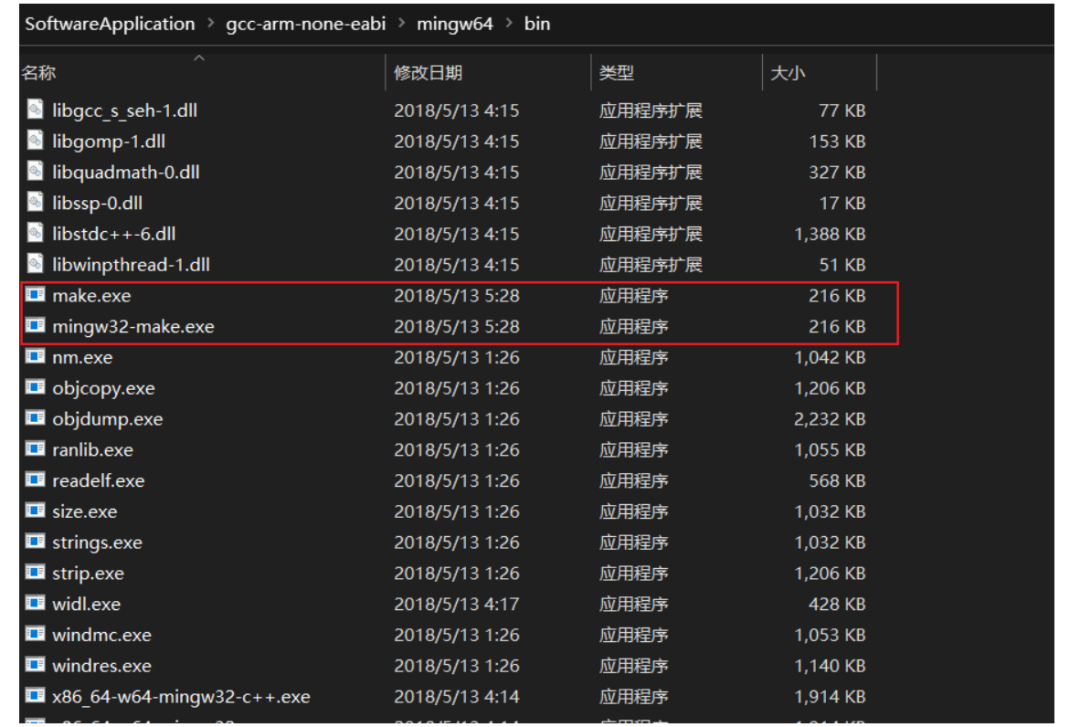
Similarly, extract the downloaded file into the “gcc-arm-none-eabi” folder, and remember the path of the “bin” folder.
Inside the “bin” folder, find the “mingw32-make” application file, copy it and rename it to “make”. This makes it easier to execute the make command in the command line without typing mingw32-make.
After adding the environment variable, perform a test to check if it is installed correctly.
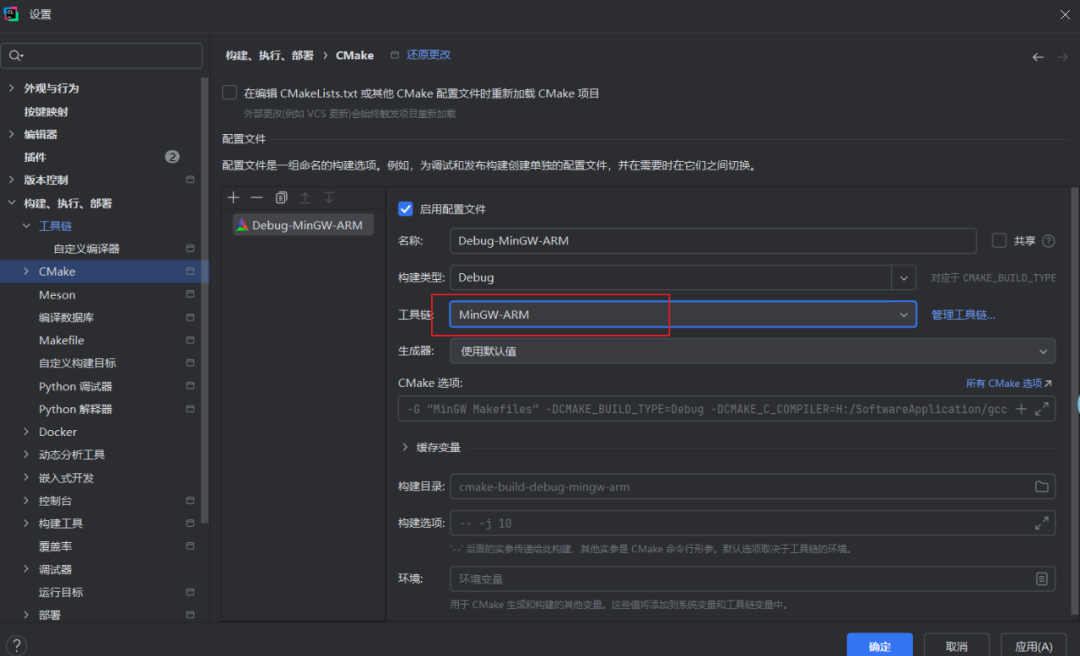
2.3 Configure CLion Toolchain
Next, start configuring the toolchain. Select the section in Settings under Build, Execution, Deployment and click on Toolchains, then click Add to create a new toolchain configuration. I named mine MinGW-ARM. The reason for not using the default configuration is to prevent affecting the compilation and execution of ordinary C programs. When developing ARM series microcontrollers, select the MinGW-ARM configuration, and when developing ordinary C programs, select MinGW.
Then switch to the CMake section and confirm that the current Toolchain configuration value is set to the MinGW-ARM we set above, and then you can click the OK button below to save the settings.
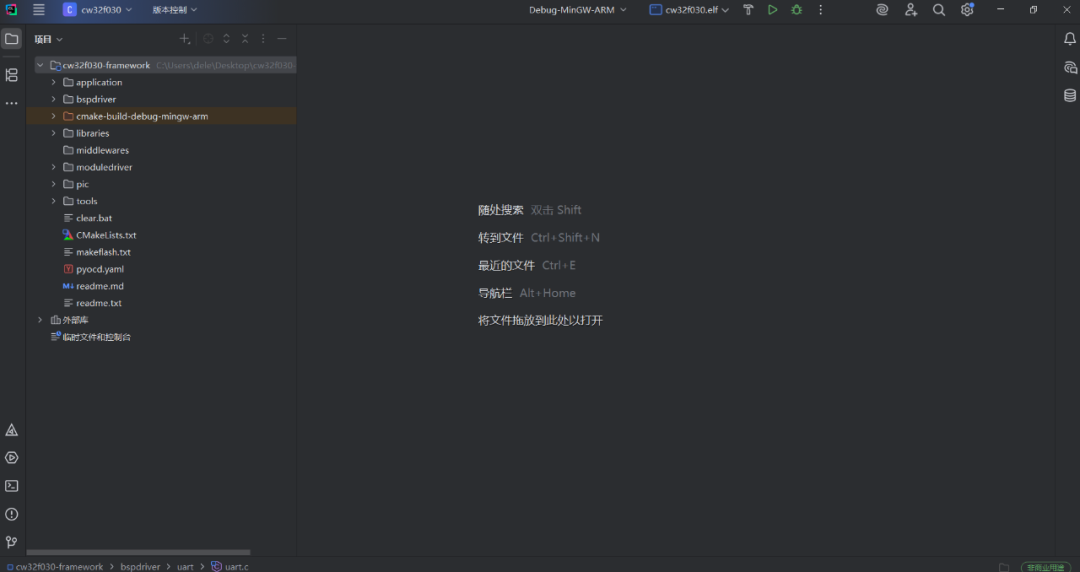
3. Creating Project Templates
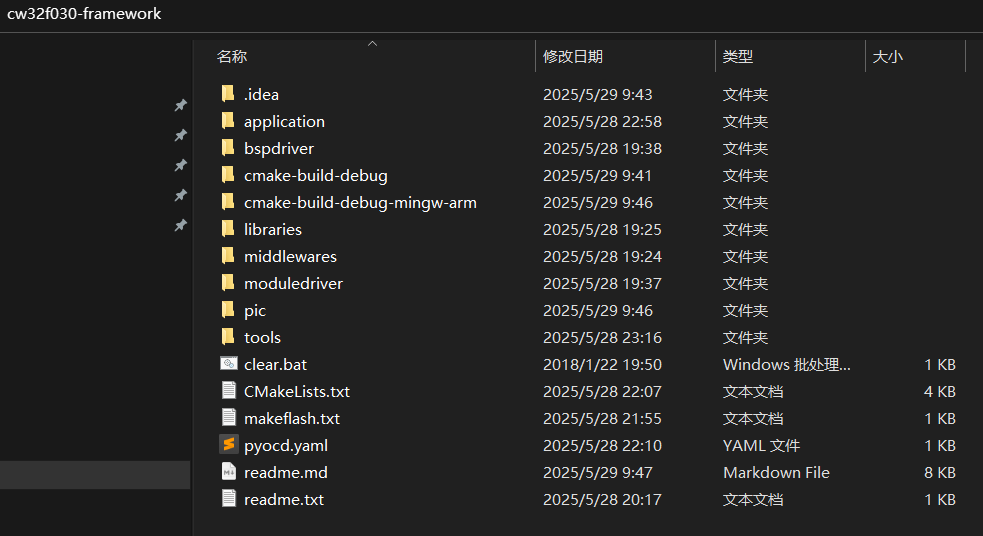
1. Project File Directory
• <span>application/</span> Application layer code, including the main program <span>app_main.c</span>, <span>interrupts_cw32f030.c</span>, etc.
• <span>bspdriver/</span> Board Support Package (BSP), such as clock, delay, timer, onboard resource initialization, etc.
• <span>moduledriver/</span> Common module drivers, such as LED drivers, button drivers, etc.
• <span>middlewares/</span> Common middleware libraries (such as FreeRTOS, log, Multitimer, SoftTimer, etc.).
• <span>tools/</span> Startup files, linker scripts, DAP configuration, and other tool files.
Note: The startup files and linker scripts are not provided officially; they are written based on other F030 series chips. Here, I hope the official can support GCC in the future.
Startup file startup_cw32f030_gcc.s
Linker script CW32F030x_FLASH.ld
2. Writing CMakeLists.txt file (Key Point)
cmake_minimum_required(VERSION 3.20)
set(CMAKE_SYSTEM_NAME Generic)
set(CMAKE_SYSTEM_VERSION 1)

# Specify cross-compilation toolchain
set(CMAKE_C_COMPILER arm-none-eabi-gcc)
set(CMAKE_CXX_COMPILER arm-none-eabi-g++)
set(CMAKE_ASM_COMPILER arm-none-eabi-gcc)
set(CMAKE_AR arm-none-eabi-ar)
set(CMAKE_OBJCOPY arm-none-eabi-objcopy)
set(CMAKE_OBJDUMP arm-none-eabi-objdump)
set(SIZE arm-none-eabi-size)
set(CMAKE_TRY_COMPILE_TARGET_TYPE STATIC_LIBRARY)

# Project settings
project(cw32f030 C CXX ASM)  # Modify project name
set(CMAKE_CXX_STANDARD 17)
set(CMAKE_C_STANDARD 11)
# Note to modify the cortex core type for different MCU
set(MCPU cortex-m0plus)  # TODO: Modify core type according to actual MCU, e.g., cortex-m4

# Floating-point options configuration
# Uncomment to enable hardware floating point
#add_compile_definitions(ARM_MATH_CM4;ARM_MATH_MATRIX_CHECK;ARM_MATH_ROUNDING)
#add_compile_options(-mfloat-abi=hard -mfpu=fpv4-sp-d16)
#add_link_options(-mfloat-abi=hard -mfpu=fpv4-sp-d16)

# Uncomment to enable software floating point
add_compile_options(-mfloat-abi=soft)

# General compilation options
add_compile_options(-mcpu=${MCPU} -mthumb -mthumb-interwork -specs=nosys.specs)
add_compile_options(-ffunction-sections -fdata-sections -fno-common -fmessage-length=0)

# Uncomment to eliminate C++17 absolute address warnings
#set(CMAKE_CXX_FLAGS "${CMAKE_CXX_FLAGS} -Wno-register")

# Set optimization level based on build type
if ("${CMAKE_BUILD_TYPE}"STREQUAL"Release")
    message(STATUS "Maximum optimization for speed")
    add_compile_options(-Ofast)
elif ("${CMAKE_BUILD_TYPE}"STREQUAL"RelWithDebInfo")
    message(STATUS "Maximum optimization for speed, debug info included")
    add_compile_options(-Ofast -g)
elif ("${CMAKE_BUILD_TYPE}"STREQUAL"MinSizeRel")
    message(STATUS "Maximum optimization for size")
    add_compile_options(-Os)
else ()
    message(STATUS "Minimal optimization, debug info included")
    add_compile_options(-Og -g)
endif ()

# Include header file directories - can be modified
include_directories(
        application/
        bspdriver/adc/
        bspdriver/delay/
        bspdriver/rcc/
        bspdriver/timer/
        bspdriver/uart/
        moduledriver/button/
        moduledriver/beep/
        moduledriver/dht11/
        moduledriver/lcd/
        moduledriver/led/
        moduledriver/oled/
        libraries/cmsis/device/
        libraries/cmsis/include/
        libraries/drivers/inc/
        middlewares/
)

# Define preprocessor macros
add_definitions(
#        -D USE_STDPERIPH_DRIVER  # Use standard peripheral driver
)

# Collect source files - can be modified
file(GLOB_RECURSE SOURCES
        "tools/startup_cw32f030_gcc.s"# Startup file
        "application/*.c"
        "bspdriver/adc/*.c"
        "bspdriver/delay/*.c"
        "bspdriver/rcc/*.c"
        "bspdriver/timer/*.c"
        "bspdriver/uart/*.c"
        "moduledriver/button/*.c"
        "moduledriver/beep/*.c"
        "moduledriver/dht11/*.c"
        "moduledriver/lcd/*.c"
        "moduledriver/led/*.c"
        "moduledriver/oled/*.c"
        "libraries/drivers/src/*.c"
)

# Linker script configuration
set(LINKER_SCRIPT ${CMAKE_SOURCE_DIR}/tools/CW32F030x_FLASH.ld)
add_link_options(-Wl,-gc-sections,--print-memory-usage,-Map=${PROJECT_BINARY_DIR}/${PROJECT_NAME}.map)
add_link_options(-mcpu=${MCPU} -mthumb -mthumb-interwork --specs=nosys.specs)
add_link_options(-T ${LINKER_SCRIPT})

# Generate ELF executable file
add_executable(${PROJECT_NAME}.elf ${SOURCES}${LINKER_SCRIPT})

# Generate HEX and BIN files
set(HEX_FILE ${PROJECT_BINARY_DIR}/${PROJECT_NAME}.hex)
set(BIN_FILE ${PROJECT_BINARY_DIR}/${PROJECT_NAME}.bin)

# Post-build processing: generate hex and bin files
add_custom_command(TARGET${PROJECT_NAME}.elf POST_BUILD
        COMMAND${CMAKE_OBJCOPY} -Oihex $<TARGET_FILE:${PROJECT_NAME}.elf> ${HEX_FILE}
        COMMAND${CMAKE_OBJCOPY} -Obinary $<TARGET_FILE:${PROJECT_NAME}.elf> ${BIN_FILE}
        COMMENT "Building ${HEX_FILE}
Building ${BIN_FILE}")
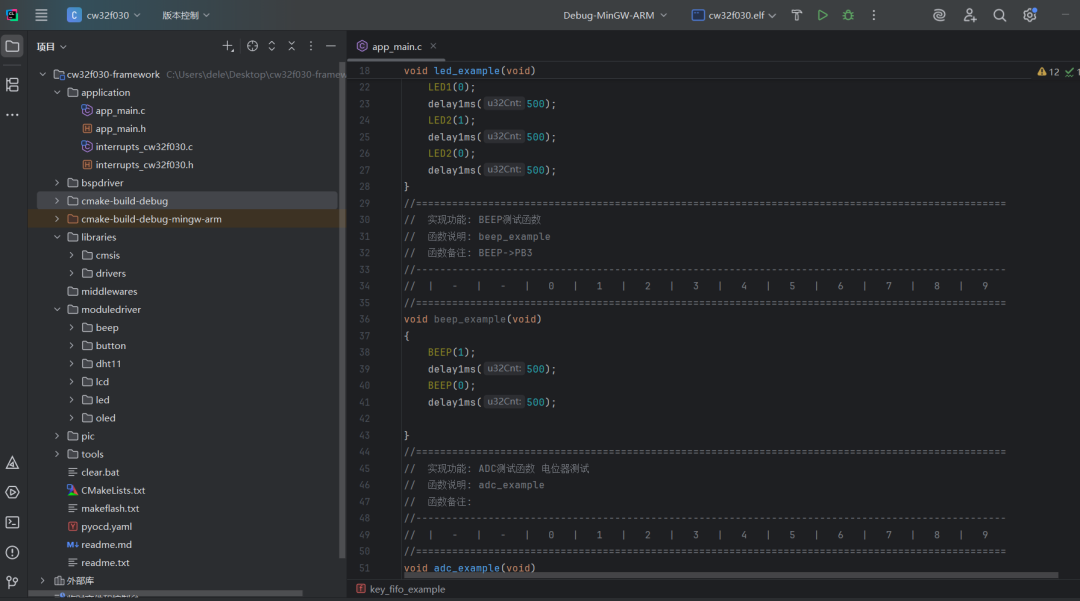
3. Open the project
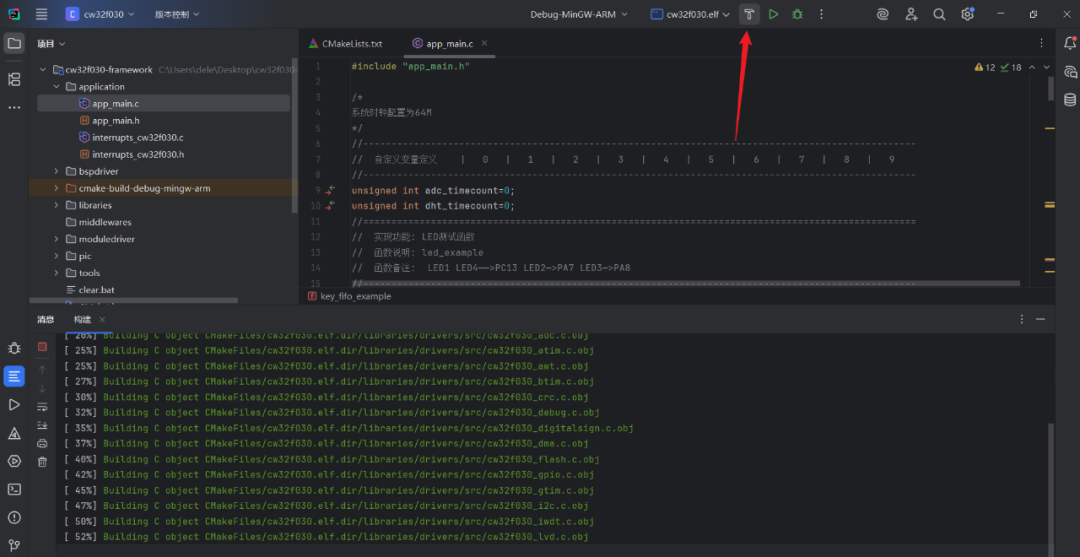
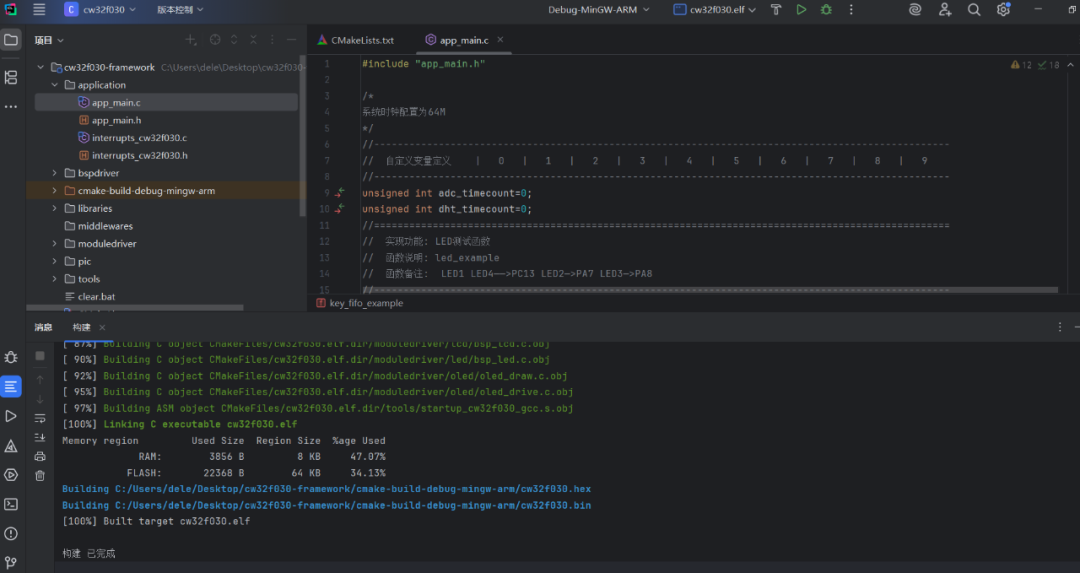
4. Compile Code
5. Points to Note
In Keil (MDK), the compiler used is <span>ARMCC (AC5 or AC6)</span>, while the compiler used in CLion is <span>arm-none-eabi-gcc</span>. The redirection operations for <span>printf</span> are different between the two. The contents of the <span>stdio.h</span> file referenced in Keil and CLion are not the same. In Keil, you only need to add a serial output in the <span>fputc</span> function, while in CLion, you also need to redirect the serial port.
#ifdef __GNUC__
    /* With GCC/RAISONANCE, small printf (option LD Linker->Libraries->Small printf
    set to 'Yes') calls __io_putchar() */
    #define PUTCHAR_PROTOTYPE int __io_putchar(int ch)
#else
    #define PUTCHAR_PROTOTYPE int fputc(int ch, FILE *f)
#endif /* __GNUC__ */

/**
 * @brief Retargets the C library printf function to the USART.
 *
 */
PUTCHAR_PROTOTYPE
{
    USART_SendData_8bit(DEBUG_USARTx, (uint8_t)ch);

    while (USART_GetFlagStatus(DEBUG_USARTx, USART_FLAG_TXE) == RESET);

    return ch;
}

/*!*
* @brief       Redirect C Library function printf to serial port.
*              After Redirection, you can use printf function.
*
* @param       file:  Meaningless in this function.
*
* @param       *ptr:  Buffer pointer for data to be sent.
*
* @param       len:  Length of data to be sent.
*
* @retval      The characters that need to be send.
*
* @note
*/
int _write(int file, char* ptr, int len)
{
    int i;
    for (i = 0; i < len; i++)
    {
        __io_putchar(*ptr++);
    }

    return len;
}
4. Downloading Programs
Downloading programs and debugging code in CLion is currently not as convenient as in IAR or MDK. For chips like STM32, the ecosystem is relatively mature and well-supported, but for domestic chips, CLion’s support is quite limited. Although CLion supports downloading and debugging code via OpenOCD, OpenOCD currently does not support CW32 chips. I hope that the official can add support for it in the future, or that some technical experts in the community can attempt to adapt it.
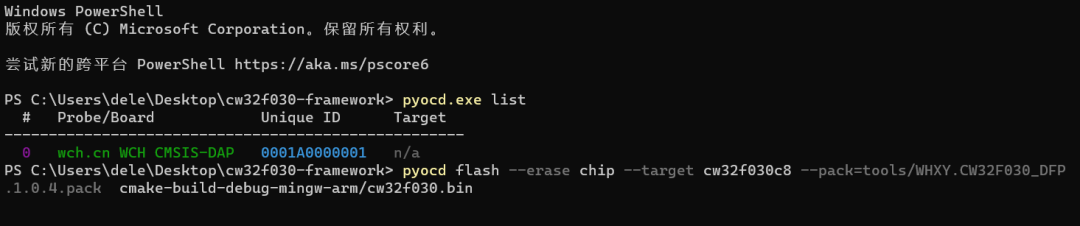
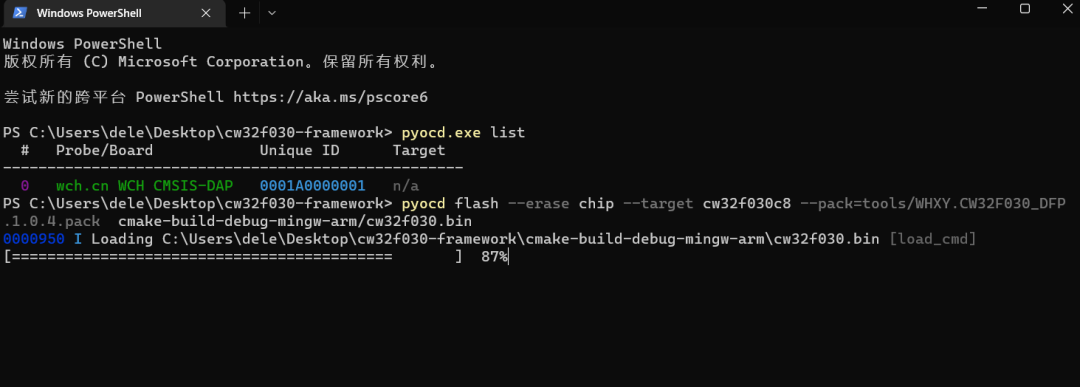
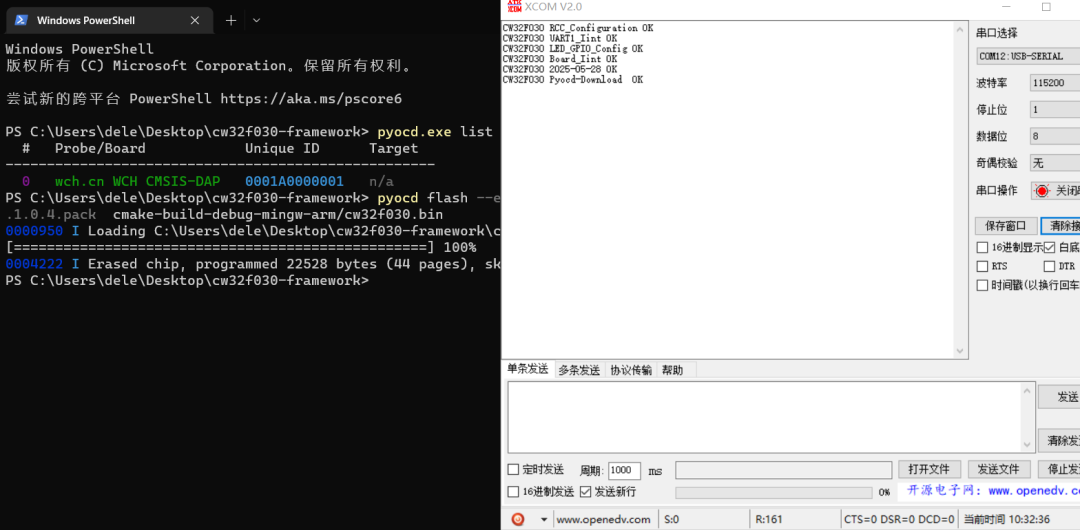
The downloader used is the WCH-Link provided by Wuhan Chip Semiconductor. After configuring the downloader in MDK – ARM, you can directly download. Since this time the GCC toolchain is used for compilation, you can use the official hex/bin file downloader or OpenOCD or PyOCD. Since OpenOCD does not support CW32 chips, I found through online searches that PyOCD can be used to download CW32 code. Of course, there are many ways to download code to the chip. Next, I will focus on introducing a few software tools I have recently encountered and recommend them.
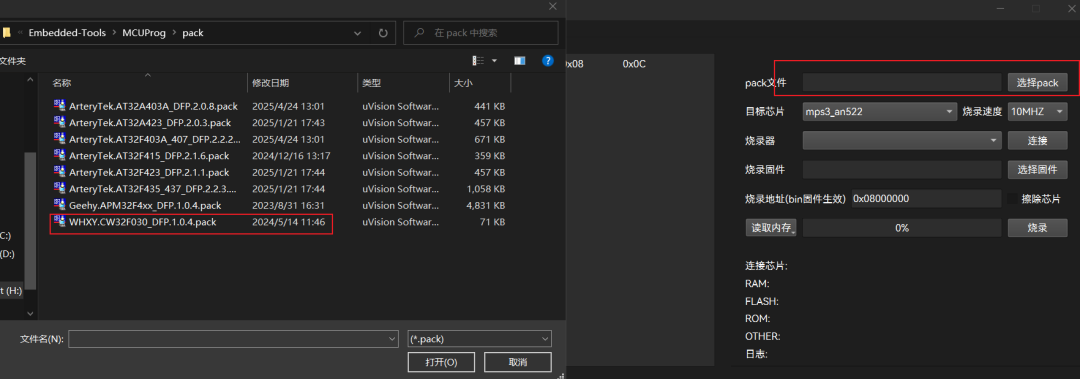
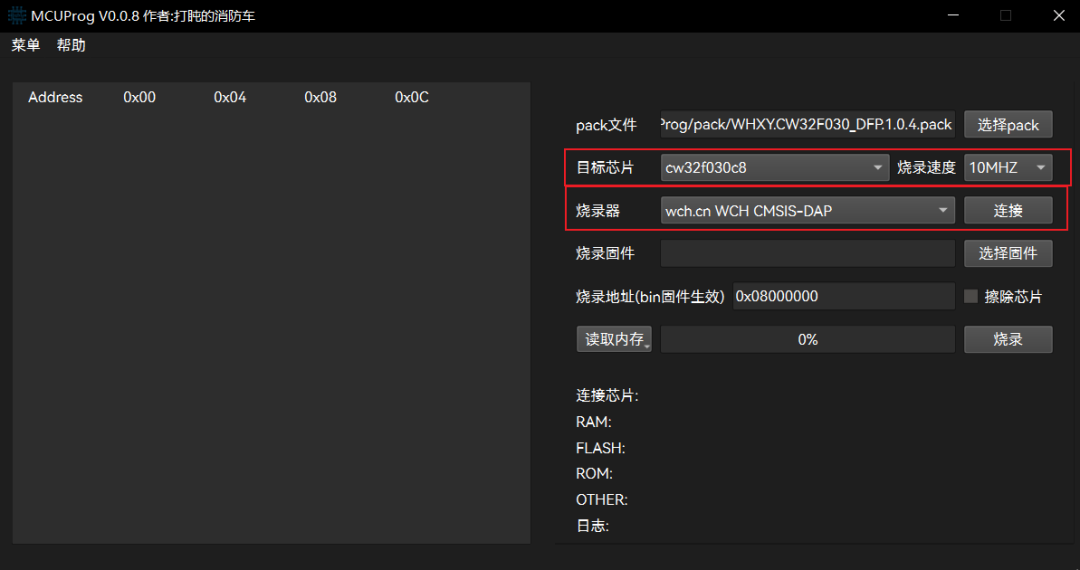
Using PyOCD for downloading generally involves command line input, but this time we chose an open-source DAP-Link, PyOCD visual download tool, which is very convenient and straightforward.
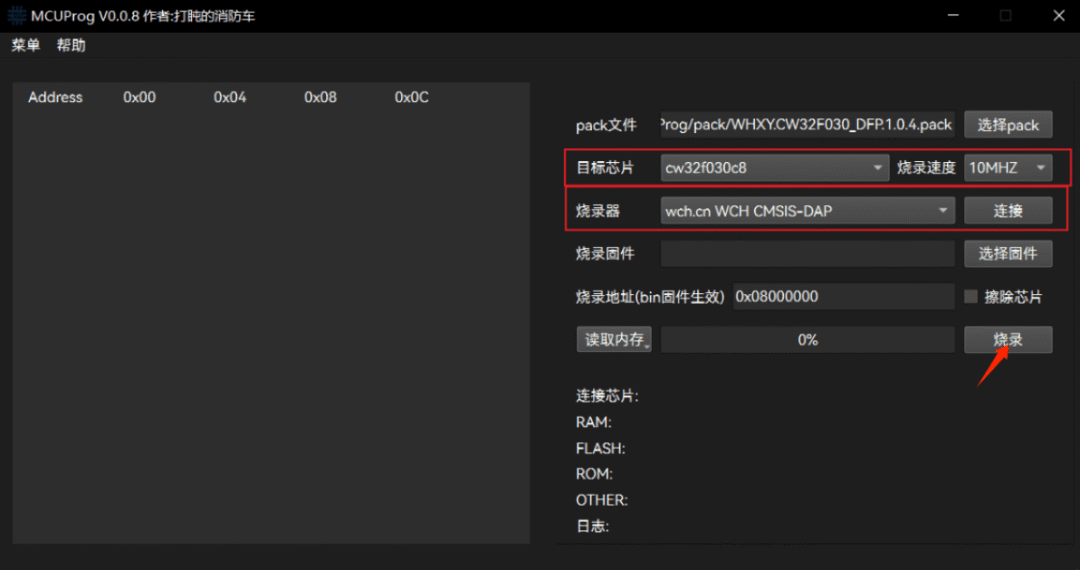
1. Select the pack file (officially provided)
2. Select the target chip
3. Select the target firmware
4. Connect the downloader
5. Start downloading
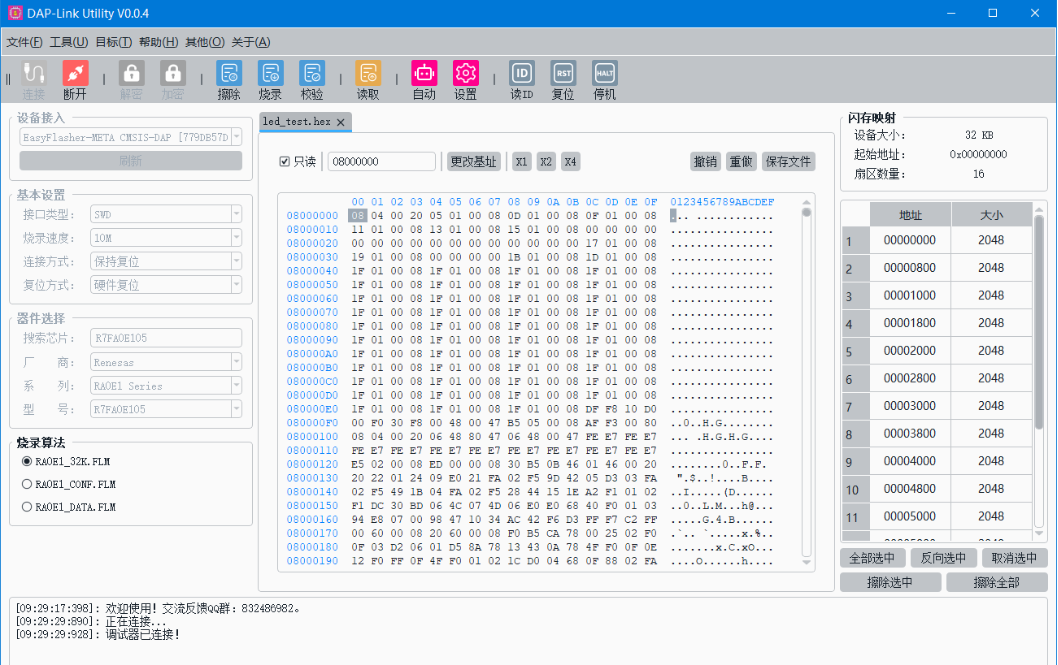
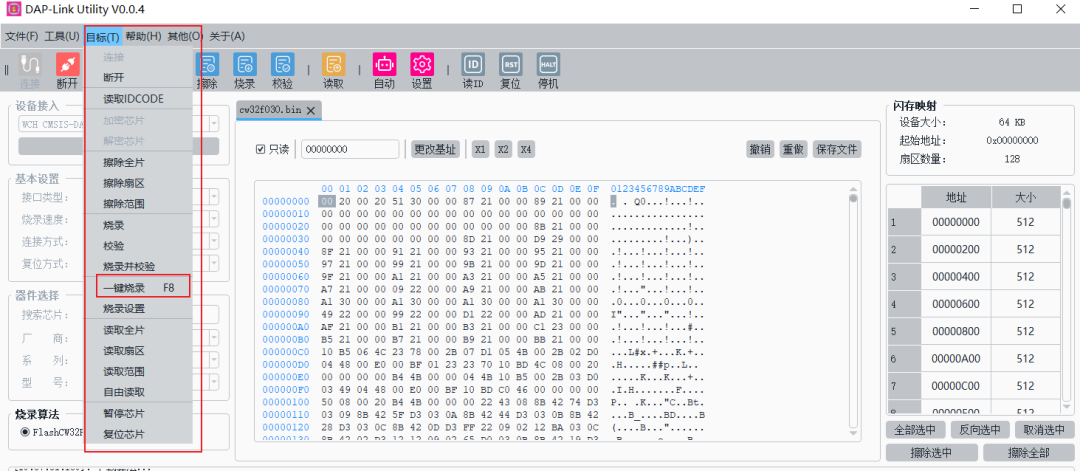
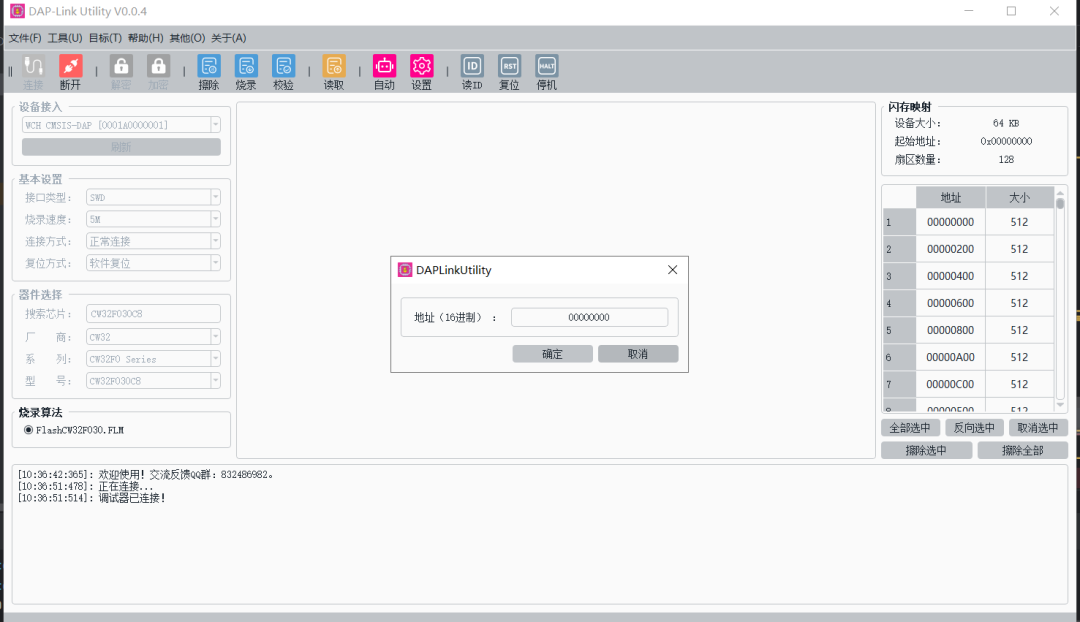
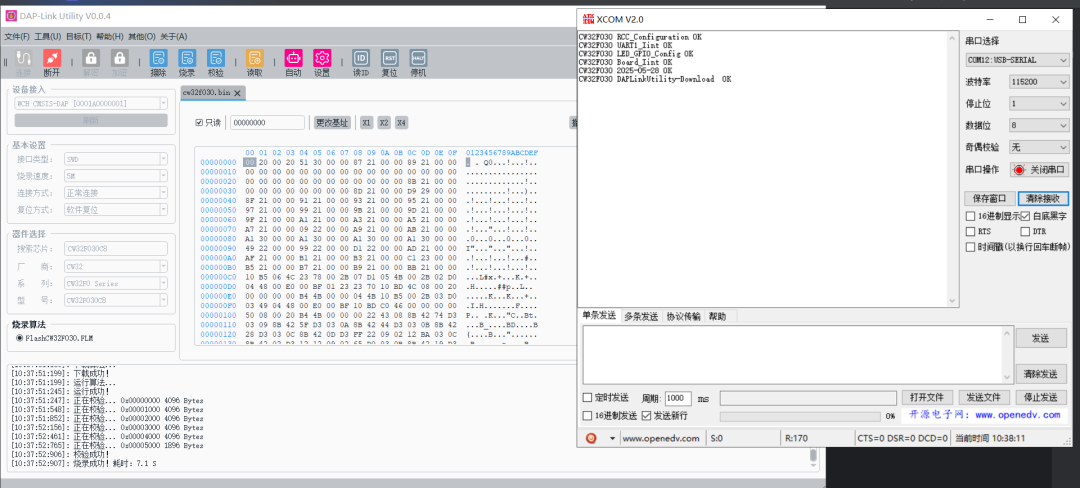
Method 3: DAPLinkUtility Download Tool
Download address for DAPLinkUtility: https://gitee.com/jhembed/DAPLinkUtility
Universal DAPLink host, supports online reading and programming for 30+ chip manufacturers
Connect to DAP-Link, select the corresponding chip to download.
Download successful
ENDPrevious ReviewsREVIEW
[Product Application] Open Source CW32 Electric Tool Products
[Product Solution] Low-Cost Electric Tool Solution Based on CW32L010
[Product Application] Smart Power Bank Based on CW32 (Open Source Solution)
[Product Application] CW-W88 Pump General Control Board Design Scheme (Open Source)
[Product Application] Controller Product Solution for Angle Grinder Based on CW32
[Product Solution] Low-Voltage Brushless Fan Sensorless Controller Based on CW32F030C8
[Product Solution] Brushless DC Hollow Cup Motor Sensorless Control Drive Solution Based on CW32
[Product Solution] Brushless DC Hollow Cup Motor Sensor Control Drive Solution Based on CW32
[Product Solution] Digital Voltage and Current Meter Product Solution Based on CW32F003E4P7
[Product Solution] Low-Cost Industrial Instrument Based on CW32L010
CW32 Ecosystem Community (WX) Group
Scan to Join QQ Group4 Group | 478586307
Get materials and “Developer Support Program” First-hand information


 Scan to Join QQ Group4 Group | 478586307