Electrical Engineering Learning Network: www.dgdqw.com
Follow the official WeChat account of the Electrical Engineering Learning Network “Electrical Engineering and Electronics” to gain more experience and knowledge.
The multimeter is the primary troubleshooting tool for electricians. Once accustomed to it, even when a fault occurs that could be diagnosed without a multimeter, one may feel uneasy without it nearby. This is also a professional habit. Since the multimeter is a powerful tool for electricians, we should find ways to maximize its potential. Below is a lesser-known method of using a multimeter that I hope will help fellow professionals while working. Experienced electricians who are already aware of this method can skip this section. A wire break, commonly referred to as an open circuit, is one of the frequent faults encountered by electricians. It is very common in the workplace and can be easily determined using a multimeter. By measuring the resistance at both ends of a wire, one can immediately know if it is intact or broken, which is something any novice electrician would know. However, the question arises: if we measure a wire and find that there is a break in the middle, but we do not have any other measuring instruments at hand, how can we accurately locate the breakpoint? We cannot simply cut the wire into segments to find the fault, as this defeats the purpose of troubleshooting. Fortunately, we can still quickly locate the breakpoint using just a multimeter.
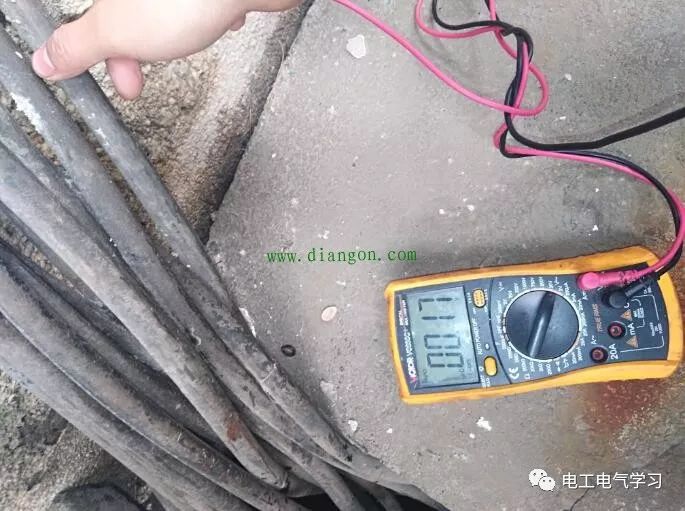 After confirming a wire break using the resistance setting, we first energize the wire. Then, using the low voltage setting on the multimeter, remember to only use the AC voltage measurement range, and it is recommended to use a digital multimeter, typically set to the 20V AC range. Using a range that is too high or too low can hinder fault diagnosis. While searching, hold the black probe’s metal tip with one hand and move the red probe along the energized wire, observing the changes in the display. If you reach a point where the reading drops significantly or changes abruptly, you can determine that this point is approximately where the wire break is located. Mark this spot, turn off the power, strip the wire, connect it, and complete the troubleshooting. It is important to note that this method cannot be used on shielded wires or wires with a metallic outer casing. Additionally, a branded digital multimeter should be used; this method is not recommended for intertwined multi-strand wires as shown in the accompanying image.
This is an exclusive original article. Reproduction must indicate the original source and link; violations will be pursued!