Through the previous introduction, we have learned how to use .NET nanoFramework to connect ESP32 devices to the Wi-Fi network. However, in actual IoT environments, we often need a more convenient method to meet provisioning requirements. This article will take you through some common provisioning solutions and, using ESP32 as an example, introduce how to use .NET nanoFramework for Bluetooth provisioning.
1. Introduction
After the previous introduction, we have learned how to connect ESP32 devices to the Wi-Fi network. However, the hard-coded method in this code, while simple, is not suitable for productized IoT devices in actual environments. Today, we will look at how to use .NET nanoFramework for Bluetooth provisioning with ESP32.
2. Common Provisioning Solutions
To connect our IoT devices to the network, there are many provisioning methods, each with its specific application scenarios and pros and cons. Here, we will not describe the principles in detail but will give a brief overview. If you are interested, you can search for more information. Below is a summary of some common provisioning methods:
1.softAP: In this mode, the device to be provisioned creates a hotspot, and users can connect to this hotspot through their phones or other devices, then set the network information through a specific interface. The advantage of this method is good compatibility and no need for additional hardware support, but the downside is that the mobile end requires switching Wi-Fi connection settings twice, making the steps more complex and the user experience worse.2.Sniffer Mode: Sniffer mode, also known as promiscuous mode, allows the device to receive all data packets without filtering. For example, protocols like SmartConfig, AirKiss, and simpleConfig use this method to obtain network information by listening for specific packets. The advantage of this method is that it does not require users to perform complex operations, but it generally uses proprietary protocols from various manufacturers, resulting in poor compatibility and interoperability.3.Bluetooth Provisioning: In this mode, the device to be provisioned opens the Bluetooth interface, and users can connect to the device via Bluetooth from their phones or other devices, then transfer network information via Bluetooth. The advantage of this method is its simplicity and good user experience, but the downside is that it requires Bluetooth hardware support.4.QR Code Provisioning: If the device to be provisioned has a camera, it can obtain network information by scanning a QR code. The advantage of this method is simplicity and good user experience, but it also has obvious downsides, such as requiring camera hardware support and needing to guide the user on the placement distance of the QR code, which affects user experience.5.Sound Wave Provisioning: If the device to be provisioned has a microphone, it can obtain network information through sound encoding. The advantage of this method is that it does not require additional hardware support, but the downside is that it may be affected by environmental noise, reducing provisioning success rates.
3. Implementation of Bluetooth Provisioning
Although there are many solutions, for the ESP32-S3-Zero development board, which has a Bluetooth module, we can use Bluetooth provisioning after flashing the ESP32_S3_BLE firmware.
3.1. Bluetooth Provisioning Protocol Improv
Using Bluetooth provisioning, we can define our private implementation or use an open-source protocol for rapid development. Besides not having to reinvent the wheel, we also do not need to design the provisioning tool ourselves. Improv is a free and open standard that allows devices to securely provision Wi-Fi over Bluetooth. This process can be completed through the following steps:
1. Power on the device2. The client sends Wi-Fi credentials to the device to be provisioned using the Improv protocol3. The device connects to the Wi-Fi network and returns a URL.4. The client uses the URL to connect to the device and continues setting up the device.
The Improv protocol can be used over Bluetooth Low Energy or through a serial port. Both protocols can be accessed from a browser. However, the serial port requires wiring; we will use the Bluetooth Low Energy method here.
For more detailed information about the Improv protocol, please refer to its official documentation[1].
3.2 Dependencies Preparation
First, we need to install the following three packages:
•nanoFramework.System.Device.Wifi: Used for connecting to Wi-Fi networks•nanoFramework.Device.Bluetooth: Used for implementing Bluetooth provisioning•nanoFramework.System.Net.Http: Used for demonstrating network services after connecting
For implementing the Improv protocol, there are no dependency packages, but there is an ImprovWifi example[2] in the official Samples repository that we can refer to, directly using its Improv.cs and then using ImprovWifi;.
3.3 Coding Implementation
ImprovWifi has already implemented the Improv protocol; we just need to implement some simple code in Program.cs.
Here, after completing the provisioning, we start a simple network service to demonstrate the network service after successful provisioning. We use HttpListener to implement a simple network service; of course, you can use other methods, such as WebServer, etc.
static Improv _imp;
public static void Main(){    Console.WriteLine("Bluetooth Provisioning Improv Protocol Example");
    _imp = new Improv();    // Callback after provisioning completion    _imp.OnProvisioningComplete += Imp_OnProvisioningComplete;    // Start provisioning service, device name can be customized, Chinese is also supported, and will display this name when searching for devices    _imp.Start("ESP32 桑榆肖物");    // For demonstration, directly authorize here    _imp.Authorise(true);
    Console.WriteLine("Waiting for device provisioning...");
    while (_imp.CurrentState != Improv.ImprovState.provisioned)    {        Thread.Sleep(500);    }
    Console.WriteLine("Device provisioning completed, IP address:" + _imp.GetCurrentIPAddress());    // Stop provisioning service    _imp.Stop();    _imp = null;
    Console.WriteLine("Starting a simple network service to demonstrate the network service after successful provisioning");    SimpleWebListener();
    Thread.Sleep(Timeout.Infinite);}
private static void Imp_OnProvisioningComplete(object sender, EventArgs e){    SetProvisioningURL();}
private static void SetProvisioningURL(){    _imp.RedirectUrl = "http://" + _imp.GetCurrentIPAddress() + "/start.htm";}
private static void SimpleWebListener(){    string responseString =        "<html><head><meta charset='utf-8'>" +        "<title>Hello from ESP32</title></head>" +        "<body><h2>Hello from ESP32</h2>" +        "<p>It works!</p>" +        "<p>Here you can continue with more device configuration information</p>" +        "</body></html>";    byte[] buffer = System.Text.Encoding.UTF8.GetBytes(responseString);    HttpListener listener = new("http", 80);    listener.Start();
    while (true)    {        try        {            HttpListenerContext context = listener.GetContext();            Console.WriteLine("Request received");            HttpListenerResponse response = context.Response;            response.ContentLength64 = buffer.Length;            response.OutputStream.Write(buffer, 0, buffer.Length);            context.Response.Close();            Console.WriteLine("Response sent");            context.Close();        }        catch (Exception ex)        {            Console.WriteLine("Error: " + ex.Message + "\nSack = " + ex.StackTrace);        }    }}
Note: The above code is just a demonstration of functionality. In actual projects, modifications should be made according to your needs, such as automatically completing the connection next time after verifying the connection, and for security, we also need to perform validation, etc. I will have a real open-source project demonstration later, introducing how to use the recently introduced related features, so stay tuned.
4. Provisioning Test
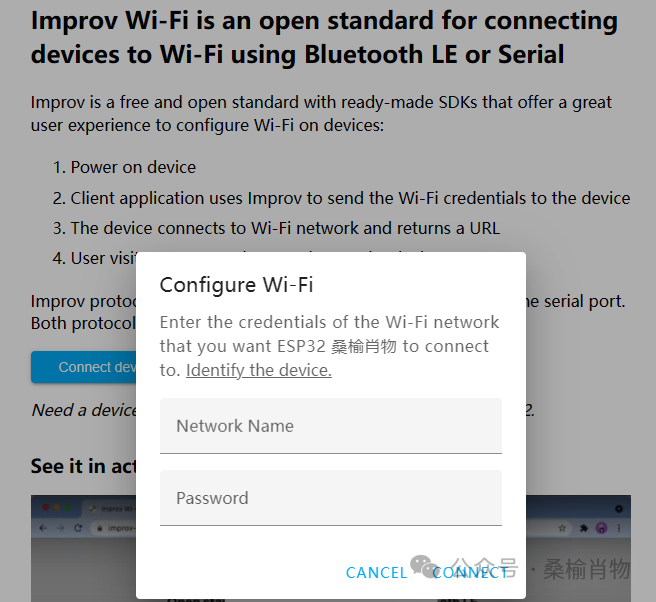
After compiling and flashing, we can see from the debug output that the device has successfully entered the waiting provisioning state. At this point, we can open the Improv web provisioning client through the web, which is the previous Improv official introduction site[3]. Of course, both the site and the protocol are open source, and you can set up your own.
Here we directly use the official one for testing, but it should be noted that because Bluetooth provisioning is used, your computer also needs to support Bluetooth; otherwise, you will not be able to search for the device. If your computer does not have Bluetooth, you can also use your phone’s Chrome or Edge browser to open the webpage for provisioning.
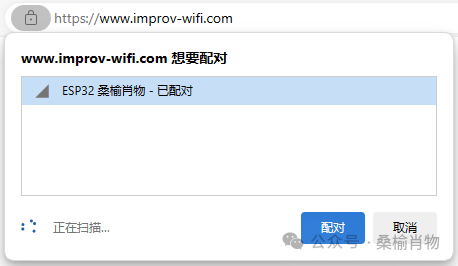
Here we can see that our device has been searched in the device list; just click to pair. After successful pairing, a dialog box will pop up where we can set the Wi-Fi SSID and password, then click the Connect button.
After successful connection, we can see that the device status has changed to Provisioned, and we can now access the network service started by the device.

5. Conclusion
Through this article, we learned how to use .NET nanoFramework for Bluetooth provisioning with ESP32 devices. Although we used the Improv protocol here, the implementation principles are similar; only the protocols differ. In actual projects, we can choose a suitable provisioning method based on our needs or implement a provisioning protocol ourselves, which will not be elaborated here.
For the Improv protocol provisioning client, we can also implement it through WeChat mini-programs or integrate SDKs into our applications for convenient provisioning. Interested students can learn about the implementation themselves.
References
[1] Official Documentation: https://www.improv-wifi.com/[2] ImprovWifi Example: https://github.com/nanoframework/Samples/blob/main/samples/Bluetooth/ImprovWifi/README.md?wt.mc_id=DT-MVP-5005195[3] Improv Official Introduction Site: https://www.improv-wifi.com/