Getting Started with Raspberry Pi 4: Environment Setup
-
1. Purpose of the Article
-
2. Hardware Configuration of Raspberry Pi 4B
-
3. Building the First Basic Project
-
3.1 Environment Preparation
-
3.2 Source Code Download
-
3.3 Code Compilation and Program Download
-
3.4 Raspberry Pi Hardware Connection
-
-
4. Optimization and Debugging Methods
-
4.1 Modify the config.txt file on the SD card
-
4.2 Modify the Network Environment
-
4.3 Modify the Code Link Address
-
5. Summary
1. Purpose of the Article
The Raspberry Pi 4 is a great choice for learning embedded ARM development. Embedded development often requires not only theoretical knowledge but also hands-on practice to experience the results. Currently, development boards either have too little documentation, are too expensive, or lack playability, making it difficult to get started and delve deeper into embedded systems. I wrote this series of articles on the Raspberry Pi 4 bare-metal basics, advanced Raspberry Pi 4 drivers, and RTOS to share various aspects of the embedded development process with everyone and hope that those interested in learning embedded systems will gain something from reading these articles. The peripherals of the Raspberry Pi 4 are much more standardized compared to previous models like Raspberry Pi 2 and 3, making it a great choice for learning embedded systems and ARM programming. As the saying goes, learning the embedded development of Raspberry Pi 4 can also provide insights for lower-level development of other chips in the future.
The purpose of writing this is purely based on personal interest and to improve my documentation writing skills and professional abilities outside of work. If there are any incorrect viewpoints or knowledge points, please feel free to provide guidance.
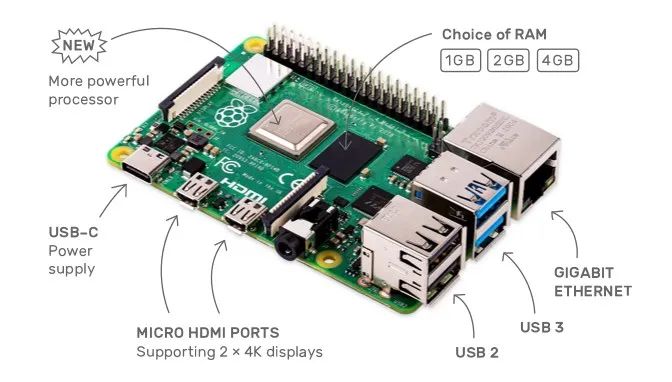
2. Hardware Configuration of Raspberry Pi 4B
The performance of Raspberry Pi 4B is very strong, running Android and Windows 10 without any pressure. It offers powerful performance at a very low price, making it an excellent development board for learning embedded and ARM development.
-
1.5GHz 4-core 64-bit ARM Cortex-A72 CPU (~3× performance) -
1GB/2GB/4GB LPDDR4 SDRAM memory -
Full throughput Gigabit Ethernet -
Dual-band 802.11ac wireless network -
Bluetooth 5.0 -
Two USB 3.0 and two USB 2.0 ports -
Dual monitor support, resolutions up to 4K -
VideoCore VI GPU, supports OpenGL ES 3.x -
HEVC video 4Kp60 hardware decoding -
Fully compatible with earlier Raspberry Pi products
3. Building the First Basic Project
Embedded code compilation generally comes in two forms: one is through an IDE for compilation, downloading, and debugging, which is simpler and requires less environment configuration, only needing to install the required environment for the IDE. This development method is common in microcontroller and low-end chip development. The other method is to input relevant commands in the command line, requiring the manual creation of compilation scripts, which is common in Linux development.
The development process for Raspberry Pi programs generally does not involve an IDE, and GCC is used directly, so I will also use GCC in the console for project construction. Project construction needs to be resolved independently. The commonly used automated compilation tool is Makefile. Since the first project is relatively easy, we can use Makefile for project construction.
3.1 Environment Preparation
When building a project on different platforms, the following environments need to be prepared:
1. ARM cross-compilation toolchain
2. A tool capable of executing makefile
The cross-compilation toolchain arm-none-eabi-gcc-5.4.1 can be downloaded from the official website or from a cloud disk:
Link: https://pan.baidu.com/s/1ad3d-pl4YbpgYrxKg6mX9g
Extraction code: f3cm
The GCC in the cloud disk above is only suitable for Windows; please download the ARM cross-compilation toolchain for other systems.
If you want to use the make command on Windows, you can download msys2, which integrates the make environment.
Then add the cross-compilation toolchain to the system environment variables, and open the msys64 folder to modify msys2_shell.cmd
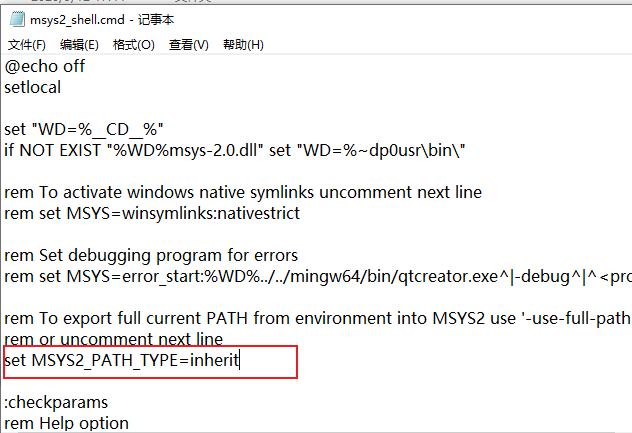
Double-click msys2_shell.cmd to open the window, ensuring that typing ‘arm’ and pressing the tab key shows the following screen

Thus, the system environment is prepared.
3.2 Source Code Download
The source code project already exists on GitHub; relevant source code can be found at the following address:
https://github.com/bigmagic123/raspi4-bare-metal.git
In arm/1.compilation_environment, you can see the relevant file list.
| File Name | Description |
|---|---|
| link.ld | Linking file |
| main.c | Function entry |
| Makefile | Compilation rules file |
| start.S | Initialization assembly code |
| uart.c | Code related to serial port |
| uart.h | Header file related to serial port |
The function of this code is to start and jump to the C code for execution, then output the hello world program via the serial port.
3.3 Code Compilation and Program Download
After completing the above two steps, you can enter the project directory in MSYS and type ‘make’ to compile directly.

You can see that the kernel7.img firmware has been generated. This firmware can be run on the board.
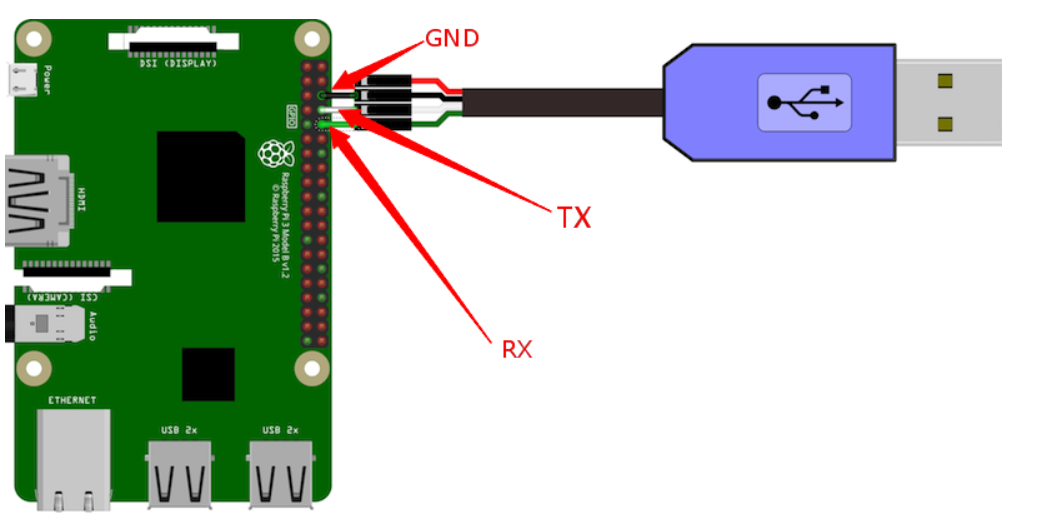
3.4 Raspberry Pi Hardware Connection
For the Raspberry Pi 4, you need to prepare an empty SD card, a serial cable for outputting information, and a TYPE-C cable for power supply.
First, place the files from the sd_boot folder in the project directory onto the empty SD card. Then, place the compiled kernel7.img onto the SD card.
Next, connect the serial cable to the Raspberry Pi.
Then, open the serial port, power on the development board, and you can see the serial output information:
Hello world!
At this point, a simple bare-metal program is running.
4. Optimization and Debugging Methods
The above process has completed the environment setup, and you can see the serial output information. However, since the firmware needs to be placed on the SD card for execution after each compilation, this operation is cumbersome and not suitable for learning embedded development. Therefore, you can use the Raspberry Pi’s U-Boot to automatically retrieve the code from the TFTP server. The specific steps are as follows:
4.1 Modify the config.txt File on the SD Card
Change the config.txt file as follows:
enable_uart=1
arm_64bit=0
kernel_addr=0x8000
kernel=u-boot32.bin
core_freq=250
This essentially changes kernel=kernel7.img to kernel=u-boot32.bin, directly booting U-Boot.
4.2 Modify the Network Environment
To allow the development board to retrieve code from the TFTP server, set the development board to be in the same subnet as the PC server. Plug the network cable into the router, and the development board can obtain an IP address via DHCP.
U-Boot 2020.07-rc1-g627e7ce (May 11 2020 - 19:26:54 +0800)

DRAM:  1.1 GiB
RPI 4 Model B (0xb03112)
MMC:   emmc2@7e340000: 0, mmcnr@7e300000: 1
Loading Environment from FAT... OK
In:    serial
Out:   serial
Err:   serial
Net:
Warning: genet@7d580000 MAC addresses don't match:
Address in DT is                dc:a6:32:95:c1:79
Address in environment is       dc:a6:32:28:22:50
eth0: genet@7d580000
Hit any key to stop autoboot:  0
U-Boot>
Follow these steps:
1. Plug the network cable into the router
2. Set the environment variables
setenv bootcmd "dhcp 0x00200000 192.168.12.137:kernel7.img;dcache flush;go 0x00200000"
saveenv
Note that 192.168.12.137 is your computer’s IP address.
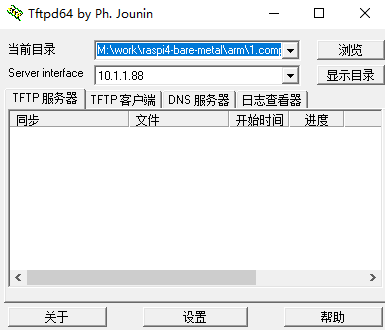
3. Start the TFTP server on the computer
Note:
If the development board is directly connected to the computer via a network cable, this setting is ineffective because the PC generally does not support DHCP servers. A static IP address must be set.
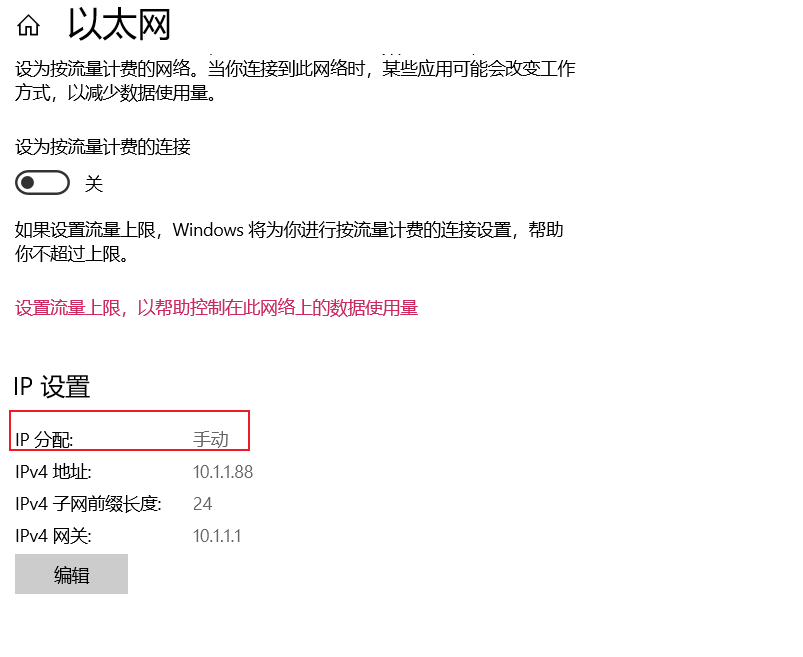
Then, the development board also needs to be assigned an IP address. You can set an environment variable as follows:
setenv ipaddr 10.1.1.100
saveenv
reset
Where 10.1.1.100 is the IP address of the development board and should be in the same subnet as the server.
setenv bootcmd "tftp 0x00200000 10.1.1.88:kernel7.img;dcache flush;go 0x00200000"
saveenv
4.3 Modify the Code Link Address
Since the U-Boot startup address and the bare-metal code address should not be the same, the U-Boot startup address is 0x8000, while the bare-metal code address is now changed to 0x200000.
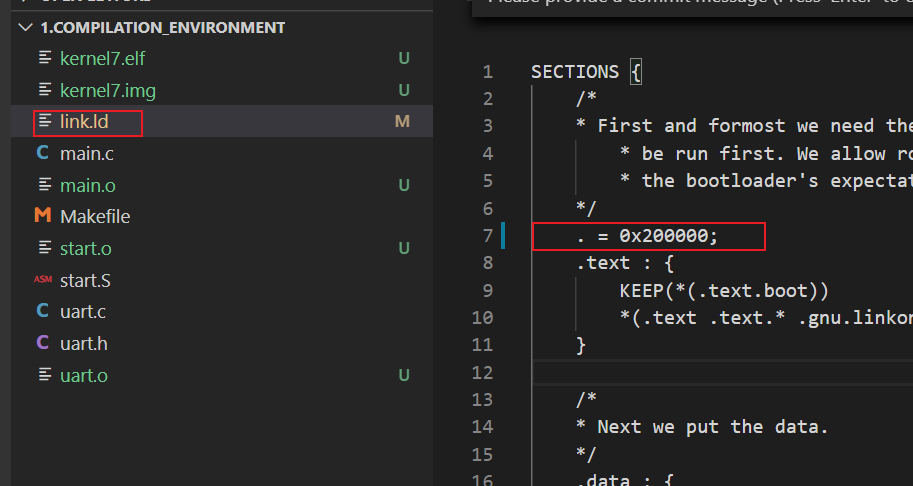
Set this address accordingly.
Recompile the code, power on the development board, and you can see the serial port print the following information.
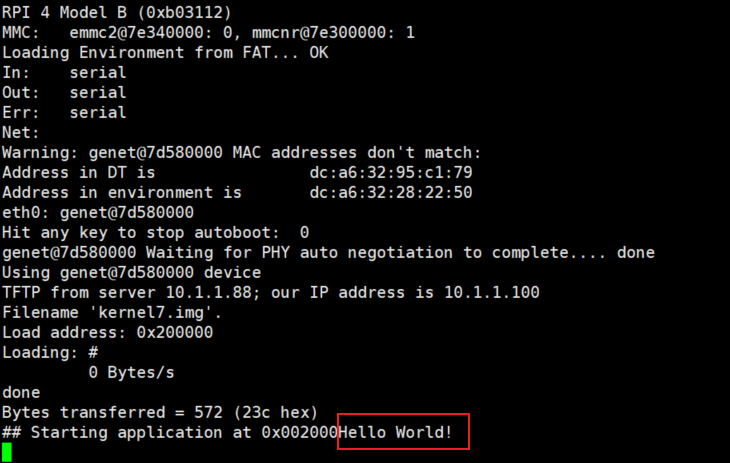
Now, every time the development board powers on, it will retrieve the code from the TFTP server for execution. If you add a power switch to the power line of the Raspberry Pi, it will be very convenient and efficient for debugging code.
5. Summary
This article mainly introduces the steps of bare-metal development on Raspberry Pi. In the process of embedded development, setting up the environment is often very important. A good development environment and an efficient verification approach can greatly save development time. Therefore, as the saying goes, to do a good job, one must first sharpen their tools. To learn embedded development well, it is crucial to utilize various tools to double your work efficiency. Through the descriptions in the above article, the basic environment for embedded systems can be set up, and the system startup process can be understood. I believe that the first step is often the hardest, but once you take it, writing code will not be too difficult.
– END –