Originally, I planned to do something big over the weekend, like WIFI and web pages. However, after two days of work and discussions with foreign friends, I realized that there was a problem with the firmware. After communicating with a senior expert at night, I found out that the official firmware for the ESP32S has issues and won’t work.
So, I recommend buying the ESP32, just any model will do.
The new board I bought is already on the way, so I can only wait for it to arrive before proceeding.
In the meantime, I can still do some simple tasks, so let’s get started.
Basic Knowledge of Embedded Systems
If you have little understanding of microcontrollers and embedded systems, it is essential to delve into the basic hardware knowledge.
You can refer to “Zero Dead Angle Play with STM32—F429 Challenger.pdf” to understand most of the relevant knowledge; just look at the basics, but of course, it’s better to read more.
Although the boards are different, the fundamental knowledge is quite similar, as they share similar architectural styles.
For example, STM32 can have over a hundred pins, while the ESP32 may have only around 40 pins. Most of the IO ports are already brought out for hardware-level design, aside from the built-in WIFI that occupies some pins.
On development boards, such pins are usually brought out separately for development and testing purposes.
GPIO
What is GPIO? In English: General-purpose input/output; in Chinese, it means the abbreviation for general-purpose input and output. Simply put, it refers to pins that the CPU can control. The CPU’s GPIO pins connect to external devices (like sensors and AD acquisition devices) to achieve communication, control, and data collection with the outside world.
Basic Input and Output of GPIO
Basic Input
The most basic output is to detect the external input level, such as determining whether a button is pressed.
Basic Output
The most basic output is controlling the chip’s pin to output high or low levels to achieve switch control. For example, if the GPIO pin is connected to an LED, it can control the LED’s on and off state. If connected to a relay or transistor, it can control the switching of external high-power circuits.
GPIO Diagram
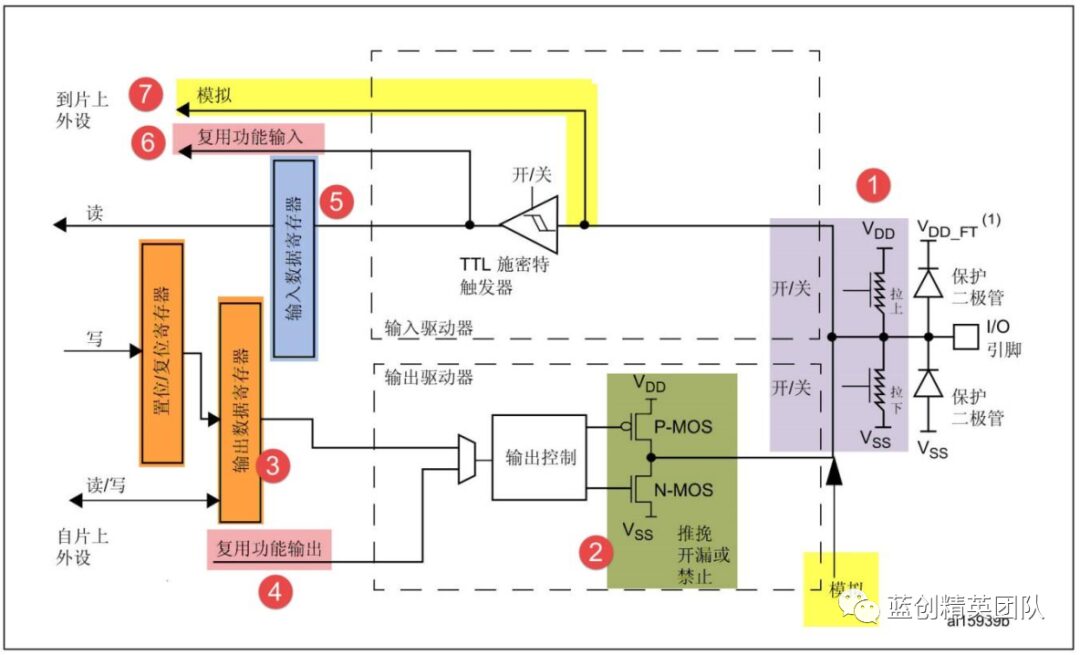
Above is the schematic diagram of GPIO. Of course, hardware may be upgraded, but the general principle remains the same.
For a deeper explanation, you can refer to the book’s introduction and online materials; here, I’ll provide a brief explanation.
IO ports essentially have two functions: input and output.
Therefore, the purpose of this circuit is to ensure that its input and output are stable, safe, and reliable.
Of course, greater safety and reliability rely on external pull-up resistors, etc. The GPIO itself is relatively weak, operating at around 3.3V with a small current, leaning towards control signal levels.
So, to obtain external information or output information externally, you can get a general idea from the diagram, which shows both paths: one for input and one for output.
C# Implementation of Lighting and Button Pressing
Board Related Information
My current board is the ESP32S. I finally found the official documentation after searching. The address is as follows:
https://docs.ai-thinker.com/esp32/boards/nodemcu_32s
Most of the documentation can be referred to and downloaded.
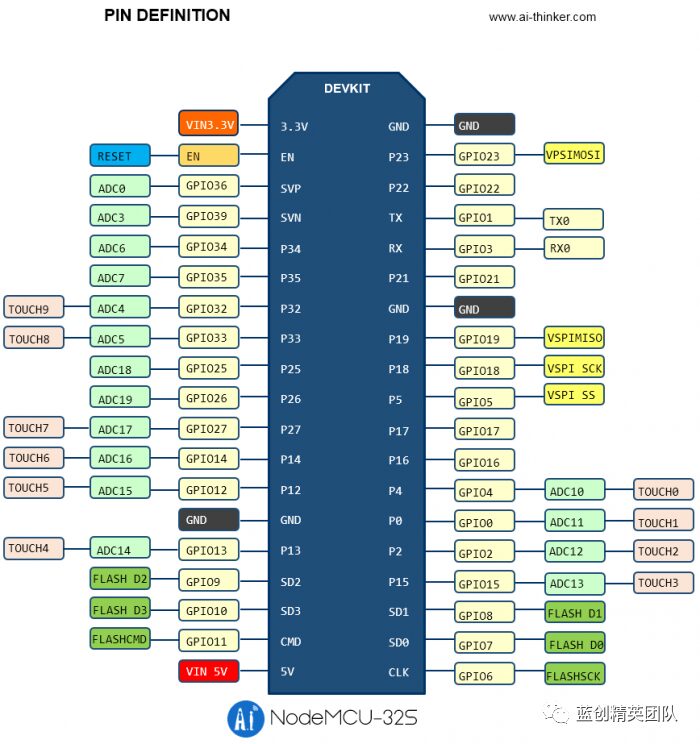
Below is the functional pin diagram.
Below is the complete circuit diagram.
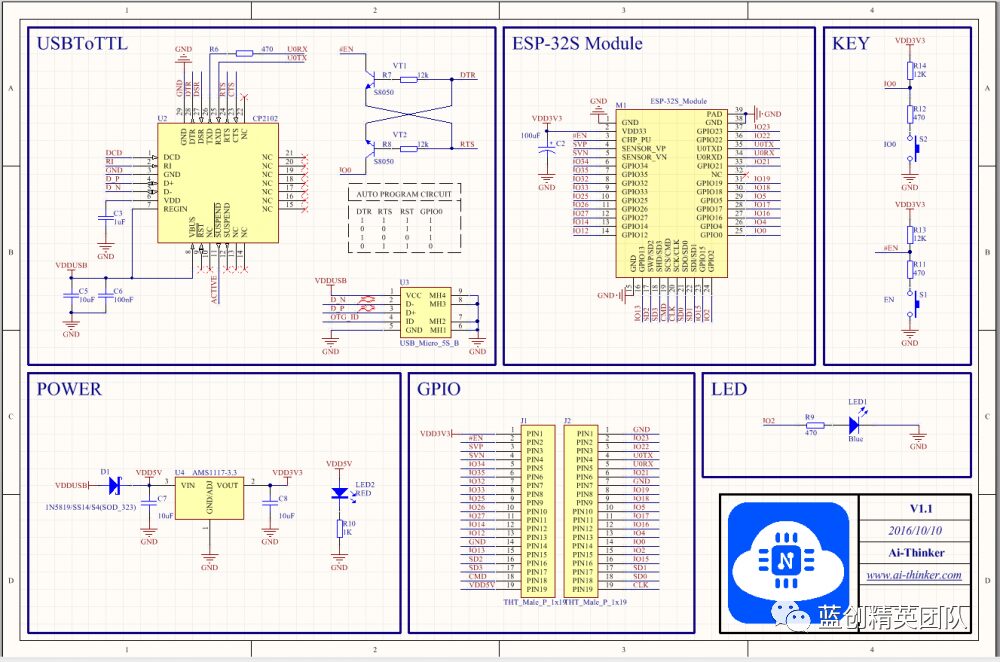
We need to light the LED and detect button presses, so we need to find the IO pins for these two functions.
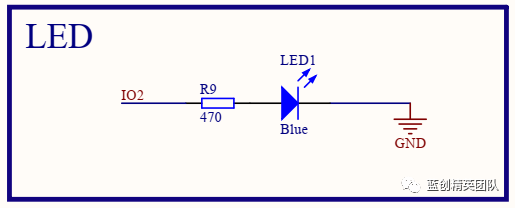
GPIO for LED and Button
From the diagram, the GPIO for the LED is IO2 (meaning GPIO 2, which is the second IO pin).
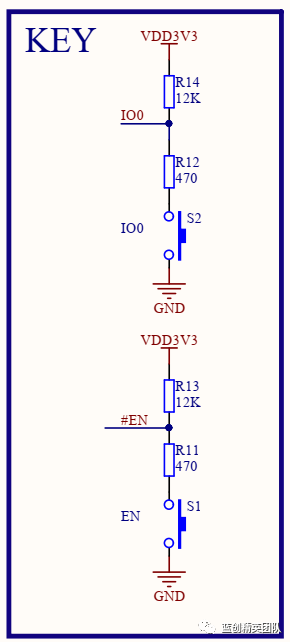
For the button, one is EN, which is the board’s power enable switch. This button cannot be used, so we can only use another one, which is IO0, the first button.
Code Related
We need to add a few NuGet packages.
Install-Package nanoFramework.Hardware.Esp32 -Version 1.3.6.7
Install-Package nanoFramework.Runtime.Events -Version 1.10.0
Install-Package nanoFramework.System.Device.Gpio -Version 1.0.4
Then, add some code. The logic is simple: when the Boot button is pressed, the light turns on; when the button is released, the light turns off.
public class Program
{
    public static GpioPin led;
    public static GpioPin button;
    public static void Main()
    {
        var gpioController = new GpioController();
        button = gpioController.OpenPin(Gpio.IO00, PinMode.Input);
        led = gpioController.OpenPin(Gpio.IO02, PinMode.Output);
        button.ValueChanged += Button_ValueChanged;

        while (true)
        {
            Thread.Sleep(1000);
        }
    }

    private static void Button_ValueChanged(object sender, PinValueChangedEventArgs e)
    {
        Debug.WriteLine("Button event : " + e.ChangeType.ToString());
        Debug.WriteLine("Button current value: " + button.Read());

        if (e.ChangeType != PinEventTypes.Rising)
        {
            // Light on when pressed
            led.Write(PinValue.High);
        }
        else
        {
            // Light off when released
            led.Write(PinValue.Low);
        }
    }
}
Results of Execution
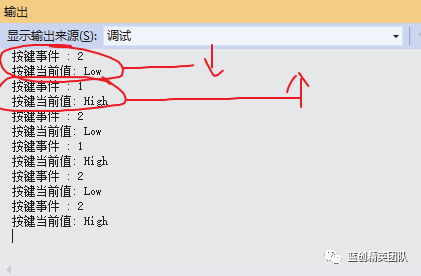
It can be clearly seen that when the button is pressed, the current value is Low, and when released, it is High.
The small image above shows the button being pressed.
I tested it repeatedly; it takes about 2 seconds for the button to become effective after startup. The logic between the button and the light is also very responsive.
Conclusion
Overall, the operation has become much more convenient, and debugging is possible. However, the board and firmware must be consistent; otherwise, there will be many small issues to overcome.
Code Repository
https://github.com/kesshei/NanoFreamworkKeyOrButtonDemo.git
https://gitee.com/kesshei/NanoFreamworkKeyOrButtonDemo.git
Read
One-click three links! Thanks to the experts for their support; your support is my motivation!