Overview
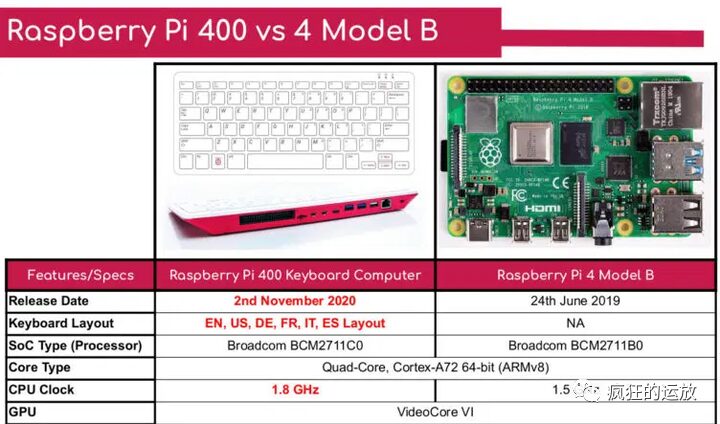
In the series of hardware for the Raspberry Pi 4, the processor is based on the Broadcom BCM2711, which has 4 ARM Cortex-A72 and VideoCore VI internally. If you look closely: the Raspberry Pi 4B development board uses the BCM2711B0, with a clock speed of 1.5GHz; while the Pi 400 (Keyboard Computer) has a slightly different SoC, the BCM2711C0, with a clock speed of 1.8GHz. This suggests that the RPi 4 has some overclocking capability.
Why Overclock?
If you need to run high-speed computing applications on the Raspberry Pi, such as video encoding/decoding, image recognition, game emulators, etc., then a faster rate is better.
Some foreign users have tried, and the BCM2711B0 (Raspberry Pi 4B) can be overclocked from the original 1.5GHz to 2.147GHz, while the BCM2711C0 (Raspberry Pi 400) can be overclocked from the original 1.8GHz to 2.3GHz (see reference link [1]). This speed increase of over 30% may make some applications that were lagging before overclocking run smoothly afterward.
Why Is Overclocking Not Set by Default?
Since everyone likes high performance, why is it not set to overclock by default from the factory?
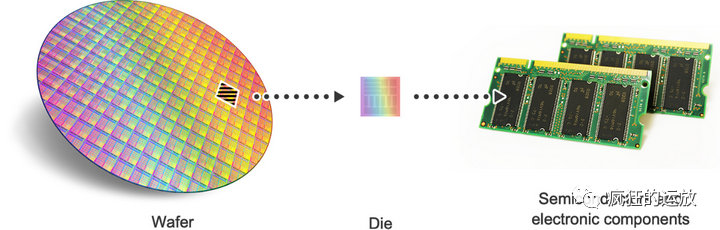
Firstly, chips are manufactured in wafers, and there are thousands of chips on a single wafer. They are all made in batches, but some perform better while others perform worse. The better-performing ones may be named the earlier “BCM2711C0” (used for Raspberry Pi 400), while the worse-performing ones are named “BCM2711B0” (used for Raspberry Pi 4B). Manufacturers can only promote a conservative performance that most chips can achieve. After testing, for example, setting the BCM2711C0 to 1.8GHz or the BCM2711B0 to 1.5GHz, it is stable and meets the standards.
Secondly, the so-called “standard frequency” or “overclocking” is relative to external conditions, which are closely related to “heat dissipation.” In another better cooling scenario, it is possible that the factory default standard frequency for the BCM2711C0 is 1.9GHz, or the BCM2711B0 is 1.6GHz, which is also possible. But it is certain that high performance comes at the cost of more complex PCBs and cooling devices, which all add to the cost. In high-performance scenarios, the price of the Raspberry Pi may be higher, which is all built with money, right?
What Does Overclocking Mean?
Overclocking means setting the maximum clock speed of the processor (CPU or GPU) higher than the factory default level. For example, the default clock speed for the Raspberry Pi 4B BCM2711B0 is 1.5GHz, and if this clock speed is raised above 1.5GHz, it is considered overclocking.
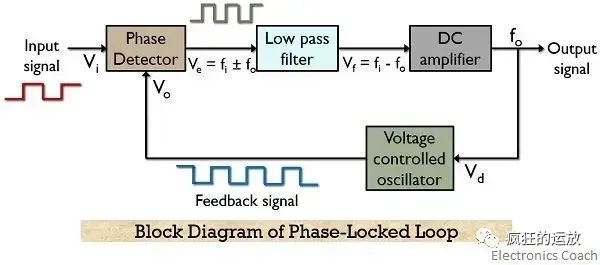
This “frequency” of overclocking refers to the clock frequency, which is PLL (Phase-Locked Loop) in modern processors. Simply put, PLL is a voltage-controlled oscillator that can change the clock oscillator frequency by parameter settings.
Power Consumption and Throttling Issues
When overclocking, the processor’s power consumption will increase. If the extra heat cannot dissipate, the processor’s temperature will rise, and when the temperature reaches a certain level, it will trigger processor throttling, which may make the processor’s performance worse than before overclocking, or even unstable. Let’s look at the internal principles:
All processors, including the Raspberry Pi BCM2711, consist of many transistors driven by PLL clock. When the processor executes instructions, the internal transistors are performing “0”/“1” or “on”/“off” operations.
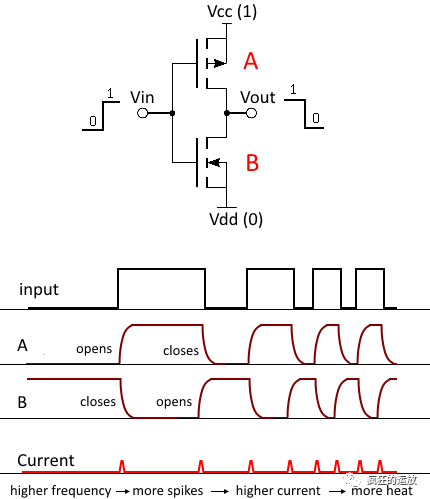
Although the on and off operations happen very quickly, the state switching of transistors still takes time, during which some current flows through the transistors (the small peaks in the figure), and during this time, the transistors have impedance. Therefore, current + impedance will generate heat. As the clock frequency increases, the number of these small peaks also increases proportionally, and heat increases accordingly.
The processor has protection mechanisms to protect hardware from damage, such as automatically slowing down the clock rate when the temperature is too high. This is called processor throttling, and in this case, the processor’s performance will be worse than the factory default 1.5GHz. This is why if you want to overclock, you must be equipped with good cooling equipment; otherwise, it will be counterproductive.
In addition to the temperature rise, the processor needs to consume more energy. Therefore, the power supply to the processor must be sufficient, and sometimes it is necessary to appropriately increase the processor’s supply voltage to maintain the required power consumption.
For the Raspberry Pi, if the processor temperature is too high (80°C or above) or the power supply voltage is insufficient, there will be an indicator mark on the display (I have not seen it; if anyone has, please leave a message):

Potential Impacts of Overclocking
We need to know: the processor is in a harsher working state during overclocking.
The processor also has another protection mechanism – Dynamic Clock Switching, which means the CPU switches clock frequency based on needs, executing tasks at high speed when there are tasks to execute, and running at low speed when there are no tasks.
However, some people will turn off this “Dynamic Clock Switching” feature, forcing the processor to always be in overclocking mode, which can easily damage the CPU.
Because in overclocking mode, transistors are subjected to high temperatures and high pressures. In modern chip manufacturing, such as the 28nm process used in the Raspberry Pi’s BCM2711, the gate insulation layer of the transistors is very thin, only a few tens of atoms thick. Prolonged exposure to high temperatures and high pressures can easily break through this layer, rendering the processor useless.

This is why it is not recommended to buy second-hand graphics cards that have been used in mining, as their chips may have been “damaged” from long-term high-load operation.
Overclocking Methods
Many bloggers have discussed overclocking methods, and the specific operation process is detailed. See reference links [1]~[5] for key steps and explanations.
First, the adjustment of the processor’s working frequency is done in the /boot/config.txt file, where you need to find arm_freq, gpu_freq, over_voltage, and change them to the following values:
arm_freq=2000
gpu_freq=750
over_voltage=6
Let’s explain each:
-
arm_freq is the working frequency of the ARM core, setting it to 2000 means 2GHz. As mentioned in multiple articles in the reference links, setting it to 2147 (2.147GHz) is the upper limit. If it is set any higher, it may become unstable or fail to start.
-
gpu_freq is the working frequency of the GPU core, changing it from the default 600MHz to 750MHz.
-
over_voltage represents different power supply levels for the processor, with a default of 1.35V; setting it to “6” means changing the power supply to 1.5V.
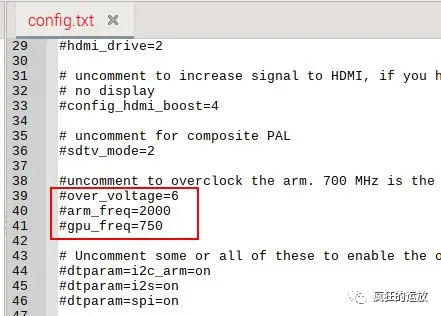
There is also a parameter called force_turbo, which defaults to force_turbo=0. If changed to “1”, it disables the aforementioned “Dynamic Clock Switching,” meaning the Raspberry Pi will always run at high speed, which is not recommended to modify.
After setting the parameters in the /boot/config.txt file, restart for the changes to take effect.
If it does not work normally after the restart, remove the SD card, modify it back to the default values on another computer, and then put it back to restart. Therefore, it is recommended to back up the config.txt file before performing the above overclocking operations.
Performance Comparison Before and After Overclocking
Here are some commands or tools for comparing processor performance, along with reference links and some screenshots.
Using lscpu
This command collects CPU architecture information from sysfs and /proc/cpuinfo and displays it. See reference link [6].

Using vcgencmd
This command can get the frequency and temperature of the processor. See reference link [7].

Using sysbench
This command tests performance by calculating prime numbers. The output does not provide processor frequency but shows the number of events per second and the time taken for calculations to compare performance. See reference link [8].
Using Stressberry
Stressberry is a software package for testing core temperature under different loads, which can generate nice graphs for easy performance comparison. See reference link [9].
After overclocking, my Raspberry Pi 4B core temperature did not exceed 70°C:
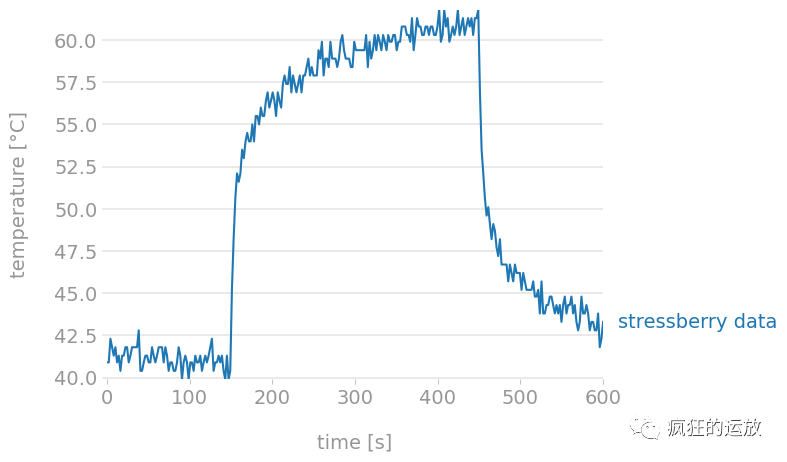
Could it be because my case has good heat dissipation?
Using Phoronix
Phoronix is a testing suite tool that allows users to share their hardware and software test results through online test scripts published on http://OpenBenchmarking.org. See reference link [10].
Finally, I wish everyone a happy time overclocking.
Reference Links:
-
[1] https://magpi.raspberrypi.com/articles/how-to-overclock-raspberry-pi-4
-
[2] https://www.zdnet.com/article/how-to-overclock-and-stress-test-your-raspberry-pi/
-
[3] https://qengineering.eu/overclocking-the-raspberry-pi-4.html
-
[4] https://www.jeffgeerling.com/blog/2020/overclocking-raspberry-pi-compute-module-4
-
[5] https://hackaday.com/2020/11/11/adventures-in-overclocking-which-raspberry-pi-4-flavor-is-fastest/
-
[6] https://cloud.tencent.com/developer/article/1581191
-
[7] https://hackpi.fun/docs/raspbian/applications/vcgencmd/
-
[8] https://github.com/akopytov/sysbench
-
[9] https://github.com/nschloe/stressberry
-
[10] https://www.phoronix.com/
This column is created for makers, providing interesting and useful software and hardware content. If you find it helpful, please click the “Like” button and follow this public account; it is my greatest motivation~