Ureteroscopic Access: Sheaths, Balloons, and Wireless ApproachesCite this chapter
Best, S.L. (2013). Ureteroscopic Access: Sheaths, Balloons, and Wireless Approaches. In: Nakada, S., Pearle, M. (eds) Surgical Management of Urolithiasis. Springer, New York, NY. https://doi.org/10.1007/978-1-4614-6937-7_7

Ureteroscopic Access: Sheaths, Balloons, and Wireless Approaches
During ureteroscopy, there are various techniques available to access the ureter and renal collecting system. The initial step involves the retrograde insertion of one or more “working” wires through the ureter, coiling in the renal pelvis. Several types of guidewires are available to help overcome obstructive stones or tortuous segments. A second “safety” wire is typically placed to facilitate repeated access to the collecting system. Once placed, a semi-rigid ureteroscope can be directly introduced into the ureter, or a flexible ureteroscope can be introduced via a sheath, Seldinger-fashion. If necessary, there are many devices available for ureteral dilation. In some cases, a ureteral access sheath may offer advantages by facilitating repeated access to the ureter for stone fragment retrieval and reducing renal intrapelvic pressure. Urologists should be adaptable to various ureteral access techniques to achieve maximal success in a range of clinical situations.Since the first ureteroscopy performed by Hugh Hampton Young in 1912 using a pediatric cystoscope, there have been extensive technological advancements in devices available for ureteral and upper urinary tract endoscopic evaluation and management. The diameter of the ureteroscope itself has decreased, and optical improvements have greatly enhanced visualization. Today’s actively deflectable flexible scopes can reach most locations in the upper urinary tract to target urinary stones and tumors. There are various methods to deliver these ureteroscopes to the ureter and collecting system. In this chapter, we will review several options for ureteroscopic access, including methods for dilating the ureter when necessary.
Initial Steps in Ureteroscopy
When preparing for ureteroscopy, various wires should be used to access the ureter, as most of the tools (catheters, balloons, dilators, sheaths, and scopes) utilized during ureteroscopy are passed through these guidewires.
Guidewire Placement
Generally, the first step in most ureteroscopy procedures is to retrograde place a soft-tipped guidewire through the ureteral orifice, coiling up the ureter into the renal pelvis or one of its calices. Prior to placing the wire, consideration should be given to performing a retrograde pyelogram to outline the ureteral and renal anatomy and guide wire placement. The wire is then typically passed through the ureteral orifice under cystoscopic and fluoroscopic guidance, allowing the distal portion of the wire to extend outside the patient’s urethra. The choice of wire depends on the indications for surgery and the anticipated anatomy. In most cases, a standard PTFE-coated wire with a diameter of 0.035 inches or 0.038 inches can be used as the initial access wire. However, in cases of obstruction, such as the presence of ureteral stones, standard wires may not easily navigate around the obstructed area, and alternative access techniques may be helpful. In these instances, hydrophilic “slippery wires” may be easier to navigate past obstructions. Once the hydrophilic wire has crossed the stone or other lesions, a 5 Fr open ureteral catheter can be passed over it, and the wire can be exchanged for a safer standard wire. Some surgeons prefer to use combination wires, such as the SensorTM (Boston Scientific, Natick, MA) wire, which consists of a standard PTFE-coated wire with a hydrophilic soft tip (Figure 7.1).
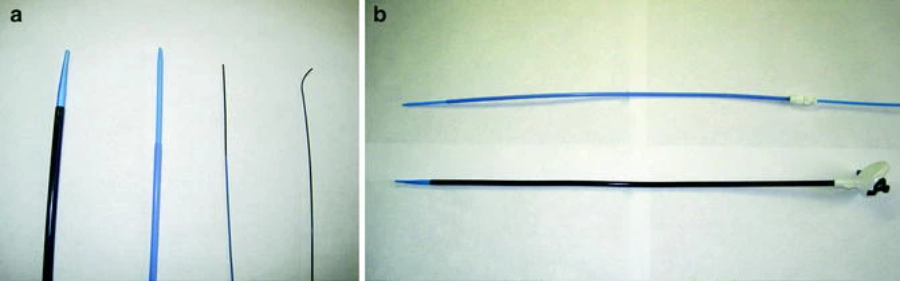
(a, from left to right) ureteral access sheath, inner obturator is light blue; 2-piece 8/10 Fr ureteral dilator; 0.035 inch mixed wire, PTFE-coated (blue), with hydrophilic soft tip (black); angled hydrophilic “slippery wire.” (b) 2-piece 8/10 Fr ureteral dilator (top). To dilate the ureter, both components are passed together over the working wire. The second wire can then be added by removing the 8 Fr component (light blue). The ureteral access sheath (bottom) also consists of two parts that are passed together over the working wire. The inner obturator (light blue) is then removed to allow the ureteroscope to be inserted.
If difficulties persist despite the use of hydrophilic wires, alternative techniques can be employed for wire placement. A 5 Fr ureteral catheter can be passed under fluoroscopic guidance to a position just below the stone or difficult area via the wire. At this point, the wire can be temporarily removed from the catheter lumen, and contrast can be injected through the catheter to further define the anatomy (in cases of ureteral stones, this process may sometimes be sufficient to mobilize the stone adequately so that the wire can more easily “slip” past it). The hydrophilic wire can then be re-advanced through the ureteral catheter, whether straight or with a curved/angled tip (Figure 7.1). In some cases, using the ureteral catheter is sufficient to straighten the ureter to alter the angle of the wire tip, thereby improving the chances of navigating past obstructive lesions. Finally, if these techniques fail, in some instances, a “last resort” may be to place the safety wire under direct visualization with the ureteroscope. This option may be best suited for treating obstructing stones in the distal ureter, where the ureteral wall is thicker, and under direct guidance, a semi-rigid ureteroscope can be advanced more safely into the ureter. Once the stone is visualized with the ureteroscope, the wire can be passed through the working channel and positioned favorably around the stone.
Ureteroscope Placement
Once the safety wire is coiled in the renal collecting system, the next step depends on the indication for surgery and the type of ureteroscope to be used. Many modern semi-rigid ureteroscopes, with a narrow tip measuring 4.0-7.2 Fr, can be introduced into the ureter along the safety wire without the need for any formal dilation of the ureteral orifice. If there is any resistance to advancement, the procedure should be halted, and ureteral dilation methods should be employed as described below. For most flexible ureteroscopy procedures, both a safety wire and a second working wire are required. The second wire can be added by passing a dual-lumen 10 Fr catheter over the safety wire under fluoroscopic guidance, then inserting the second wire into the open lumen of the catheter. Another instrument can be used for this task, employing a paired 8/10 Fr dilator set, where the 8 Fr portion serves as the obturator, tapering to the size of the wire (Figure 7.1). Once this set is passed over the safety wire, the 8 Fr component can be removed, and the second wire can be passed through the 10 Fr component before removal. This technique typically provides sufficient dilation to allow modern flexible ureteroscopes to enter the ureter. At this point, the flexible ureteroscope can be back-loaded onto the working wire and advanced to the desired position in the ureter or renal pelvis under fluoroscopic guidance (Figure 7.2).
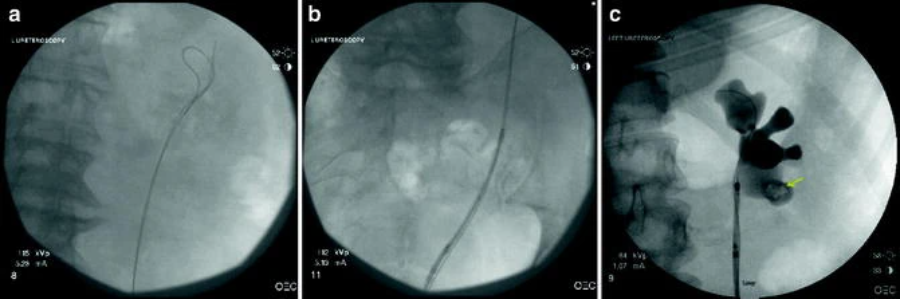
Ureteroscope insertion using Seldinger technique. First, two wires (one “working” wire and one “safety” wire) are passed to coil in the renal pelvis under fluoroscopic and cystoscopic guidance (a). The flexible ureteroscope is then back-loaded onto the working wire and advanced into the ureter under fluoroscopic visualization, maintaining tension on the wire (b). Once the endoscope is advanced all the way to the renal pelvis (c), the working wire can be removed, releasing the working channel in the endoscope. The retrograde pyelogram here shows the position of the wire and ureteroscope, as well as the lower pole calculus (arrow)
Balloon Dilation
If advancement of the ureteroscope fails, the most common site where the scope “hangs up” is at the ureteral orifice/intramural tunnel. Sometimes a simple modification that can overcome this issue is to rotate the scope 180°, positioning the angled tip forward, and then gently attempt to advance the scope again. If this does not work, a balloon dilator can be used to complete dilation of the distal ureter. The inflatable portion of these balloons typically measures 4-10 cm in length, and while there are many diameters available, a balloon diameter of 12-15 Fr is usually suitable for this task. These balloons have radiopaque markers at both proximal and distal ends that can be used to position the balloon on the working wire under fluoroscopy (Figure 7.3). Direct visualization of the balloon’s position can also be accomplished by first back-loading a cystoscope over the wire. This is useful to ensure that the ureteral orifice itself is dilated.
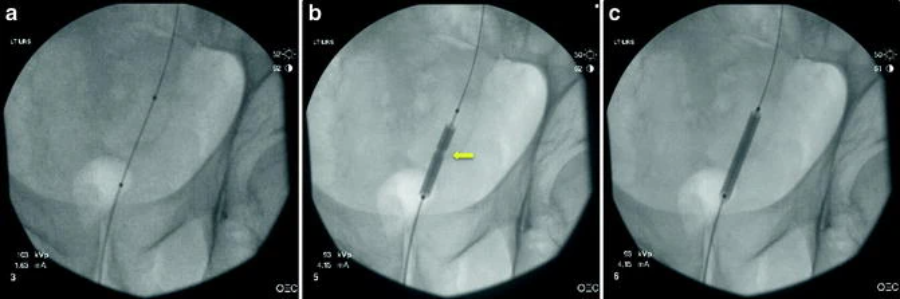
The fluoroscopic image of the ureteral balloon dilator, positioned on the working wire. The pre-inflation image (a) clearly shows the radiolucent markers on the inflatable portion of the designated balloon. Once the balloon is well positioned in the distal ureter, it can be slowly inflated using a pressure injector (b) with a diluted contrast medium. As the balloon inflates, a “waist” typically appears (arrow), corresponding to the tight spot in the ureter. This waist often disappears when the balloon is fully inflated (c). Once the balloon is positioned in the distal ureter, it can be inflated using a pressure injector with a diluted contrast medium. Each balloon is marked with its pressure capacity (usually 17-20 atmospheres), and exceeding that capacity may cause the balloon to rupture, but it is rarely necessary to inflate to maximum pressure. Typically, 5-7 atmospheres are sufficient to dilate the ureter. Balloon inflation should be done under fluoroscopic guidance and slowly, so the surgeon can observe if a “waist” appears, indicating a narrowing or tightness in the ureter (Figure 7.3). Even at low pressures, this waist often quickly disappears. The balloon can then be deflated and removed, leaving the working wire in place for the ureteroscope to pass through into the ureter.
The “Wire-Free” Method
As mentioned earlier, guidewires have multiple uses during ureteroscopy, providing a working wire for Seldinger-style instruments or placing stents when the procedure needs to be aborted. However, in some cases, urologists may find this wire intrusive. For example, during diagnostic ureteroscopy, the presence of a safety wire may interfere with the identification of ureteral lesions or cause “scraping” of the ureteral mucosa, compromising the surgeon’s ability to recognize malignancies. Urologists may consider using a semi-rigid ureteroscope for careful direct observation of the distal ureter without the safety wire, avoiding these visual inaccuracies. Once the distal ureter has been inspected, the position of the tip of the scope can be noted under fluoroscopy, and only within the range previously examined by the rigid scope can the working wire of the ureteroscope be passed, ensuring that any unvisualized mucosa is not exposed to potential wire trauma. The semi-rigid scope can then be removed, leaving the wire in place, and the flexible ureteroscope can be introduced through the wire into the ureter. The wire can then be removed, and the scope can be carefully advanced up the ureter under direct visualization. While this method allows visualization of the ureter and collecting system’s urothelial lining without the impact of wire trauma, if resistance to scope passage or any other technical difficulties are encountered, a safety wire should be inserted through the working channel of the ureteroscope to minimize the risk to the ureter. Similarly, after the endoscopic procedure is successfully completed, consideration should be given to inserting a safety wire into the renal pelvis under direct visualization before removing the scope. This way, if any ureteral perforation is discovered during the pull-back ureteroscopy, a stent can be easily placed. Likewise, during nephrolithotomy, if wire intrusion is noted, the wire-free method may be useful. The ureteroscope can be advanced all the way to the renal pelvis using a working wire through standard Seldinger technique. The wire is then removed from the working channel, and lithotripsy is performed. In this method, as long as the scope remains at or above the ureteropelvic junction, the ureteroscope itself acts as a safety wire, maintaining a channel through the entire ureter. After lithotripsy is completed, the wire can be reinserted through the working channel, coiling around the upper pole and withdrawing the scope, leaving the wire in place for stent placement if needed. Some authors have reported this technique without ureteral perforation or tearing.
Ureteral Access Sheath
Another approach to ureteroscopic access is the use of ureteral access sheaths. These disposable devices are available from several manufacturers and typically consist of two components: the anti-kinking sheath itself and the inner obturator, which tapers to the diameter of the working wire and dilates the ureter during sheath insertion (Figure 7.1). These devices come in various diameters from 10/12 to 14/16 Fr, with the first number describing the inner diameter of the sheath and the second number representing the outer diameter. Their lengths also vary from 20 to 55 cm to accommodate variations in patient body habitus and surgical indications.
Clinical Applications
Ureteral access sheaths have several potential advantages. Some authors have reported that using a sheath with a diameter of 12/14 Fr or larger minimizes the increase in intrarenal pressure while maximizing irrigation flow, which can improve visualization [5-7]. Sheaths are also useful if the surgeon plans to pass the scope multiple times up and down the ureter, such as for stone fragment retrieval. Using a sheath in these cases makes repeated passage of the scope easier and may be safer [8]. Finally, some surgeons performing ureteroscopic biopsies of lesions (such as upper tract transitional cell carcinoma) have found that using sheaths can preserve the integrity of specimens, as the sheath can prevent the ureteral wall from “scraping” specimens off the biopsy forceps [9]. A summary of the results of several studies reporting the use of ureteral access sheaths is presented in Table 7.1.
Technique
Ureteroscopy using an access sheath begins with the retrograde placement of two wires into the renal pelvis. The working wire should be a super stiff wire to minimize the risk of wire bending and allow the obturator tip to perforate the ureter. The sheath should be thoroughly moistened with saline or water to ensure the hydrophilic coating has sufficient lubrication. The safety wire is then secured alongside the sheath under fluoroscopic guidance while advancing the sheath forward. Care should be taken during the placement process to note any resistance encountered, as the ureter may perforate. Once the sheath is positioned, the obturator and working wire are removed, completing the sheath expansion. In some cases, deployment of the sheath may not be possible. Potential reasons include sheath kinking (often seen in males), small or narrow ureteral caliber, stones, or other causes of obstruction. Surgeons should be vigilant for these possibilities rather than attempting to force the sheath. If obstruction is not suspected, consideration can be given to trying to pass the smaller caliber obturator portion of the device first. This may gently dilate the ureter and allow the combined sheath/obturator to advance successfully upon re-access. If the sheath still does not reach the intended direction but is at least deployed in the distal ureter, the sheath can be kept in place, and the obturator/wire can be removed to inspect the area causing resistance with a ureteroscope. This will allow the surgeon to see if obstructive stones or strictures are present. In some cases, placing the sheath only at the distal or mid-ureter may be sufficient to complete the task at hand, and the process can continue. If not, sheath placement can be abandoned, and one of the other ureteroscopic access techniques can be used, or a stent can be placed to allow passive ureteral dilation and a repeat attempt after a few days. After completing the planned ureteroscopy tasks (lithotripsy, biopsy, etc.), the ureter should be carefully inspected for possible tears as the endoscope is removed from the upper urinary tract. The sheath should be extracted simultaneously with the scope to allow direct visualization of the entire ureter. If any ureteral injury is detected, stents should be placed postoperatively for several weeks based on the extent of the injury. Even if no injury is seen, consideration should be strongly given to temporarily placing a ureteral stent after sheath deployment, as some authors report that a significant number of patients experience colic if no stent is left behind.In summary, the reduced caliber of ureteroscopes and improved optical components have broadened the appropriate task scope of modern ureteroscopy. Urologists should cultivate comfort with various ureteral access techniques to maximize success in various clinical scenarios.