Purpose
This article introduces the implementation principles of the ROS Robot Operating System, analyzing how ROS code is implemented from the lowest level.
1. Serialization
Serializing the content of communication (i.e., messages) is the foundation of communication, so we first study serialization.
Although I have been engaged in robotics learning and research for a long time, during the study of ROS, the term “serialization” was something I heard for the first time in my life.
It is easy to imagine how bewildered many people might be when they see descriptions like “serialize a message”.
However, serialization is a relatively common concept; even if you don’t know it, you have certainly encountered it.
Next, we will introduce some common knowledge about “serialization” and then explain how serialization is done in ROS.
1.1 What is Serialization?
“Serialization” means converting an object into a byte stream.
The object mentioned here can be understood as the object in “object-oriented” programming, specifically, the object data stored in memory.
The opposite process is “deserialization”.
Although the term is associated with robotics, the following introduction is entirely about computer knowledge and has nothing to do with robotics; serialization is purely a computer concept.
The English term Serialize implies turning something into a continuous string of data.
To illustrate, a data object is like a lump of dough; serialization is like stretching the dough into a noodle, and deserialization is like kneading the noodle back into dough.
Another analogy is that when we talk or make a phone call, a person’s thoughts are converted into one-dimensional speech, which then transforms back into structured thoughts in another person’s mind; this is also a form of serialization.
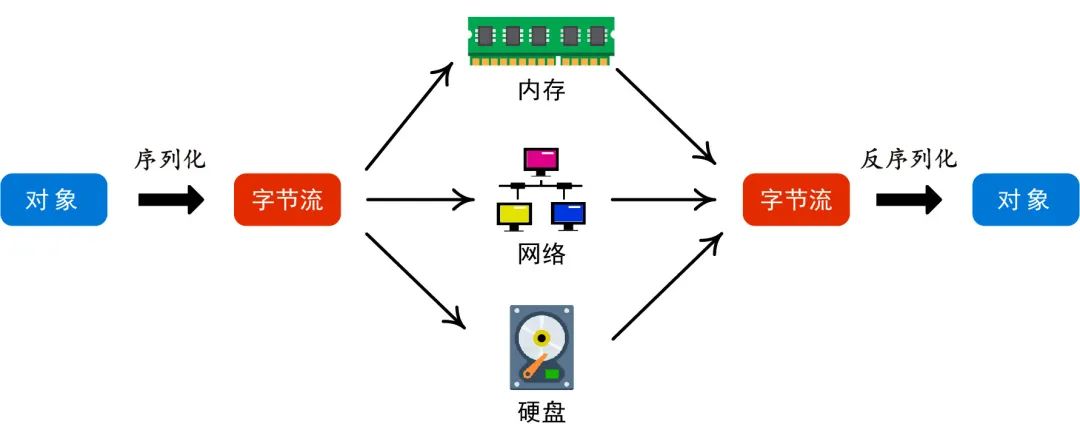
When faced with serialization, many people may have many questions.
First, why serialize? Or more specifically, since the object’s information is already stored in memory as bytes, why go through the trouble of converting some byte data into another form, a one-dimensional, continuous byte data?
If our program stores a number in memory, say 25, how do we pass this number to other program nodes or permanently store this number?
It’s simple; we can directly pass the number 25 (its byte representation, which is 0X19, and will eventually be represented in binary as 11001 for high and low level transmission/storage) or write this number (its byte representation) directly to the hard drive.
Therefore, for data that is already continuous, one-dimensional, and a series of data (such as strings), serialization does not require much; its essence is merely copying data from memory to elsewhere.
So, if you see the memcpy function in a serialization library, don’t be surprised, because you know that serialization at its core is just manipulating memory data (some libraries also use the stream’s ostream.rdbuf()->sputn function).
However, the objects that actual programs operate on are rarely this simple; most of the time, we face complex data structures (like vectors and lists) that contain different data types (int, double, string), and they may not be stored continuously in memory but scattered in various places. For example, many ROS messages contain vectors.
There are also various pointers and references in the data. Moreover, if data needs to be transmitted between node programs running on different architectures and written in different programming languages, the problem becomes even more complicated; their byte order (endianness) may differ, and the length of basic data types (like int) may also vary (some ints are 4 bytes, others are 8 bytes).
These cannot be solved by simply copying and pasting the original data as is. This is when serialization and deserialization become necessary.
Thus, when programs need to communicate (which is precisely the case with ROS), or when we want to save intermediate computation results, serialization comes into play.
Furthermore, to some extent, serialization also serves to standardize.
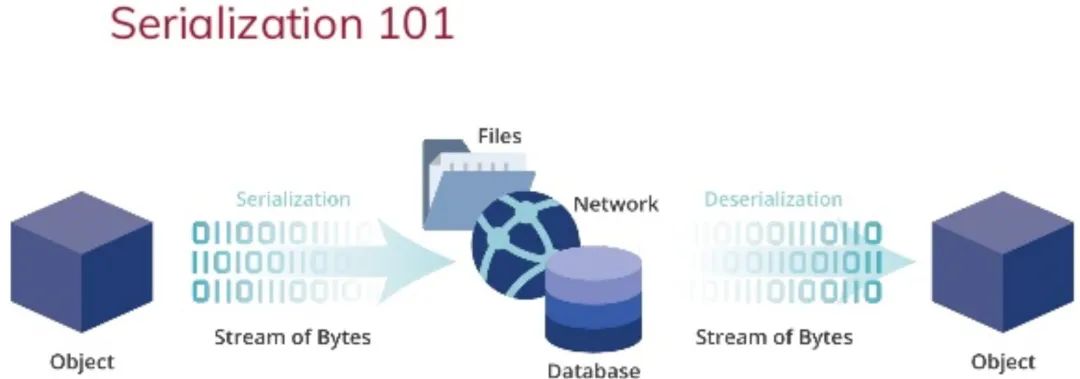
We call what is being serialized an object; it can be any data structure or object: structures, arrays, instances of classes, etc.
The result of serialization is called an archive; it can be in a human-readable text format or a binary format.
The former includes formats like JSON and XML, which are the most commonly used serialization formats in web applications and can be opened and read with a text editor.
The latter are raw binary files, such as files with a .bin extension, which humans cannot directly read like a bunch of 0101s or 0XC9D23E72s.
Serialization is a relatively common function, so most programming languages (such as C++, Python, Java, etc.) come with libraries for serialization, so you don’t need to reinvent the wheel.
For example, in C++, although the standard STL library does not provide serialization functionality, third-party libraries like Boost provide it, Google’s protobuf is also a serialization library, as are Fast-CDR and the lesser-known Cereal. Java has built-in serialization functions, and Python can use the third-party pickle module to achieve serialization.
In short, there is nothing mysterious about serialization; users can look at the code of these open-source serialization libraries or write a small program to try simple data serialization, such as this example or this one, which helps better understand the implementation in ROS.
1.2 ROS Serialization Implementation
Having understood serialization, let’s return to ROS. We find that ROS does not use third-party serialization tools but chooses to implement its own, with the code located in the roscpp_core project under roscpp_serialization, as shown in the figure below. The amount of code involved is not large.
Why didn’t ROS use existing serialization tools or libraries? It is possible that when ROS was created (in 2007), some serialization libraries did not yet exist (protobuf was created in 2008), or more likely that the creators of ROS thought there were no suitable tools at that time.
1.2.1 serialization.h
The core functions are in serialization.h; in short, it uses the C standard library’s memcpy function to copy messages into the stream.
Let’s take a look at the specific implementation.
The characteristic of serialization functionality is that it needs to handle many types of data, and for each specific type, corresponding serialization functions must be implemented.
To minimize code volume, ROS uses the concept of templates, so there are a lot of templates in the code.
Starting from the back, let’s first look at the Stream structure. In C++, there is hardly any difference between structures and classes; functions can also be defined within structures.
Stream, translated as stream, is an abstract concept in computing. Earlier, we mentioned byte streams; what does it mean?
When data needs to be transmitted, we can think of the data as a series of objects continuously arranged on a conveyor belt; they form a stream.
More vividly, one can imagine a tape or a continuous paper tape in a Turing machine. Streams are often used in file reading and writing, serial port usage, network socket communication, and so on. For example, our commonly used input and output streams:
cout << “hello”; Due to frequent usage, the concept of streams is evolving. To learn more, you can check here.
struct Stream{ // Returns a pointer to the current position of the stream inline uint8_t* getData() { return data_; } // Advances the stream, checking bounds, and returns a pointer to the position before it was advanced. // hrows StreamOverrunException if len would take this stream past the end of its buffer ROS_FORCE_INLINE uint8_t* advance(uint32_t len){ uint8_t* old_data = data_; data_ += len; if (data_ > end_) { // Throwing directly here causes a significant speed hit due to the extra code generated for the throw statement throwStreamOverrun(); } return old_data; } // Returns the amount of space left in the stream inline uint32_t getLength() { return static_cast<uint32_t>(end_ - data_); } protected: Stream(uint8_t* _data, uint32_t _count) : data_(_data), end_(_data + _count) {} private: uint8_t* data_; uint8_t* end_;};The comments indicate that Stream is a base class, and input/output streams IStream and OStream both inherit from it.
The member variable data_ is a pointer that points to the beginning of the serialized byte stream, and its type is uint8_t.
In the Ubuntu system, uint8_t is defined as typedef unsigned char uint8_t;
Thus, uint8_t is one byte, which can be verified using the size_of() function. The space pointed to by data_ is where the byte stream is stored.
The output stream class OStream is used to serialize an object; it references the serialize function, as follows.
struct OStream : public Stream{ static const StreamType stream_type = stream_types::Output; OStream(uint8_t* data, uint32_t count) : Stream(data, count) {} /* Serialize an item to this output stream*/ template<typename T> ROS_FORCE_INLINE void next(const T& t){ serialize(*this, t); } template<typename T> ROS_FORCE_INLINE OStream& operator<<(const T& t) { serialize(*this, t); return *this; }}The input stream class IStream is used to deserialize a byte stream; it references the deserialize function, as follows.
struct ROSCPP_SERIALIZATION_DECL IStream : public Stream{ static const StreamType stream_type = stream_types::Input; IStream(uint8_t* data, uint32_t count) : Stream(data, count) {} /* Deserialize an item from this input stream */ template<typename T> ROS_FORCE_INLINE void next(T& t){ deserialize(*this, t); } template<typename T> ROS_FORCE_INLINE IStream& operator>>(T& t) { deserialize(*this, t); return *this; }}Naturally, the serialize and deserialize functions are where the data format changes occur; their definitions are located earlier in the code. They both accept two templates and are inline functions, with not much content, but they call the member functions write and read of the Serializer class. Thus, the serialize and deserialize functions act as intermediaries.
// Serialize an object. Stream here should normally be a ros::serialization::OStreamtemplate<typename T, typename Stream>inline void serialize(Stream& stream, const T& t){ Serializer<T>::write(stream, t);}// Deserialize an object. Stream here should normally be a ros::serialization::IStreamtemplate<typename T, typename Stream>inline void deserialize(Stream& stream, T& t){ Serializer<T>::read(stream, t);}Thus, let’s analyze the Serializer class, as follows. We find that the write and read functions again call the serialize and deserialize functions within the types.
Don’t get confused by the names; the serialize and deserialize functions here are not the same as the ones mentioned above.
The comments state: “Specializing the Serializer class is the only thing you need to do to get the ROS serialization system to work with a type” (to make ROS’s serialization functionality applicable to another type, all you need to do is specialize this Serializer class).
This introduces another knowledge point—template specialization.
template<typename T> struct Serializer{ // Write an object to the stream. Normally the stream passed in here will be a ros::serialization::OStream template<typename Stream> inline static void write(Stream& stream, typename boost::call_traits<T>::param_type t){ t.serialize(stream.getData(), 0); } // Read an object from the stream. Normally the stream passed in here will be a ros::serialization::IStream template<typename Stream> inline static void read(Stream& stream, typename boost::call_traits<T>::reference t){ t.deserialize(stream.getData()); } // Determine the serialized length of an object. inline static uint32_t serializedLength(typename boost::call_traits<T>::param_type t){ return t.serializationLength(); }}Next, a macro function ROS_CREATE_SIMPLE_SERIALIZER(Type) with parameters is defined, and this macro is applied to 10 basic data types in ROS: uint8_t, int8_t, uint16_t, int16_t, uint32_t, int32_t, uint64_t, int64_t, float, double.
This indicates that the handling of these 10 data types is similar. At this point, you should understand that the write and read functions use the memcpy function to move data.
Note the template<> statement in the macro definition; this is the mark of template specialization, where the keyword template is followed by a pair of angle brackets.
For other data types, such as bool, std::string, std::vector, ros::Time, ros::Duration, boost::array, etc., their handling methods have subtle differences, so they are not defined using the above macro but are instead defined individually using template specialization; this is why serialization.h is so lengthy.
For single-element data types like int and double, serialization is directly implemented using the memcpy function in the specialized Serializer class.
For multi-element data types like vectors and arrays, how do we handle them? The approach is to divide them into several cases; for fixed-length simple types, we still use the memcpy function in their respective specialized Serializer classes, with little difference.
For fixed but non-simple types or non-fixed and non-simple types, or fixed but non-simple types, we use a for loop to process each element individually.
How to determine whether a data type is fixed or simple? This is accomplished in the roscpp_traits folder’s message_traits.h.
It employs a technique called Type Traits, which is a relatively advanced programming technique that I don’t quite understand either.
For now, this concludes the introduction to serialization; some details remain to be discussed, which I will supplement once I understand them.
2. Message Publishing and Subscription
2.1 The Essence of ROS
If you ask what the essence of ROS is, or to summarize the core functionality of ROS in one sentence, I believe ROS is a communication library that allows different program nodes to talk to each other.
Many articles and books often describe ROS as “a communication framework” when introducing what ROS is.
However, I believe this description is not very appropriate. The term “framework” is an abstract term that is very unfriendly to beginners; using a more abstract and obscure concept to explain a concept that is already unclear does not help beginners at all.
Moreover, I seriously doubt that the vast majority of authors have a deeper understanding of the essence of robotics or software frameworks; their insights are unlikely to be much deeper than yours or mine.
Since we are discussing essence, let’s delve into the most fundamental question.
Before getting into endless details, let’s engage in some philosophical thinking.
That is, why does ROS aim to solve communication problems?
Robotics involves thousands of things, encompassing mechanics, electronics, software, and artificial intelligence; why is the underlying design a program for communication rather than something else?
So far, I have not seen anyone discuss this question. This goes back to the essence of robotics or intelligence.
When we talk about robots, the primary issue is not hardware design, but information processing. What information does a robot need, where does the information come from, how is it transmitted, and who uses it are the most important questions.
Humans cannot fly like birds, swim like fish, or run like horses, nor do they have the strength of oxen; why do we still claim to be the most intelligent beings?
Because humans have brains, and the human brain processes more complex information.
Setting aside material concerns, from an informational perspective, there are many similarities between humans and animals, as well as between humans and robots.
Robots are composed of many functional modules that need to collaborate to form a useful whole; robots also need to collaborate with one another to form a useful system, and collaboration is impossible without communication.
The type of information needed and where it comes from is not the primary concern of ROS, as it depends on the application scenario of the robot.
Therefore, ROS’s primary focus is to solve communication problems, i.e., how to establish communication, what means to use for communication, what the format of communication should be, and so on.
With these questions in mind, let’s take a look at how ROS is designed.
2.2 Client Libraries
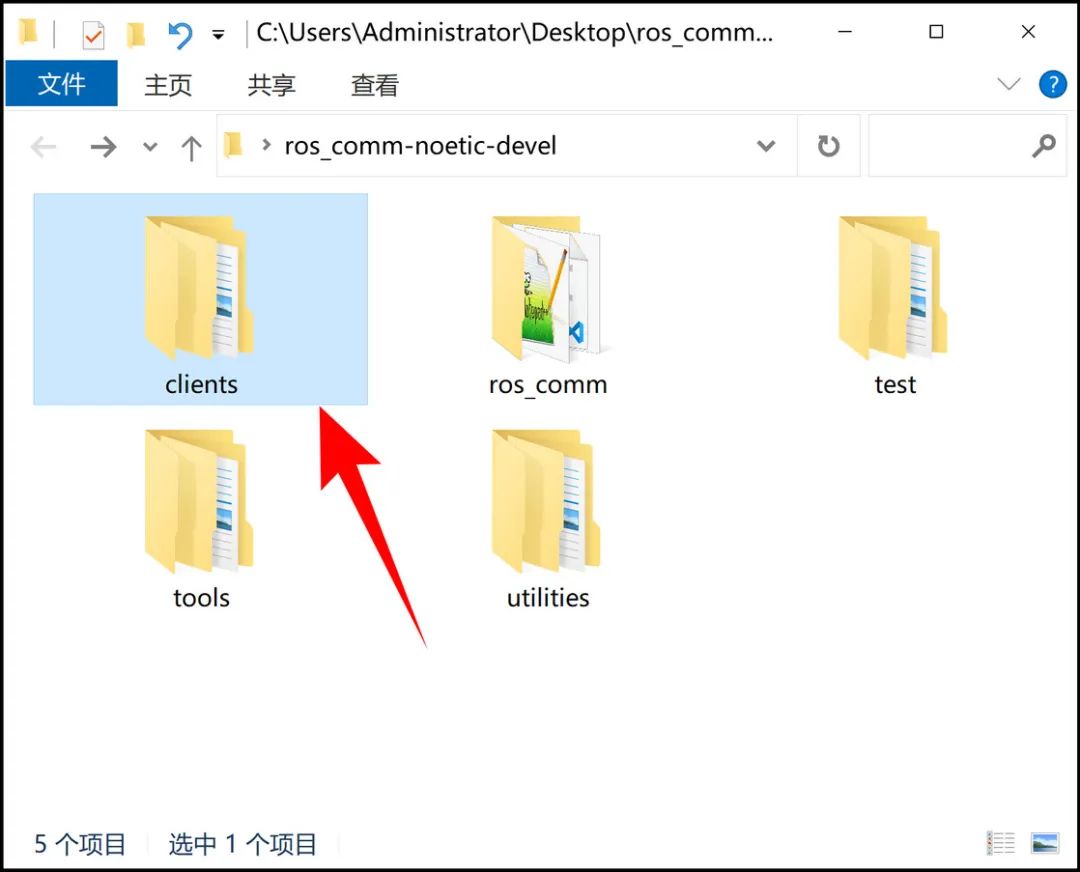
The code for implementing communication is in the ros_comm package, as follows.
The clients folder contains a total of 127 files, indicating it is the largest package.
Now we have arrived at the most core area of ROS.
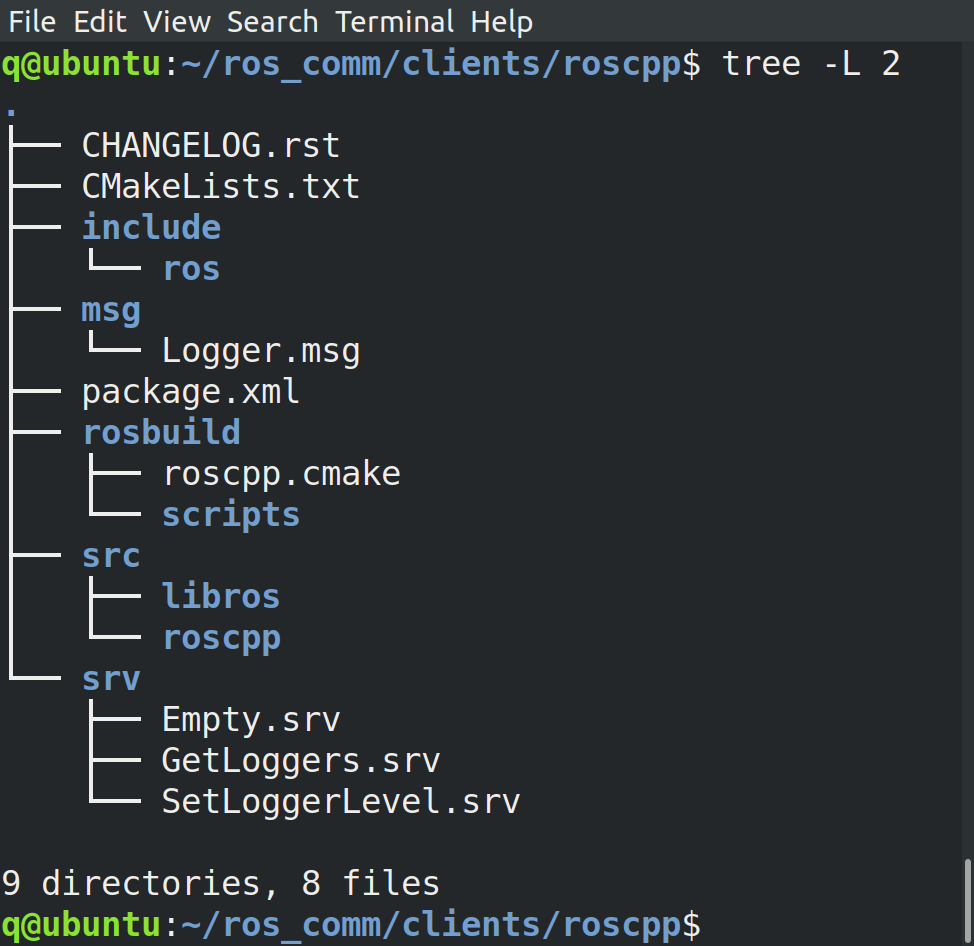
The term “client” appears somewhat suddenly; why is there a client in a robot operating system?
The reason is that the relationship between nodes and the master node is client/server; each node acts as a client, while the master is naturally the server.
So what are client libraries for? They are designed to facilitate communication between nodes.
Although the entire folder contains numerous files, if we analyze it according to a certain context, it will not be overwhelming.
The primary communication method between nodes is based on messages. To achieve this, three steps are required, as follows.
Understanding these three steps will clarify how ROS operates. These steps seem quite logical and are not surprising.
1. The publisher and subscriber (i.e., the message receiver) establish a connection;
2. The publisher publishes messages to a topic, and the subscriber receives messages on the topic, storing them in a callback function queue;
3. The callback functions in the callback function queue are called to process the messages.
2.2.1 The Birth of a Node
Before establishing a connection, a node must first exist.
A node is an independent program; once it runs, it is an ordinary process, not much different from other processes in the computer.
One question is: why is an independent program referred to as a “node” in ROS?
This is because ROS adopts the concept of “node” from computer networking.
In a network, for example, the internet, each computer connected to the internet is a node. The terms client and server we saw earlier are also borrowed from computer networking.
Now let’s see how a node is born. When we first use ROS, we usually follow the official tutorial to write a talker and a listener node to familiarize ourselves with how to use ROS.
Taking the talker as an example, part of its code is as follows.
#include "ros/ros.h"int main(int argc, char **argv){ /* You must call one of the versions of ros::init() before using any other part of the ROS system. */ ros::init(argc, argv, "talker"); ros::NodeHandle n;The main function first calls the init() function to initialize a node; this function is defined in the init.cpp file.
When our program reaches the init() function, a node is born.
Moreover, at birth, we also conveniently give it a name, which is “talker”.
The name can be arbitrary, but it is required.

Let’s enter the init() function to see what it does; the code is as follows, and it looks quite complex. It initializes a global data called g_global_queue, which is of type CallbackQueuePtr.
This is a very important class called the “callback queue,” and we will encounter it later. The init() function also calls the init functions in several namespaces: network, master, this_node, file_log, and param, each initializing some variables, all prefixed with “g,” indicating they are global variables.
Among them, network::init initializes the node’s hostname, IP address, etc.; master::init gets the master’s URI, hostname, and port number.
this_node::init defines the node’s namespace and name; indeed, the name we gave the node is stored here. file_log::init initializes the path for log files.
void init(const M_string& remappings, const std::string& name, uint32_t options){ if (!g_atexit_registered) { g_atexit_registered = true; atexit(atexitCallback); } if (!g_global_queue) { g_global_queue.reset(new CallbackQueue); } if (!g_initialized) { g_init_options = options; g_ok = true; ROSCONSOLE_AUTOINIT; // Disable SIGPIPE#ifndef WIN32 signal(SIGPIPE, SIG_IGN);#else WSADATA wsaData; WSAStartup(MAKEWORD(2, 0), &wsaData);#endif check_ipv6_environment(); network::init(remappings); master::init(remappings); // names:: namespace is initialized by this_node this_node::init(name, remappings, options); file_log::init(remappings); param::init(remappings); g_initialized = true; }}After initialization, it proceeds to the next step, defining the handle ros::NodeHandle n.
We then enter the node_handle.cpp file, where we find that the constructor NodeHandle::NodeHandle calls its own construct function. Then, tracing back, we find the construct function calls ros::start().
Indeed, we have circled back to the init.cpp file.
The ros::start() function primarily instantiates several important classes, as follows.
After instantiation, it immediately calls their respective start() functions to initiate the corresponding actions.
Once all this is done, the node can publish or subscribe to messages.
The story of a node ends here for now.
TopicManager::instance()->start();ServiceManager::instance()->start();ConnectionManager::instance()->start();PollManager::instance()->start();XMLRPCManager::instance()->start();2.2.1 What is XMLRPC?
Regarding the technical details of how ROS nodes establish connections, the official documentation presents it very simply, as seen here in ROS Technical Overview. For those without a foundation, this introduction will inevitably be unclear.
In ROS, communication between nodes relies on the node manager (master) to act as an intermediary.
The master acts like a mediator, introducing nodes to each other. Once nodes are acquainted, the master completes its task and no longer interferes.
This is also why, after starting nodes, if you kill the master, communication between nodes continues to function normally.
Those who have used eMule and Thunder and researched BitTorrent should be familiar with how the master works; the master is akin to a Tracker server, storing the information of other nodes.
Before we download, we always query the Tracker server to find nodes with movie resources, and then we can establish connections with them and start downloading movies.
So how does the master connect nodes? ROS uses a method called XMLRPC to implement this functionality.
In XMLRPC, RPC stands for Remote Procedure Call.
In simple terms, remote procedure calling means that a program (in our case, a node) on one computer can call a function on another computer as long as both computers are on the same network.
This sounds like a sophisticated function; it allows nodes to access program resources on another computer in the network.
The XML in XMLRPC refers to a data representation method, which we mentioned in section 1.1 when discussing message serialization.
So, combined, XMLRPC means sending data represented in XML to be executed by programs on other computers.
After execution, the result is returned in XML format, which we can parse (restoring it to pure data) to perform other tasks.
To understand more about XMLRPC details, you can check this XML-RPC: Overview.
For example, a request in XMLRPC looks like this. Since XMLRPC is based on the HTTP protocol, the following is a standard HTTP message.
POST / HTTP/1.1User-Agent: XMLRPC++ 0.7Host: localhost:11311Content-Type: text/xmlContent-length: 78
<?xml version="1.0"?><methodCall>   <methodName>circleArea</methodName>      <params>         <param>            <value><double>2.41</double></value>         </param>      </params></methodCall>
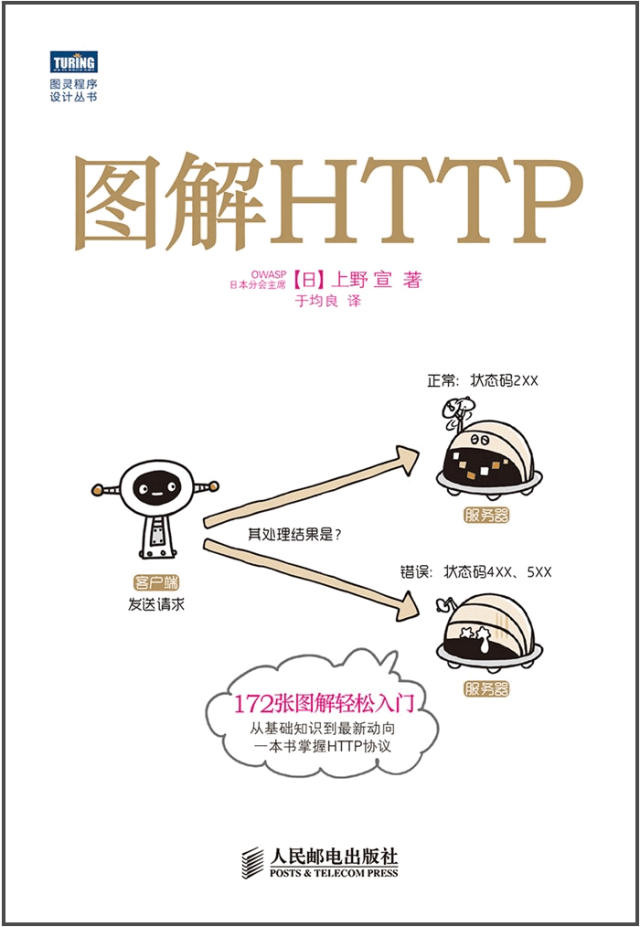
If you haven’t learned the HTTP protocol, the above statement might seem unfamiliar. The small book “Illustrated HTTP” can help you quickly get started.
HTTP messages are relatively simple; they are divided into two parts: the header and the body.
The header and body are separated by an empty line, which is a standard prescribed by the HTTP protocol.
The format of the body part above is XML; once you see it often, you will become familiar with it.
Thus, the messages transmitted by XMLRPC are essentially HTTP messages where the body is in XML format, nothing mysterious.
Correspondingly, a response from the server for a client’s XMLRPC request is also an HTTP message, as follows.
Its structure is the same as the request; no further explanation is needed. Therefore, the process of XMLRPC is quite similar to that of browsing the web.
HTTP/1.1 200 OKDate: Sat, 06 Oct 2001 23:20:04 GMTServer: Apache.1.3.12 (Unix)Connection: closeContent-Type: text/xmlContent-Length: 124
<?xml version="1.0"?><methodResponse>   <params>      <param>         <value><double>18.24668429131</double></value>      </param>   </params></methodResponse>
2.2.2 Implementation of XMLRPC in ROS
The above example explains what XMLRPC is; now let’s see how ROS implements XMLRPC.
The XMLRPC used by ROS is introduced here:
http://wiki.ros.org/xmlrpcpp. This time, the creators of ROS did not reinvent the wheel from scratch but modified an existing XMLRPC library.
The C++ code for XMLRPC is located in the downloaded ros_comm-noetic-devel\utilities\xmlrpcpp path.
Fortunately, the entire project is not too large. XMLRPC is divided into client and server parts.
Let’s first look at the client; the main code is in XmlRpcClient.cpp.
To catch the thief, catch the king first; the core function in XmlRpcClient.cpp is execute, which is used to perform remote calls, as follows.
// Execute the named procedure on the remote server.// Params should be an array of the arguments for the method.// Returns true if the request was sent and a result received (although the result might be a fault).bool XmlRpcClient::execute(const char* method, XmlRpcValue const& params, XmlRpcValue& result){  XmlRpcUtil::log(1, "XmlRpcClient::execute: method %s (_connectionState %s).", method, connectionStateStr(_connectionState));
  // This is not a thread-safe operation, if you want to do multithreading, use separate  // clients for each thread. If you want to protect yourself from multiple threads  // accessing the same client, replace this code with a real mutex.  if (_executing)    return false;
  _executing = true;  ClearFlagOnExit cf(_executing);  _sendAttempts = 0;  _isFault = false;
  if ( ! setupConnection())    return false;
  if ( ! generateRequest(method, params))    return false;
  result.clear();  double msTime = -1.0;   // Process until exit is called  _disp.work(msTime);
  if (_connectionState != IDLE || ! parseResponse(result)) {    _header = "";    return false;  }
  // close() if server does not supports HTTP1.1  // otherwise, reusing the socket to write leads to a SIGPIPE because  // the remote server could shut down the corresponding socket.  if (_header.find("HTTP/1.1 200 OK", 0, 15) != 0) {    close();  }
  XmlRpcUtil::log(1, "XmlRpcClient::execute: method %s completed.", method);  _header = "";  _response = "";  return true;}
It first calls the setupConnection() function to establish a connection with the server.
Once the connection is successful, it calls the generateRequest() function to create the request message.
The header of the XMLRPC request message is handled by the generateHeader() function, as follows.
// Prepend http headersstd::string XmlRpcClient::generateHeader(size_t length) const{  std::string header =     "POST " + _uri + " HTTP/1.1\r\n"    "User-Agent: ";  header += XMLRPC_VERSION;  header += "\r\nHost: ";  header += _host;
  char buff[40];  std::snprintf(buff,40,":%d\r\n", _port);
  header += buff;  header += "Content-Type: text/xml\r\nContent-length: ";
  std::snprintf(buff,40,"%zu\r\n\r\n", length);  return header + buff;}
The body part converts the method and parameters for the remote call into XML format, and the generateRequest() function combines the header and body into a complete message, as follows:
std::string header = generateHeader(body.length());_request = header + body;After sending the message to the server, it waits quietly.
Once the server’s response message is received, it calls the parseResponse function to parse the message data, which means converting the XML format back into pure data format.
We find that XMLRPC uses socket functionality to implement communication between the client and server.
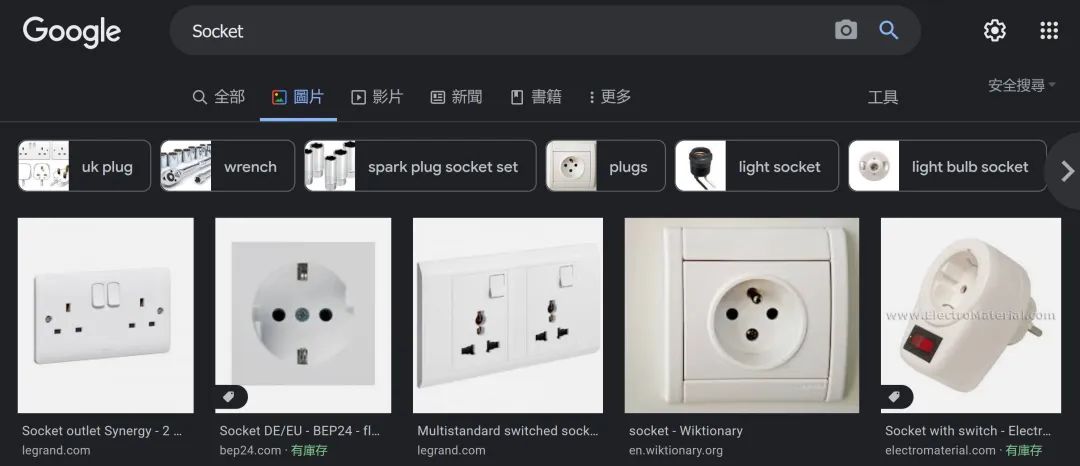
We search for the word socket and find that its original meaning is socket, which is quite illustrative; establishing a connection for communication is like plugging a plug into a socket.
Although XMLRPC is part of ROS, it is merely a basic function, and we will use it as needed without delving into its implementation details.
So, our analysis of it stops here. Next, let’s see how nodes call XMLRPC.
2.2.3 Establishing Connections Between Nodes via XMLRPC
When a node is just started, it is unaware of the existence of other nodes and has no knowledge of what they are communicating; thus, communication cannot be established.
Therefore, it first needs to talk to the master to query the status of other nodes before communicating with them.
Nodes communicate with the master using XMLRPC.
From this perspective, the master truly lives up to its name as the node manager; it serves as a big housekeeper, providing services to newly born nodes.
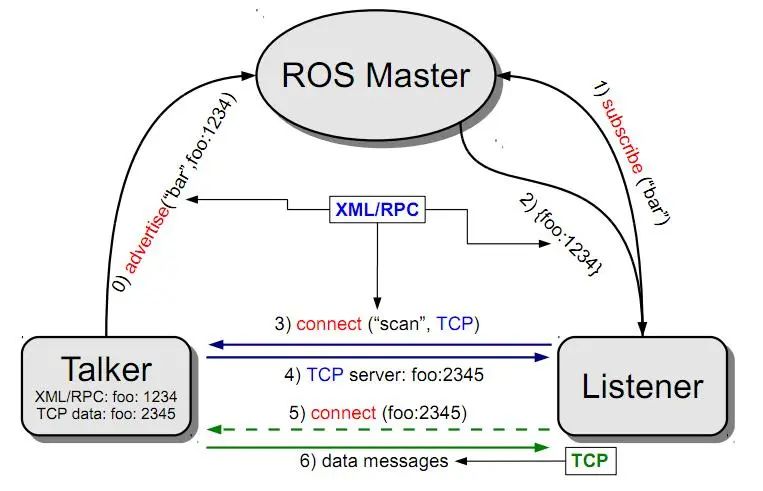
Now, let’s take two nodes: talker and listener, as an example to illustrate the process of establishing communication connections through XMLRPC, as shown in the figure below.
-
talker registration
Suppose we first start the talker. After starting, it uses XMLRPC to register its information with the master through port 1234, including the name of the topic it publishes. The master will add the talker’s registration information to the registration list;
2. listener registration
After the listener starts, it similarly uses XMLRPC to register its information with the master, including the name of the topic it needs to subscribe to;
3. master matching
The master searches the registration list based on the listener’s subscription information; if it does not find a matching publisher, it waits for the publisher to join. If it finds matching publisher information, it sends the talker’s address information to the listener via XMLRPC.
4. listener sends connection request
Upon receiving the talker address information sent back by the master, the listener attempts to send a connection request to the talker via XMLRPC, transmitting the subscribed topic name, message type, and communication protocol (TCP or UDP);
5. talker confirms the connection request
After the talker receives the connection request sent by the listener, it continues to confirm the connection information to the listener via XMLRPC, which includes its own TCP address information;
6. listener attempts to establish a connection with talker
After receiving the confirmation information, the listener attempts to establish a network connection with the talker using TCP.
7. talker publishes messages to listener
After successfully establishing the connection, the talker begins to send topic message data to the listener; the master no longer participates.
From the analysis above, we can see that the communication protocol used in the first five steps is XMLRPC, while the final data publishing process utilizes TCP.
The master only plays a role in the process of establishing connections between nodes, but does not participate in the final data transmission between nodes.
When a node requests to establish a connection, it calls the execute() function in master.cpp to invoke the function from the XMLRPC library.
For example, if the talker node is to publish a message, it will call the TopicManager::advertise() function in topic_manager.cpp, which will call the execute() function; the relevant code is as follows.
XmlRpcValue args, result, payload; args[0] = this_node::getName(); args[1] = ops.topic; args[2] = ops.datatype; args[3] = xmlrpc_manager_->getServerURI(); master::execute("registerPublisher", args, result, payload, true);Here, registerPublisher is a remote procedure call method (or function). The node registers with the master through this remote procedure call, indicating that it intends to publish messages.
You may ask where the registerPublisher method is executed. We navigate to the ros_comm-noetic-devel\tools\rosmaster\src\rosmaster path and open the master_api.py file, then search for the registerPublisher method to find the corresponding code, as follows.
A quick glance reveals that it notifies all nodes subscribing to this message to prepare for receiving messages.
You may have noticed that this called XMLRPC is implemented in Python.
This means that during XMLRPC communication, as long as the message format is consistent, it can achieve remote calling functionality regardless of whether it is implemented in C++ or Python.
def registerPublisher(self, caller_id, topic, topic_type, caller_api): try: self.ps_lock.acquire() self.reg_manager.register_publisher(topic, caller_id, caller_api) # don't let '*' type squash valid typing if topic_type != rosgraph.names.ANYTYPE or not topic in self.topics_types: self.topics_types[topic] = topic_type pub_uris = self.publishers.get_apis(topic) sub_uris = self.subscribers.get_apis(topic) self._notify_topic_subscribers(topic, pub_uris, sub_uris) mloginfo("+PUB [%s] %s %s",topic, caller_id, caller_api) sub_uris = self.subscribers.get_apis(topic) finally: self.ps_lock.release() return 1, "Registered [%s] as publisher of [%s]"%(caller_id, topic), sub_uris2.3 What is the Master?
When we type roscore in the command line to start ROS’s node manager, what exactly happens behind the scenes? Let’s first use Ubuntu’s which command to find where the roscore command is located, and we find it at /opt/ros/melodic/bin/roscore, as shown in the figure. Then we use the file command to check its attributes, and we find it is a Python script.

2.3.1 The roscore Script
We return to the downloaded source code: in the ros_comm folder, we find the roscore file located in \ros_comm-melodic-devel\tools\roslaunch\scripts.
Although it is a Python script, it does not have a .py extension.
Opening it with a text editor, the first line reads #!/usr/bin/env python, indicating that it is a Python 2 version script.
We find that this roscore is just a shell; the only important command is at the end, as follows:
import roslaunchroslaunch.main(['roscore', '--core'] + sys.argv[1:])2.3.2 The roslaunch Module
2.3.2.1 How is the XMLRPC Server Started?
roscore calls the roslaunch.main function, and we continue tracing into the ros_comm-noetic-devel\tools\roslaunch\src\roslaunch folder, where we find an __init__.py file, indicating that this folder is a Python package. Opening the __init__.py file, we find the def main(argv=sys.argv) function, which is the implementation of the roslaunch.main function, as follows (only the main code is retained, with less important parts removed).
def main(argv=sys.argv):    options = None    logger = None    try:        from . import rlutil        parser = _get_optparse()                (options, args) = parser.parse_args(argv[1:])        args = rlutil.resolve_launch_arguments(args)        write_pid_file(options.pid_fn, options.core, options.port)        uuid = rlutil.get_or_generate_uuid(options.run_id, options.wait_for_master)        configure_logging(uuid)        # #3088: don't check disk usage on remote machines        if not options.child_name and not options.skip_log_check:            rlutil.check_log_disk_usage()
        logger = logging.getLogger('roslaunch')        logger.info("roslaunch starting with args %s"%str(argv))        logger.info("roslaunch env is %s"%os.environ)                    if options.child_name:           # This part is not executed, so it will not be listed.        else:            logger.info('starting in server mode')            # #1491 change terminal name            if not options.disable_title:                rlutil.change_terminal_name(args, options.core)            # Read roslaunch string from stdin when - is passed as launch filename.            roslaunch_strs = []            # This is a roslaunch parent, spin up parent server and launch processes.            # args are the roslaunch files to load            from . import parent as roslaunch_parent            # force a port binding spec if we are running a core            if options.core:                options.port = options.port or DEFAULT_MASTER_PORT            p = roslaunch_parent.ROSLaunchParent(uuid, args, roslaunch_strs=roslaunch_strs, is_core=options.core, port=options.port, local_only=options.local_only, verbose=options.verbose,  force_screen=options.force_screen, force_log=options.force_log, num_workers=options.num_workers, timeout=options.timeout, master_logger_level=options.master_logger_level, show_summary=not options.no_summary, force_required=options.force_required, sigint_timeout=options.sigint_timeout, sigterm_timeout=options.sigterm_timeout)            p.start()            p.spin()
roslaunch.main starts logging, and the information recorded in the logs can help us understand the order of execution of the main function.
We go to the Ubuntu .ros/log/ path and open the roslaunch-ubuntu-52246.log log file; the content is as follows.
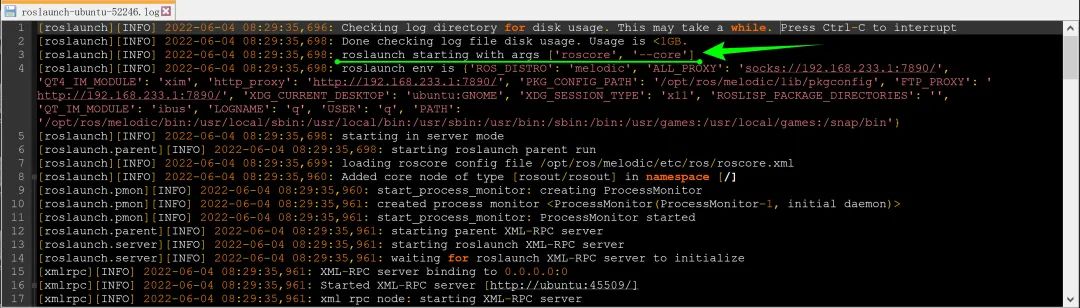
By reading the logs, we find that the main function first checks the disk usage of the log folder; if there is remaining space, it continues executing.
Then it changes the title of the terminal running roscore.
Next, it calls the function in the ROSLaunchParent class, which is probably the most important part of the main function.
The definition of the ROSLaunchParent class is in the same path’s parent.py file. Why it is called LaunchParent, I am not sure.
Let’s not dwell on that; we check the logs and find that it reaches the following function, intending to start the XMLRPC server.
Thus, the calling order is: roslaunch\__init__.py’s main() function calls parent.py\start() function, start() calls the _start_infrastructure() function in its class, _start_infrastructure() calls the _start_server() function in its class, and _start_server() calls the start function in server.py.
def _start_server(self): self.logger.info("starting parent XML-RPC server") self.server = roslaunch.server.ROSLaunchParentNode(self.config, self.pm) self.server.start()Next, we go to the ros_comm-noetic-devel\tools\rosgraph\src\rosgraph path and find the xmlrpc.py file. We find the class XmlRpcNode(object) and enter the start(self) function, where it calls the run function of its class, and the _run function calls the _run_init() function in its class, which finally calls the ThreadingXMLRPCServer class that actually works.
Since the master node is implemented in Python, we need a Python version of the XMLRPC library.
Fortunately, Python has a ready-made XMLRPC library called SimpleXMLRPCServer. SimpleXMLRPCServer is built into Python, so no installation is required.
Thus, the ThreadingXMLRPCServer class directly inherits from SimpleXMLRPCServer, as follows.
class ThreadingXMLRPCServer(socketserver.ThreadingMixIn, SimpleXMLRPCServer)2.3.2.2 How is the Master Started?
Next, let’s see how the node manager master is started. We return to the parent.py\start() function, as follows.
We find that after starting the XMLRPC server, it calls the _init_runner() function next.
def start(self, auto_terminate=True): self.logger.info("starting roslaunch parent run") # load config, start XMLRPC servers and process monitor try: self._start_infrastructure() except: self._stop_infrastructure() # Initialize the actual runner. self._init_runner() # Start the launch self.runner.launch()The _init_runner() function instantiates the ROSLaunchRunner class, which is defined in launch.py.
def _init_runner(self): self.runner = roslaunch.launch.ROSLaunchRunner(self.run_id, self.config, server_uri=self.server.uri, ...)After instantiation, the parent.py\start() function calls its launch() function.
We open the launch.py file and find the launch() function, which calls the _setup() function in its class, and the _setup() function calls the _launch_master() function.
The name suggests that the _launch_master() function is responsible for starting the master node; it calls the create_master_process function, which is in nodeprocess.py.
So we open nodeprocess.py, and the create_master_process function uses the LocalProcess class. This class inherits from the Process class. The nodeprocess.py file imports the subprocess module used in Python for creating new processes.
The create_master_process function instantiates the LocalProcess class with ‘rosmaster’, i.e., ros_comm-noetic-devel\tools\rosmaster.
The main.py file’s rosmaster_main function uses the Master class from master.py, which in turn uses the ROSMasterHandler class from master_api.py. This class contains all the remote calls received by the XMLRPC server, a total of 24, as follows.
shutdown(self, caller_id, msg='')getUri(self, caller_id)getPid(self, caller_id)deleteParam(self, caller_id, key)setParam(self, caller_id, key, value)getParam(self, caller_id, key)searchParam(self, caller_id, key)subscribeParam(self, caller_id, caller_api, key)unsubscribeParam(self, caller_id, caller_api, key)hasParam(self, caller_id, key)getParamNames(self, caller_id) param_update_task(self, caller_id, caller_api, key, param_value)_notify_topic_subscribers(self, topic, pub_uris, sub_uris)registerService(self, caller_id, service, service_api, caller_api)lookupService(self, caller_id, service)unregisterService(self, caller_id, service, service_api)registerSubscriber(self, caller_id, topic, topic_type, caller_api)unregisterSubscriber(self, caller_id, topic, caller_api)registerPublisher(self, caller_id, topic, topic_type, caller_api)unregisterPublisher(self, caller_id, topic, caller_api)lookupNode(self, caller_id, node_name)getPublishedTopics(self, caller_id, subgraph)getTopicTypes(self, caller_id) getSystemState(self, caller_id)2.3.2.1 Checking Disk Space Usage of Log Files
The roslaunch Python package is also responsible for checking how much space the log folder occupies. In the ros_comm-noetic-devel\tools\roslaunch\src\roslaunch\__init__.py file’s main function, there is the following statement.
The name indicates what it is for.
rlutil.check_log_disk_usage()Next, we open rlutil.py in the same path, and we find that it calls the get_disk_usage function from the rosclean package.
We discover that this function has a hard-coded upper limit: disk_usage > 1073741824; of course, this is not ideal and should be configurable.
The number 1073741824 is in bytes, exactly 1GB (1024^3 bytes).
If we want to modify the log folder’s warning limit, we can directly change this value.
def check_log_disk_usage(): """ Check size of log directory. If high, print warning to user """ try: d = rospkg.get_log_dir() roslaunch.core.printlog("Checking log directory for disk usage. This may take a while.\nPress Ctrl-C to interrupt") disk_usage = rosclean.get_disk_usage(d) # warn if over a gig if disk_usage > 1073741824: roslaunch.core.printerrlog("WARNING: disk usage in log directory [%s] is over 1GB.\nIt's recommended that you use the 'rosclean' command."%d) else: roslaunch.core.printlog("Done checking log file disk usage. Usage is <1GB.") except: passWe dig deeper, tracing how rosclean.get_disk_usage(d) is implemented.
This rosclean package is not in ros_comm and needs to be downloaded separately.
Upon opening, we find that this package is cross-platform, providing implementations for both Windows and Linux.
If it is a Windows system, it uses the os.path.getsize function to get the size of the files and uses os.walk to traverse all files, summing them up to get the folder size.
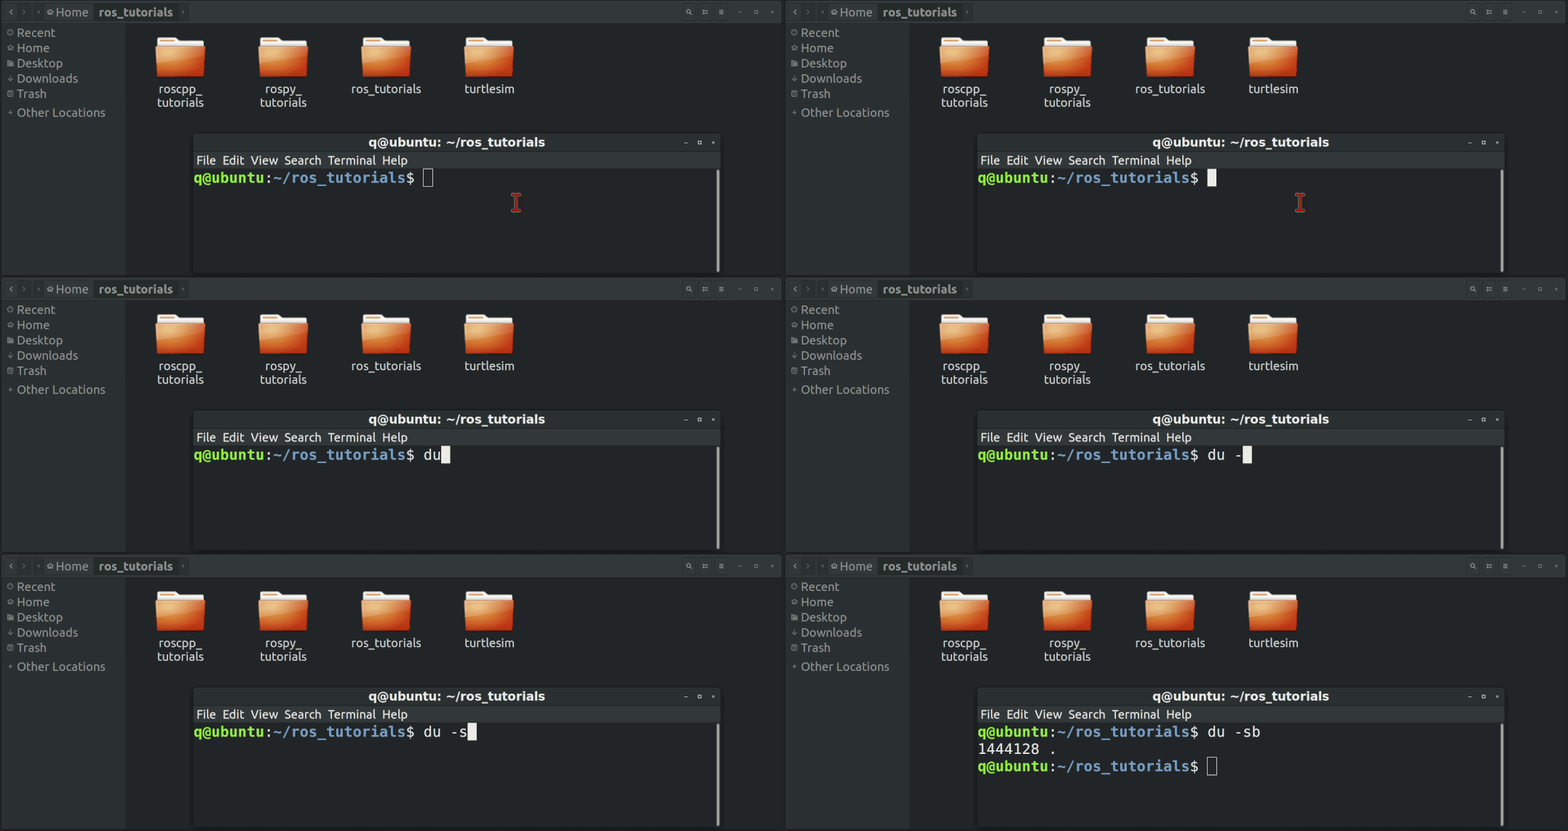
If it is a Linux system, it uses the du -sb command to get the size of the folder. Ah, developing a robot requires not only learning Python but also being familiar with Linux; is it easy?
The master node will obtain the URI address and port number listed in the user-set ROS_MASTER_URI variable (default is the current local IP and port 11311).
3. Time
Not just robots, time is an essential topic in any system. So let’s start from the beginning of everything—time.
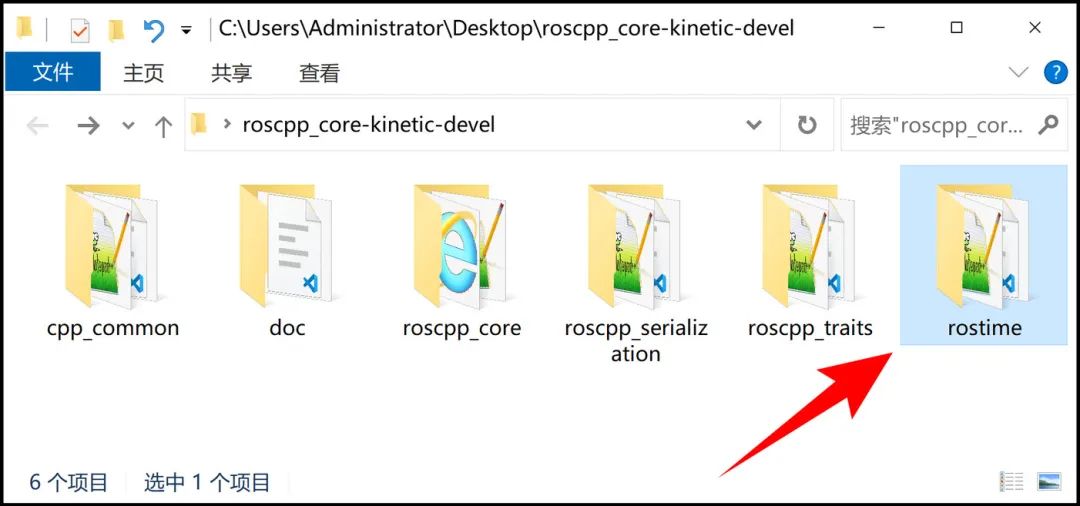
All programs defining time in ROS are located in the roscpp_core project under rostime, as shown in the figure.
If we break it down, there are actually two types of time: one called “moment”, which is a specific point in time;
the other is called “duration” or time interval, which is the part between two moments. These two are implemented in separate code.
In Ubuntu, when printing the files in the rostime folder, we indeed find files for both time and duration, but there is also one for rate, as shown in the figure below.
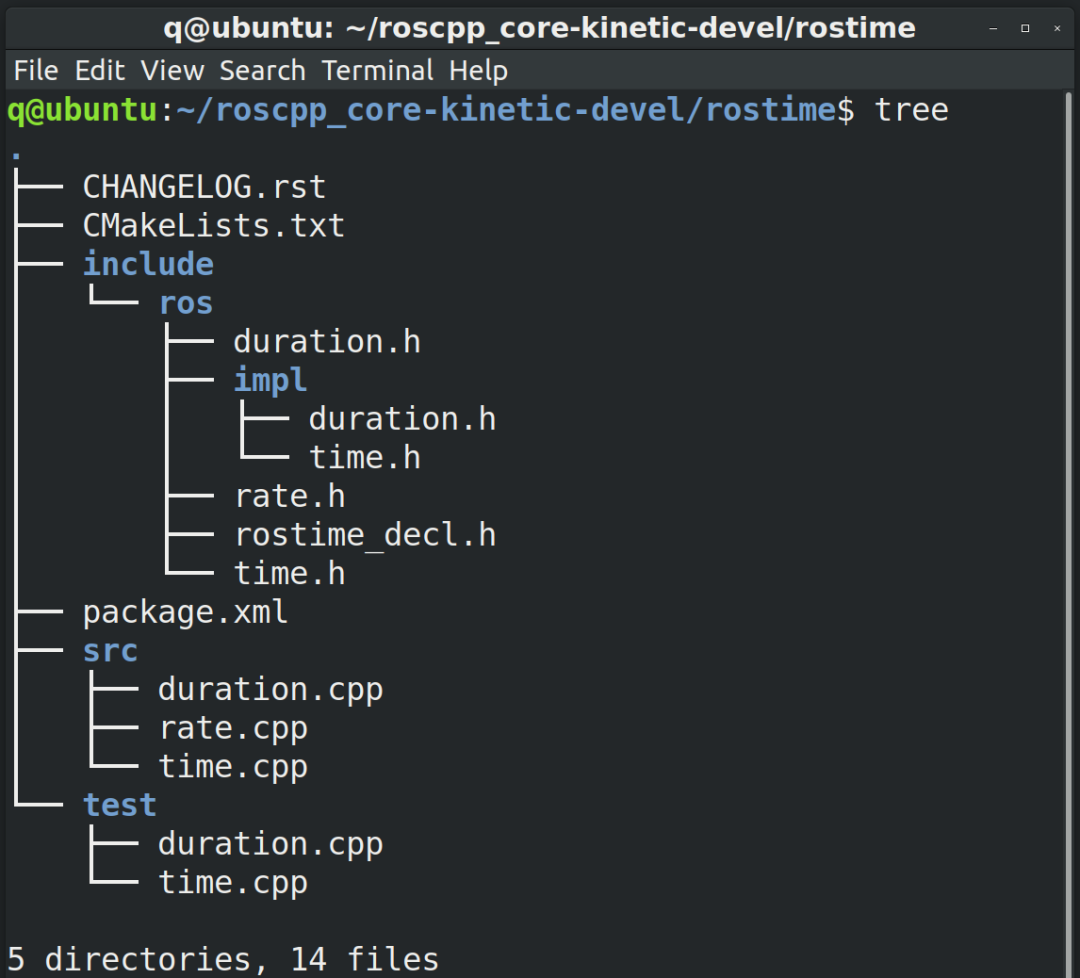
We also notice that there are two files, CMakeLists.txt and package.xml, indicating that rostime is also a ROS package that can be compiled separately.
3.1 Moment Time
First, let’s look at the dependencies between the files. The files related to moment time are two time.h files and one time.cpp file.
time.h provides the class declaration, while impl\time.h provides the implementation of operator overloading for the class, and time.cpp provides the implementation of other functions.
3.1.1 TimeBase Base Class
First, let’s look at the time.h file, which defines a class called TimeBase. The comment states that TimeBase is a base class that defines two member variables uint32_t sec, nsec, and overloads operators such as +, ++, −, −−, <, <<, >, >>, =, ==, etc.
The member variables uint32_t sec and nsec represent the seconds and nanoseconds of time, respectively, combining to form a complete moment.
As for why they are divided into two parts instead of using one, it may consider the precision issue of integer representation.
This is because a 32-bit integer can only represent a maximum number of 2147483647. If we were to use nanoseconds for this range, it would not be sufficient.
You may ask how a robot system could use such a high precision time resolution, as the timer of the controller may only achieve microsecond precision at most?
If you have worked on autonomous driving projects and have experience using GPS and LiDAR sensors, you will find that the GPS clock precision is indeed at the nanosecond level, allowing it to synchronize the timestamp of each laser point.
Also, why define TimeBase as a base class? The reason is quite easy to guess.
In a program, time is essentially just a number, and the sequential relationship (comparable) and operations (addition and subtraction) of number systems also apply to time.
Of course, there are only addition and subtraction, as multiplication and division of time have no meaning.
3.1.2 Time Class
Next is the Time class, which is a subclass of TimeBase. We will often use the Time class in robotics application development, but we do not need to directly use the TimeBase base class.
3.1.3 The now() Function
The Time class has a now() function, which is a familiar function to us. In application development, we can directly use the following code to get the current timestamp:
ros::Time begin = ros::Time::now(); // Get current timeThe definition of the now() function is in rostime\src\time.cpp; since it is commonly used and important, I will paste the code here:
The function is simple; if simulation time (g_use_sim_time) is defined as true, it uses simulation time; otherwise, it uses wall time.
Time Time::now(){ if (!g_initialized) throw TimeNotInitializedException(); if (g_use_sim_time) { boost::mutex::scoped_lock lock(g_sim_time_mutex); Time t = g_sim_time; return t; } Time t; ros_walltime(t.sec, t.nsec); return t; }In ROS, time is divided into two categories: one is called simulation time, and the other is called wall time.
As the name suggests, wall time is the actual objective time that flows second by second; no one can change it or speed it up or slow it down unless you have superpowers.
Simulation time, on the other hand, can be controlled by you, allowing you to speed it up if desired. The reason for having simulation time is that sometimes, when simulating robots, you may want to control time, for example, to improve the efficiency of validating algorithms by advancing at your desired speed.
In the case of using wall time, the now() function calls the ros_walltime function, which is also in rostime\src\time.cpp.
Peeling back the layers, we ultimately find that the ros_walltime function is where the operating system’s time function is truly called, and it is a cross-platform implementation (for Windows and Linux).
If the operating system is Linux, it uses the clock_gettime function, which can be found in the /usr/include path in the Ubuntu 18.04 system I am using.
However, if this function is missing, ROS will use the gettimeofday function, which is less precise than clock_gettime, as clock_gettime can provide nanosecond precision.
If the operating system is Windows, it uses the STL’s chrono library to get the current moment; to use this library, just include its header file, so time.cpp includes #include .
The specific function used is:
uint64_t now_ns = std::chrono::duration_cast<std::chrono::nanoseconds> (std::chrono::system_clock::now().time_since_epoch()).count();3.1.4 WallTime Class
Next, the WallTime class and SteadyTime class are declared.
3.2 Duration
The implementation of the time interval duration is similar to that of moment time, but the sleep() delay function in the Duration class is defined in time.cpp, where the Linux operating system’s nanosleep system call is used.
Although this system call is called nanoseconds, the actual precision it can achieve is only a few milliseconds; even so, it is much better than the sleep function provided by C, which has much lower precision. If it is a Windows system, it calls the STL chrono function:
std::this_thread::sleep_for(std::chrono::nanoseconds(static_cast<int64_t>(sec * 1e9 + nsec)));3.3 Rate
The Rate class is explained in the declaration comment as “Class to help run loops at a desired frequency,” which helps (the program) execute in a loop at the expected frequency.
Let’s see how a ROS node uses the Rate class, as shown in the example in the figure below.
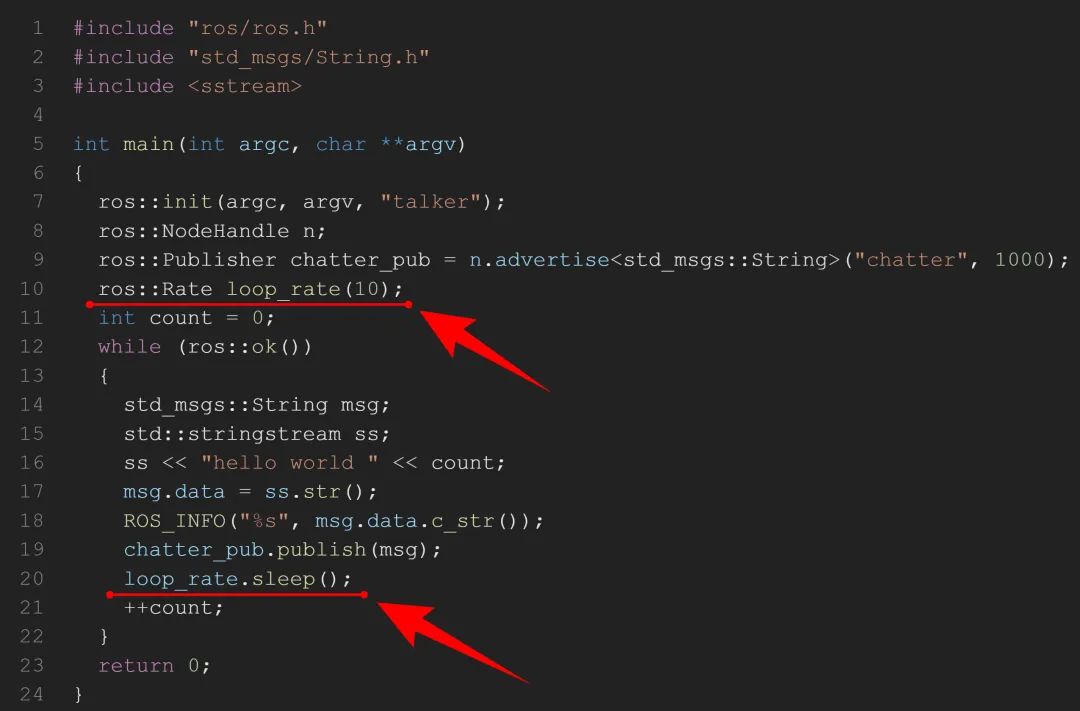
First, an object loop_rate is instantiated using the Rate constructor. The constructor uses inputs to initialize three parameters.
Then, in the while loop, the sleep() function is called to achieve a delay.
Since a delay is involved, the previously mentioned time class is used.
Rate::Rate(double frequency): start_(Time::now()), expected_cycle_time_(1.0 / frequency), actual_cycle_time_(0.0){ }3.4 Summary
Thus, the explanation of rostime is complete. It can be seen that this part of the implementation mainly relies on STL standard library functions (like chrono), BOOST libraries (date_time), Linux operating system system calls, and standard C functions. This is the underlying layer of ROS.
As a side note, the Baidu Apollo autonomous driving project has also been influenced by rostime, as the definitions of the Time, Duration, and Rate classes in its cyber\time are similar to those in rostime, but without defining a base class, making the implementation simpler.
Copyright Notice: This article is an original post by CSDN blogger “robinvista”, following the CC 4.0 BY-SA copyright agreement. Please include the original source link and this statement when reprinting.
Original link:
https://blog.csdn.net/robinvista/article/details/124226042


↑Hot courses, limited-time discount coupons! 🎉Grab now↑