Recently, I have been learning STM32 to create a simple application, and I thought I would share an article.
The microcontroller used in this article is the STM32F103C8T6, the ultrasonic distance measuring module is the HC-SR04, and the distance results are displayed using a 0.96-inch OLED screen module.
Effect Display
The display result when the distance is less than 10cm has some issues, but the code has been fixed and updated.
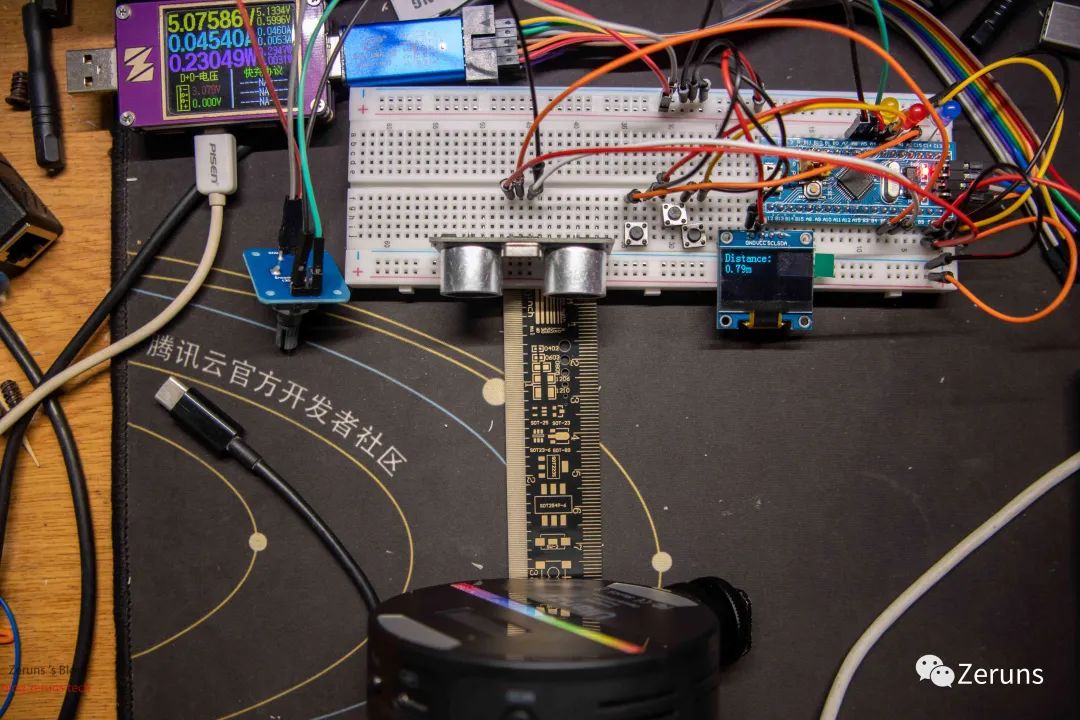
Fixed result:
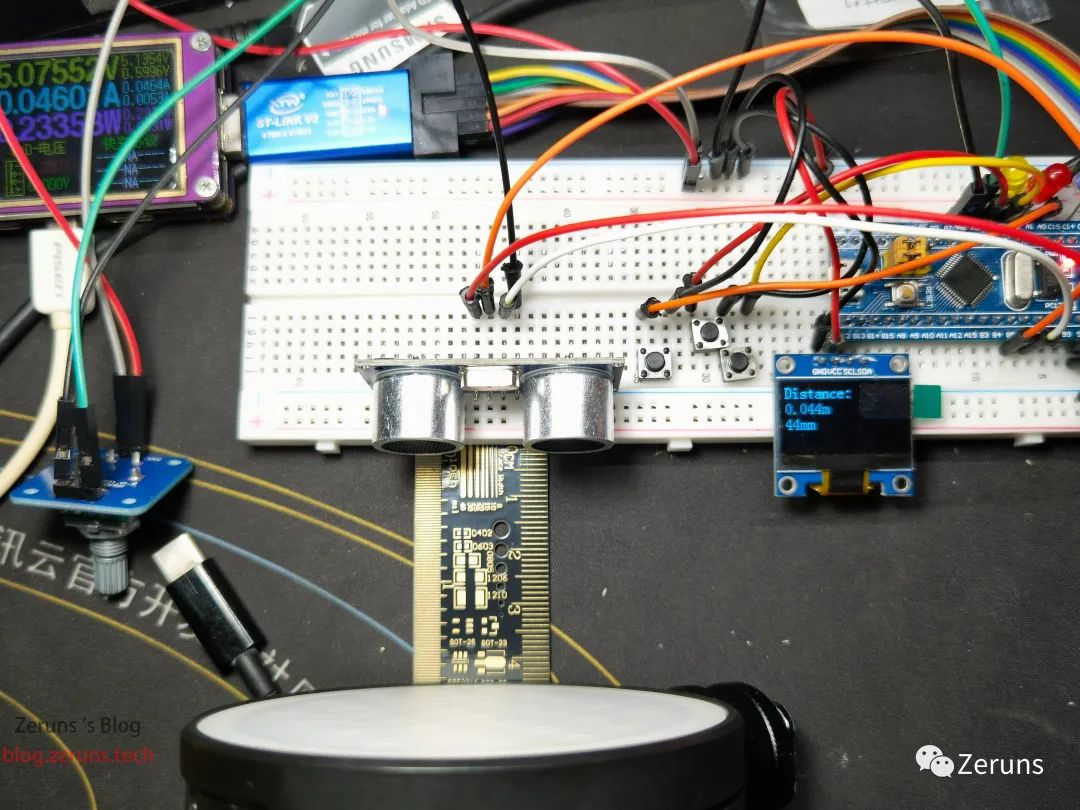
Video demonstration: https://www.bilibili.com/video/BV1Sg411Z7ex/
HC-SR04 Hardware Overview
The core of the HC-SR04 ultrasonic distance sensor consists of two ultrasonic sensors. One acts as a transmitter, converting electrical signals into 40 KHz ultrasonic pulses. The receiver listens for the emitted pulses. If it receives them, it generates an output pulse whose width can be used to determine the distance the pulse traveled. It’s that simple!
This sensor is compact, easy to use in any robotics project, and provides excellent non-contact range detection between 2 cm and 400 cm (approximately 1 inch to 13 feet), with an accuracy of 3mm.
| Operating Voltage | DC 5V |
|---|---|
| Operating Current | 15 mA |
| Operating Frequency | 40 KHz |
| Max Range | 4m |
| Min Range | 2 cm |
| Ranging Accuracy | 3 mm |
| Measuring Angle | 15 degrees |
| Trigger Input Signal | 10µS TTL pulse |
| Dimension | 45 x 20 x 15 mm |
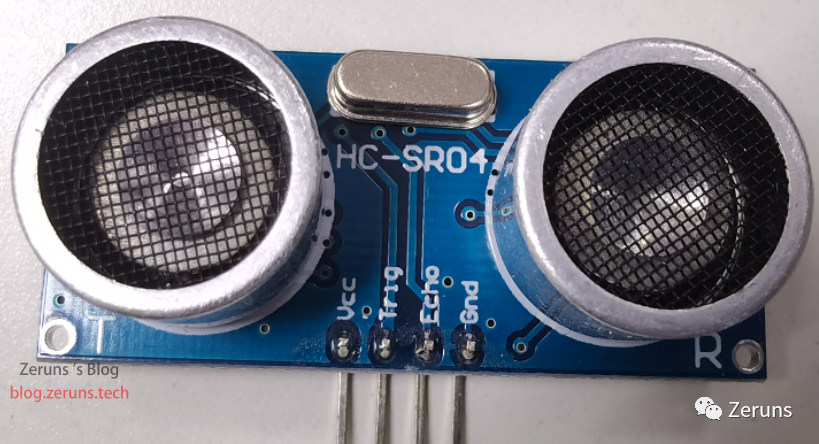
HC-SR04 Ultrasonic Sensor Pins
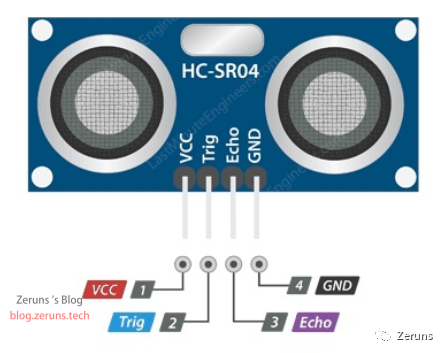
Let’s take a look at its pin arrangement.
VCC is the power supply for the HC-SR04 ultrasonic distance sensor, and we connected it to a 5V supply.
Trig (Trigger) pin is used to trigger the ultrasonic pulse, and in the example below, we used GPIOB5, so connect it to STM32’s GPIOB5.
Echo pin generates a pulse when it receives the reflected signal. The length of the pulse is proportional to the time taken for the emitted signal to return, and in the example below, we used GPIOB6, so connect it to STM32’s GPIOB6.
GND should be connected to the ground of the STM32.
How Does HC-SR04 Work?
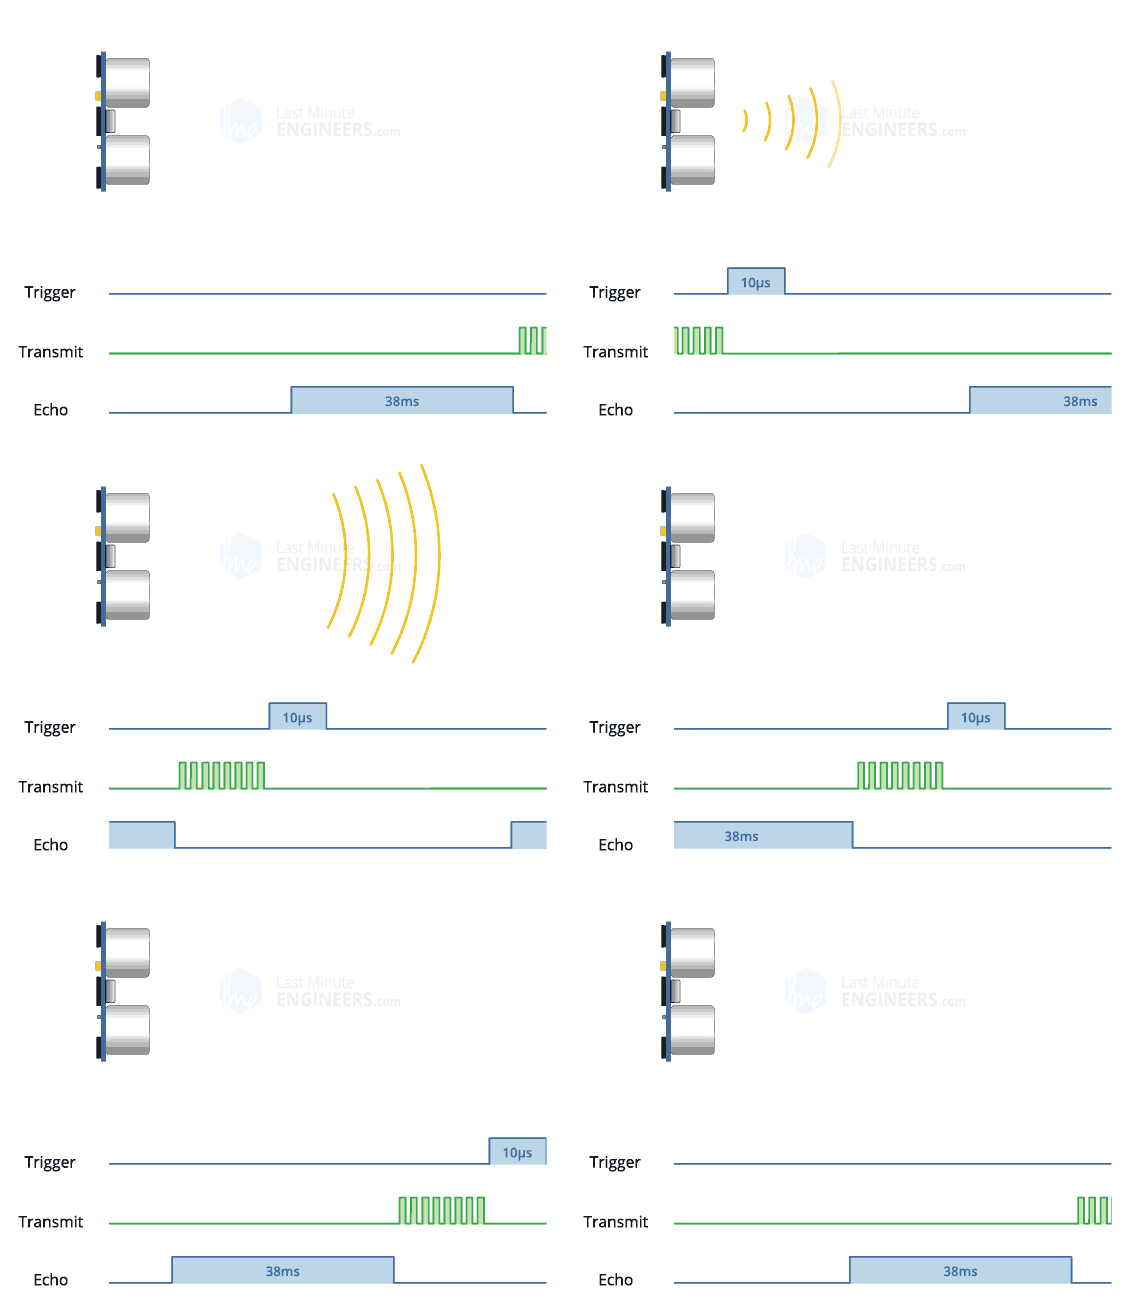
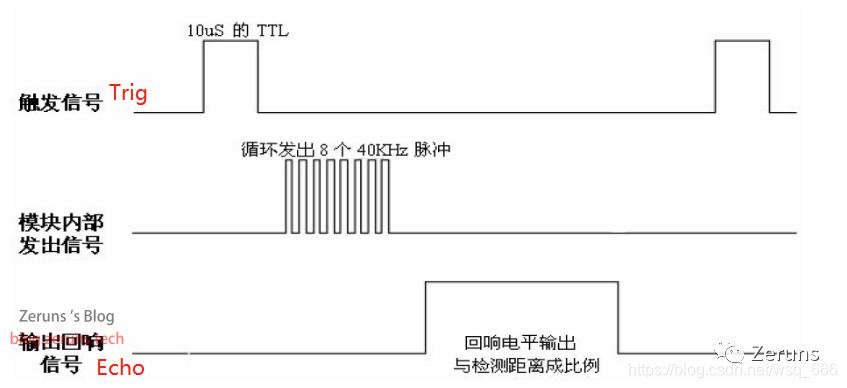
Everything starts when a pulse of at least 10 µS (10 microseconds) is applied to the trigger pin. In response, the sensor emits eight sound pulses at 40 KHz. This 8-pulse mode makes the device’s “ultrasonic characteristics” unique, allowing the receiver to distinguish the emitted pattern from environmental ultrasonic noise.
The eight ultrasonic pulses propagate through the air away from the transmitter. Simultaneously, the echo pin goes high, marking the start of the echo signal.
If these pulses are not reflected back, the echo signal will time out after 38 milliseconds and return to low. Thus, a 38 ms pulse indicates that there is no obstruction within the sensor’s range.
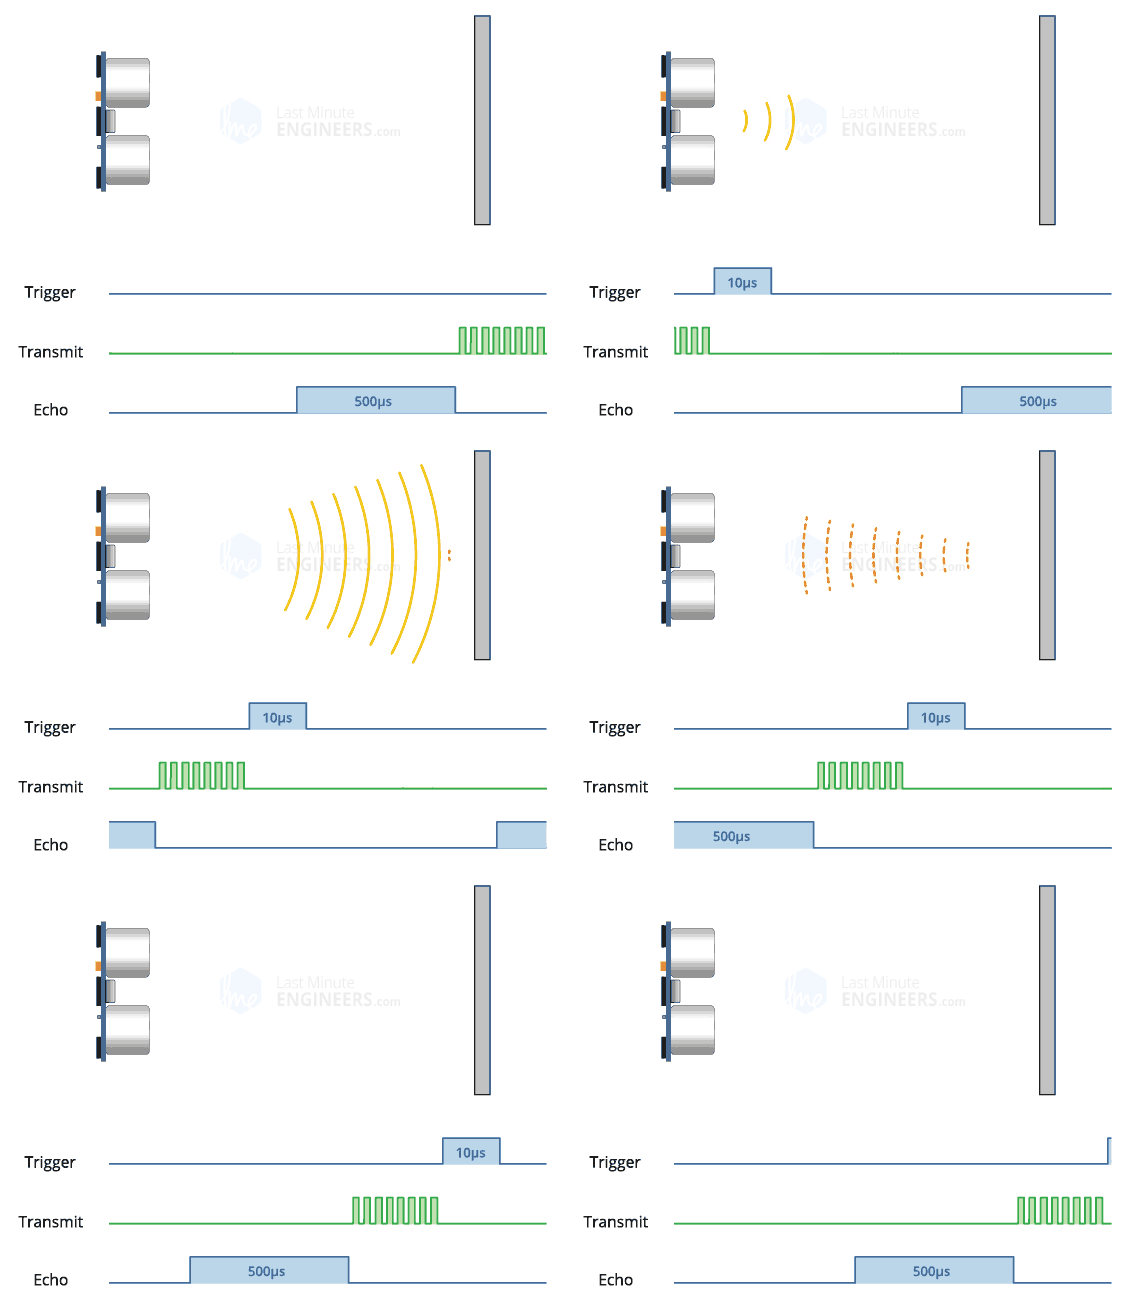
If these pulses are reflected back, the Echo pin goes low upon receiving the signal. This generates a pulse whose width varies between 150 µS and 25 mS, depending on the time taken to receive the signal.
The timing diagram for the HC-SR04 is as follows:
Then, the width of the received pulse is used to calculate the distance to the reflecting object. This can be solved using the simple distance-speed-time equation we learned in middle school.
Distance = Speed x Time
Wiring
Connect the HC-SR04 and the 0.96-inch OLED screen to the STM32.
| HC-SR04 | STM32 |
|---|---|
| VCC | 5V |
| Trig | GPIO PB5 |
| Echo | GPIO PB6 |
| Gnd | Gnd |
| OLED | STM32 |
|---|---|
| VCC | 3.3V |
| GND | GND |
| SCL | GPIO PB12 |
| SDA | GPIO PB13 |
Effect of Temperature on Distance Measurement
Although the HC-SR04 is quite accurate for most of our projects, such as intrusion detection or proximity alarms, sometimes you may want to design a device to be used outdoors or in abnormally hot or cold environments. In such cases, you may need to consider the fact that the speed of sound in air varies with temperature, atmospheric pressure, and humidity.
Since the speed factor enters into the HC-SR04 distance calculation, it may affect our readings. If the temperature (°C) and humidity are known, consider the following formula:
Speed of Sound m/s = 331.4 + (0.606 * Temperature) + (0.0124 * Humidity)
Purchase Links
The purchase links for the modules used in this article are as follows:
STM32F103C8T6 Development Board: https://s.click.taobao.com/8SoQMVu ST-LINK V2 Emulator: https://s.click.taobao.com/FEuPMVu HC-SR04 Module: https://s.click.taobao.com/Ing88Vu 0.96-inch OLED Module: https://s.click.taobao.com/o4fPMVu Breadboard: https://s.click.taobao.com/dBjPMVu Breadboard Jumper Wires: https://s.click.taobao.com/7eG88Vu
Program
I wrote the program using the ST standard library, and the main program is shared in the article. Please click the link below to download the complete project files.
Complete project file download: https://url.zeruns.tech/HCSR04
Extraction code: d9xr
main.c
#include "stm32f10x.h"                  // Device header#include "Delay.h"#include "OLED.h"#include "Timer.h"#include "HCSR04.h"
uint64_t numlen(uint64_t num)//Calculate the length of the number{    uint64_t len = 1;        // Initial length is 1    for(; num > 9; ++len)    // Check if num is greater than 9, otherwise length +1        num /= 10;           // Use division until num is less than 1    return len;              // Return the length value}
int main(void){    OLED_Init();    //Initialize OLED screen  Timer_Init();    //Initialize timer  HC_SR04_Init();    //Initialize ultrasonic distance measuring module    OLED_ShowString(1, 1, "Distance:");    //Display string on OLED screen    while (1)  {    int Distance_mm=sonar_mm();      //Get distance measurement result, in millimeters (mm)        int Distance_m=Distance_mm/1000;  //Convert to meters (m), placing the integer part into Distance_m    int Distance_m_p=Distance_mm%1000;  //Convert to meters (m), placing the decimal part into Distance_m_p    OLED_Clear_Part(2,1,16);      //Clear the 2nd line of the OLED screen    OLED_ShowNum(2, 1,Distance_m,numlen(Distance_m));  //Display the integer part of the measurement result    OLED_ShowChar(2, 1+numlen(Distance_m), '.');    //Display decimal point    if(Distance_m_p<100){                //Check if less than 100 mm      OLED_ShowChar(2, 1+numlen(Distance_m)+1,'0');                //Since the unit is meters, add 0 if less than 10cm      OLED_ShowNum(2, 1+numlen(Distance_m)+2,Distance_m_p,numlen(Distance_m_p));  //Display decimal part of the measurement result      OLED_ShowChar(2, 1+numlen(Distance_m)+2+numlen(Distance_m_p), 'm');      //Display unit    }else                                      // https://blog.zeruns.tech    {      OLED_ShowNum(2, 1+numlen(Distance_m)+1,Distance_m_p,numlen(Distance_m_p));  //Display decimal part of the measurement result      OLED_ShowChar(2, 1+numlen(Distance_m)+1+numlen(Distance_m_p), 'm');      //Display unit    }    OLED_Clear_Part(3,1,16);      //Clear the 3rd line of the OLED screen    OLED_ShowNum(3, 1,Distance_mm,numlen(Distance_mm));    //Display distance result in millimeters    OLED_ShowString(3, 1 + numlen(Distance_mm), "mm");    Delay_ms(300);            //Delay 300 milliseconds      }}
Timer.c
#include "stm32f10x.h"                  // Device header//blog.zeruns.techvoid Timer_Init(void){  RCC_APB1PeriphClockCmd(RCC_APB1Periph_TIM3, ENABLE);    //Enable TIM3 clock
  TIM_InternalClockConfig(TIM3);                //Set TIM3 to use internal clock    TIM_TimeBaseInitTypeDef TIM_TimeBaseInitStructure;      //Define structure to configure timer  TIM_TimeBaseInitStructure.TIM_ClockDivision = TIM_CKD_DIV1;  //Set 1 prescaler (no prescaling)  TIM_TimeBaseInitStructure.TIM_CounterMode = TIM_CounterMode_Up;  //Set counting mode to up counting  TIM_TimeBaseInitStructure.TIM_Period = 10 - 1;      //Set maximum count value, trigger update event when reaching max value, since counting starts from 0, counting 10 times is 10-1, triggers every 10 microseconds  TIM_TimeBaseInitStructure.TIM_Prescaler = 72 - 1;      //Set clock prescaler, 72-1 means every clock frequency (72Mhz)/72=1000000 clock cycles, counter increases by 1 every 1 microsecond  TIM_TimeBaseInitStructure.TIM_RepetitionCounter = 0;    //Repetition counter (only available for advanced timers, so set to 0)  TIM_TimeBaseInit(TIM3, &TIM_TimeBaseInitStructure);      //Initialize TIM3 timer    TIM_ClearFlag(TIM3, TIM_FLAG_Update);      //Clear update interrupt flag  TIM_ITConfig(TIM3, TIM_IT_Update, ENABLE);    //Enable update interrupt    NVIC_PriorityGroupConfig(NVIC_PriorityGroup_2);        //Set interrupt priority grouping    NVIC_InitTypeDef NVIC_InitStructure;            //Define structure to configure interrupt priority  NVIC_InitStructure.NVIC_IRQChannel = TIM3_IRQn;        //Specify interrupt channel  NVIC_InitStructure.NVIC_IRQChannelCmd = ENABLE;        //Enable interrupt  NVIC_InitStructure.NVIC_IRQChannelPreemptionPriority = 2;  //Set preemption priority  NVIC_InitStructure.NVIC_IRQChannelSubPriority = 2;      //Set response priority  NVIC_Init(&NVIC_InitStructure);                // https://blog.zeruns.tech    TIM_Cmd(TIM3, ENABLE);              //Enable timer}
/*void TIM3_IRQHandler(void)      //Update interrupt function{  if (TIM_GetITStatus(TIM3, TIM_IT_Update) == SET)    //Get TIM3 timer update interrupt flag  {        TIM_ClearITPendingBit(TIM3, TIM_IT_Update);      //Clear update interrupt flag  }}*/
Timer.h
#ifndef __TIMER_H#define __TIMER_H
void Timer_Init(void);
#endif
HCSR04.c
#include "stm32f10x.h"#include "Delay.h"
/*My blog: blog.zeruns.tech For specific usage instructions, please visit my blog*/
#define Echo GPIO_Pin_6    //HC-SR04 module's Echo pin connected to GPIOB6#define Trig GPIO_Pin_5    //HC-SR04 module's Trig pin connected to GPIOB5
uint64_t time=0;      //Declare variable for timinguint64_t time_end=0;    //Declare variable to store echo signal time
void HC_SR04_Init(void){  RCC_APB2PeriphClockCmd(RCC_APB2Periph_GPIOB,ENABLE);  //Enable GPIOB peripheral clock    GPIO_InitTypeDef GPIO_InitStructure;          //Define structure  GPIO_InitStructure.GPIO_Mode = GPIO_Mode_Out_PP;    //Set GPIO port to push-pull output  GPIO_InitStructure.GPIO_Pin = Trig;            //Set GPIO port 5  GPIO_InitStructure.GPIO_Speed = GPIO_Speed_50MHz;    //Set GPIO port speed to 50Mhz  GPIO_Init(GPIOB,&GPIO_InitStructure);          //Initialize GPIOB    GPIO_InitStructure.GPIO_Mode = GPIO_Mode_IPD;      //Set GPIO port to pull-down input mode  GPIO_InitStructure.GPIO_Pin = Echo;            //Set GPIO port 6  GPIO_Init(GPIOB,&GPIO_InitStructure);          //Initialize GPIOB  GPIO_WriteBit(GPIOB,GPIO_Pin_5,0);            //Output low level  Delay_us(15);                      //Delay 15 microseconds}
int16_t sonar_mm(void)                  //Measure distance and return result in millimeters{  uint32_t Distance,Distance_mm = 0;  GPIO_WriteBit(GPIOB,Trig,1);            //Output high level  Delay_us(15);                    //Delay 15 microseconds  GPIO_WriteBit(GPIOB,Trig,0);            //Output low level  while(GPIO_ReadInputDataBit(GPIOB,Echo)==0);    //Wait for low level to end  time=0;                        //Reset timing  while(GPIO_ReadInputDataBit(GPIOB,Echo)==1);    //Wait for high level to end  time_end=time;                    //Record end time  if(time_end/100<38)                  //Check if less than 38 milliseconds, greater than 38 milliseconds is timeout, directly go to return 0 below  {    Distance=(time_end*346)/2;            //Calculate distance, speed of sound in air at 25°C is 346m/s    Distance_mm=Distance/100;            //Since the above time_end is in units of 10 microseconds, to get the result in millimeters, it needs to be divided by 100  }  return Distance_mm;                  //Return distance measurement result}
float sonar(void)                    //Measure distance and return result in meters{  uint32_t Distance,Distance_mm = 0;  float Distance_m=0;  GPIO_WriteBit(GPIOB,Trig,1);          //Output high level  Delay_us(15);  GPIO_WriteBit(GPIOB,Trig,0);          //Output low level  while(GPIO_ReadInputDataBit(GPIOB,Echo)==0);  time=0;  while(GPIO_ReadInputDataBit(GPIOB,Echo)==1);  time_end=time;  if(time_end/100<38)  {    Distance=(time_end*346)/2;    Distance_mm=Distance/100;    Distance_m=Distance_mm/1000;  }  return Distance_m;}
void TIM3_IRQHandler(void)      //Update interrupt function, used to time, variable time increases every 10 microseconds{  if (TIM_GetITStatus(TIM3, TIM_IT_Update) == SET)    //Get TIM3 timer update interrupt flag  {    time++;    TIM_ClearITPendingBit(TIM3, TIM_IT_Update);      //Clear update interrupt flag  }}
HCSR04.h
#ifndef __HCSR04_H#define __HCSR04_H
void HC_SR04_Init(void);int16_t sonar_mm(void);float sonar(void);
#endif
Recommended Reading
-
High Cost-Performance and Cheap VPS/Cloud Server Recommendations:https://blog.zeruns.tech/archives/383.html
-
ESP8266 Development Environment Setup and Project Demonstration: https://blog.zeruns.tech/archives/526.html
-
Arduino Reading DHT11, DHT22, SHTC3 Temperature and Humidity Data: https://blog.zeruns.tech/archives/527.html
-
Student Exclusive Discounts and Benefits: https://blog.zeruns.tech/archives/557.html
-
How to Build a Personal Blog: https://blog.zeruns.tech/archives/218.html
-
Using NPS to Build an Intranet Penetration Server with Web Panel: https://blog.zeruns.tech/archives/660.html