Want to keep track of the soil moisture in your flower pot at any time? Today, I will teach you how to build a low-cost smart monitoring system using Arduino UNO + Soil Moisture Sensor, allowing you to view data in real-time on your phone!
1. Project Highlights
✅ Low Cost: Materials cost less than 20 yuan✅ Easy to Use: No complex circuit knowledge required✅ Highly Practical: Suitable for home gardening and agricultural IoT✅ Strong Expandability: Can be linked to an automatic irrigation system
2. Materials List
| Component | Model/Parameters | Purpose |
|---|---|---|
| Arduino UNO | Standard Development Board | Main Control Unit |
| Analog Type (e.g., SHT30/DHT22 module) | Measures Soil Moisture | |
| 10kΩ Resistor | Used for Signal Conditioning (required for analog sensors) | – |
| LCD1602 Display | Optional | Real-time display of moisture data |
| LED Alarm Light | Optional | Flashes to remind when moisture is too low |
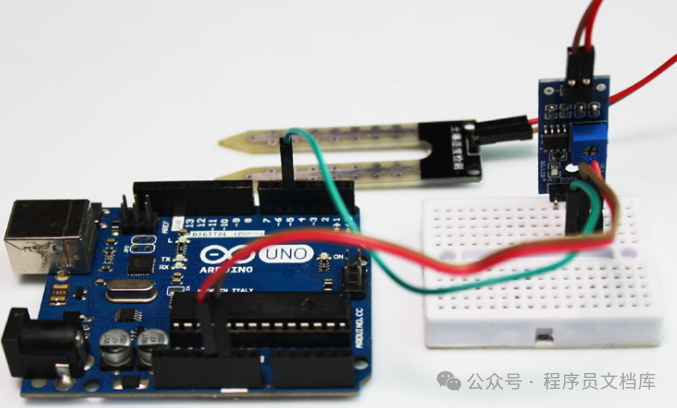
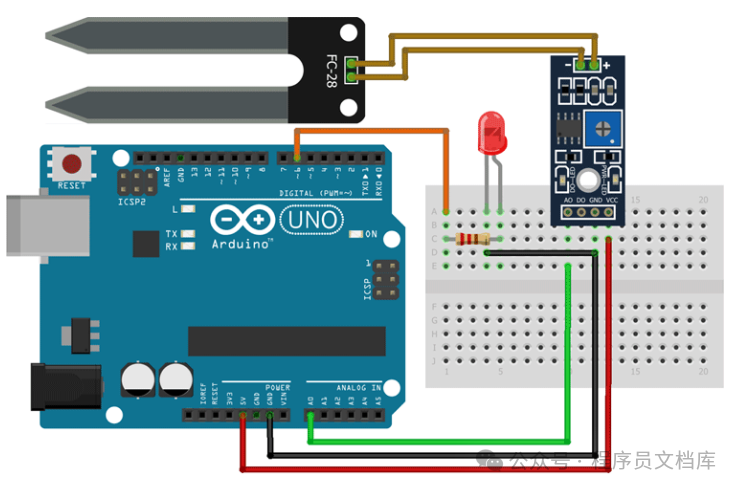
3. Hardware Connection Diagram
1. Analog Sensor Version
Soil Moisture Sensor → Arduino UNO:
  VCC → 5V
  GND → GND
  AO → A0 (Analog Signal Input)
Soil Moisture Sensor → Arduino UNO:
VCC → 5V
GND → GND
AO → A0 (Analog Signal Input)2. Digital Sensor Version (e.g., SHT30)
SHT30 → Arduino UNO:
  VCC → 3.3V
  GND → GND
  SDA → A4
  SCL → A5
SHT30 → Arduino UNO:
VCC → 3.3V
GND → GND
SDA → A4
SCL → A5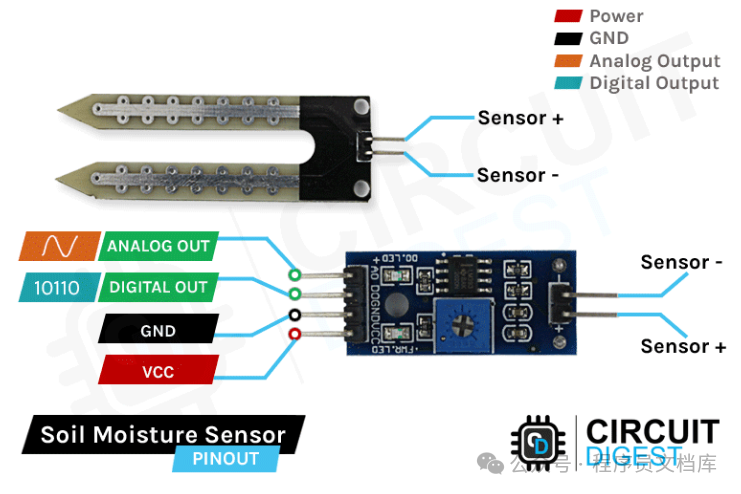
4. Code Implementation (Analog Sensor Example)
const int sensorPin = A0;    // Sensor connected to A0 pin
const int ledPin = 9;        // Alarm LED

void setup() {
  Serial.begin(9600);
pinMode(sensorPin, INPUT);
pinMode(ledPin, OUTPUT);
}

void loop() {
int moistureValue = analogRead(sensorPin); // Read analog value
float moisturePercentage = map(moistureValue, 0, 1023, 0, 100); // Convert to percentage

  Serial.print("Soil Moisture: ");
  Serial.print(moisturePercentage);
  Serial.println("%");

// Threshold judgment (example: trigger alarm below 30%)
if (moisturePercentage < 30) {
    digitalWrite(ledPin, HIGH);
} else {
    digitalWrite(ledPin, LOW);
}

delay(1000);
}
const int sensorPin = A0; // Sensor connected to A0 pin
const int ledPin = 9; // Alarm LED
void setup() {
Serial.begin(9600);
pinMode(sensorPin, INPUT);
pinMode(ledPin, OUTPUT);
}
void loop() {
int moistureValue = analogRead(sensorPin); // Read analog value
float moisturePercentage = map(moistureValue, 0, 1023, 0, 100); // Convert to percentage
Serial.print("Soil Moisture: ");
Serial.print(moisturePercentage);
Serial.println("%");
// Threshold judgment (example: trigger alarm below 30%)
if (moisturePercentage < 30) {
digitalWrite(ledPin, HIGH);
} else {
digitalWrite(ledPin, LOW);
}
delay(1000);
}5. Data Calibration Guide
Different soil types require separate calibration, the steps are as follows:
-
Prepare Standard Moisture Samples:
- Dry Soil: Bake in the oven at 100℃ for 2 hours
- Moist Soil: Soak in water and let sit for 24 hours
Measure and Record Data:
// Calibration array (example, actual values need to be measured)
const int dryValue = 600;    // Analog value for dry soil
const int wetValue = 300;    // Analog value for moist soil

float getCalibratedMoisture(int rawValue) {
return map(rawValue, dryValue, wetValue, 0, 100);
}
6. Advanced Function Extensions
1. LCD Real-time Display
#include <LiquidCrystal.h>

LiquidCrystal lcd(12, 11, 5, 4, 3, 2);

void setup() {
  lcd.begin(16, 2);
// ...other initialization code
}

void loop() {
  lcd.setCursor(0, 0);
  lcd.print("Soil Moisture:");
lcd.setCursor(0, 1);
lcd.print(moisturePercentage + "%");
}
#include <LiquidCrystal.h>
LiquidCrystal lcd(12, 11, 5, 4, 3, 2);
void setup() {
lcd.begin(16, 2);
// ...other initialization code
}
void loop() {
lcd.setCursor(0, 0);
lcd.print("Soil Moisture:");
lcd.setCursor(0, 1);
lcd.print(moisturePercentage + "%");
}2. WiFi Data Upload
Use the ESP8266 module to connect to the router:
#include <ESP8266WiFi.h>

void sendToServer(float moisture) {
  WiFiClient client;
if (client.connect("api.yourserver.com", 80)) {
    String url = "/log?moisture=" + String(moisture);
    client.print(String("GET ") + url + " HTTP/1.1\r\n" +
               "Host: api.yourserver.com\r\n" +
               "Connection: close\r\n\r\n");
}
}
7. Precautions
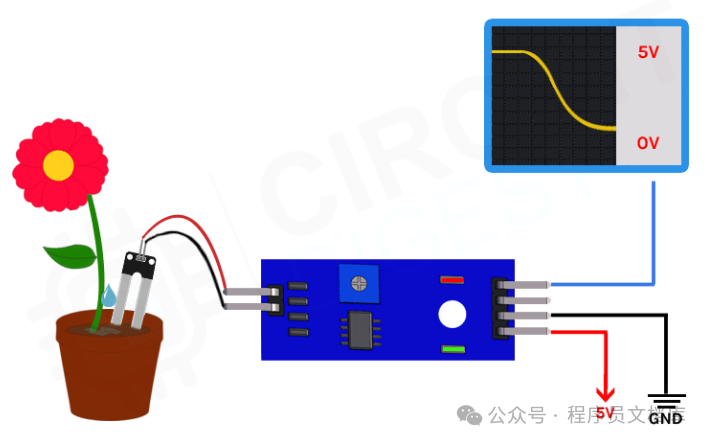
- Sensor Insertion Depth It is recommended to insert 5-10cm into the soil (to avoid surface moisture interference)
- Power Supply Stability Digital sensors should use a 3.3V regulated power supply
- Interference Prevention Measures
- Add 100nF Capacitor Filtering to the analog signal line
- Avoid running parallel to strong power lines
8. Application Scenarios
- Home Plant Care Automatically reminds when to water
- Agricultural IoT Achieves smart irrigation with water pumps
- Environmental Monitoring Used for scientific experiment data collection
Give it a try! If you successfully create it, feel free to share your creative modifications!