GPIO, translated as General Purpose Input Output. I believe everyone is quite clear about the meaning of input and output. The most commonly used output function is the LED, while the most commonly used input function is the key.
To use the GPIO functionality of STM32, the first thing to clarify is who controls this functionality. You should understand that for STM32 microcontrollers, part of this functionality is determined by the Cortex core, while another part is determined by the STM32 chip itself. If you open the Cortex core manual, you will see that the GPIO functionality is determined by the chip itself.
● From Manual to Process
Open the STM32 manual and locate the chapter on GPIO. Not all content in the manual needs to be read, nor does all content in the GPIO chapter need to be read. Each chapter begins with a functionality introduction, which may already allow you to operate the functionality you need…
1. Function Overview

From the above introduction, the basic configuration process of GPIO can already be summarized: mode selection, output settings, output speed, pull-up/pull-down. Want to be more specific? Directly jump to the register details.
2. Register Details
GPIOx_MODER (Mode Selection)
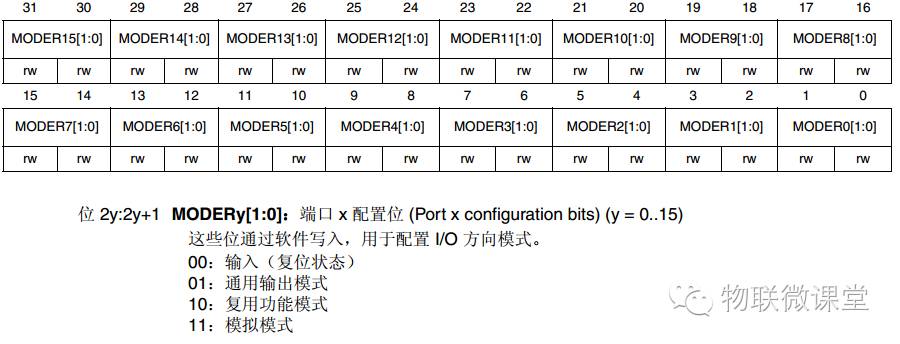
This is a 32-bit register, divided into 16 groups, meaning 2 bits control one IO pin (each IO port of STM32 happens to have 16 pins). You can see that each IO pin has 4 functions, and currently, we are using the two simplest functions. Additionally, please note its reset value.
GPIOx_OTYPER (Output Type)
 Here you can set the output mode, which is divided into two types: push-pull and open-drain. (GPIO is 16 bits, so the high 16 bits of this register are reserved by the system).
GPIOx_OSPEEDR (Output Speed)
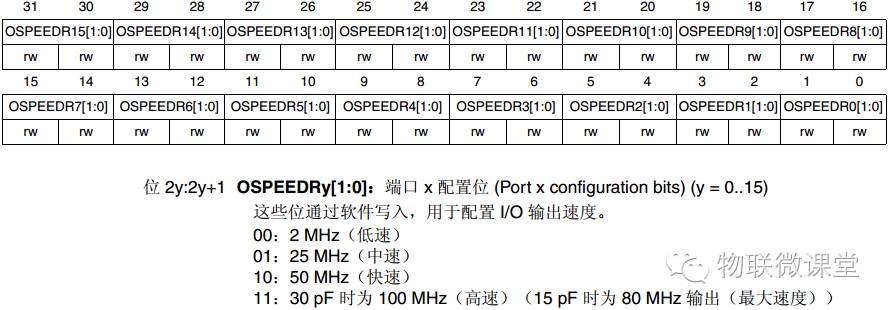 The output function is merely to drive an external device, so the output speed can be set according to the external connection circuit.
GPIOx_PUPDR (Pull-Up/Pull-Down)


Configure IO pull-up or pull-down, divided into 16 groups, with 2 bits controlling one pin.
GPIOx_IDR (Port Data Input)
 GPIOx_ODR (Port Data Output)

Regardless of whether it is data input or output, it is always 16 bits, so the high 16 bits of these two registers are reserved by the system.
3. GPIO Initialization Process
1) Turn on the GPIO clock (each module must first turn on the corresponding clock when used).
2) Select input/output mode.
3) Set output type (if in output mode).
4) Set output speed (if in output mode).
5) Choose pull-up or pull-down.
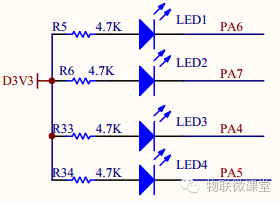
● From Process to Code (Using LED as an Example)
1. Directly Operate Registers
void led_init(){
// Turn on GPIOA clock
RCC->AHB1ENR |= 1;
// Set PA6 pin to output mode GPIOA->MODER |= 1<<(6*2); // Set push-pull output GPIOA->OTYPER &= ~(1<<6); // Set output speed to 50MHz GPIOx->OSPEEDR |= 2<<(6*2); // Set pull-up GPIOA->PUPDR |=1<<(6*2);}void led_on(){ GPIOA->ODR &= ~(1<<6);}void led_off(){ GPIOA->ODR |= 1<<6;}
2. Library Functions
To operate library functions, you need to find the corresponding library function source files and header files. In the library functions, initialization uses a structure, and the definition of the structure is in the header file.
void myled_init(void){ GPIO_InitTypeDef GPIO_InitStructure; // Turn on clock RCC_AHB1PeriphClockCmd(RCC_AHB1Periph_GPIOA, ENABLE); // Select pin GPIO_InitStructure.GPIO_Pin = GPIO_Pin_6; // Set to output mode GPIO_InitStructure.GPIO_Mode = GPIO_Mode_OUT; // Push-pull output GPIO_InitStructure.GPIO_OType = GPIO_OType_PP; // Output speed 100MHz GPIO_InitStructure.GPIO_Speed = GPIO_Speed_100MHz; // Pull-up GPIO_InitStructure.GPIO_PuPd = GPIO_PuPd_UP; GPIO_Init(GPIOA, &GPIO_InitStructure);}
// Turn on light
void led_on(){ GPIO_ResetBits(GPIOA, GPIO_Pin_6);}
// Turn off light
void led_off(){ GPIO_SetBits(GPIOA, GPIO_Pin_6);
}