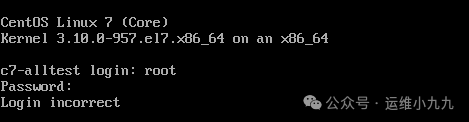
In the world of Linux, the root password is like a master key to unlock the system’s treasures, holding supreme privileges. However, if this “key” is lost, it can lead to significant trouble. Imagine being excited to log into the server and showcase your skills, only to be met with the unyielding “Password incorrect” message, leaving you feeling like an ant on a hot pan, frantically moving in circles? Don’t panic; today we will discuss how to reset the root password in Linux systems, allowing you to regain control.
Resetting the root password is not uncommon during daily use of Linux systems. This article will outline methods to reset the password when it is forgotten, and no logged-in users are available.
The procedures for resetting the password may vary across different versions of Linux. Currently, the most popular versions are 7 and 8, with 6 becoming increasingly rare. This article will summarize the root password reset methods for Linux versions 7, 8, and 9 for reference.
Linux 7
-
When the machine enters the following interface, anxious individuals can press any key to pause at this screen, interrupting the system boot.Then select the first line, and press the ‘e’ key to enter edit mode:
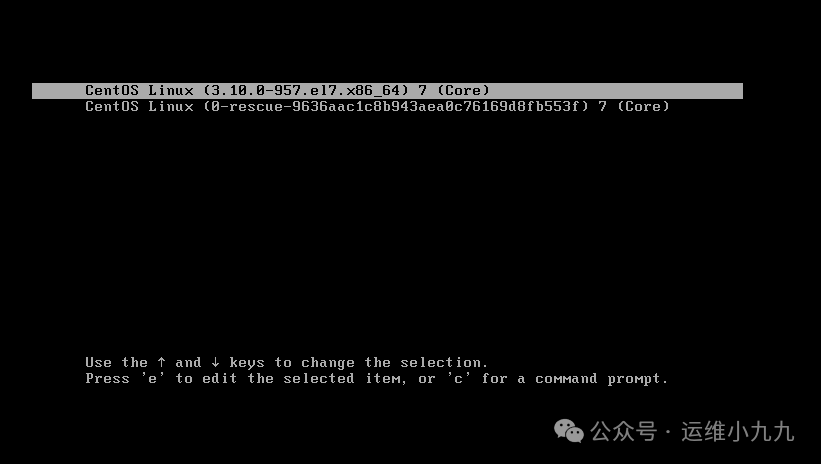
image-20250114160330540 -
In edit mode, use the ↑↓ keys to find ‘ro’, and change the content within the red box to: rw init=/sysroot/bin/sh
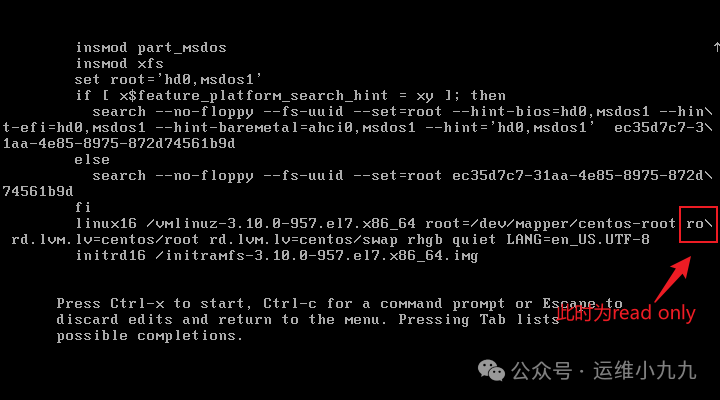
image-20250114162110017 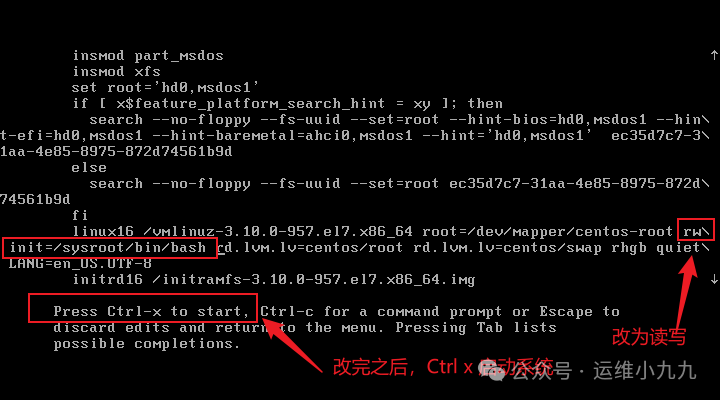
image-20250114162659013 -
After making the changes, simultaneously press the CTRL and x keys to enter emergency rescue mode.

image-20250114162817760 -
Execute the following commands in emergency mode:
chroot /sysroot  # Change root
# Change language environment to English to avoid garbled output. Input: LANG=en
echo 'admin1' | passwd root --stdin              # Reset root password to admin1
touch /.autorelabel  # Reapply SELinux context labels; if SELinux is not enabled, this step can be skipped. For convenience, it is recommended to execute this step.
exit                 # Exit chroot mode
reboot               # Reboot the system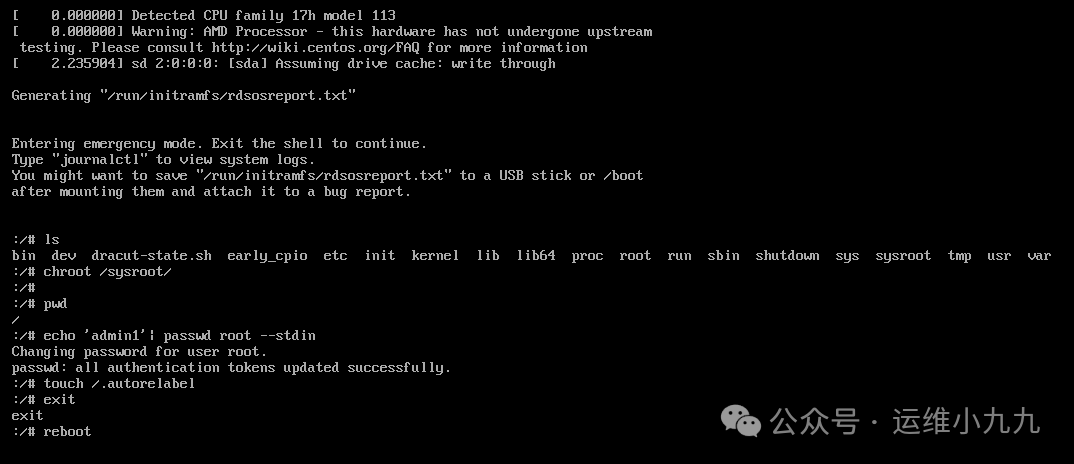
image-20250114163537853 -
After the system reboots, you can use the modified new password to log in to the system.

image-20250114163710565
Linux 8
The password reset method for Linux 8 differs slightly from 7.
-
Enter kernel edit mode just like in version 7, select the first line, and press ‘e’ to enter.
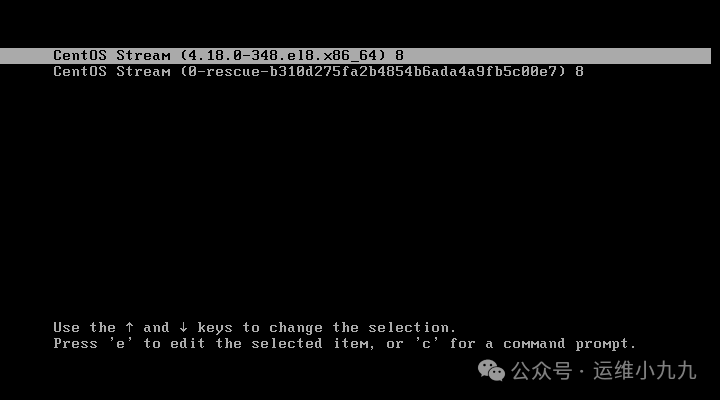
image-20250114164119859 -
Move the cursor to the line containing ‘ro’, and add ‘rd.break’ at the end of the line.
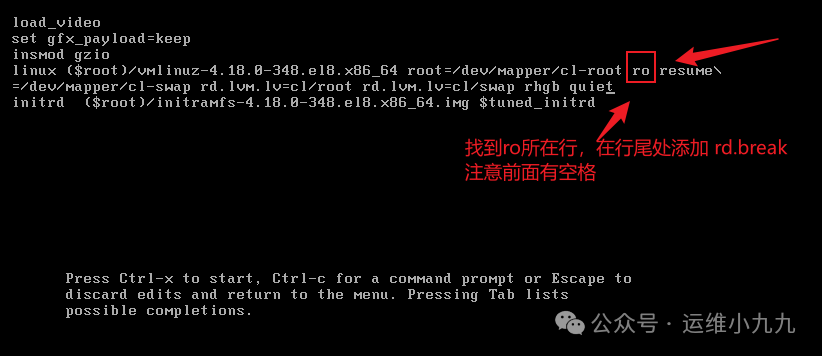
image-20250114164523751 
image-20250114164607419 -
Similarly, after making changes, press CTRL x to enter emergency mode.
image-20250114164729113 -
In emergency mode, execute the following password reset commands.
The difference between Linux 8 and 7 is that Linux 7 directly modifies the system to rw mode in edit mode, while Linux 8 interrupts the normal system boot by adding the “rd.break” parameter, entering emergency rescue mode. At this point, the system is still read-only, so the first step after entering the system is to change it to rw mode. At this point, you can check if the /sysroot directory is ro using the mount command; it needs to be remounted as rw.
mount -o remount,rw /sysroot ## Remount sysroot directory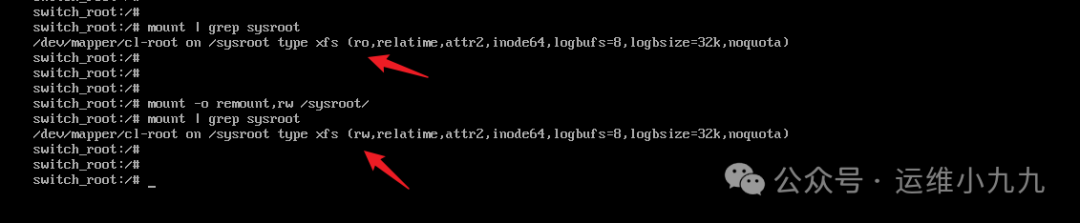
image-20250114165657831 ## Subsequent steps are the same as Linux 7 chroot /sysroot # Change root echo 'admin1' | passwd root --stdin # Reset root password to admin1 touch /.autorelabel # Reapply SELinux context labels; if SELinux is not enabled, this step can be skipped. For convenience, it is recommended to execute this step. exit # Exit chroot mode reboot # Reboot the system -
Reboot to enter the system.
image-20250114171740201
Linux 9
Linux 9 has a change in the way to enter emergency mode compared to previous versions; select the line with ‘rescue’.
-
Enter emergency mode.
-
Move the cursor to the line containing ‘ro’, and add ‘rd.break’, then press CTRL x to start emergency mode.
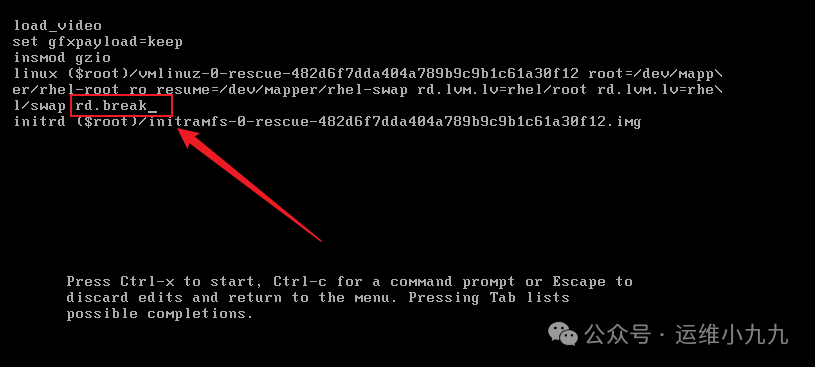
image-20250114172922728 -
Press enter to enter emergency (maintenance) mode.
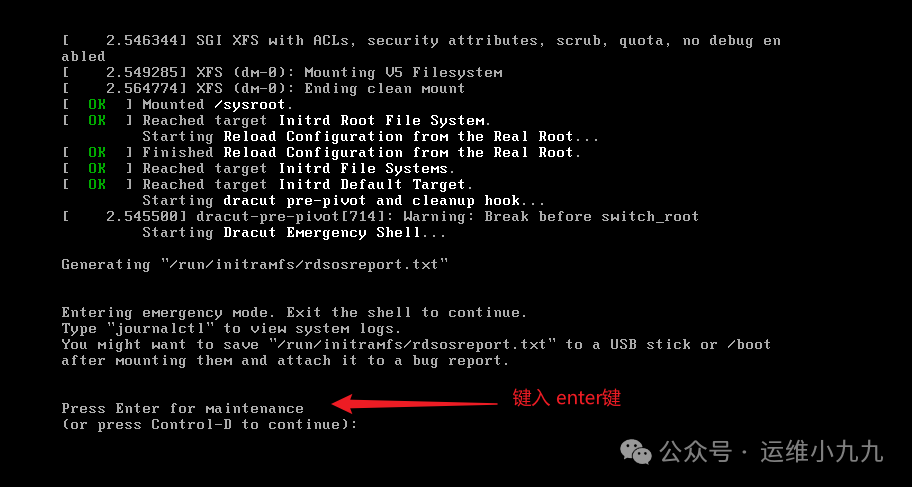
image-20250114173119206 -
The steps to modify the password are the same as in Linux 8.
mount -o remount,rw /sysroot  ## Remount sysroot directory
chroot /sysroot      # Change root
echo 'admin1' | passwd root --stdin              # Reset root password to admin1
touch /.autorelabel  # Reapply SELinux context labels; if SELinux is not enabled, this step can be skipped. For convenience, it is recommended to execute this step.
exit                 # Exit chroot mode
reboot               # Reboot the system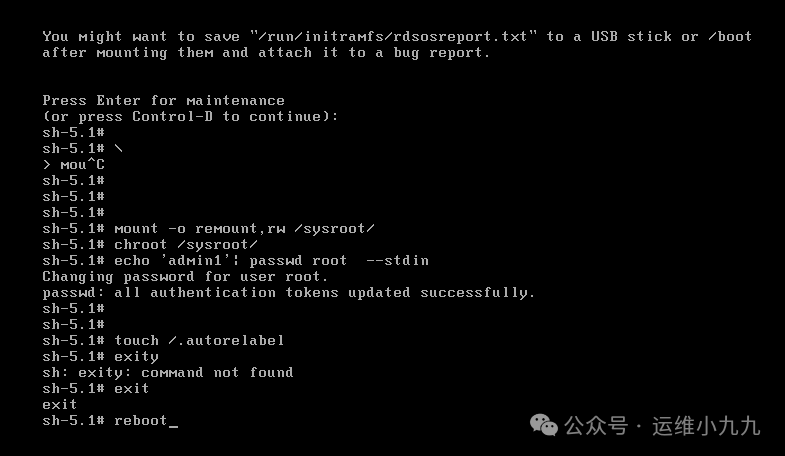
image-20250114173812047 -
Reboot to enter the system.
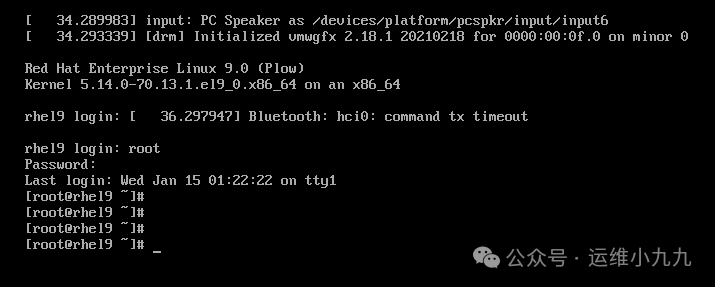
image-20250114173924165
Linux 6
Refer to this blog post.
https://blog.csdn.net/gxhacx/article/details/79286532
Summary
Although the methods for resetting the root password differ across Linux versions, the core idea is to utilize special modes during system startup to gain sufficient privileges to modify the password. Linux 7 enters emergency rescue mode by modifying the boot parameters to set the system to read/write; Linux 8 enters emergency mode by adding the “rd.break” parameter and then manually remounts the system as read/write; Linux 9 is similar to 8, but the boot option must include “rescue.” Each step during the process must be handled cautiously to ensure that commands are entered correctly, avoiding system issues due to operational errors.
About touch /.autorelabel
This file is created because when SELinux is enabled, this file needs to be created. In the rd.break environment, SELinux is not effective. When we modify the user’s password, we also modify the /etc/shadow file, which cancels the security context features of the password file. If we do not allow the system to automatically restore the SELinux security context at boot, the system will report an error “unable to log in.” Therefore, when SELinux is in Enforcing mode (not needed in disabled mode), touching the hidden file /.autorelabel in the root directory will allow the system to rewrite the SELinux security context with the default type upon reboot.
Below is an example of the output for autorelabel:

About /sysroot
After changing the system to read/write, the next step is to change the root to “/”. The chroot command is used to run commands in the specified root directory. <span>chroot</span> means change root directory. In Linux systems, the default directory structure starts at /, which is the root. After using chroot, the system’s directory structure will take the specified location as the root. After the chroot command, the directories and files read by the system will no longer be from the old system root but from the new specified location.
-
/sysroot
-
In Linux systems, <span>/sysroot</span>is a special directory often used for system recovery, system initialization, or in specific security mechanisms (like chroot environments). -
This directory is often seen as a copy of the system’s root directory or an alternative root directory. It plays a crucial role in some Linux installation processes or system rescue scenarios. -
Conceptually, <span>/sysroot</span>can be considered an independent filesystem environment used to isolate core parts of the system or provide a restricted operational environment. -
During the password reset process, especially when using some Linux Live CDs (or other bootable rescue media) to reset a forgotten root password, <span>/sysroot</span>may be mounted. -
For example, in some password reset processes based on Red Hat or CentOS systems, the actual system’s root filesystem might first be mounted to <span>/sysroot</span>. This is because in single-user mode or rescue mode, the system’s operational environment differs from that after normal startup. By mounting the actual root filesystem to<span>/sysroot</span>, it allows access to and modification of critical files in the system, such as<span>/etc/shadow</span><span> (the file storing user password hashes) to reset the password.</span> -
Assuming in a CentOS system, the root password is forgotten. By booting into rescue mode (using installation disks, etc.), one enters a temporary system environment. At this point, the actual system root directory (containing configuration files, etc.) has not been mounted. To modify password-related configuration files, one must first mount the actual system root directory to <span>/sysroot</span>, and then use<span>chroot /sysroot</span>to change the root to the mounted actual system root environment, allowing the use of<span>passwd</span>commands to reset the password.
mount -o remount,rw /sysroot
mount -o remount,rw /sysroot
Remount the already mounted /sysroot as read/write
Parameters:
-o <options> Specifies the options for mounting the filesystem, some of which can also be written in /etc/fstab. Common options include:
defaults Use all options with default values (auto, nouser, rw, suid)
auto/noauto Allow/disallow mounting with the -a option
dev/nodev Interpret/do not interpret special devices on the filesystem
exec/noexec Allow/disallow execution of binary code
suid/nosuid Confirm/do not confirm suid and sgid bits
user/nouser Allow/disallow ordinary users to mount
codepage=XXX Code page
iocharset=XXX Character set
ro Mount as read-only
rw Mount as read/write
remount Remount an already mounted filesystem
loop Mount "loop devices" and "ISO image files"