RT-Thread is about to release a series of practical guides for RA6M3 peripheral drivers. We will use the Renesas RA6M3 HMI-Board development board to guide everyone in getting started with RT-Thread device drivers.
【Hardware Introduction】
1. Development Board Description
The HMI-Board is a cost-effective graphical evaluation kit jointly launched by RT-Thread and Renesas. Compared to traditional HMI + main control board setups, a single piece of hardware can achieve full capabilities of HMI + IoT + control. Relying on Renesas’ high-performance chip RA6M3 and the RT-Thread software ecosystem, the HMI Board not only boasts strong hardware performance but also a rich software ecosystem, helping developers quickly create GUI intelligent hardware products.The HMI-Board is equipped with a high-capacity main control chip RA6M3 with 2M Flash, an integrated 2D accelerator, JPEG codec, LCD controller, and other modules to aid in graphical application development. Additionally, the onboard TFT display and audio interface allow developers to showcase their skills in the HMI field. Furthermore, the HMI-Board also features Ethernet interfaces and high-speed WIFI modules, enabling the development board to connect to the cloud. The board includes a variety of expansion interfaces such as CAN, Arduino interfaces, and two PMOD interfaces, allowing developers to easily expand various peripherals for more flexible control methods. With the HMI-Board development board, developers can easily realize GUI intelligent hardware products.
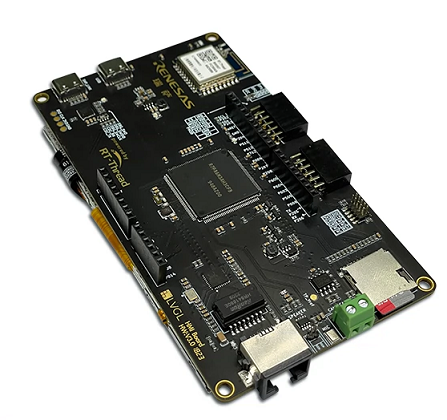
2. Hardware Configuration
- RA6M3(R7FA6M3AH3CFB): Cortex-M4 core, 120MHz main frequency, with 2MB Flash/640KB RAM, integrated TFT controller, 2D accelerator, and JPEG decoder.
- 4.3-inch LCD (RGB 888)
- Onboard emulator
- Ethernet
- RW007 (SPI high-speed WIFI)
- USB-Device
- TF Card
- CAN
- 1 microphone, 1 speaker
- Arduino expansion interface
- 2 PMOD expansion interfaces
- 4 buttons: 3 user buttons and one reset button
【Development Environment】
Before the experiment, you need to download:
- RT-Thread Studio installation package https://www.rt-thread.org/download.html#download-rt-thread-studio
- RA Smart Configurator https://github.com/renesas/fsp/releases/tag/v3.5.0
(Note that the file name is: setup_fsp_v3_5_0_rasc_v2021-10.exe. Other versions may not work properly)
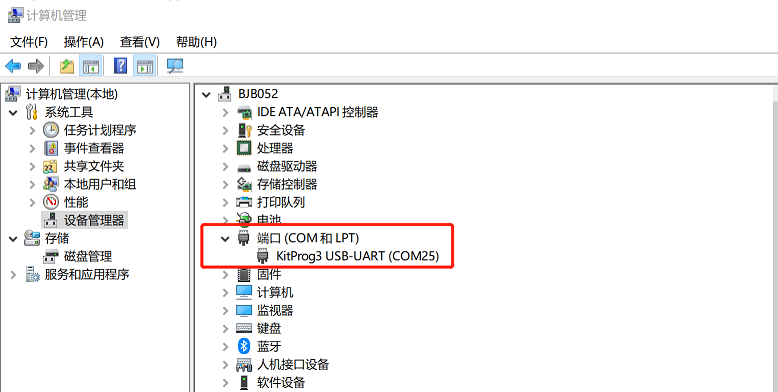
Automatic Serial Port Recognition Installation:
How to Use RT-Thread Studio:
If you are not familiar with the usage of RT-Thread Studio, please refer to the RT-Thread Studio Getting Started Guide:
https://www.rt-thread.org/document/site/#/rt-thread-version/rt-thread-standard/hw-board/ra6m3-hmi-board/ra6m3-hmi-board?id=%e4%bd%bf%e7%94%a8%e8%af%b4%e6%98%8e
【UART Practice on Renesas RA6M3】
The serial port is one of the most common and frequently used peripherals on MCUs. It can be used for printing debug information, remote login, and controlling peripherals that support serial communication. Understanding and mastering the serial port is an essential skill in embedded development.
Content of this Chapter:
Create a program for the development board using RT-Thread Studio, write a UART program to implement serial port data printing, and use the Finsh Shell to control the LED on the development board.
Module Introduction:
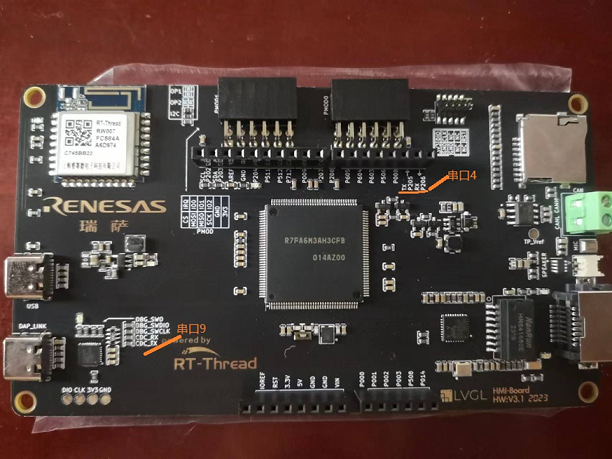
The development board provides two serial connections, specifically UART 9 on P109 and P110, communicating with the host computer through the virtual serial port of the debugger. (UART9 is the default log output port)

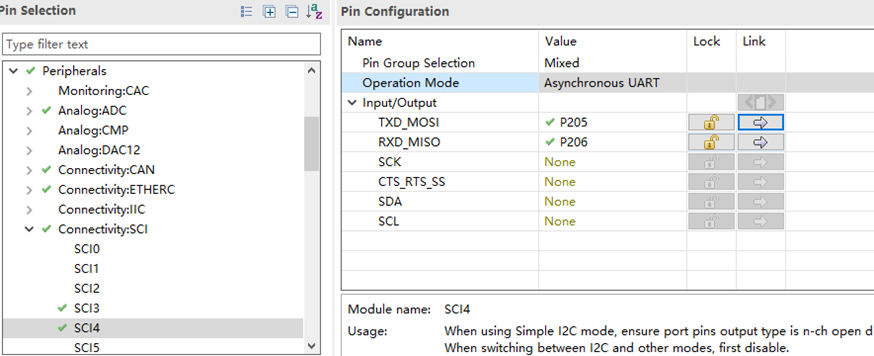
 The other serial port is UART 4 located on P205 and P206, with TXD and RXD pins routed to the Arduino interface, which is also marked directly on the development board.


【Development Software】
Install fsp3.5.0 and RT-Thread Studio(2.2.6) according to the “Practical Guide Instructions”.
Step Instructions
-
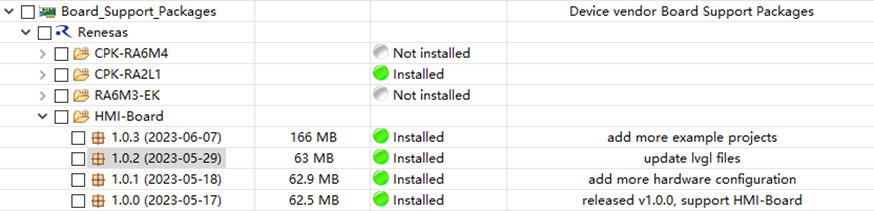
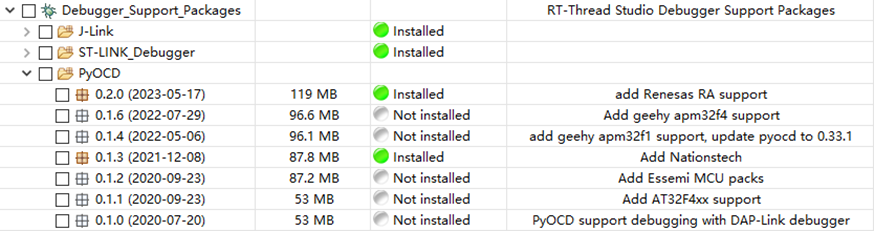
After setting up the development environment, first check the installation packages in the SDK Manager of RT-Thread Studio to ensure that the relevant software support packages are installed.
Create New Project
-
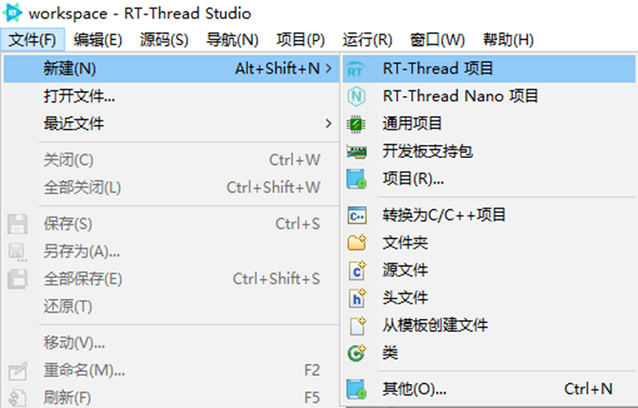
Click on the toolbar File -> New -> RT-Thread Project
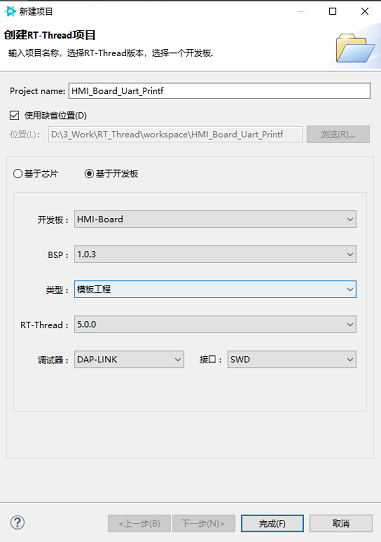
- Select the target development board and the default location for the project. Be sure to select HMI_Board, with the corresponding BSP version being 1.0.3. If you select RA6M3-HMI-Board, the corresponding BSP version is 1.0.2, which contains bugs when using the serial port and may cause the program to not run correctly.
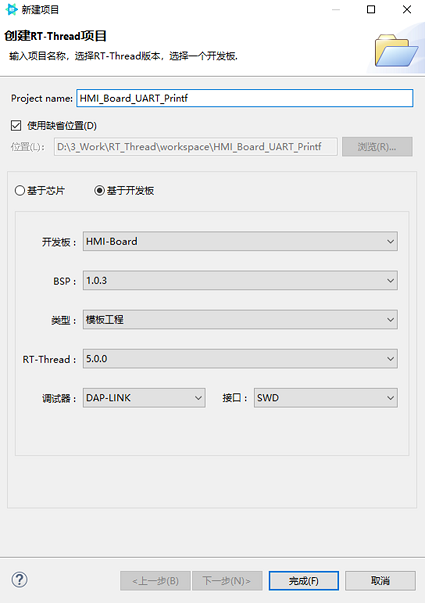
- Give the project a suitable name
- After clicking finish, you will get a program that prints information, supports Finsh, and flips the LED every second.
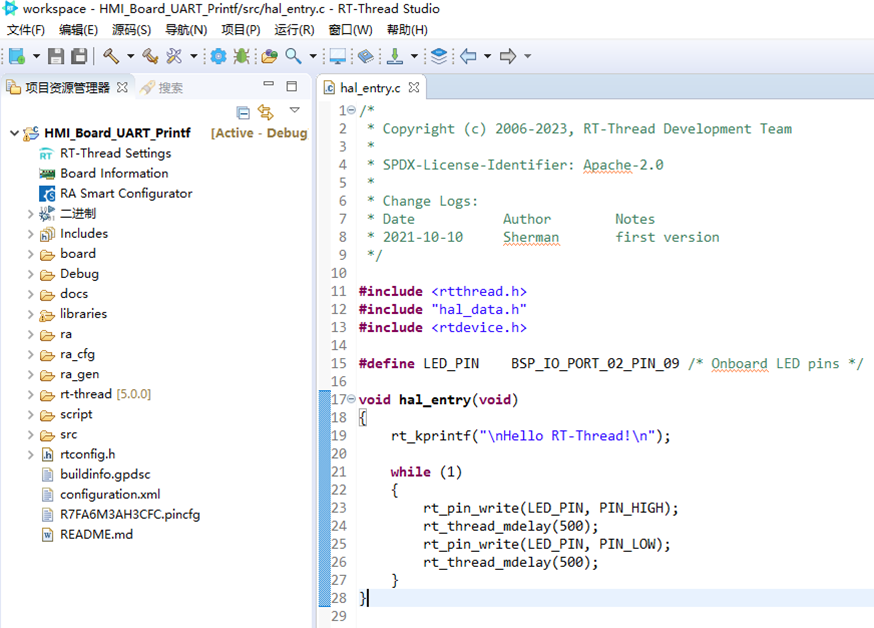
- This program is a complete program that can be directly downloaded and run after clicking compile. Based on this, we can write corresponding driver programs according to our needs.
-
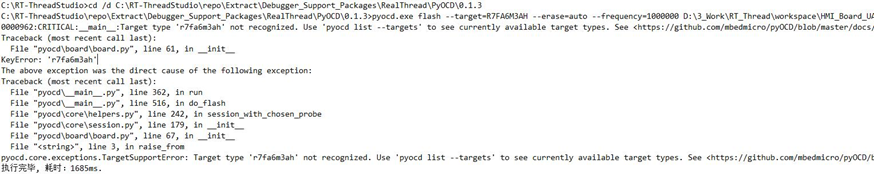
If you encounter the above issues during the download process, you can fix them by updating the version of pyocd. The reason for this issue is that the version of pyocd is too low. Installing version 0.2.0 of pyocd will add support for Renesas and resolve this issue.
- The software project created by RT-Thread Studio itself is an example demonstrating LED flipping and serial port functionality. We can immediately obtain a runnable program that uses the serial port to output information. It is important to note that RT-Thread has embedded the Finsh console program in the system for the convenience of developers to debug, providing different control commands based on the modules enabled by the user.
After the newly created project compiles successfully:Use the onboard daplink to flash the firmware onto the development board.Enter help in the serial terminal to view the currently supported commands.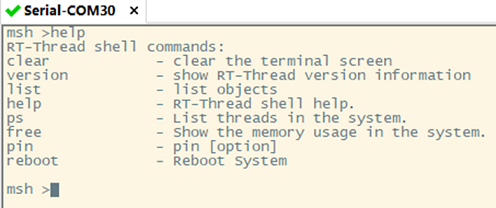
Among them, the list function has many capabilities, and different parameters can be followed to achieve different functionalities.
As shown in the figure, you can view the current system’s threads, timers, semaphores, mutexes, events, mailboxes, message queues, and the number of device instances. This can help developers grasp the current system’s operating status. Additionally, the reboot function can reduce the number of power cycles for the device, facilitating remote debugging.
Besides the predefined functions mentioned above, Finsh also supports custom functions, which can help developers define test functions for specific situations.
The development board defaults to using uart9 as the debugging serial port, and uart4 is routed to the Arduino interface on the development board. By default, uart4 is disabled. To use uart4, first configure the relevant pins using the FSP tool.
Click on RA Smart Configurator in the project to launch the code configuration tool to configure the MCU’s peripherals.
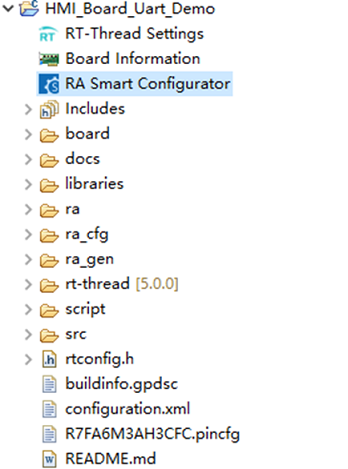
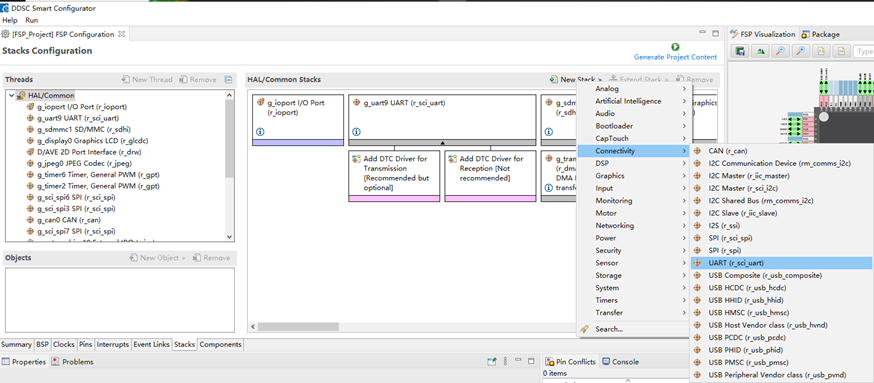
- In the Stack section, add a new UART instance under New Stack -> Connectivity -> UART.
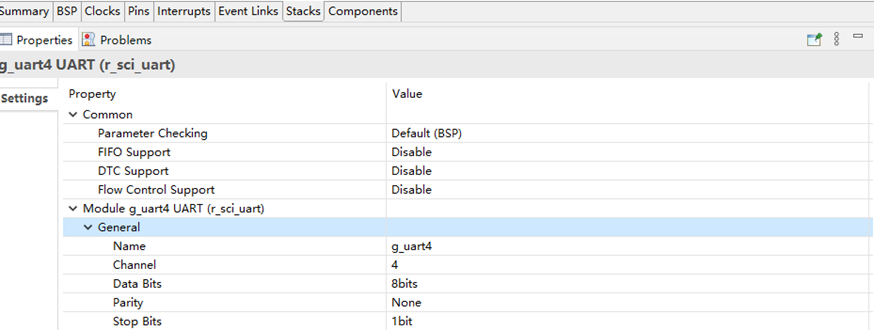
- Modify the channel and device name in the General section.
- In the Pins section, set the pins and their working modes.
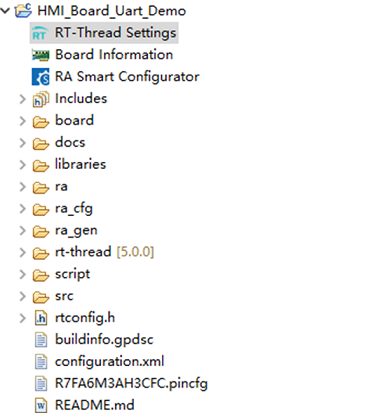
- Click the “Generate Project Content” button in the upper right corner to close the FSP tool.Back in the project, click on RT-Thread Settings to configure the hardware you want to use in the project.
- In the hardware section of the configuration interface, check Enable UART4.
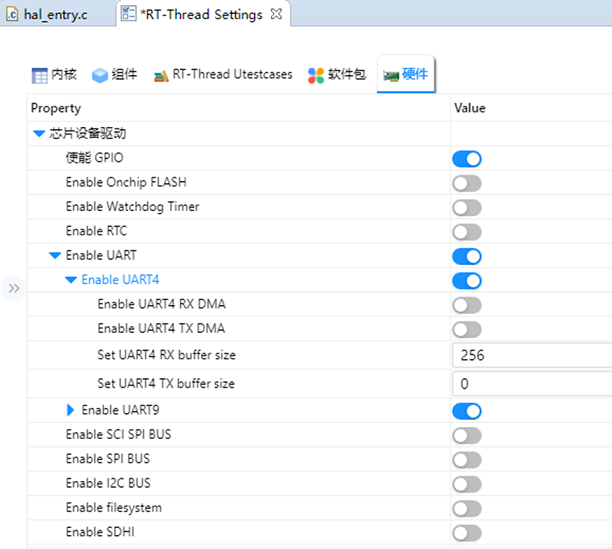
- After saving the file, you can add uart4 in the project and call the relevant serial port functions in the project.
【Writing Test Program】
Sending strings through the serial port is a basic program in embedded applications to check whether the serial port is functioning properly. Add the following code in hal_entry.c:
Hardware connection as shown: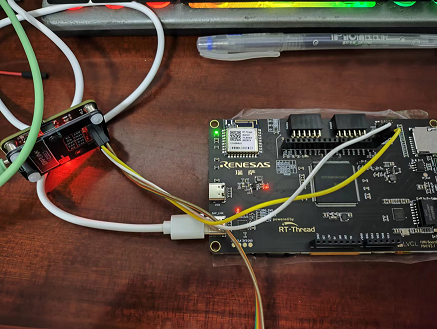
Next, use Finsh’s custom function to implement the uart4 loopback function. The specific code is as follows:
Code Verification:
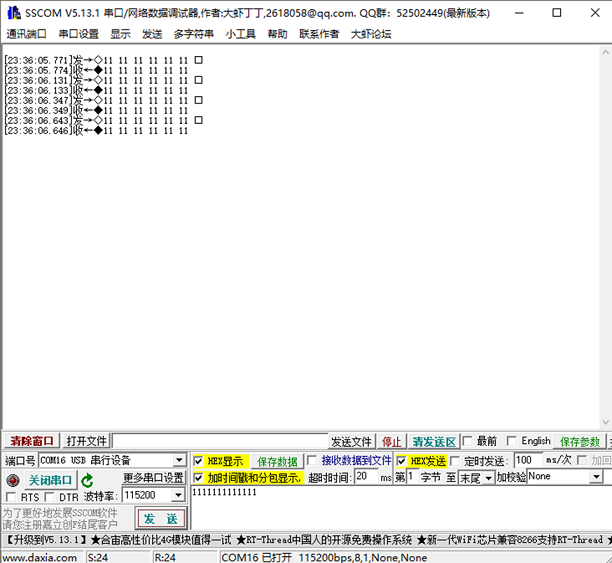
The effect of serial port printing is shown in the following figure.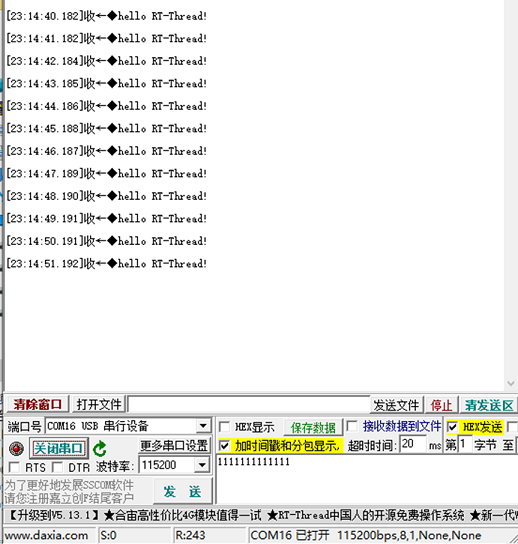 Finsh custom function feature test, input control commands in the serial port interface.
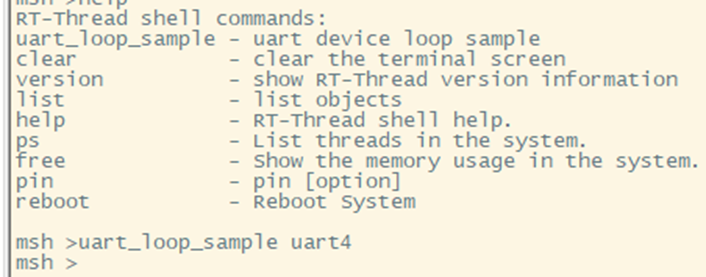 The test effect is shown in the figure:
Chapter Summary: Using RT-Thread and FSP to get started is quite convenient. In FSP, modify the functionalities of the relevant pins, and use the configuration tool in RT-Thread to enable the BSP. Additionally, RT-Thread’s official website has detailed documentation and sample code to help newcomers quickly set up projects and get started with embedded development, making it a good choice.
【Purchase HMI Board】:
RT-Thread x Renesas offline training enrollment is in full swing, for more details click:【Offline Training】 Shanghai Lingang: RT-Thread × Renesas Industrial Monitor RA6M3 HMI Board Solution
———————End———————
 👇 Click to read the original text for more