To not miss my updates, remember to check the public account in the upper right corner and set it as a star, and send me a star.


The project I share today is a very practical remote control smart home. By sending requests to Raspberry Pi via a web or mobile application, Raspberry Pi communicates with Arduino via Bluetooth to control devices in the home. Let’s first take a look at the final implementation effect—
The hardware used in the project includes:
-
Raspberry Pi 3 Model B
-
Arduino UNO
-
Adafruit RGB Backlight LCD
-
Rotary Potentiometer (General)
-
HC-05 Bluetooth Module
-
5V 8-channel Relay Module
The inspiration behind this project came from a day when I forgot to turn off the appliance at home, resulting in it being completely burned out. If I had this remote smart home controller, the appliance burning out would not have happened.
The entire project can be divided into three parts for convenience (the relevant design materials have been packaged, message me “Darwin says”: Remote smart home, get information):
1) Arduino Control Part
Arduino receives requests from Raspberry Pi via Bluetooth (HC-05 Bluetooth module) and processes them. Accordingly, it activates the 8-channel relay to turn on or off the corresponding device and displays real-time information on the LCD. For example, I only used 3 of the 8 relays.

Connection diagram for Arduino, Bluetooth HC-05, LCD, and 8-channel relay is as follows:

Arduino Bluetooth connection can refer to the link below for configuration:
https://www.instructables.com/id/Controlling-Arduino-UNO-Via-Smart-Phone-Using-HC-0/Ensure to choose pin 13 for the LED to blink. Upload this code to Arduino:
int ledPin = 13;void setup() { Serial.begin( 9600 ); // baud rate 9600 for the serial Bluetooth communication}void loop() { // listen for the data from raspberry pi if ( Serial.available() > 0 ) { // read a numbers from serial port int inputVal = Serial.parseInt(); if (inputVal > 0) { Serial.print("Your input is: "); Serial.println(String(inputVal)); // Here blink the LED blinkLED(inputVal); } }}void blinkLED(int inputVal) { for (int i=0; i< inputVal; i++) { digitalWrite(ledPin, HIGH); delay(500); digitalWrite(ledPin, LOW); delay(500); }}2) Raspberry PiRaspberry Pi is responsible for listening to client requests through the web or mobile application. A Python-based server runs, listening for client requests and forwarding them to Arduino via Bluetooth. For this project, you only need a Raspberry Pi 3 with the latest Raspbian OS.
Follow the steps below to implement the configuration on the Raspberry Pi side:
Step 1: Start and run Raspberry Pi
Get a Raspberry Pi with Raspbian OS from this link:https://thepi.io/how-to-install-noobs-on-the-raspberry-pi/
Step 2: Configure Raspberry Pi’s built-in Bluetooth
Ensure that the serial port and serial console are enabled. Go to the main menu -> Preferences -> Raspberry Pi Configuration. Click the interface tab. Now enable the serial port and serial console.
For installing and configuring Bluetooth, you can find the relevant code in the downloaded article or directly download it from GitHub:
https://github.com/cloud-github/raspberry-pi-arduino-bluetooth-wireless-communication
Step 3: Install Python and necessary permissions
Open the terminal and enter:
sudo apt-get install python3-flasksudo python main.pyIf all goes well, you should see the server running on port 0.0.0.0:80
Now, check the local IP. Open the terminal -> ifconfig. Copy that IP address and paste it into the browser, for example: 192.168.0.104. We should be able to see the webpage start and run.
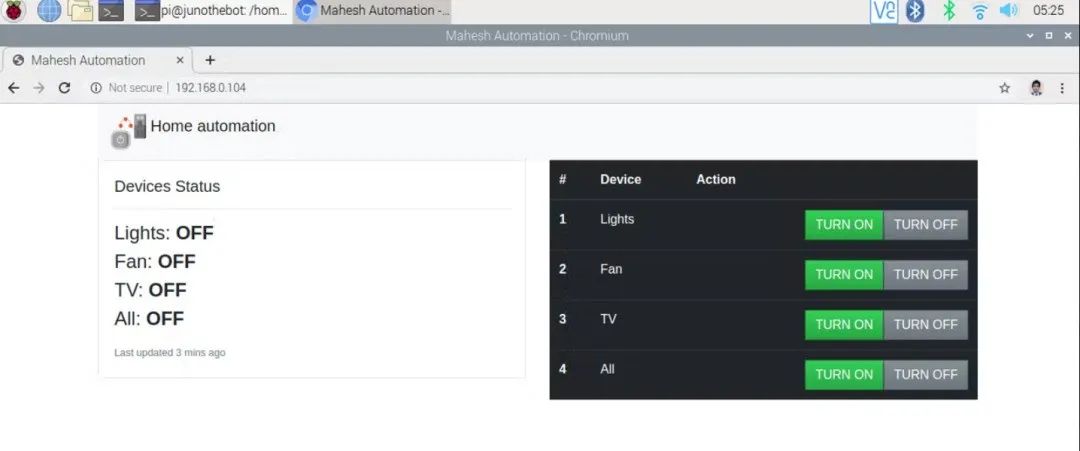
Application user interface
3) Port Forwarding
Let’s understand what port forwarding is and why we need it? Port forwarding is a technology that allows external computers from anywhere in the world to access local hosts or local servers. For example, the local IP address is192.168.0.104 this is a local private network address. The router assigns this address to Raspberry Pi. You can only connect to that network when connected to that router.
So, this is why we need port forwarding.
Different routers may have different user interfaces for configuring port forwarding. But the main logic remains unchanged. If it’s a TPLink router, you can follow this link for port forwarding.
https://www.noip.com/support/knowledgebase/setting-port-forwarding-tp-link-router/
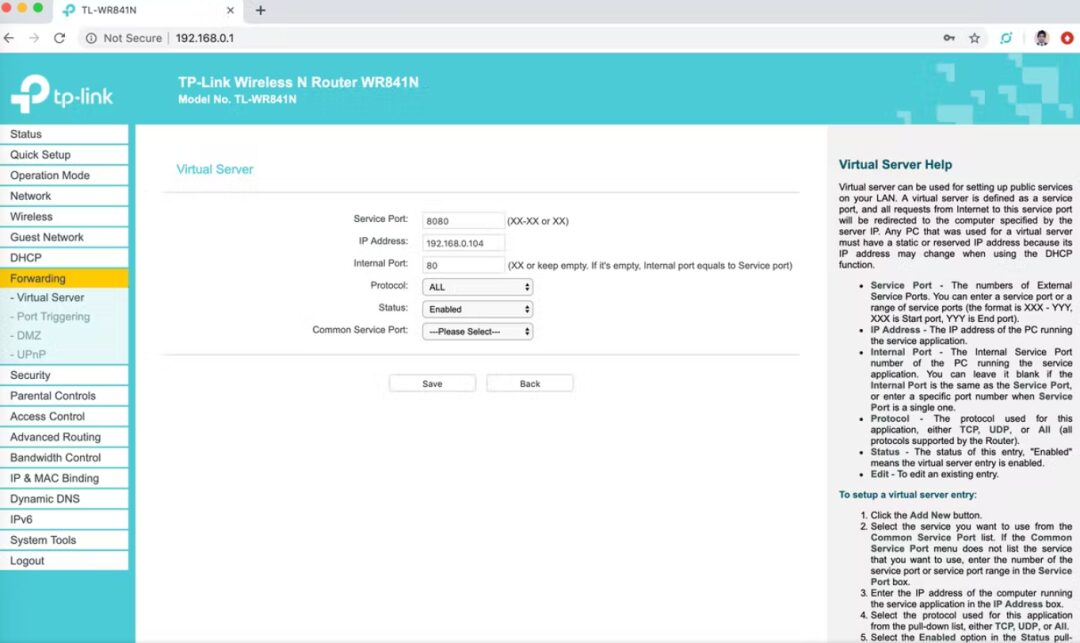
Port 8080 is redirected to 192.168.0.104:80
After successful configuration, go to the router’s default page and check its WAN IP address. For example, in my case, I have:100.66.208.221 .
So now if you browse100.66.208.221:8080 it should automatically forward the request to the local IP address, for example, 192.168.0.1:80, and you should be able to see the webpage start and run.
This is how the entire system is set up! Relatively speaking, it is quite simple. Here I provide the corresponding design materials (message me “Darwin says”: Remote smart home, get information), those interested can give it a try.
This project comes from hackster.io, created by Mahesh Joshi

<<< STM32 Project Summary >>>
<<< Raspberry Pi Project Summary >>>
<<< ESP32 Project Summary >>>
<<< ESP8266 Project Summary >>>
<<< Arduino Project Summary >>>
<<< Darwin Project Sharing Full Series >>>