To avoid missing my updates, remember to check the public account in the upper right corner and set it as a star, and send me a star.
With the help of the open-source hardware Raspberry Pi, we can design and implement our own smart home system.Being able to remotely control home appliances such as air conditioning and lights from anywhere on your phone is quite an accomplishment.
Today’s project is a simple smart home system built by Student Zhang (Zhihu: zyziszy) using Raspberry Pi 3B+ as a web server to remotely control air conditioning and other appliances through a web page.In simple terms, this small project allows you to use your phone to control the air conditioning and set the desired temperature while on your way home.At the same time, you can monitor the indoor temperature and humidity in real-time on the web page.
1) Install the Linux operating system on Raspberry Pi and deploy the necessary software environment, connecting it to the internet.
2) Install an infrared transmitter and temperature and humidity sensors on the Raspberry Pi.
3) Record the infrared signals from the air conditioning remote control and store them on the Raspberry Pi.
4) Use the Python-Flask framework to write a simple website running on the Raspberry Pi.To ensure that this webpage can be accessed over the public network, a cloud server with a public IP address was used for forwarding.
5) When the server receives different requests from the webpage, the Raspberry Pi sends corresponding infrared signals to control the air conditioning or detect temperature and humidity, and feedback is provided on the webpage.
Project Implementation Process
Installing the Raspberry Pi Operating System:
The Raspberry Pi is not just a small computer without a monitor, but a stable, reliable, low-power small Linux server.Since this project does not require the graphical interface of the Raspberry Pi, I chose to install the Raspbian Stretch Lite operating system directly.This saves power and reduces memory usage by eliminating the graphical user interface (GUI).

If you have a basic understanding of using Linux, installing the operating system on the Raspberry Pi is not difficult.Of course, there are many tutorials and blogs online about how to install the operating system and partition the disk.The key is that if you do not have an Ethernet cable, you need to manually add two files in the boot partition:
SSH empty file:To enable SSH on the Raspberry Pi;
wpa_supplicant.conf file:To configure your WiFi information so that the Raspberry Pi automatically connects to WiFi upon booting.
Only then can you wirelessly SSH into the Raspberry Pi over the local area network.
Project Circuit Connections:
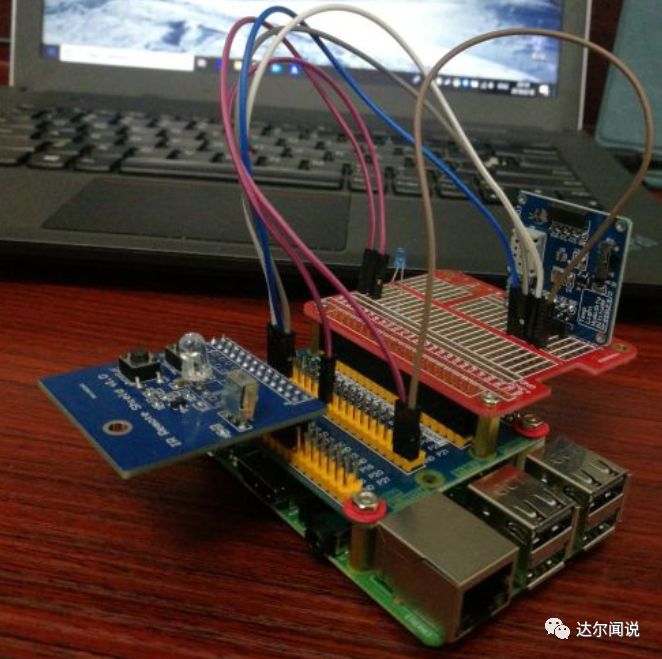
The Raspberry Pi circuit connection diagram (using a power bank for power, also soldered an LED light, which can also be controlled via the web page).
Infrared Communication Module Design:
Infrared remote control, utilizes near-infrared light with wavelengths between 0.76~1.5um to transmit control signals.The infrared remote control system generally consists of two main parts: the infrared transmitting device and the infrared receiving device — the infrared transmitting device can be composed of keyboard circuits, infrared encoding chips, power supply, and infrared transmission circuits.The infrared receiving device can consist of infrared receiving circuits, infrared decoding chips, power supply, and application circuits.
Transmission method, to ensure that the signals are better transmitted by the sender, binary data signals are often modulated into pulse signals and transmitted through infrared emitting tubes.To improve anti-interference performance and reduce power consumption, infrared remote controls often transmit binary encoding using carrier frequencies, typically at 38kHz.Thus, standard infrared remote controls modulate the remote control signals (binary pulse codes) onto a 38KHz carrier, buffer amplifying them before sending them to the infrared light-emitting diode, converting them into infrared signals for transmission.
The infrared remote control receiving module converts the infrared light signals sent by the remote transmitter into electrical signals, amplifies, limits, demodulates, and shapes them to form remote control command pulses, outputting them to the remote microprocessor.
The encoding method of the air conditioning infrared signal, there are various forms of binary pulse codes, among which the most commonly used are PWM codes (pulse width modulation codes) and PPM codes (pulse position modulation codes, which modulate signals based on the time intervals between pulse strings).If you want to develop an infrared receiving device, you must know the encoding method and carrier frequency of the infrared remote control so that we can select integrated infrared receiving heads and develop decoding schemes.
The data format includes the header code, user code, data code, and data code inverse, totaling 32 bits.The inverse code is the encoding after the data code is inverted, which can be used for error correction during encoding.Note:The user code in the second segment can also be set to the inverse of the first segment user code in the remote control application circuit.
Each key on the infrared remote control has a corresponding infrared encoding, pressing different keys can emit different infrared signals, and you can select the power key, +, – and other keys corresponding to the infrared signals for application — suppose the infrared signal with the “switch” command is called KEY_OPENOFF, the infrared signal for the “increase temperature” command is called KEY_UP, and the infrared signal for the “decrease temperature” command is called KEY_DOWN.The air conditioning executes different operations based on the received infrared signals.For example, upon receiving KEY_OPENOFF, the air conditioning turns on and sets the temperature to 26 degrees.

Next, consider how to enable the Raspberry Pi to emit the corresponding infrared signal.For example, if the web client sends a request to “turn on the air conditioning,” the infrared transmitting device on the Raspberry Pi will need to emit the infrared signal KEY_OPENOFF — install and configure the LIRC software within the Raspberry Pi system, which can record and store a segment of infrared signal.For instance, as long as the “switch” key on the remote control is pressed, the Raspberry Pi can save the pulse signal from KEY_OPENOFF into a key value for easy future calls; if the Raspberry Pi receives the client’s “switch” request, it can send the infrared signal KEY_OPENOFF just by calling this key value.
Temperature and Humidity Detection Module Design:
Using the AM2321 temperature and humidity sensor, which adopts the I2C bus transmission protocol.The I2C protocol divides the transmitted messages into two types of frames: one address frame, used by the master to indicate which slave the message is directed to; one or more data frames, containing data sent from the master to the slave (or from the slave to the master), with each frame being 8 bits of data.The protocol requires that each byte placed on SDA must be 8 bits long, and each byte must be followed by an ACK bit.Data is placed on SDA when SCL is low and sampled after SCL goes high.The time interval between reading and writing data and the rising edge of SCL is defined by the devices on the bus, which may vary between different chips.
Temperature information and humidity information each occupy 2 bytes (with a resolution of 16 bits).The highest bit of temperature information (Bit15) equals 1 indicates a negative temperature, and Bit15 equals 0 indicates a positive temperature;the highest bit (Bit14~Bit0) indicates the temperature value outputted by the sensor.The temperature value outputted by the sensor is ten times the actual temperature value.The humidity information of 16 bits (Bit15~Bit0) collectively represents the humidity value outputted by the sensor.The humidity value outputted by the sensor is ten times the actual humidity value.
Connect the AM2321 to the corresponding pins of the Raspberry Pi.Data line SDA and clock line SCL together complete the bit transmission of the I2C bus:The master sends communication commands to the sensor, the sensor begins to receive and reads information according to the function code and related requirements;then returns the execution result (data) to the master.The returned information includes the function code, the data after execution, and the CRC checksum.
The web frontend interface has the following functions:
① Air conditioning remote control function: control the power and set the temperature of the air conditioning
② Implement temperature and humidity monitoring: display indoor temperature and humidity on the web page
③ Control of the light-emitting diode: control the on and off of the LED on the web page

Python-Flask Framework and Scheme Design, Flask is a lightweight web application framework written in Python, with Jinja2 as the default template engine. We developed a simple CS architecture web application for controlling this system using Flask.
To achieve remote control of air conditioning and other appliances via the web page, we need to connect the Raspberry Pi microcontroller to the internet. However, most current network connection methods involve dynamic IP allocation by the three major telecom operators, so we need to connect the microcontroller to the internet and perform NAT (Network Address Translation), using a server with a public fixed IP to penetrate the internal network, allowing it to be accessed by any device while connected to the campus network.
Internal Network Penetration NAT (Network Address Translation), NAT stands for “Network Address Translation”, which is a technology that translates internal private network addresses (IP addresses) into legitimate network IP addresses. NAT allows internal networks using private addresses to connect to the Internet or other IP networks. When the NAT router sends internal network data packets to the public network, it translates the private address in the IP packet header into a legitimate IP address. In simple terms, NAT allows an entire organization to use a single public IP.
The project uses the open-source FRP (a high-performance reverse proxy application for internal network penetration) available on GitHub. With FRP, you can easily access the webpage deployed on the Raspberry Pi from anywhere on the public network.FRP link:github.com/fatedier/frp.
Project Source Code and Debugging
The project source code can be obtained by replying to “Darwin Says” on WeChat:Raspberry Pi Project. File description: net_setting folder — for storing internal network penetration configuration files; web_interface — for storing the Flask project written in Python.
The code for reading temperature and humidity, and the infrared communication module of the Raspberry Pi will not be provided here due to different components used.
If you have any questions about the Raspberry Pi project or want to discuss with Student Zhang, you can join the Darwin Technical Exchange Group, Group Addition Method:Add WeChat Ni Jie — 459888529, note:Technical Exchange.
Darwin Project Sharing Series — Focusing on popular application technologies such as IoT, embedded systems, AI, FPGA, etc., sharing schematics, code, and project solutions openly, making it your knowledge base.
Project Sharing Series Highlights:
STM32 IoT Smart Home Project
Raspberry Pi + Compute Stick 2 Real-Time Face Recognition Project
Building a Cloud Computing Platform for Embedded Development Boards
STM32 Implementing the Simplest Air Mouse
Arduino Rubik’s Cube Robot
STM32 Version of “AI Soul Painter”
STM32 Electronic Photo Album Production
STM32 + DDS Homemade Signal Generator
We are Ni Mo, the founder of Darwin, focusing only on technology, not flirting. The Darwin online education platform aims to serve professionals in the electronics industry, providing training videos covering popular topics in various subfields such as embedded systems, FPGA, artificial intelligence, etc. It offers tailored learning content for different audiences, including commonly used knowledge points, disassembly evaluations, and topics for electronic competitions/intelligent vehicles/postgraduate exams, welcome to follow.
Official Website: www.darwinlearns.com