Introduction
Continuing the attempt to recreate Xiao Zhi AI, but based on the Arduino framework.
Last week, I completed the development environment setup for ESP32-S3 + ESP-SR + ESP-TTS using VSCode + PlatformIO + Arduino (see the article “Recreating Xiao Zhi AI, ESP32-S3 Building Arduino + ESP-SR + ESP-TTS Development Environment Pitfall Record”), and the main functions of voice wake-up, command recognition, and text-to-speech are all operational. Next, I can start integrating with the Xiao Zhi AI server’s WebSocket protocol.
However, the original author’s <span>78/xiaozhi-esp32</span> project is a bit complex, making it inconvenient to read. I also didn’t want to set up the IDF compilation environment, so I looked for other platform implementations and found a <span>huangjunsen0406/py-xiaozhi</span> project, which is a desktop client written in Python + PyTk with a GUI. It supports manual and automatic conversation mode switching, allowing me to learn about lightweight voice recognition on PC.
Communication Process
The Xiao Zhi AI client and server can use either the WebSocket or MQTT protocol. Here, for convenience, I will directly use the WebSocket protocol for learning.
Protocol Overview
In the communication process of Xiao Zhi AI, WebSocket is used to achieve real-time, bidirectional communication between the client and server. The following types of data are mainly transmitted:
-
Control Commands: Such as start/stop listening, interrupt TTS, etc.
-
Text Information: Such as LLM responses, emotional commands, configuration information, etc.
-
Audio Data:
-
Client -> Server: Recorded Opus encoded audio stream.
-
Server -> Client: TTS generated Opus encoded audio stream.
-
Status Synchronization: Such as TTS playback start/end.
The communication mainly uses two formats:
-
JSON: Used for transmitting text, control commands, and status information.
-
Binary: Used for transmitting Opus encoded audio data.
Establishing Connection
-
Client Initiates Connection: The client initiates a WebSocket connection request to the server based on the
<span>WEBSOCKET_URL</span>in the configuration. -
Send Header Information: When establishing a WebSocket connection, the client needs to send necessary HTTP header information, including:
-
<span>Authorization</span>:<span>Bearer <access_token></span>(in the configuration<span>WEBSOCKET_ACCESS_TOKEN</span>) -
<span>Protocol-Version</span>:<span>1</span>(protocol version number) -
<span>Client-Id</span>: Client identifier -
<span>Device-Id</span>: Device identifier (usually the device MAC address) -
Currently, among the above fields, except for Device-Id which needs to be generated by the client, the others are fixed values and can be set as follows:
"WEBSOCKET_URL": "wss://api.tenclass.net/xiaozhi/v1/","WEBSOCKET_ACCESS_TOKEN": "test-token","CLIENT_ID": "1dd91545-082a-454e-a131-1c8251375c9c",
Server Response: The server accepts the connection.
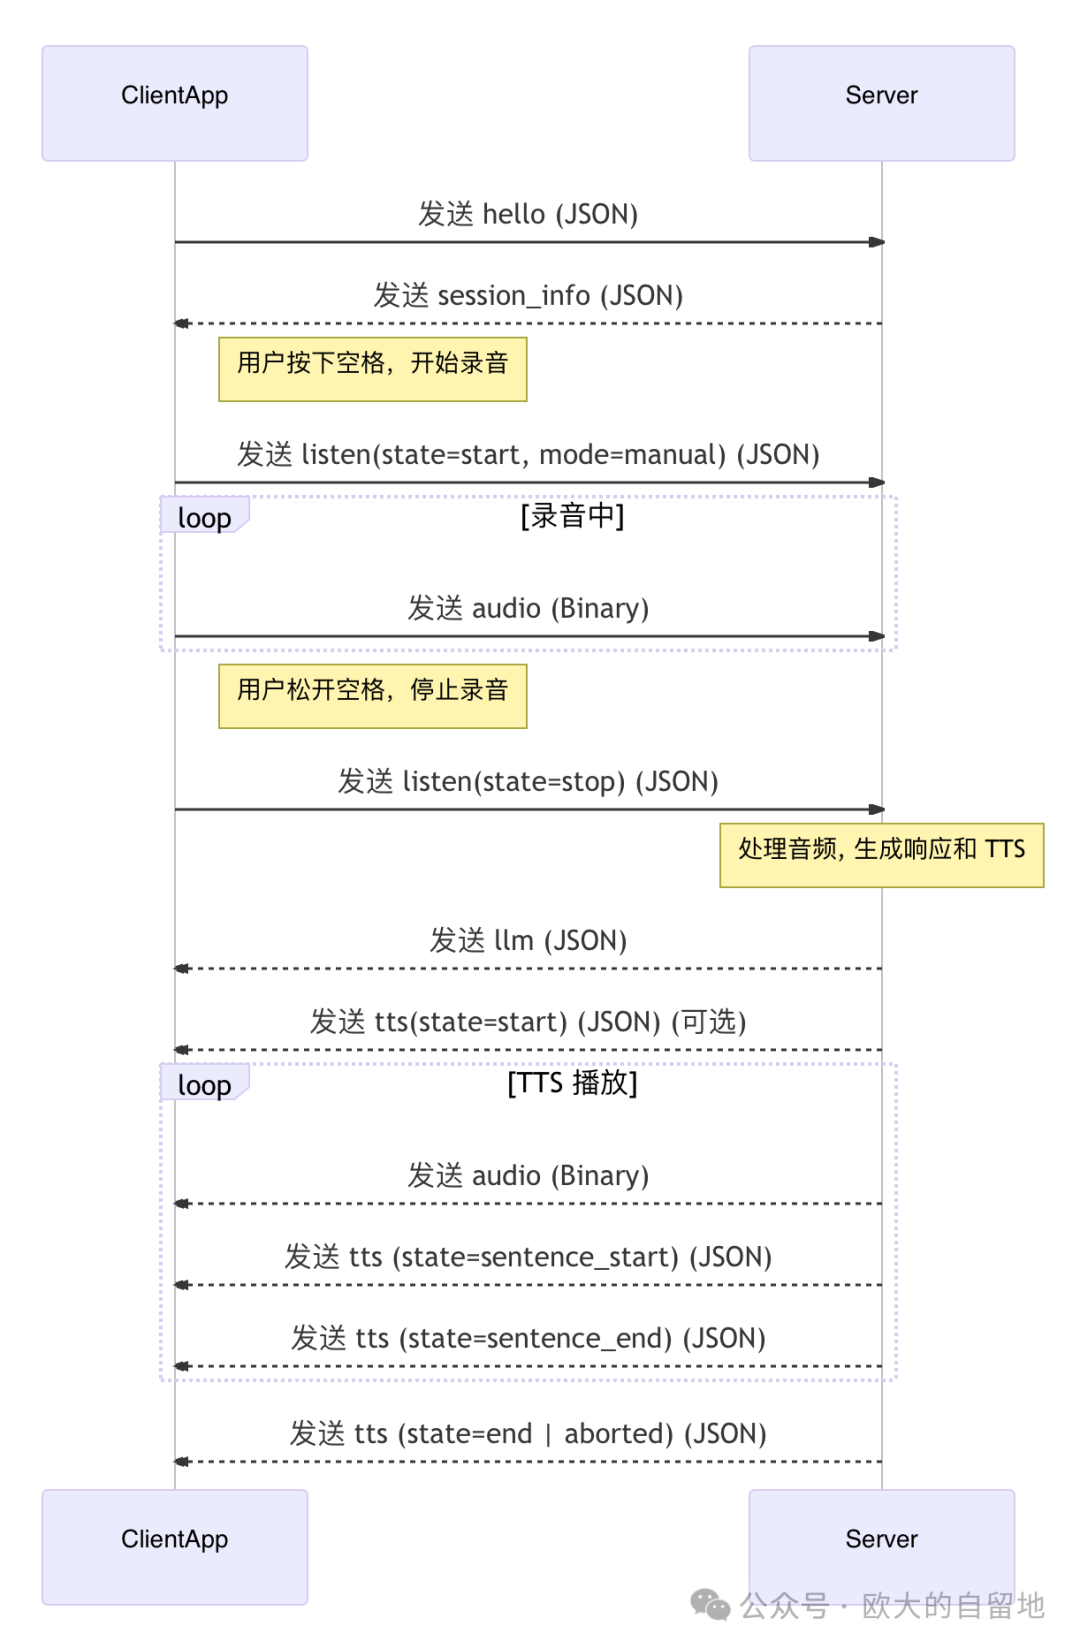
Client Sends <span>hello</span>: After the connection is successfully established, the client needs to send a <span>hello</span> message (in JSON format).
hello_message = { "type": "hello", "version": 1, "transport": "websocket", "audio_params": { "format": AudioConfig.FORMAT, "sample_rate": AudioConfig.SAMPLE_RATE, "channels": AudioConfig.CHANNELS, "frame_duration": AudioConfig.FRAME_DURATION, }}Here, audio encoding parameters will be preset, but it’s not a big issue as the server will later push the settings it can accept.
Server Responds to hello: Provides session ID and possible initial configuration.
{ "type": "hello", "version": 1, "transport": "websocket", "audio_params": { "format": "opus", "sample_rate": 24000, "channels": 1, "frame_duration": 20 }, "session_id": "a1f81xs89"}Note: The client must store the <span>session_id</span> for all subsequent messages that require session identification.
Note 2: Here, the <span>audio_params</span> need to be used to update the local Opus encoding settings.
Server Authentication
When connecting to the Xiao Zhi AI official backend for the first time, it is necessary to add the device in the console.
The method of adding a device is also very convenient. When the client connects to the server and sends the first voice message, the server will return a voice message along with a 6-digit verification code, which can be used to add the device in the backend.
At this point, the establishment of the WebSocket connection with the Xiao Zhi AI server is complete, and the subsequent dialogue process can begin.
Client Messages
To converse with Xiao Zhi AI, the client generally needs to actively initiate the dialogue process by sending the first audio data or the wake word.
<span>listen</span> (JSON)
Control the state of audio listening (recording).
-
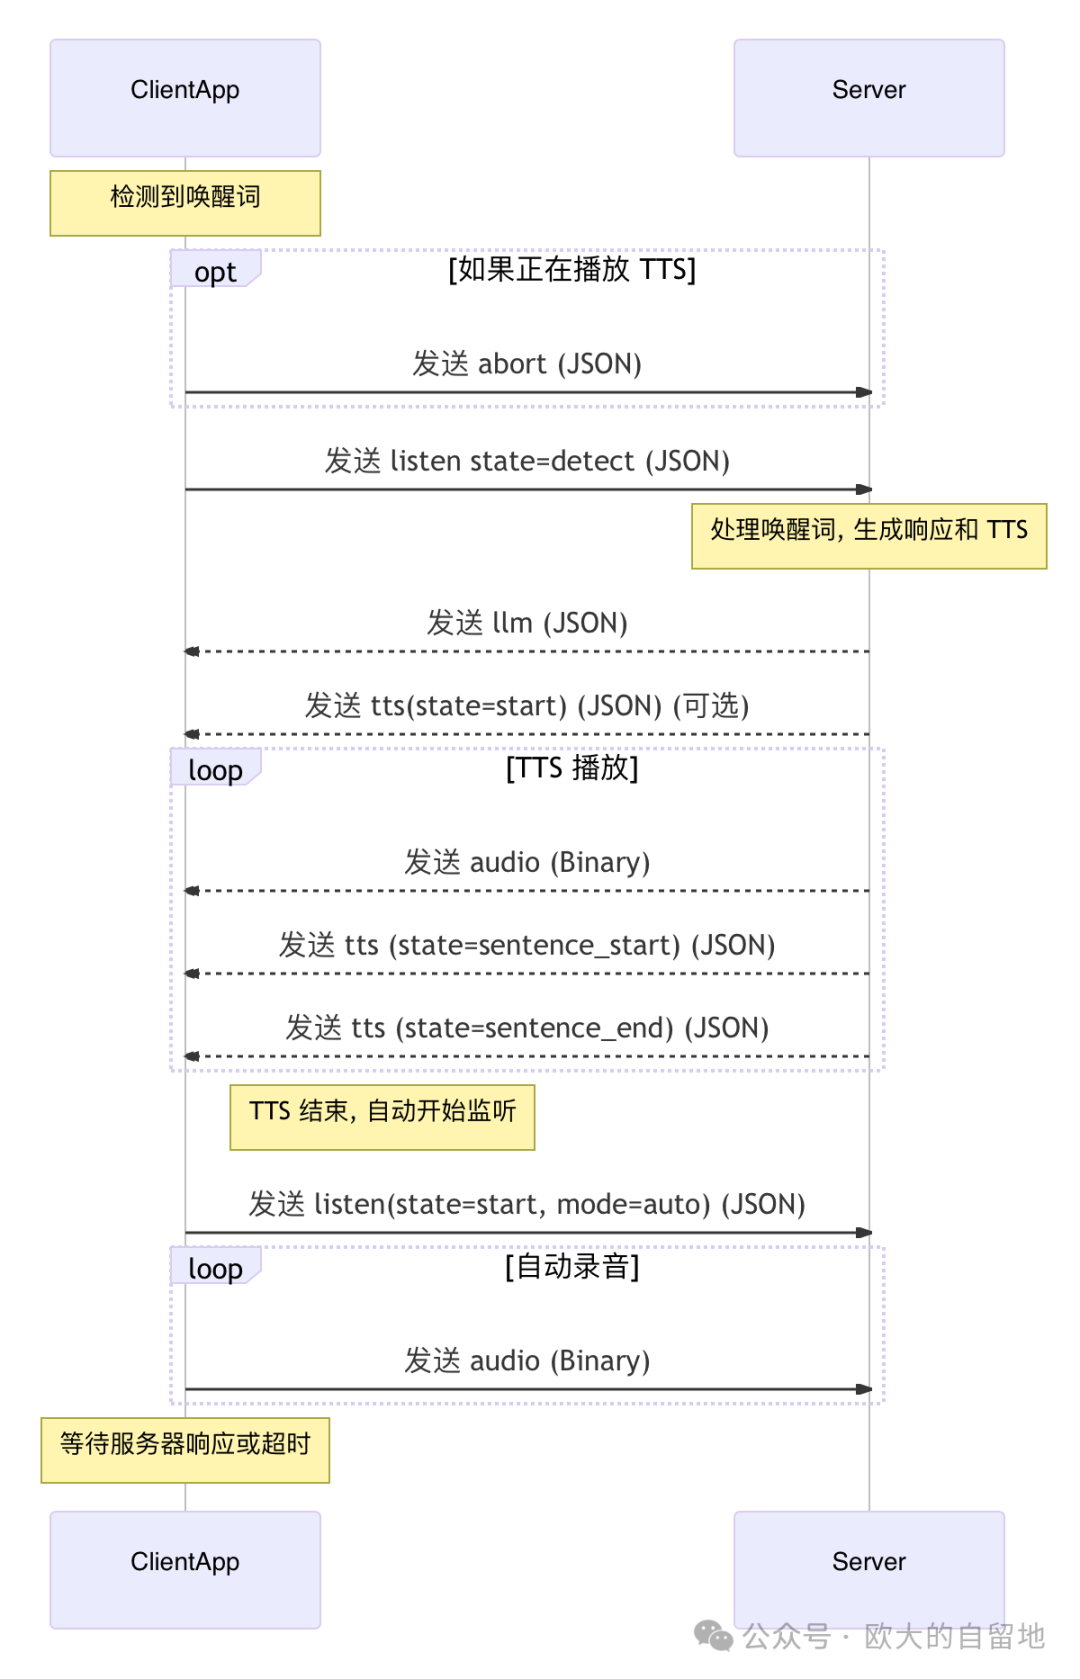
Start Listening:
{ "session_id": "session-id", "type": "listen", "state": "start", "mode": "manual" | "auto" | "realtime" // Listening mode} -
Stop Listening:
{ "session_id": "session-id", "type": "listen", "state": "stop"}
<span>wake_word</span> (JSON)
If the conversation is initiated by a wake word, another type of <span>listen</span> message should be used to notify the server that the wake word has been detected, so the server will immediately return a voice message.
-
Format:
{ "session_id": "session-id", "type": "listen", "state": "detect", "text": "你好小智" // Modify according to the actual wake word}
<span>abort</span> (JSON)
Request the server to interrupt the current ongoing operation (mainly TTS voice playback).
-
Format:
{ "session_id": "session-id", "type": "abort", "reason": "wake_word_detected" // (optional) Reason for interruption}
This is mainly used when the Xiao Zhi AI server outputs a long voice message but wants to start a new conversation.
<span>audio</span> (Binary)
Send recorded audio data.
-
Format: Binary data frame (Binary Frame).
-
Content: Audio data block encoded according to the format agreed in
<span>session_info</span>under<span>audio_config</span>(default is Opus).
IoT Messages
This part is not being explored for now; I will research the specific format later.
Server Messages
The messages returned by the Xiao Zhi AI server are also divided into JSON and Binary types, where JSON type messages rely on the <span>type</span> field to distinguish the actual content.
Example JSON message format:
{ "type": "tts", "state": "start", "sample_rate": 24000, "session_id": "session-id"}Where the <span>type</span> field is used to identify the message type, which can be <span>llm</span>, <span>tts</span>, <span>stt</span>, etc.
<span>type=tts</span> (JSON)
This message is the main message type returned by the Xiao Zhi AI server, including emotions, voice playback, and speech-to-text, all returned in this type of message.
It can be said that in the entire interaction process of Xiao Zhi AI, most of the workload is handled by the server, and the client implementation can be relatively lightweight.
In the <span>type=tts</span> type of message, based on the different values of the <span>state</span> field, targeted processing is also required.
state=start
After the Xiao Zhi AI server receives the voice data from the client, it generates the corresponding LLM chat dialogue content and starts returning voice data. Here, an audio data <span>sample_rate</span> parameter is also provided to synchronize the playback configuration.
{ "type": "tts", "state": "start", "sample_rate": 24000, "session_id": "session-id"}state=sentence_start
Indicates the start of a sentence in the dialogue returned by Xiao Zhi AI,<span>text</span> field contains the text content of the spoken voice.
{ "type": "tts", "state": "sentence_start", "text": "感觉你心情不太好,发生了什么事吗?", "session_id": "session-id"}state=sentence_end
Indicates the end of a sentence in the dialogue returned by Xiao Zhi AI.
{ "type": "tts", "state": "sentence_end", "text": "感觉你心情不太好,发生了什么事吗?", "session_id": "session-id"}state=stop
Indicates that the response content generated by Xiao Zhi AI for the previously received voice has been completely finished, and the client can continue recording operations.
{ "type": "tts", "state": "stop", "session_id": "session-id"}<span>type=llm</span> (JSON)
This message returns the emotions that the large model needs to express when replying,<span>text</span> is an Emoji expression, and <span>emotion</span> corresponds to the word for the emotion. On devices that cannot display Emoji, the word can be used to correspond to an image for display.
{ "type": "llm", "text": "🤔", "emotion": "thinking", "session_id": "session-id"}<span>emotion</span> optional values are as follows:
static const std::vector<Emotion> emotions = { {"😶", "neutral"}, {"🙂", "happy"}, {"😆", "laughing"}, {"😂", "funny"}, {"😔", "sad"}, {"😠", "angry"}, {"😭", "crying"}, {"😍", "loving"}, {"😳", "embarrassed"}, {"😯", "surprised"}, {"😱", "shocked"}, {"🤔", "thinking"}, {"😉", "winking"}, {"😎", "cool"}, {"😌", "relaxed"}, {"🤤", "delicious"}, {"😘", "kissy"}, {"😏", "confident"}, {"😴", "sleepy"}, {"😜", "silly"}, {"🙄", "confused"}};<span>type=stt</span> (JSON)
This is the text recognized from the voice sent by the client by the Xiao Zhi AI server, which can be displayed on the screen to show the complete dialogue content between both parties.
{ "type": "stt", "text": "今天天气怎么样", "session_id": "session-id"}<span>type=iot</span> (JSON)
Similar to client messages, this has not been researched yet; I will look into it later.
<span>audio</span> (Binary)
The TTS audio data sent by the Xiao Zhi AI server.
-
Format: Binary data frame (Binary Frame).
-
Content: TTS audio data block encoded according to the format agreed in the
<span>hello</span>message under<span>audio_params</span>(default is Opus). The client should immediately decode and play it upon receipt.
Core Interaction Flowcharts
Manual Conversation Interaction Flow
Automatic Conversation Interaction Flowchart
Exception Handling
Server Actively Disconnects
When saying “goodbye” to Xiao Zhi AI, the server will actively disconnect. Therefore, at this time, if a manual conversation is restarted or a wake word is used to trigger a conversation, it will be necessary to reconnect to the server.
Network Exception
In case of network exceptions, simply reconnect the WebSocket according to the normal initialization process.
Conclusion
Overall, the communication protocol of Xiao Zhi AI is relatively simple. After going through it, I can quickly create a Python version of the client using Cursor + AI, and then try integrating it with ESP32.
Additionally, the processes and messages here are referenced from the official repository and the actual interaction process summary, so there may be inaccuracies. If there are any errors, please feel free to point them out.
References
Other DIY Projects
Open-sourced, tutorial for recreating a smart UV glue UV curing lamp

How about a coin-sized game console? Can play Snake and Pac-Man – fully open source!

Costing 60 yuan, make an open-source game console with ESP32-S3, can play FC/NES, GameBoy, and has a dedicated colored PCB

Don’t miss out on idle fast charging heads, DIY a USB-PD power deception device with screen display power

Follow the public account for updates
If this article has helped you, please follow, like, share, or forward it. Thank you very much 😃.
Historical Articles
-
Automatically load batteries, this nickel-hydrogen battery charger is quite interesting
-
Electromagnet-driven 7-segment code clock, has a bit of mechanical flavor
-
How much does it cost to sell for 25 yuan? Disassemble a 500-in-1 game console
-
An open-source pure PCB keyboard project, only the size of a credit card
-
Here it comes, using the ESP32-S3 microcontroller to run a RISC-V emulator to run Linux, this time it only takes 8 seconds to boot
-
No-code DIY all-in-one air monitoring station AirCube, can also connect to Home Assistant
-
How about a coin-sized game console? Can play Snake and Pac-Man – fully open source!
-
Costing 60 yuan, make an open-source game console with ESP32-S3, can play FC/NES, GameBoy, and has a dedicated colored PCB
-
30 yuan DIY a flexible filament ambient light
-
Fully open source! DIY USB ammeter tutorial using a 0.7 yuan microcontroller, get into hardware design, firmware development, and appearance modeling