
Python3IDE iOS 1.4 Update: Run tkinter Directly on Your Phone/iPad, Out of the Box!
As a Python developer, I have always wanted to write small tools with graphical interfaces on mobile devices, but setting up the environment has been too troublesome. Now, it’s finally done—Python3IDE version 1.4 officially supports tkinter, and no configuration is required! Additionally, we have replaced the commonly usedturtle drawing library with the official standard version, driven by tkinter, making drawing smoother.
What is tkinter? Why is it worth paying attention to?
If you have ever written desktop applications in Python, you have probably encountered tkinter. It is the GUI library that comes with Python, the one that gets installed directly on your computer when you install Python. Although it is not as fancy as third-party libraries like PyQt or Tkinter, it excels innot requiring any dependencies, allowing you to write a few lines of code and pop up a window with a button.
Previously, running tkinter on iOS was nearly impossible (due to Apple’s numerous restrictions), but now we have bypassed these pitfalls. You can directlyimport tkinter in Python3IDE, write your code, and click run— just like on a computer, and you will immediately see the window pop up.
What pain points does this update address?
1. True zero configuration
o No need to change system settings, no need to connect to a server, just install the app and it works
o No network permissions required (can be used offline)
2. turtle drawing upgrade
o The previous iOS turtle library was a simplified version, now replaced with the official Python standard library
o Rewritten using tkinter at the core, drawing speed is faster, and more features are supported (such as color filling, event binding)
3. iPad large screen optimization
o Enhanced syntax highlighting: The code editor supports full Python syntax highlighting, making it easier to read code on a large screen
o Split-screen operation: write code on the left, view the running results on the right
o External keyboard support (ESC key to exit window, code completion)
Hardcore details that tech people care about
Why can tkinter run on iOS now? Apple has many restrictions on GUI and multi-process, but we have worked on the underlying layer:
· Independent process operation: tkinter windows run in a separate process (although Apple does not allow ordinary apps to open multiple processes, we used a compliant solution within the sandbox)
· Crash isolation: Even if your Python code enters an infinite loop or crashes, the main Python3IDE program remains stable, and you can continue writing code after closing the window
· True native rendering: Not a web shell! Using iOS native drawing APIs to render tkinter controls
A practical example
Suppose you want to write a simple GUI program, try running this code on your phone/iPad:
# Run directly on phone/iPad! from tkinter import Tk, Button, Labelcount =0def click(): global count count +=1 label.config(text=f”Clicked {count} times”) root = Tk() label = Label(root, text=“Click the button to try”) label.pack() Button(root, text=“Click me”, command=click).pack() root.mainloop() # This line is essential!
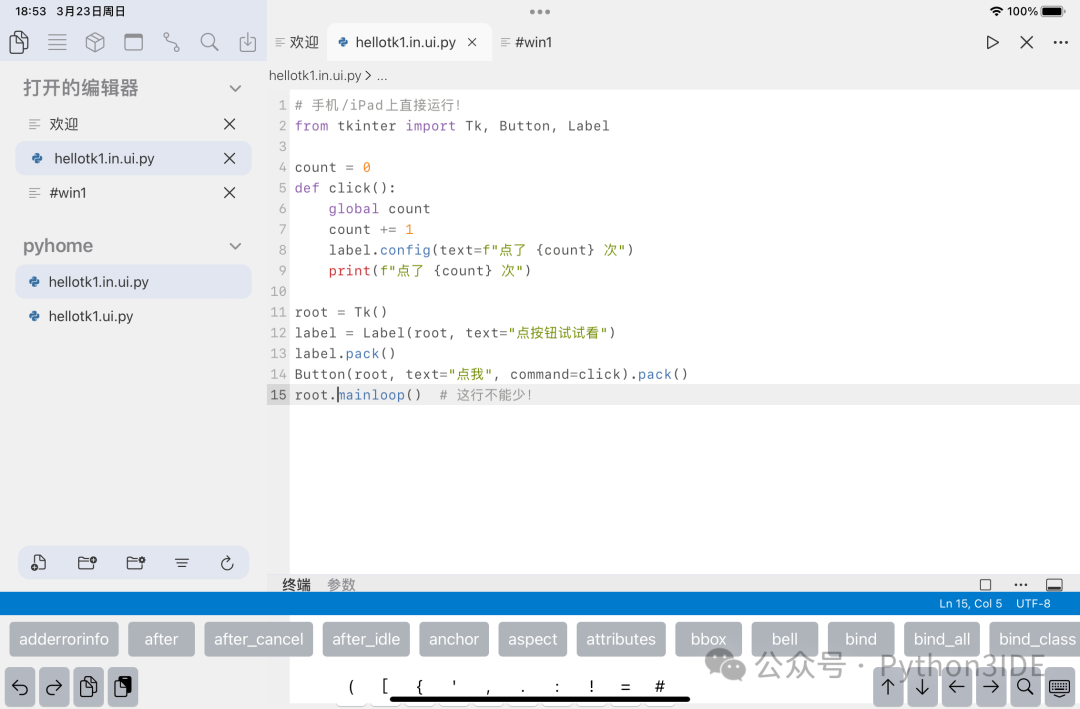
Click run, and you will see a native iOS-style window (not a web simulation!), with button touch response almost indistinguishable from that on a computer.

Useful details for developers
· Direct debugging: If the program hangs, simply swipe up to close the window, it won’t crash
· File read/write compatibility: tkinter’s filedialog can read files within the app sandbox (like images in the project)
· iPad productivity:
o External display support for extended screens (requires iPadOS 16+)
o Use a trackpad/mouse for precise control placement
o Automatically adapt window size in landscape mode
What scenarios is it suitable for?
· Writing teaching demos: Demonstrating GUI logic to students, pulling out your phone to modify code on the spot
· Temporarily fixing bugs: Receiving feedback on the subway, directly connecting to the phone hotspot to debug the interface layout
· Casual tools: Using the iPad in split-screen to write a calculator/tomato timer (don’t let the boss find out)
· Hardware integration: Quickly writing a control panel prototype for IoT devices with a Bluetooth keyboard
Known issues (honest version)
· Complex ttk themed widgets (like Treeview) are temporarily not fully supported
· Windows cannot be dragged off the screen (iOS system limitation)
· If multiple windows are opened simultaneously, it is recommended to close the previous one before opening a new one (the phone screen is small, you understand)
How to experience it?
1. Go to the App Store to update to version 1.4 (if you haven’t updated yet)
2. It is recommended to use an iPad: writing code on a large screen is more comfortable, and you can split-screen to reference documents
3. If you encounter problems, feel free to email me: [email protected] (including code snippets is better)
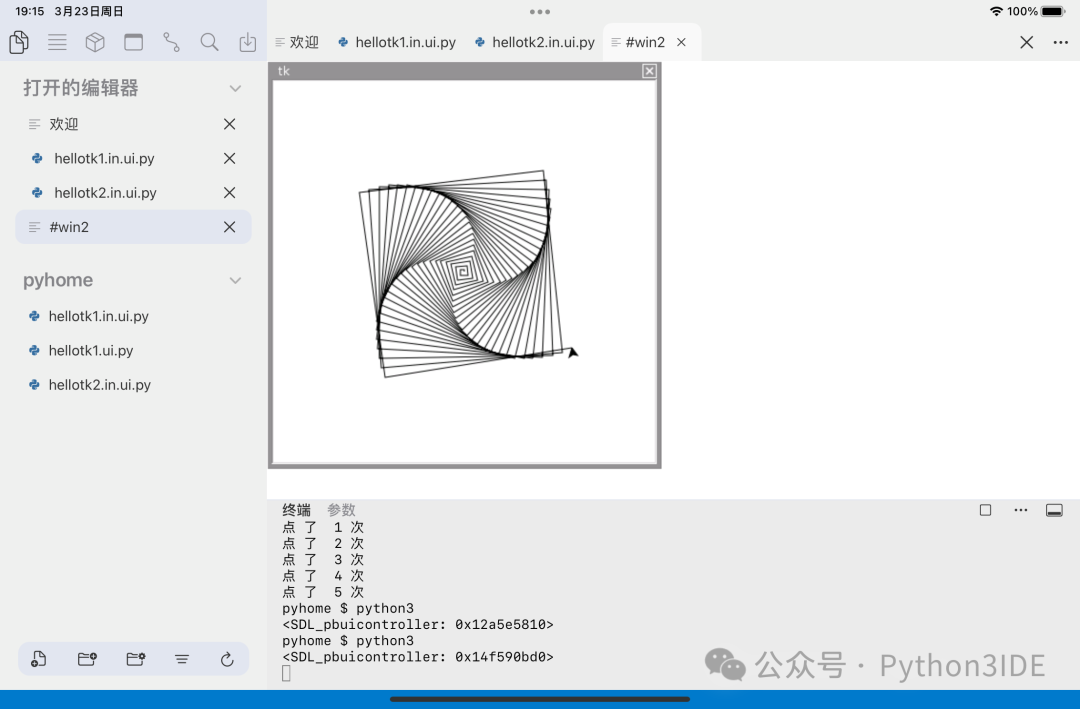
Finally, here’s a hardcore example—using tkinter+turtle to draw a spiral line, just to prove this is not a gimmick:
# Running on iPad is even better import tkinter as tk from turtle import RawTurtle root = tk.Tk() canvas = tk.Canvas(root, width=400, height=400) canvas.pack() t = RawTurtle(canvas) t.speed(0) for i inrange(100): t.forward(i*2) t.left(91) root.mainloop()
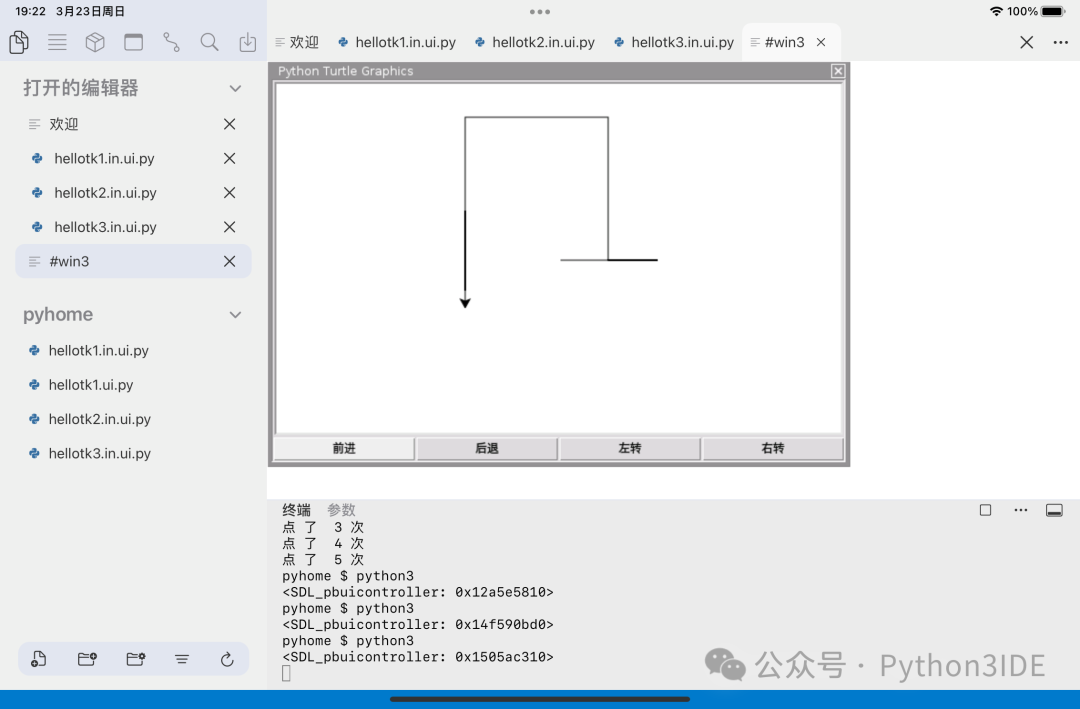
Turtle and tk combined
import turtleimport tkinter as tk# Initialize Turtle window and set positionscreen = turtle.Screen()screen.setup(width=600, height=400, startx=0, starty=0) # Window top left corner# Get the underlying tkinter root window of Turtleroot = screen.getcanvas().master# Create Frame container to place buttons (located at the bottom of the window)button_frame = tk.Frame(root)button_frame.pack(side=tk.BOTTOM, fill=tk.X) # Horizontal fill# Define button action functionsdef move_forward(): turtle.forward(50)def move_backward(): turtle.backward(50)def turn_left(): turtle.left(15) def turn_right(): turtle.right(15)# Create buttons and bind actionsbtn_forward = tk.Button(button_frame, text=“Forward”, command=move_forward)btn_backward = tk.Button(button_frame, text=“Backward”, command=move_backward)btn_left = tk.Button(button_frame, text=“Turn Left”, command=turn_left)btn_right = tk.Button(button_frame, text=“Turn Right”, command=turn_right)# Layout buttons (horizontally arranged)btn_forward.pack(side=tk.LEFT, expand=True, fill=tk.X)btn_backward.pack(side=tk.LEFT, expand=True, fill=tk.X)btn_left.pack(side=tk.LEFT, expand=True, fill=tk.X)btn_right.pack(side=tk.LEFT, expand=True, fill=tk.X)# Start main loopturtle.done()
Environment configuration? Not needed. Now, writing Python GUI really only requires a phone or iPad.