Click the above  “Easy Learning Electronics” to follow us with one click and easily learn electronic knowledge.
Students may encounter fewer issues, but when starting work in software development, various “unimaginable” problems may arise. However, with gradual accumulation, you can gain a certain understanding of hardware and software, enabling you to master them quickly!
When using the STM32F103 series MCU, I used a pirated JTAG programmer back in school, so I didn’t pay much attention to the programming pins (as long as it works, that’s fine). However, after starting work in a company, I found that typically only 4 pins are used for programming—this is the so-called SWD mode, which only requires 4 pins (VCC, GND, SWCLK, SWDATA). The reason for using only four pins is to make the chip smaller and the device more compact! Sometimes, the JTAG debugging interface of the MCU may be used as a regular IO port, so the pin multiplexing feature needs to be utilized. Once multiplexed, you need to be cautious! Once you reuse the programming interface, you can write to it, but you can no longer program it!
Therefore, let’s get to the point—ISP programming.
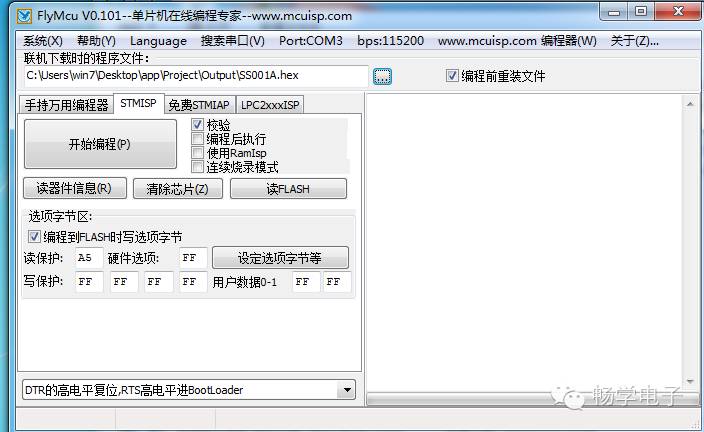
Software used—FlyMCU.
Preparation before use: Understanding Boot0 and Boot1.
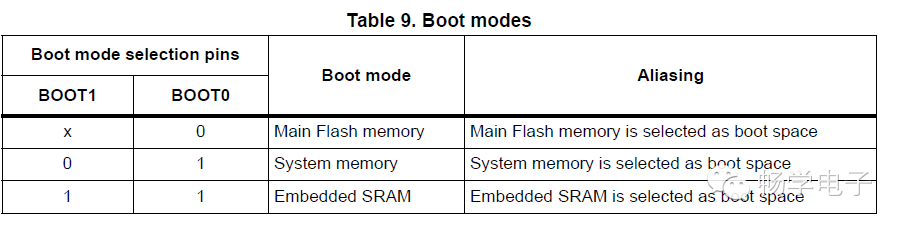
The programmer writes code into the flash memory; therefore, generally speaking, Boot0 is set to 0 (ground mode).
What is the second situation used for?
It is our ISP mode, where the chip comes with a built-in BootLoader to download via UART1 (user cannot erase!).
The third situation is in SRAM mode (SRAM is volatile random-access memory, used for debugging, but generally not used).
Thus, we only need to focus on two modes:
1. Boot0 = 0
2. Boot0 = 1 && Boot1 = 0
We use the second mode for ISP programming!
1. First, insert the USB-to-serial adapter (or any serial port that can connect to the MCU).
Wiring: Use the STM32’s UART1, which are PA9 and PA10; TX connects to RX, RX connects to TX, and then share the ground.
2. Open FlyMCU, as shown in the interface: first click to clear the chip, then power it on! This will clear the written chip data.
> > > > > > > > > > > > > > > > > > > > > > > > > > > > > > > > > > > > > > > > > > > > > > > > > > > > > >
==> Visit www.eeskill.com to learn more!