Click the blue “Most Programmer” to follow me!
Add a “Star“, every day at 18:03 to learn technology together
Understanding Linux Permissions Thoroughly (Detailed Analysis, Must-Read for Beginners)
1 Linux Permission Concepts
In Linux, permissions are a mechanism to control user access to files and directories. Each file and directory has three basic permissions: read (r), write (w) and execute (x). These permissions apply to three types of users: the file owner (u), users in the file’s group (g), and other users
1.1 User Classification
There are two types of users in Linux: superuser (root) and regular users
- • Superuser: Can do anything in the Linux system without restrictions
- • Regular User: Can perform limited actions in Linux.
- • The command prompt for the superuser is “#”, while the command prompt for regular users is “$”
2.1 Syntax
su [username]
2.2 Function
Switch user
2 Linux Permission Management
2.1 Classification of File Accessors (People)
- 1. User (User): The owner of the file or directory, usually the user who created it. Symbol representation is
<span>u</span>. - 2. Group (Group): The user group to which the file or directory belongs, usually the group of the owner. Symbol representation is
<span>g</span>. - 3. Others: All other users except the owner and the group. Symbol representation is o
2.2 Permission Representation
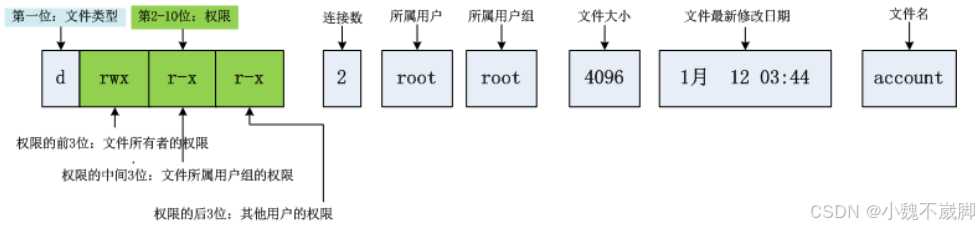
1 File Types
- • d: Directory
- • -: Regular file
- • l: Symbolic link (similar to Windows shortcuts)
- • b: Block device file (e.g., hard drives, CD-ROMs)
- • p: Pipe file
- • c: Character device file (e.g., screens, serial devices)
- • s: Socket file
2 Basic Permissions
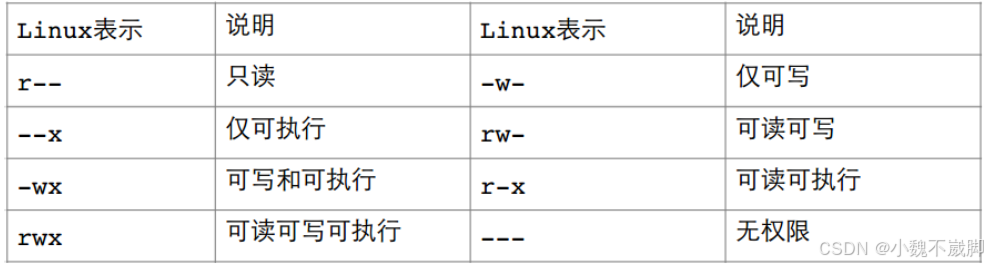
- • Read (r): Allows viewing the contents of a file or listing the contents of a directory.
- • Write (w): Allows modifying the contents of a file or creating and deleting files in a directory.
- • Execute (x): Allows executing a file or entering a directory.
- • **”—”:** Indicates the absence of that permission
3 File Permission Value Representation
a) Character Representation
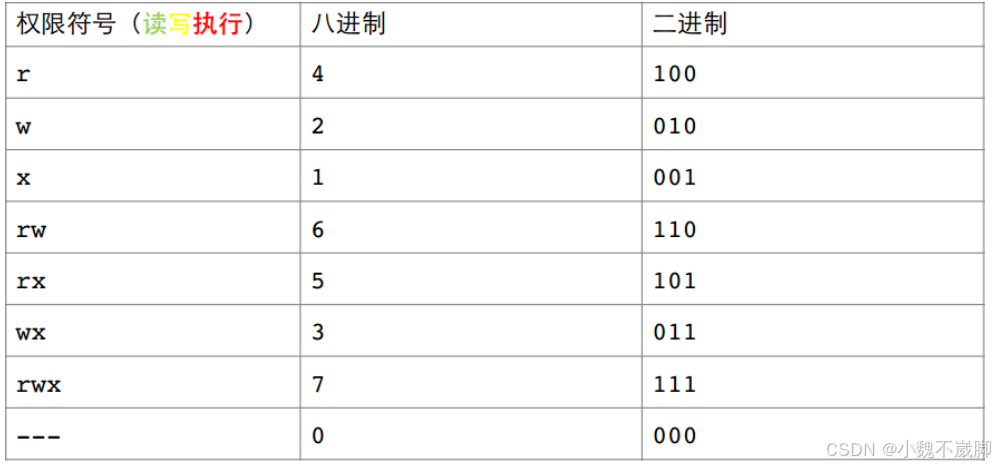
b) Octal Value Representation
2.3 Permission Management Commands
In Linux, permission management is mainly implemented through the following commands:
1. <span>chmod</span> command
Used to change the permissions of files or directories.
chmod [options] mode file- • Example:
chmod u+rwx file.txt  # Add read, write, and execute permissions for the file owner
chmod g-w file.txt    # Remove write permission for group users
chmod o=rx file.txt   # Set other users to have only read and execute permissions
chmod 755 file.txt    # Set file permissions to rwxr-xr-x
chmod -R 755 directory  # Recursively change permissions for the directory and its subdirectories
2. <span>chown</span> command
Used to change the owner of files or directories.
chown [options] owner[:group] file- • Example:
chown user file.txt  # Change the file owner to user
chown user:group file.txt  # Change the file owner to user, group to group
chown -R user:group directory  # Recursively change the owner and group of the directory and its subdirectories
3. <span>chgrp</span> command
Used to change the group of files or directories.
chgrp [options] group file- • Example:
chgrp group file.txt  # Change the file group to group
chgrp -R group directory  # Recursively change the group of the directory and its subdirectories
4. <span>umask</span> command
Used to set the default permission mask, determining the default permissions for newly created files and directories.
umask [options] [mask]- • Example:
umask 022  # Set default permissions for new files to 755, new directories to 755
umask 077  # Set default permissions for new files and directories to 700
In Linux, the permission mask (umask) is a mechanism used to set the default permissions for newly created files and directories. It determines the final permissions by masking certain permission bits.
a) How the Permission Mask Works
By default, the permissions for newly created files and directories are <span>666</span> (rw-rw-rw-) and <span>777</span> (rwxrwxrwx). The permission mask determines the final permissions by subtracting the specified mask value from these default permissions.
b) Calculation Method
Assuming the umask value is <span>022</span>:
- • Default File Permissions:
<span>666</span>–<span>022</span>=<span>644</span>(rw-r–r–) - • Default Directory Permissions:
<span>777</span>–<span>022</span>=<span>755</span>(rwxr-xr-x)
c) Setting and Viewing umask
- • View Current umask:
umask - • Set umask:
umask 022
d) Example
- 1. View Current umask:
$ umask 0022 - 2. Create Files and Directories:
$ touch newfile $ mkdir newdir - 3. View Permissions:
$ ls -l newfile newdir
-rw-r--r-- 1 user user 0 Aug 16 09:04 newfile
drwxr-xr-x 2 user user 4096 Aug 16 09:04 newdir
e) Modify umask
To permanently modify umask, you can add a line in the user’s shell configuration file (such as <span>.bashrc</span> or <span>.profile</span>):
umask 022f) Special Cases
- • umask 000: New files and directories will have maximum permissions (666 and 777), which is generally not recommended due to security risks.
- • umask 077: New files and directories will only have full permissions for the owner (600 and 700), suitable for high-security scenarios.
By properly setting umask, you can effectively control the default permissions of newly created files and directories, ensuring system security and reasonable resource allocation.
2.4 Special Permissions (Sticky Bit)
In Linux systems, the sticky bit is a special permission bit primarily used to control the deletion of files in specific directories. Once the sticky bit is set, only the file owner or the root user can delete or move that file, while other users cannot delete or move these files even if they have write permissions.
1 Function of the Sticky Bit
The sticky bit is typically used in public directories in multi-user environments, such as the <span>/tmp</span> directory, to prevent users from deleting or moving files belonging to other users. Once the sticky bit is set, the other user permission bits for the directory will display as <span>t</span> or <span>T</span>:
- • t: Indicates that other users have execute permissions for that directory.
- • T: Indicates that other users do not have execute permissions for that directory.
2 Setting the Sticky Bit
You can set the sticky bit using the <span>chmod</span> command:
chmod +t directory  # Set the sticky bit for the directory
chmod -t directory  # Remove the sticky bit from the directory
3 Example
- 1. View Permissions of the
<span>/tmp</span>Directory:ls -ld /tmp drwxrwxrwt 10 root root 4096 Aug 16 09:04 /tmpYou can see that the other user permission bit for the
<span>/tmp</span>directory is<span>t</span>, indicating that the sticky bit is set. - 2. Set the Sticky Bit for a Directory:
mkdir mydir
chmod 1777 mydir  # Set the sticky bit and grant all users read, write, and execute permissions
ls -ld mydir
drwxrwxrwt 2 user user 4096 Aug 16 09:04 mydir
4 Notes
- • The sticky bit is only effective for directories, not for files.
- • After setting the sticky bit, other users can still modify the file contents but cannot delete or move the file.
By using the sticky bit appropriately, you can effectively protect files in public directories from unauthorized deletion and moving operations.
Link: https://blog.csdn.net/m0_73494049/article/details/141232516?ops_request_misc=%257B%2522request%255Fid%2522%253A%2522b297818035a8927be6bf298243b570a2%2522%252C%2522scm%2522%253A%252220140713.130102334..%2522%257D&request_id=b297818035a8927be6bf298243b570a2&biz_id=0&utm_medium=distribute.pc_search_result.none-task-blog-2~all~top_positive~default-1-141232516-null-null.142^v102^pc_search_result_base6&utm_term=Linux%E6%9D%83%E9%99%90&spm=1018.2226.3001.4187