The previous article introduced the basic concepts of FreeRTOS linked lists, and this article will explain how to insert and delete nodes.
Inserting Nodes
To insert a node into a linked list, you first need to break the connection between the two nodes at the insertion point, and then connect the new node to these two nodes. The before and after effects are shown in the figure below.
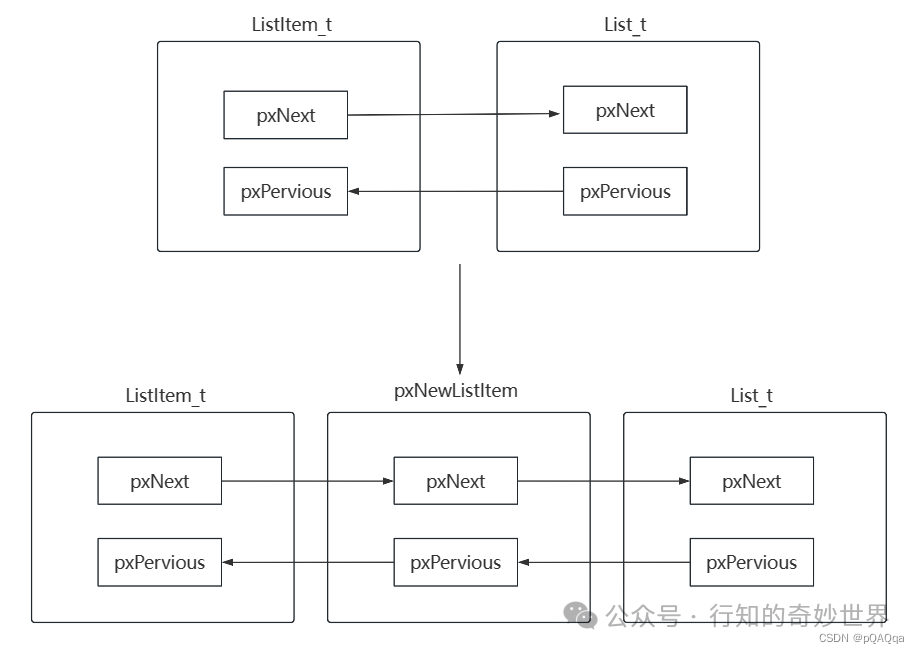
The following demonstrates the process of inserting a node.
1. Set the new node’s next pointer to point to the root node;
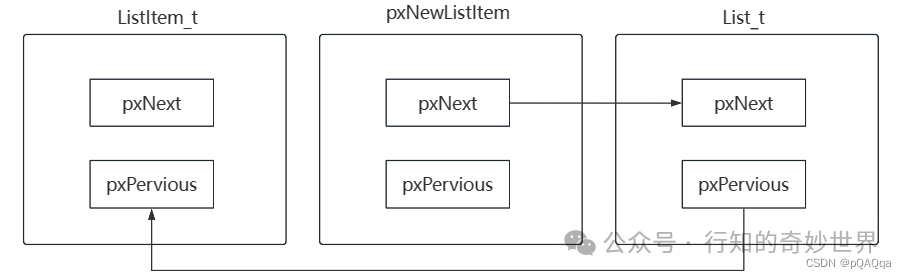 2. Set the new node’s previous pointer to point to the root node’s previous node;
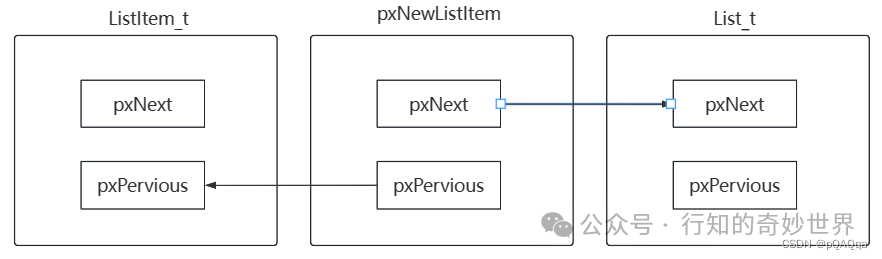 3. Set the previous node’s next pointer to point to the new node;
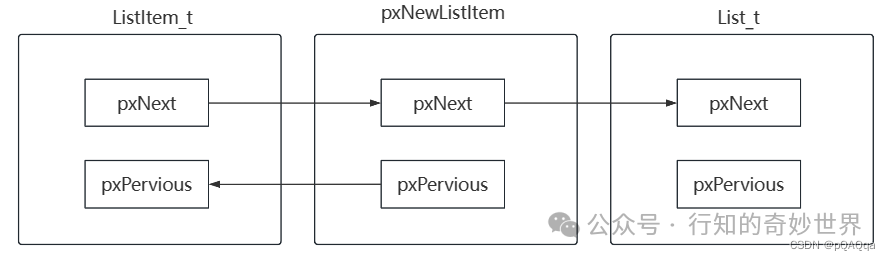 4. Set the root node’s previous pointer to point to the new node;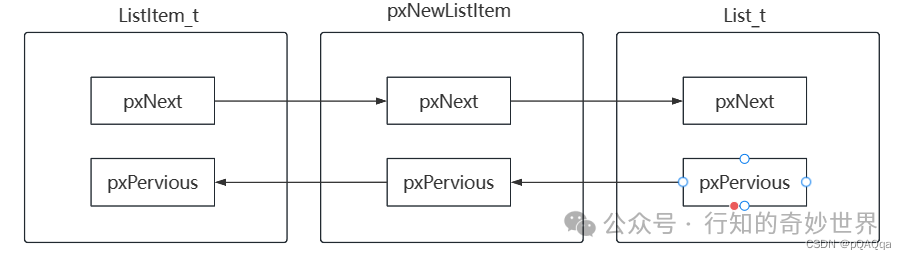
Inserting a node at the end
This method can insert a node into an empty linked list, which means connecting the node to the root node. This process consists of the following steps:
1. Set the root node’s next pointer to point to the new node.
2. Set the root node’s previous pointer to point to the new node.
3. Adjust other parameters as necessary.
void vListInsertEnd( List_t * const pxList, ListItem_t * const pxNewListItem ){    ListItem_t * const pxIndex = pxList->pxIndex;
	pxNewListItem->pxNext = pxIndex;
	pxNewListItem->pxPrevious = pxIndex->pxPrevious;
	pxIndex->pxPrevious->pxNext = pxNewListItem;
	pxIndex->pxPrevious = pxNewListItem;
	pxNewListItem->pvContainer = ( void * ) pxList;
	( pxList->uxNumberOfItems )++;
}
The operations performed by the above code are as follows:
1. Set the root node’s index pointer to point to the last node of the root node (i.e., the simplified node).
2. The new node’s pxNext points to the index pointer, which points to the root node.
3. The new node’s pxPrevious points to the root node.
4. The root node’s pxNext points to the new node.
5. The root node’s pxPrevious points to the new node.
6. The new node’s pvContainer points to the root node.
7. Increment the root node’s item counter by 1.
Inserting nodes in ascending order
This insertion method relies on xItemValue, which is the sequence number of each node. Therefore, after initializing the new node, we need to assign a value to the new node’s xItemValue.
Starting from the root node’s next node, the value of xItemValue increases, arranged in ascending order. After finding the position where the new node should be inserted based on this sequence number, it will be inserted into the linked list; if a node with the same sequence number as the new node exists, the new node will be inserted after this node.
void vListInsert( List_t * const pxList, ListItem_t * const pxNewListItem ){    ListItem_t *pxIterator;    const TickType_t xValueOfInsertion = pxNewListItem->xItemValue;
	if( xValueOfInsertion == portMAX_DELAY )
	{        pxIterator = pxList->xListEnd.pxPrevious;
	}
	else
	{
		for( pxIterator = ( ListItem_t * ) &( pxList->xListEnd );
			 pxIterator->pxNext->xItemValue <= xValueOfInsertion;
			 pxIterator = pxIterator->pxNext )
		{
		}
	}
	pxNewListItem->pxNext = pxIterator->pxNext;
	pxNewListItem->pxNext->pxPrevious = pxNewListItem;
	pxNewListItem->pxPrevious = pxIterator;
	pxIterator->pxNext = pxNewListItem;
	pxNewListItem->pvContainer = ( void * ) pxList;
	( pxList->uxNumberOfItems )++;
}
First, obtain the sequence number of the new node. If the sequence number equals the maximum value of the node count, then this node will be inserted before the root node; otherwise, a for loop is used to find the insertion position.
Once the insertion position is found, the node is inserted, and the pvContainer of the inserted node and the root node’s item counter are updated.
Deleting Nodes
UBaseType_t uxListRemove( ListItem_t * const pxItemToRemove ){    List_t * const pxList = ( List_t * ) pxItemToRemove->pvContainer;
	pxItemToRemove->pxNext->pxPrevious = pxItemToRemove->pxPrevious;
	pxItemToRemove->pxPrevious->pxNext = pxItemToRemove->pxNext;
	if( pxList->pxIndex == pxItemToRemove )
	{        pxList->pxIndex = pxItemToRemove->pxPrevious;
	}
	pxItemToRemove->pvContainer = NULL;
	( pxList->uxNumberOfItems )--;
	return pxList->uxNumberOfItems;
}
The entire function flow is as follows:
1. First, obtain the linked list where the node to be deleted is located;
2. Set the previous pointer of the next node to point to the previous node of the node to be deleted;
3. Set the next pointer of the previous node to point to the next node of the node to be deleted;
4. Adjust the index pointer of the linked list;
5. Initialize the linked list of the node to be deleted to NULL, indicating that the node has not been inserted into any linked list;
6. Then decrement the node counter and return.
The entire process of deleting a node is roughly the opposite of inserting a node; one points to the inserted node, while the other points to the previous node of that node.
At this point, the content of the linked list comes to a temporary conclusion. The next part will cover task creation related content.